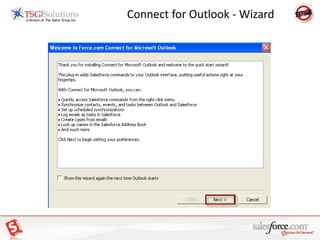
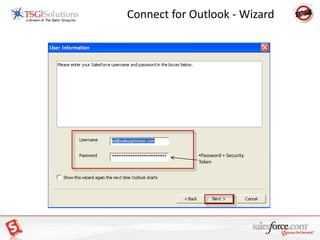
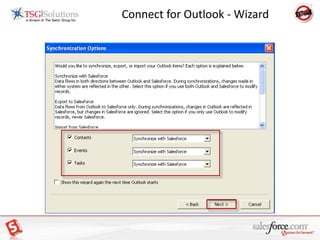
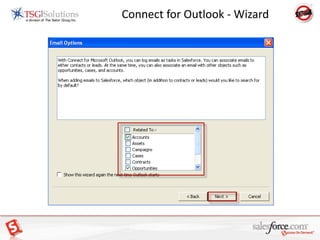
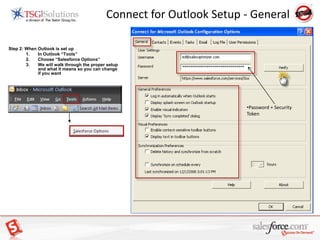
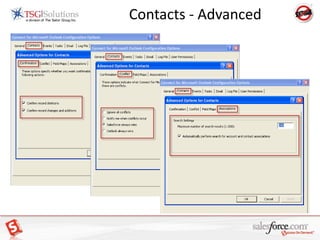
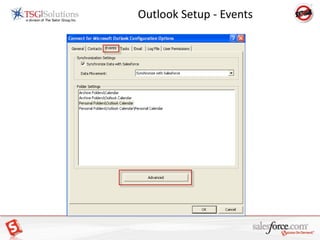
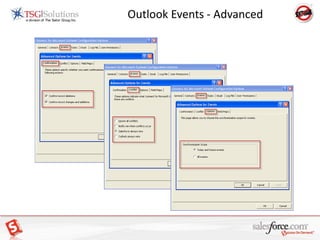
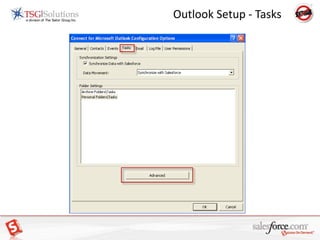
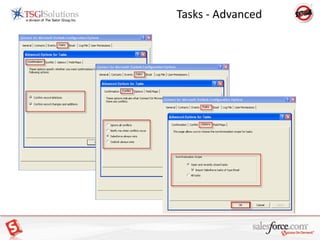
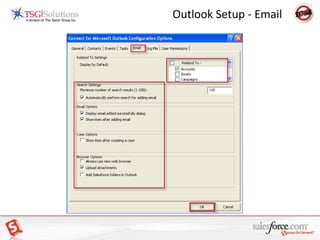
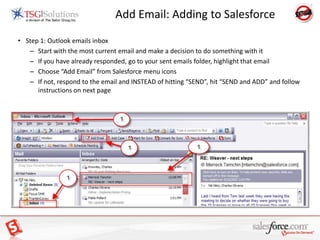
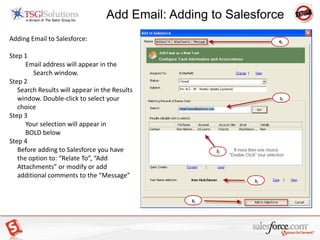
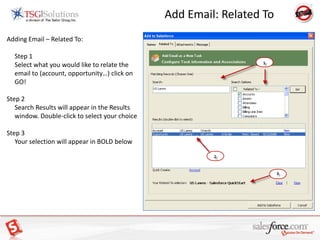
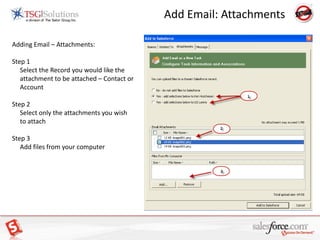
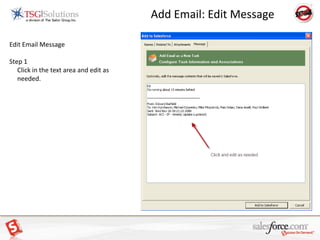
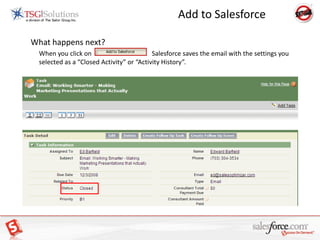
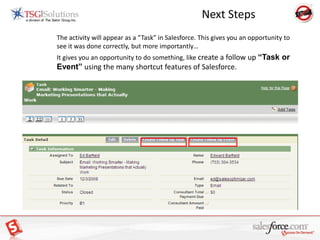
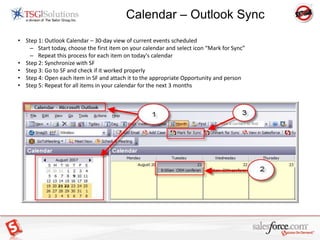
Connect for Outlook with Salesforce.com
First – Send your Security TokenRequest Security Token
Security Token will be sent to your Email AddressConnect for Outlook SetupStep 1: Set up Outlook to sync with SFChoose “Setup”Choose “Desktop Integration”Choose “Outlook Edition”Choose “Install Now”
Install: Connect for OutlookSave to DesktopConnect for Outlook - Wizard
Connect for Outlook - Wizard Password + Security TokenConnect for Outlook - Wizard
Connect for Outlook - Wizard
Connect for Outlook Setup - GeneralStep 2: When Outlook is set upIn Outlook “Tools” Choose “Salesforce Options”We will walk through the proper setup and what it means so you can change if you wantPassword + Security TokenConnect for Outlook Setup - Contacts
Contacts - Advanced
Outlook Setup - Events
Outlook Events - Advanced
Outlook Setup - Tasks
Tasks - Advanced
Outlook Setup - Email
Add Email: Adding to SalesforceStep 1: Outlook emails inboxStart with the most current email and make a decision to do something with itIf you have already responded, go to your sent emails folder, highlight that emailChoose “Add Email” from Salesforce menu iconsIf not, respond to the email and INSTEAD of hitting “SEND”, hit “SEND and ADD” and follow instructions on next page
Add Email: Adding to SalesforceAdding Email to Salesforce:Step 1Email address will appear in the Search window.Step 2	Search Results will appear in the Results window. Double-click to select your choiceStep 3Your selection will appear inBOLD belowStep 4	Before adding to Salesforce you have the option to: “Relate To”, “Add Attachments” or modify or add additional comments to the “Message”
Add Email: Related ToAdding Email – Related To:	Step 1	Select what you would like to relate the email to (account, opportunity…) click on GO!Step 2	Search Results will appear in the Results window. Double-click to select your choiceStep 3	Your selection will appear in BOLD below
Add Email: AttachmentsAdding Email – Attachments:Step 1	Select the Record you would like the attachment to be attached – Contact or AccountStep 2	Select only the attachments you wish to attachStep 3	Add files from your computer
Add Email: Edit MessageEdit Email MessageStep 1	Click in the text area and edit as needed.
Add to SalesforceWhat happens next?	When you click on		    Salesforce saves the email with the settings you selected as a “Closed Activity” or “Activity History”.
Next Steps	The activity will appear as a “Task” in Salesforce. This gives you an opportunity to see it was done correctly, but more importantly…	It gives you an opportunity to do something, like create a follow up “Task or Event” using the many shortcut features of Salesforce.
Add Email: ExerciseRepeat the previous process of “ Add Email” for all emails received or sent in the last 30-days. (Inbox, Sent and Archived)	Don’t forget to create your “Next Step” Activity!
Add Email: No Contact FoundAdding a NEW Contact from Outlook:Steps 1-2-3	If the person doesn’t automatically pop up in the SF search window, type in their name & hit “GO”	If it still doesn’t appear, you need to create that contact in SF	The contact can be added as a “Contact or a Lead”Optional Step 4	Click on “Contact or Lead” and create the Contact Record
Add Email: Creating a NEW ContactAdding a NEW contact from Outlook:	Enter “Contact” information and “Search for the Account” to associate the contact by clicking on the search button.	If the Account does not exist you will have to first create the Account in SalesForce.	Cancel this window and click on “Related To”
Add Email: NEW Account Adding a NEW Account in OutlookIf the Account did not exist:	Click on Quick Create “Account” to create a New account in SalesForce	Once the “Account” is created GO back to “Names” and you will now be able to create your “Contact” associated to the proper Account.
 Outlook – NEW Calendar or TaskStep 1 	Go to your Outlook CalendarStep 2: Create a new eventStep 3:Name your event “Test Salesforce Calendar”Step 4:Click on “Save and Mark for Sync”
Calendar – Outlook SyncStep 1: Outlook Calendar – 30-day view of current events scheduledStart today, choose the first item on your calendar and select icon “Mark for Sync”Repeat this process for each item on today's calendarStep 2: Synchronize with SFStep 3: Go to SF and check if it worked properlyStep 4: Open each item in SF and attach it to the appropriate Opportunity and personStep 5: Repeat for all items in your calendar for the next 3 months
Outlook Connector Steps - Salesforce.com

Outlook Connector Steps - Salesforce.com

  • 1.
    Connect for Outlookwith Salesforce.com
  • 2.
    First – Sendyour Security TokenRequest Security Token
  • 3.
    Security Token willbe sent to your Email AddressConnect for Outlook SetupStep 1: Set up Outlook to sync with SFChoose “Setup”Choose “Desktop Integration”Choose “Outlook Edition”Choose “Install Now”
  • 4.
    Install: Connect forOutlookSave to DesktopConnect for Outlook - Wizard
  • 5.
    Connect for Outlook- Wizard Password + Security TokenConnect for Outlook - Wizard
  • 6.
  • 7.
  • 8.
  • 9.
    Connect for OutlookSetup - GeneralStep 2: When Outlook is set upIn Outlook “Tools” Choose “Salesforce Options”We will walk through the proper setup and what it means so you can change if you wantPassword + Security TokenConnect for Outlook Setup - Contacts
  • 10.
  • 11.
  • 12.
  • 13.
  • 14.
  • 15.
  • 16.
    Add Email: Addingto SalesforceStep 1: Outlook emails inboxStart with the most current email and make a decision to do something with itIf you have already responded, go to your sent emails folder, highlight that emailChoose “Add Email” from Salesforce menu iconsIf not, respond to the email and INSTEAD of hitting “SEND”, hit “SEND and ADD” and follow instructions on next page
  • 17.
    Add Email: Addingto SalesforceAdding Email to Salesforce:Step 1Email address will appear in the Search window.Step 2 Search Results will appear in the Results window. Double-click to select your choiceStep 3Your selection will appear inBOLD belowStep 4 Before adding to Salesforce you have the option to: “Relate To”, “Add Attachments” or modify or add additional comments to the “Message”
  • 18.
    Add Email: RelatedToAdding Email – Related To: Step 1 Select what you would like to relate the email to (account, opportunity…) click on GO!Step 2 Search Results will appear in the Results window. Double-click to select your choiceStep 3 Your selection will appear in BOLD below
  • 19.
    Add Email: AttachmentsAddingEmail – Attachments:Step 1 Select the Record you would like the attachment to be attached – Contact or AccountStep 2 Select only the attachments you wish to attachStep 3 Add files from your computer
  • 20.
    Add Email: EditMessageEdit Email MessageStep 1 Click in the text area and edit as needed.
  • 21.
    Add to SalesforceWhathappens next? When you click on Salesforce saves the email with the settings you selected as a “Closed Activity” or “Activity History”.
  • 22.
    Next Steps The activitywill appear as a “Task” in Salesforce. This gives you an opportunity to see it was done correctly, but more importantly… It gives you an opportunity to do something, like create a follow up “Task or Event” using the many shortcut features of Salesforce.
  • 23.
    Add Email: ExerciseRepeatthe previous process of “ Add Email” for all emails received or sent in the last 30-days. (Inbox, Sent and Archived) Don’t forget to create your “Next Step” Activity!
  • 24.
    Add Email: NoContact FoundAdding a NEW Contact from Outlook:Steps 1-2-3 If the person doesn’t automatically pop up in the SF search window, type in their name & hit “GO” If it still doesn’t appear, you need to create that contact in SF The contact can be added as a “Contact or a Lead”Optional Step 4 Click on “Contact or Lead” and create the Contact Record
  • 25.
    Add Email: Creatinga NEW ContactAdding a NEW contact from Outlook: Enter “Contact” information and “Search for the Account” to associate the contact by clicking on the search button. If the Account does not exist you will have to first create the Account in SalesForce. Cancel this window and click on “Related To”
  • 26.
    Add Email: NEWAccount Adding a NEW Account in OutlookIf the Account did not exist: Click on Quick Create “Account” to create a New account in SalesForce Once the “Account” is created GO back to “Names” and you will now be able to create your “Contact” associated to the proper Account.
  • 27.
    Outlook –NEW Calendar or TaskStep 1 Go to your Outlook CalendarStep 2: Create a new eventStep 3:Name your event “Test Salesforce Calendar”Step 4:Click on “Save and Mark for Sync”
  • 28.
    Calendar – OutlookSyncStep 1: Outlook Calendar – 30-day view of current events scheduledStart today, choose the first item on your calendar and select icon “Mark for Sync”Repeat this process for each item on today's calendarStep 2: Synchronize with SFStep 3: Go to SF and check if it worked properlyStep 4: Open each item in SF and attach it to the appropriate Opportunity and personStep 5: Repeat for all items in your calendar for the next 3 months