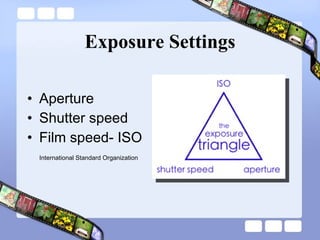
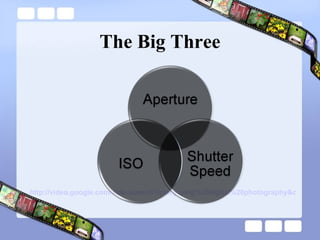
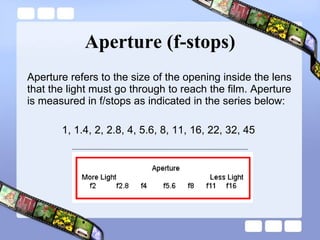
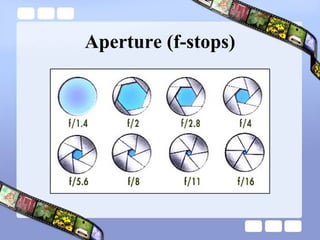
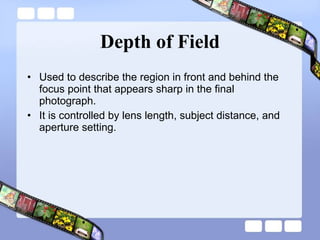
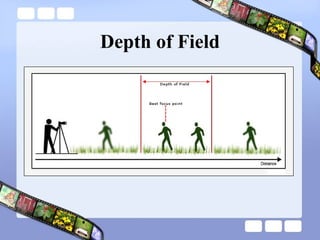
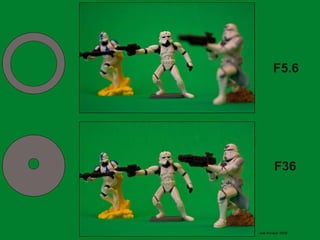
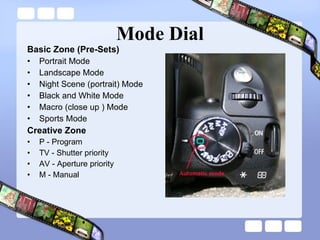
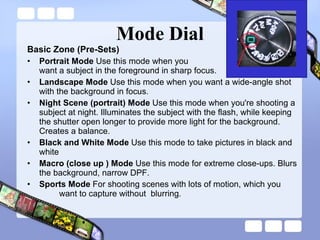
Week 2: Aperture, Shutter Speed, Film Speed Joel Kinison
“  You’ve got to push yourself harder. You’ve got to start looking for pictures nobody else could take. You’ve got to take the tools you have and probe deeper. –  William Albert Allard Check out more of Hákon’s work at   PhotoQuotes.com  and  www.Imageree.com .
Agenda Hour 1 Review Last Week Responding to a Photograph Hour 2 Aperture, Shutter Speed and Film Speed The Mode Dial Hour 3 Share what you learned reading your instructions Assignment & Responding to a photograph Flickr or camera help
Reading Review Pg. 9: What will you Photograph Pg.10-11: Using a Digital Camera Pg. 12-13: Types of Cameras Pg. 14-15: Basic Camera Controls
Five Basic Photographic Principles
Basic Photographic Principles 1.  Focus attention on the main subject Rule of thirds (tic tac toe) Reading pg 9
 
Basic Photographic Principles 1.  Focus attention on the main subject Rule of thirds (tic tac toe) Placement of subject (Empire State Building – center of attention) Framing (we are conditioned to looking through a frame) 2.  Simplify subject through focus Clutter in background  Focus on the subject (eyes) Depth of field (aperture lowest number) Reading pg 9
Waterway to Castle at Killarney – Scott1346 http://www.flickr.com/photos/bluecorvette/3921016569/in/pool-1200867@N20
 
Basic Photographic Principles 3 . Emphasis on Motion  Blurred, froze or panning More interesting and alive Shutter speed Panning (1/15 – 1/30) Blurring subject or blurring background Freezing an expression (jumping in a pool)
Basic Photographic Principles 4 . Selective lighting Subject should be the most lit portion of the photo Can be done in post processing Vignetting Filters Being aware of the light means that you know there are different kinds of light that change the feeling
Basic Photographic Principles 5. Color Saturated vs unsaturated Over saturation Under saturate to emphasize subject
Recap Emphasize your subject by placing them off center Make your subject larger Think about how your framing your subject Use of lighting Making sure the subject is in focus Use motion pg.15 Use of color
Aperture, Shutter Speed and Film Speed Joel Kinison
Exposure Settings Aperture  Shutter speed Film speed- ISO International Standard Organization
The Window: Imagine 1 . Aperture  is the size of the window. If it’s bigger more light gets through and the room is brighter.
2.  Shutter Speed  is the amount of time that the shutters of the window are open. The longer you leave them open the more comes in.
3. Now imagine that you’re inside the room and are wearing sunglasses. Your eyes become desensitized to the light that comes in (it’s like a low  ISO ).
The Big Three http://video.google.com/videosearch?q=enjoying%20digital%20photography&oe=utf-8&rls=org.mozilla:en-US:official&client=firefox-a&um=1&ie=UTF-8&sa=N&tab=wv#
Aperture (f-stops) Aperture refers to the size of the opening inside the lens that the light must go through to reach the film. Aperture is measured in f/stops as indicated in the series below: 1, 1.4, 2, 2.8, 4, 5.6, 8, 11, 16, 22, 32, 45
Aperture (f-stops)
Depth of Field Used to describe the region in front and behind the focus point that appears sharp in the final photograph.  It is controlled by lens length, subject distance, and aperture setting.
Depth of Field
 
Pg. 22-23
Shallow Depth of Field
Large Depth of Field
See the Difference
 
Depth of Field Preview A 'depth of field preview' button is one that closes down the aperture without engaging the mirror or shutter.  Using the DOF button, you can see what will be sharp in the final photograph.
Shutter Speeds The shutter-speed selector controls the length of time that the shutter remains open.  Understand that each progression represents half as much light as the preceding number. Common shutter settings are as follows:  1 second, 1/2, 1/4, 1/8, 1/15, 1/30, 1/60, 1/125, 1/250, 1/500, 1/1000, and 1/2000 second.
Shutter Operation
Shutter Speed Pg.18-21 Use it creatively
Waterfalls Example
Shutter Speed and Sharpness When hand holding your camera, be sure that your shutter speed is fast enough to produce a sharp photo.  1/60
Film Speed Film Speed Rating - ISO  All film has a speed rating, whether digital or traditional. The ISO rating describes how quickly the film reacts to light.  Film speed uses stops, just like shutter and aperture For example, going from ISO50 to ISO200 buys you 2 stops more light.
Film Speed
ISO guidelines you can follow
Trade Offs in Exposure Settings Large and small apertures (small f/ratio numbers) are subject to lens unsharpness.  Aperture determines the depth of focus.  Long exposure times require a tripod, and will usually blur the photo if you photograph moving subjects.  Low film sensitivities (low ISO number) require longer exposures.
Contrast and the Photo Contrast is affected by how much light we allow in when exposing. If light is what makes colors visible: What makes colors saturate in-camera (increase in strength)? We add Black!  Shoot with the narrowest aperture possible for light conditions Shoot with the fastest shutter speed possible for light conditions
Exposure Calculator http://www.robert-barrett.com/photo/exposure_calculator.html
Flickr Favorites http://www.flickr.com/photos/seanettles/favorites/
So What Does This Mean? Pg.24-25 Blur vs DOF
Mode Dial Basic Zone (Pre-Sets) Portrait Mode Landscape Mode Night Scene (portrait) Mode Black and White Mode Macro (close up ) Mode Sports Mode Creative Zone P - Program TV - Shutter priority AV - Aperture priority M - Manual
Mode Dial Basic Zone (Pre-Sets) Portrait Mode  Use this mode when you  want a subject in the foreground in sharp focus. Landscape Mode  Use this mode when you want a wide-angle shot with the background in focus. Night Scene (portrait) Mode  Use this mode when you're shooting a subject at night. Illuminates the subject with the flash, while keeping the shutter open longer to provide more light for the background. Creates a balance. Black and White Mode  Use this mode to take pictures in black and white Macro (close up ) Mode  Use this mode for extreme close-ups. Blurs the background, narrow DPF. Sports Mode  For shooting scenes with lots of motion, which you  want to capture without  blurring .
Mode Dial Creative Zone P - Program  - Program mode is much like Automatic mode - the camera will still do most of the setup work for you -- but it allows you to manually override some settings TV - Shutter priority  - used for manual shutter speed  AV - Aperture priority  - used for manual aperture M - Manual  - used for fully manual control  This allows you to manually adjust both shutter speed and aperture for the same shot, as well as focus.  A-DEP  = Auto depth of field*
HDR


Respond to Photograph Pg. 170-171
Assignment Take a photo using the Creative Mode, and explain the effect on the exposure. Reading http://www.flickr.com/photos/jnovek/2528932423/

Week 2 aperture, shutter speed and iso

  • 1.
    Week 2: Aperture,Shutter Speed, Film Speed Joel Kinison
  • 2.
    “ You’vegot to push yourself harder. You’ve got to start looking for pictures nobody else could take. You’ve got to take the tools you have and probe deeper. – William Albert Allard Check out more of Hákon’s work at PhotoQuotes.com and www.Imageree.com .
  • 3.
    Agenda Hour 1Review Last Week Responding to a Photograph Hour 2 Aperture, Shutter Speed and Film Speed The Mode Dial Hour 3 Share what you learned reading your instructions Assignment & Responding to a photograph Flickr or camera help
  • 4.
    Reading Review Pg.9: What will you Photograph Pg.10-11: Using a Digital Camera Pg. 12-13: Types of Cameras Pg. 14-15: Basic Camera Controls
  • 5.
  • 6.
    Basic Photographic Principles1. Focus attention on the main subject Rule of thirds (tic tac toe) Reading pg 9
  • 7.
  • 8.
    Basic Photographic Principles1. Focus attention on the main subject Rule of thirds (tic tac toe) Placement of subject (Empire State Building – center of attention) Framing (we are conditioned to looking through a frame) 2. Simplify subject through focus Clutter in background Focus on the subject (eyes) Depth of field (aperture lowest number) Reading pg 9
  • 9.
    Waterway to Castleat Killarney – Scott1346 http://www.flickr.com/photos/bluecorvette/3921016569/in/pool-1200867@N20
  • 10.
  • 11.
    Basic Photographic Principles3 . Emphasis on Motion Blurred, froze or panning More interesting and alive Shutter speed Panning (1/15 – 1/30) Blurring subject or blurring background Freezing an expression (jumping in a pool)
  • 12.
    Basic Photographic Principles4 . Selective lighting Subject should be the most lit portion of the photo Can be done in post processing Vignetting Filters Being aware of the light means that you know there are different kinds of light that change the feeling
  • 13.
    Basic Photographic Principles5. Color Saturated vs unsaturated Over saturation Under saturate to emphasize subject
  • 14.
    Recap Emphasize yoursubject by placing them off center Make your subject larger Think about how your framing your subject Use of lighting Making sure the subject is in focus Use motion pg.15 Use of color
  • 15.
    Aperture, Shutter Speedand Film Speed Joel Kinison
  • 16.
    Exposure Settings Aperture Shutter speed Film speed- ISO International Standard Organization
  • 17.
    The Window: Imagine1 . Aperture is the size of the window. If it’s bigger more light gets through and the room is brighter.
  • 18.
    2. ShutterSpeed is the amount of time that the shutters of the window are open. The longer you leave them open the more comes in.
  • 19.
    3. Now imaginethat you’re inside the room and are wearing sunglasses. Your eyes become desensitized to the light that comes in (it’s like a low ISO ).
  • 20.
    The Big Threehttp://video.google.com/videosearch?q=enjoying%20digital%20photography&oe=utf-8&rls=org.mozilla:en-US:official&client=firefox-a&um=1&ie=UTF-8&sa=N&tab=wv#
  • 21.
    Aperture (f-stops) Aperturerefers to the size of the opening inside the lens that the light must go through to reach the film. Aperture is measured in f/stops as indicated in the series below: 1, 1.4, 2, 2.8, 4, 5.6, 8, 11, 16, 22, 32, 45
  • 22.
  • 23.
    Depth of FieldUsed to describe the region in front and behind the focus point that appears sharp in the final photograph. It is controlled by lens length, subject distance, and aperture setting.
  • 24.
  • 25.
  • 26.
  • 27.
  • 28.
  • 29.
  • 30.
  • 31.
    Depth of FieldPreview A 'depth of field preview' button is one that closes down the aperture without engaging the mirror or shutter. Using the DOF button, you can see what will be sharp in the final photograph.
  • 32.
    Shutter Speeds Theshutter-speed selector controls the length of time that the shutter remains open. Understand that each progression represents half as much light as the preceding number. Common shutter settings are as follows: 1 second, 1/2, 1/4, 1/8, 1/15, 1/30, 1/60, 1/125, 1/250, 1/500, 1/1000, and 1/2000 second.
  • 33.
  • 34.
    Shutter Speed Pg.18-21Use it creatively
  • 35.
  • 36.
    Shutter Speed andSharpness When hand holding your camera, be sure that your shutter speed is fast enough to produce a sharp photo. 1/60
  • 37.
    Film Speed FilmSpeed Rating - ISO All film has a speed rating, whether digital or traditional. The ISO rating describes how quickly the film reacts to light. Film speed uses stops, just like shutter and aperture For example, going from ISO50 to ISO200 buys you 2 stops more light.
  • 38.
  • 39.
  • 40.
    Trade Offs inExposure Settings Large and small apertures (small f/ratio numbers) are subject to lens unsharpness. Aperture determines the depth of focus. Long exposure times require a tripod, and will usually blur the photo if you photograph moving subjects. Low film sensitivities (low ISO number) require longer exposures.
  • 41.
    Contrast and thePhoto Contrast is affected by how much light we allow in when exposing. If light is what makes colors visible: What makes colors saturate in-camera (increase in strength)? We add Black! Shoot with the narrowest aperture possible for light conditions Shoot with the fastest shutter speed possible for light conditions
  • 42.
  • 43.
  • 44.
    So What DoesThis Mean? Pg.24-25 Blur vs DOF
  • 45.
    Mode Dial BasicZone (Pre-Sets) Portrait Mode Landscape Mode Night Scene (portrait) Mode Black and White Mode Macro (close up ) Mode Sports Mode Creative Zone P - Program TV - Shutter priority AV - Aperture priority M - Manual
  • 46.
    Mode Dial BasicZone (Pre-Sets) Portrait Mode Use this mode when you want a subject in the foreground in sharp focus. Landscape Mode Use this mode when you want a wide-angle shot with the background in focus. Night Scene (portrait) Mode Use this mode when you're shooting a subject at night. Illuminates the subject with the flash, while keeping the shutter open longer to provide more light for the background. Creates a balance. Black and White Mode Use this mode to take pictures in black and white Macro (close up ) Mode Use this mode for extreme close-ups. Blurs the background, narrow DPF. Sports Mode For shooting scenes with lots of motion, which you want to capture without blurring .
  • 47.
    Mode Dial CreativeZone P - Program - Program mode is much like Automatic mode - the camera will still do most of the setup work for you -- but it allows you to manually override some settings TV - Shutter priority - used for manual shutter speed AV - Aperture priority - used for manual aperture M - Manual - used for fully manual control This allows you to manually adjust both shutter speed and aperture for the same shot, as well as focus. A-DEP = Auto depth of field*
  • 48.
  • 49.
  • 50.
  • 51.
  • 52.
  • 53.
    Assignment Take aphoto using the Creative Mode, and explain the effect on the exposure. Reading http://www.flickr.com/photos/jnovek/2528932423/

Editor's Notes

  • #3 We are always looking for reasons for not taking good pictures. Cartier-Bresson used film camera, same lens, no flash, same shutter speed – he didn’t need the newest digital equipment to take great photos. We all have access to some subjects that no one else has access to – look at your friends’ hobbies, the workplaces of friends and family, and any place you have access to to find a vision that comes uniquely from your access. Many people would dream of having the same access you have, and you might not have considered how valuable your access is.
  • #7 Focus attention on the main subject (whatever your subject is, make sure it is evident by the composition) Rules of thirds: basis for well balanced and interesting shots The basic principle behind the rule of thirds is to imagine breaking an image down into thirds (both horizontally and vertically) so that you have 9 parts. With this grid in mind the ‘rule of thirds’ now identifies four important parts of the image that you should consider placing points of interest in as you frame your image. Studies have shown that if you place points of interest in the intersections or along the lines that your photo becomes more balanced and will enable a viewer of the image to interact with it more naturally.
  • #9 Focus attention on the main subject (whatever your subject is, make sure it is evident by the composition)
  • #13 Theme –universal message Wedding (concept of love & marriage) Nature (simplicity of a flower) Something everyone can relate to Focus attention on the main subject
  • #14 Theme –universal message Wedding (concept of love & marriage) Nature (simplicity of a flower) Something everyone can relate to Focus attention on the main subject
  • #18 Window Analogy
  • #22 Each next f/stop (aperture) setting reduces the amount of light entering the camera by half. We can use the terms f/stop and aperture interchangeably as for our purposes they mean the same thing. The larger the number, the smaller the aperture, the smaller the number, the larger the aperture, and, the larger the aperture, the more light enters the camera. The aperture selector adjusts the size of the lens opening. F/4 lets in twice as much light as f/5.6 etc.. The lower the f-number, the larger the lens aperture.
  • #24 Depth of Field: Lens opening (f-stop) The smaller the aperture, the greater the depth of field. Focus distance The greater the focus distance from camera to subject, the greater the depth of field. Focal length of lens The shorter the focal length, the greater depth of field.
  • #25 It is also important to understand that focusing works according to the distance from the camera to the subject. You cannot focus on the left part of a scene and leave the right part blurry, but you can focus on something at a certain distance from the camera and leave everything else blurry. For example, you can focus on the foreground and leave the background blurry. The distance in front of and behind the focusing point, in which everything appears to be “acceptably sharp”, is referred to as the depth of field.
  • #33 The shutter-speed selector controls the length of time that the shutter remains open. The shorter that time is, the less likely a moving object will appear blurred.
  • #37 Your shutter speed should always be shorter than the reciprocal of twice your lens length.
  • #38 Slower films are less sensitive and generally require longer exposures / more light. Faster films react rapidly, and can be used in low light situations. Film speed ratings double each time the sensitivity of the film doubles. An ISO 100 film is one stop slower than an ISO 200 film. It needs twice as much light as the ISO 200 film for correct exposure. The more sensitive the film, the more “grainy” it is.
  • #39 Film speed (or ISO) is a measurement of how sensitive your camera's sensor (or in the case of a film camera, your camera's film) is to light. The larger the ISO (higher number), the more sensitive it is to light. The smaller the ISO (smaller number), the less sensitive it is to light. Each step up in ISO doubles the amount of light sensitivity (ISO 400 is 2x as sensitive to light as ISO 200). Using a higher ISO, you can sometimes get shots in low light that would have required a longer shutter speed or a larger aperture if you were using a lower ISO. However, this does not come without its setbacks. The higher the ISO is set, the grainier your picture will appear. At higher ISOs, you will notice some extremely substantial grain. ISO noise is much less noticable in DSLR and other large sensor cameras than it is in point and shoot cameras.
  • #41 Large apertures (small f/ratio numbers) are subject to lens unsharpness. Some lenses are worse than others at full aperture, but as a rule you should use a lens at apertures of 2 or 3 stops smaller than wide open, if the available light permits. Aperture determines the depth of focus . With landscape photography this is usually not an issue since most subjects are at infinity, so the depth of focus is irrelevant. But for macro photography, for example, it is very important. Long exposure times require a tripod , and will usually blur the photo if you photograph moving subjects. With film, long exposure times will also suffer from reciprocity errors. Short exposure times however are not always possible because the light may be too low. Low film sensitivities (low ISO number) require longer exposures, which is not always possible, and high film sensitivities suffer from coarse film grain (or, with digital sensors, from thermal noise).
  • #45 Now that we see how exposure is controlled by aperture, shutter and film speed, now we need to know how to control it. Fortunately, with DSLRs, they have what is called pre-sets. These are preset/calculated/programed setting for different situations a photographer my encounter. These settings are commonly located on the control dial.
  • #47 Basic Zone (Pre-Sets) Portrait Mode – icon- a head in profile. Use this mode when you want a subject in the foreground in sharp focus. Landscape Mode - Icon = mountains. Use this mode when you want a wide-angle shot with the background in focus. Night Scene (portrait) Mode - Icon = starry field. Use this mode when you're shooting a subject at night. Illuminates the subject with the flash, while keeping the shutter open longer to provide more light for the background. Creates a balance. Black and White Mode - Icon = a figure in contrast. Use this mode to take pictures in black and white Macro (close up ) Mode - Icon = a flower. Use this mode for extreme close-ups. Blurs the background, narrow DPF. Sports Mode - Icon = a running figure. For shooting scenes with lots of motion, which you want to capture without blurring .
  • #48 All the focus squares are used to find the nearest and farthest objects in your viewfinder. The camera then calculates the best setting to give you the ideal depth of field.