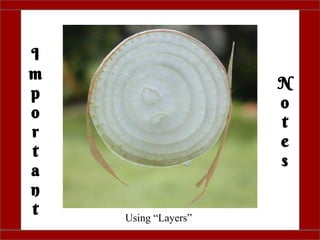
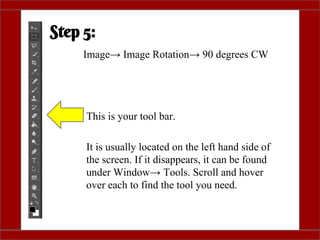
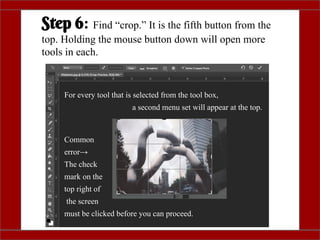
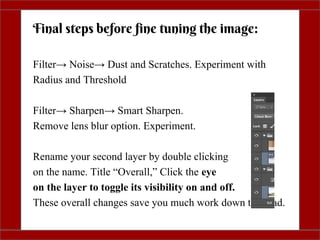
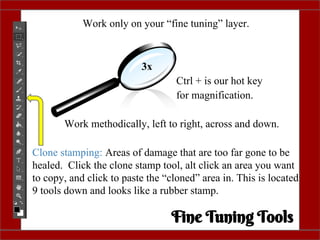
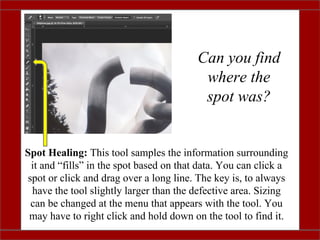
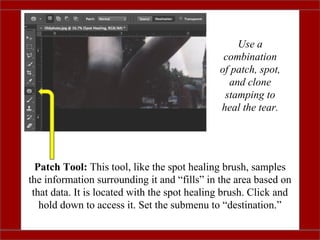
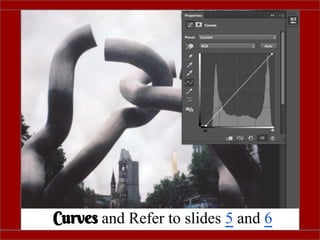
This document provides instructions for restoring an old photograph using Photoshop. It recommends using non-destructive editing techniques like layers and masks instead of deleting pixels. Key steps include downloading the photo, rotating and cropping it, applying sharpening and noise reduction filters to the overall image, and then cloning, spot healing, and patch tools to fine tune repairs on a separate layer. Frequent saving in PSD format while working and different formats like JPEG or TIFF when finished is also advised.
Raw images aren’t ready for commercial use. So we need to manage it and prepare it for use by applying for many editing works. There are many ways for the cut out image but when we are going to Cut out image with hard hair mask from a model image sometimes it’s become harder. In that case, we need to apply advanced editing services or technique.
Photo retouching tips and tricks in photoshopRemon Mia
If you want to redefine the foreground and background colors, use the Eyedropper tool to select the foreground color, and then switch the position with the background color, maybe by using the shortcut X, and pick up the next color. But there is an easier way. First, define the foreground color just as you’re accustomed to, but then define the background color by holding the Alt/Option key. Instead of changing the foreground color, you’ll redefine the background color with just one click.
https://goo.gl/pwqYM7
In this PP Presentation we explain in detail how to create watermark effect on your images using Photoshop.
Watermark effect takes your images to another level providing you the opportunity to increase brand awareness or simply to mark/protect your artistic photos.
This is a short tutorial for my students at USC, teaching them how to use Adobe's Edge Animate application to create an animated infographic. I go through some simple steps, using the Rectangle, Text and Clipping tools to show how to create a simple bar graph, and then using the Timeline, to make the bars bounce up into view.
32 Killer PhotoShop Tips & Tricks that Make You an Expert.CPZ Media
Check out our top 32 Killer photoshop shortcut tips and tricks that make your photoshop work more easy and comfortable. If you do any mistake then use these tips and tricks in Adobe photoshop and drawback your work again.
Visit our blog site to get more tips.
http://clippingpathzone.com/blog/
Follow us and get all latest slides quickly.
How to make a transparent background in PhotoshopZenith Clipping
Making image background a transparent in Photoshop is not so much boring work. Different types of tools of Photoshop are applied to remove backgrounds from different types of images. It varies in image complexity and nature. Whether you might want to make a single layer transparent, make a transparent selection, or disengage a subject on a transparent foundation, Photoshop permits you to do everything.
In photography, Blur refers to an image (or sections of an image) that are not sharp. This is frequently brought about by camera shake, and it’s a mix-up that you ordinarily need to stay away from.
TUTorial By chad neuman in InDesign,Tutorial AT Vishal Dawdy .docxwillcoxjanay
TUTorial By chad neuman in InDesign,Tutorial AT Vishal Dawdy
Download the support files first from Mod 3 Guidelines!
Begin…
INSTRUCTIONS:
Step 1
Open InDesign and go to File>New>Document or click the Create New File icon on the welcome screen. Set the settings shown here (these are all default settings except you’ll set it to 4 pages and click “facing pages”).
Step 2
Let’s set up the master pages. That way we can add a header and page numbers automatically. Make sure your “Pages” window is open from the Window Menu. DOUBLE-Click on the A-Master icon on the top of the Pages pull-out palette to work in the master pages shown here in yellow).
Step 3
In the lower-left hand corner of the left master page, click-and-drag with the Text tool to drag out a text box for the page number.
Step 4
Go to Type>Insert Special Character> Markers>Current Page Number.
Step 5
This will insert an automated page number so you don’t have to number each page. Change the size (and style if you want) of the font to an appropriate one for your publication.
[Note: Additionally, you could also place text (like the word 'page' or '#' symbol) in front of the page number and it would be continued throughout all pages using the master page template.]
Step 6
Select the Selection tool (black arrow). Hold down Option and click-and-drag the text box that has the automatic page number in it over to the right page to create another instance of the Auto Page Number. I placed the text box on the right side page on the lower right hand corner.
Step 7
If you put the text boxes for the page numbers in the same locations as I chose to, it should look something like this.
Step 8
Page numbers are not the only objects to put onto the master pages. And all the objects don’t have to be automatically updated objects, either. You can add photos, text, or shapes and they’ll be on every page. For this tutorial, add just a simple title at the top of each page by clicking-and-dragging out a text box along the top.
Step 9
Open the Paragraph palette under Window>Type & Tables>Paragraph and click the center or justify icon to center the text after highlighting it. Up in the Control options menu, change the tracking to 600 to increase the spacing of the text to spread out the title. The Tracking setting icon is an uppercase AV with directional arrows underneath it.
Step 10
Open Adobe Illustrator, create a New Document and go to File>Place to place the japanese_flag.gif file located in the downloadable support files for this tutorial (see Module 3 on our website).
Step 11
After clicking on the placed file with a Selection tool, open the Image Trace Control palette (under Window) to view the options for live tracing. Make sure the settings are set to the ones shown here; pretty much a basic black and white trace.
Step 12 Select Trace and then Go to the OBJECT menu and Expand (object+fill) to apply the trace to the selected artwork.
Step 13 Next, Deselect the image. Then, ...
10 photoshop techniques for visualization
Visit https://newinformation.com.ng
This Photoshop technique is great for every beginner.
Copyright to the respective owner.
June 3, 2024 Anti-Semitism Letter Sent to MIT President Kornbluth and MIT Cor...Levi Shapiro
Letter from the Congress of the United States regarding Anti-Semitism sent June 3rd to MIT President Sally Kornbluth, MIT Corp Chair, Mark Gorenberg
Dear Dr. Kornbluth and Mr. Gorenberg,
The US House of Representatives is deeply concerned by ongoing and pervasive acts of antisemitic
harassment and intimidation at the Massachusetts Institute of Technology (MIT). Failing to act decisively to ensure a safe learning environment for all students would be a grave dereliction of your responsibilities as President of MIT and Chair of the MIT Corporation.
This Congress will not stand idly by and allow an environment hostile to Jewish students to persist. The House believes that your institution is in violation of Title VI of the Civil Rights Act, and the inability or
unwillingness to rectify this violation through action requires accountability.
Postsecondary education is a unique opportunity for students to learn and have their ideas and beliefs challenged. However, universities receiving hundreds of millions of federal funds annually have denied
students that opportunity and have been hijacked to become venues for the promotion of terrorism, antisemitic harassment and intimidation, unlawful encampments, and in some cases, assaults and riots.
The House of Representatives will not countenance the use of federal funds to indoctrinate students into hateful, antisemitic, anti-American supporters of terrorism. Investigations into campus antisemitism by the Committee on Education and the Workforce and the Committee on Ways and Means have been expanded into a Congress-wide probe across all relevant jurisdictions to address this national crisis. The undersigned Committees will conduct oversight into the use of federal funds at MIT and its learning environment under authorities granted to each Committee.
• The Committee on Education and the Workforce has been investigating your institution since December 7, 2023. The Committee has broad jurisdiction over postsecondary education, including its compliance with Title VI of the Civil Rights Act, campus safety concerns over disruptions to the learning environment, and the awarding of federal student aid under the Higher Education Act.
• The Committee on Oversight and Accountability is investigating the sources of funding and other support flowing to groups espousing pro-Hamas propaganda and engaged in antisemitic harassment and intimidation of students. The Committee on Oversight and Accountability is the principal oversight committee of the US House of Representatives and has broad authority to investigate “any matter” at “any time” under House Rule X.
• The Committee on Ways and Means has been investigating several universities since November 15, 2023, when the Committee held a hearing entitled From Ivory Towers to Dark Corners: Investigating the Nexus Between Antisemitism, Tax-Exempt Universities, and Terror Financing. The Committee followed the hearing with letters to those institutions on January 10, 202
Operation “Blue Star” is the only event in the history of Independent India where the state went into war with its own people. Even after about 40 years it is not clear if it was culmination of states anger over people of the region, a political game of power or start of dictatorial chapter in the democratic setup.
The people of Punjab felt alienated from main stream due to denial of their just demands during a long democratic struggle since independence. As it happen all over the word, it led to militant struggle with great loss of lives of military, police and civilian personnel. Killing of Indira Gandhi and massacre of innocent Sikhs in Delhi and other India cities was also associated with this movement.
The Roman Empire A Historical Colossus.pdfkaushalkr1407
The Roman Empire, a vast and enduring power, stands as one of history's most remarkable civilizations, leaving an indelible imprint on the world. It emerged from the Roman Republic, transitioning into an imperial powerhouse under the leadership of Augustus Caesar in 27 BCE. This transformation marked the beginning of an era defined by unprecedented territorial expansion, architectural marvels, and profound cultural influence.
The empire's roots lie in the city of Rome, founded, according to legend, by Romulus in 753 BCE. Over centuries, Rome evolved from a small settlement to a formidable republic, characterized by a complex political system with elected officials and checks on power. However, internal strife, class conflicts, and military ambitions paved the way for the end of the Republic. Julius Caesar’s dictatorship and subsequent assassination in 44 BCE created a power vacuum, leading to a civil war. Octavian, later Augustus, emerged victorious, heralding the Roman Empire’s birth.
Under Augustus, the empire experienced the Pax Romana, a 200-year period of relative peace and stability. Augustus reformed the military, established efficient administrative systems, and initiated grand construction projects. The empire's borders expanded, encompassing territories from Britain to Egypt and from Spain to the Euphrates. Roman legions, renowned for their discipline and engineering prowess, secured and maintained these vast territories, building roads, fortifications, and cities that facilitated control and integration.
The Roman Empire’s society was hierarchical, with a rigid class system. At the top were the patricians, wealthy elites who held significant political power. Below them were the plebeians, free citizens with limited political influence, and the vast numbers of slaves who formed the backbone of the economy. The family unit was central, governed by the paterfamilias, the male head who held absolute authority.
Culturally, the Romans were eclectic, absorbing and adapting elements from the civilizations they encountered, particularly the Greeks. Roman art, literature, and philosophy reflected this synthesis, creating a rich cultural tapestry. Latin, the Roman language, became the lingua franca of the Western world, influencing numerous modern languages.
Roman architecture and engineering achievements were monumental. They perfected the arch, vault, and dome, constructing enduring structures like the Colosseum, Pantheon, and aqueducts. These engineering marvels not only showcased Roman ingenuity but also served practical purposes, from public entertainment to water supply.
Macroeconomics- Movie Location
This will be used as part of your Personal Professional Portfolio once graded.
Objective:
Prepare a presentation or a paper using research, basic comparative analysis, data organization and application of economic information. You will make an informed assessment of an economic climate outside of the United States to accomplish an entertainment industry objective.
Honest Reviews of Tim Han LMA Course Program.pptxtimhan337
Personal development courses are widely available today, with each one promising life-changing outcomes. Tim Han’s Life Mastery Achievers (LMA) Course has drawn a lot of interest. In addition to offering my frank assessment of Success Insider’s LMA Course, this piece examines the course’s effects via a variety of Tim Han LMA course reviews and Success Insider comments.
Unit 8 - Information and Communication Technology (Paper I).pdfThiyagu K
This slides describes the basic concepts of ICT, basics of Email, Emerging Technology and Digital Initiatives in Education. This presentations aligns with the UGC Paper I syllabus.
How to Make a Field invisible in Odoo 17Celine George
It is possible to hide or invisible some fields in odoo. Commonly using “invisible” attribute in the field definition to invisible the fields. This slide will show how to make a field invisible in odoo 17.
Palestine last event orientationfvgnh .pptxRaedMohamed3
An EFL lesson about the current events in Palestine. It is intended to be for intermediate students who wish to increase their listening skills through a short lesson in power point.
6. I
m
p
o
r
t
a
n
t
N
o
t
e
s
While working, save as “PSD” file type
When finished,
● If uploading to the web
→ Jpeg
Save for web vs. changing image size
● If archiving and
sufficient space
is available
→ Tiff
*Use a Png file type if a transparent
background needs to be saved.
7. Step 1:
Step 2:
Download this
(Or find an old photo)
File→ Open→
Find the download
(Or Drag and Drop it in)
Step 3:
Step 4: Copy the layer
Unlock
9. Step 5:
Image→ Image Rotation→ 90 degrees CW
This is your tool bar.
It is usually located on the left hand side of
the screen. If it disappears, it can be found
under Window→ Tools. Scroll and hover
over each to find the tool you need.
10. Step 6: Find “crop.” It is the fifth button from the
top. Holding the mouse button down will open more
tools in each.
For every tool that is selected from the tool box,
a second menu set will appear at the top.
Common
error→
The check
mark on the
top right of
the screen
must be clicked before you can proceed.
11. Filter→ Sharpen→ Smart Sharpen.
Remove lens blur option. Experiment.
Rename your second layer by double clicking
on the name. Title “Overall,” Click the eye
on the layer to toggle its visibility on and off.
These overall changes save you much work down the road.
Final steps before fine tuning the image:
Filter→ Noise→ Dust and Scratches. Experiment with
Radius and Threshold
12. Click and drag “Overall” to the copy/new layer symbol at the
bottom of the Layers palette. It looks like a turning piece of
paper is located next to the trash can. This will copy your
layer.
Double
click the
layer
to rename
13. Work only on your “fine tuning” layer.
3x
Ctrl + is our hot key
for magnification.
Work methodically, left to right, across and down.
Clone stamping: Areas of damage that are too far gone to be
healed. Click the clone stamp tool, alt click an area you want
to copy, and click to paste the “cloned” area in. This is located
9 tools down and looks like a rubber stamp.
Fine Tuning Tools
14. Can you find
where the
spot was?
Spot Healing: This tool samples the information surrounding
it and “fills” in the spot based on that data. You can click a
spot or click and drag over a long line. The key is, to always
have the tool slightly larger than the defective area. Sizing
can be changed at the menu that appears with the tool. You
may have to right click and hold down on the tool to find it.
15. Patch Tool: This tool, like the spot healing brush, samples
the information surrounding it and “fills” in the area based on
that data. It is located with the spot healing brush. Click and
hold down to access it. Set the submenu to “destination.”
Use a
combination
of patch, spot,
and clone
stamping to
heal the tear.