This document provides details on 10 photographs selected for a photography project. It describes the subject, theme, and reasoning for selecting each image. Various techniques used to capture the images are also discussed, including positioning subjects, manual focusing, shutter speed, ISO settings, and use of lighting. The selected images feature the photographer's friend Jacques Laycock, sometimes along with another subject, in a variety of outdoor locations and scenes relating to music style. Reasons for selecting the images emphasized capturing moments, incorporating relevant elements like season and graffiti, and showing variation across the final selection.
This presentation is actually an orientation about the "computer science" branch.This presentation includes 2 videos.....
(i)Evolutions
(ii)Influential persons in history of computer
10. Theme or focus of image & reasons for choice
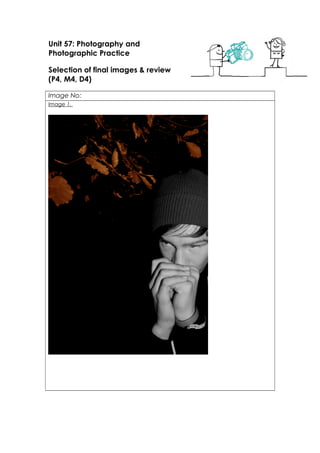
Image 1. The person featuring in this image and most of the others is one of my best
friends Jacques Laycock. He has got a cool style and I thought it would have been
very relevant to the style of magazine I was relating my photo shoot to. The theme of
this image is obviously music based even though there isn’t any real relevance to
music in the image. I could just genuinely image it featuring in a music magazine of
the rock genre. Also as my portrait shoot was shot outside I kind of wanted to
incorporate the season into it. And with this image it is apparent what season it is. With
the vibrant leaves. Also Jacques body language is good as he is breathing onto his
hands to warm them. And my main reason for choice is I really like how the image
isn’t too busy. Because it was taken later when it was dark you can’t see anything
apart from Jacques and the tree branches and leaves. It adds mystery to it.
Image 2. This image is similar to the one above. But you can see a little more in this
one. It seems a little less hidden and held back. As he is smoking and you can see him
more. And in this image Jacques is in colour so it doesn’t add as much mystery to the
image. Again there is a focus on the season with leaves. But more focus on Jacques
as well as the surroundings. I chose this one because I love how clear it is. And it’s just
an overall cool image. He is looking at the camera which suggests he is directing the
person or persons looking at the image. So this image would go well with a music
article as though the article is addressing the audience more.
Image 3. Again similar to the image above Jacques is directly assigning his attention
to the camera again. This time it is a lot different how he doesn’t look as intimidating.
In photo 2 he had a certain look about him which made him look rebellious and
untamed. Where as this one he looks held back and tamed. A thing I like about this
image is the changing in scenery. It is a different location to the ones above.
Composition wise I love this photo because of the positioning of it and the way he is
stood right in the centre of the middle of the tracks. I tried to get him as centre frame
as possible.
Image 4. Again another photo that Jacques features in. This is taken in a different
location again. The main focus is obviously Jacques. I think his body language makes
this image. The way he is generally sat like he is really chilled out. And the graffiti in the
background is relevant to the style of magazine and photography I wanted to go for.
It just adds that little more to the image. And the fact it is in a tunnel adds to it, makes
it look more interesting, it shows good depth and the fact he is centre frame as well. I
chose this one because it is slightly different from the others I have taken. Like you
can see the whole of Jacques body in this on and none one the others really show
good focal length and depth.
Image 5. This image is one of my favourites from the whole shoot. I was really proud of
this because it took a few takes to get it right. Even though you may not think it
because the image is fairly clear is that Jacques (the one on the right) actually drew
the circle when the image was being taken with a red light. So he had to try and
keep himself as still as possible and wave his arm about making the circle motion. So
considering the movement that would’ve been going on in this image it is surprisingly
really good quality. Also this is the first image that Aaron Rodgers (left hand side)
features in. I had a lot of positive feedback about this image from friends saying that
11. you could image it being on an album cover. Because the point of the shoot was for
a music magazine this did make me happy. Also with this image as it shows both
people who are “in the band” makes it slightly more relevant than when they are in
the images on their own.
Image 6. This image would work well in an article which is talking about their
relationship in the band. How in the image it is as though they are communicating
and having a bit of a joke. Aarons face is kind of jokey looking and he is looking right
at Jacques. Whereas Jacques face is looking at the camera, again directly
communicating with the people looking at the image and reading the article. Also
the lighting in this image I love. Yes the image is dark and a little grainy but it is
because I didn’t have my camera flash on because the outcome was better. This
made the images harder to capture correctly.
Image 7. This is another one of my favourites featuring just Aaron this time. I love the
lighting in the image with half of his face being white and the other red. It just looks
effective and different. And I mentioned when talking about image 4 that the graffiti
in these images add to it and make it match more to the chosen genre. And the fact
he is isn’t looking at the camera which doesn’t give off that relationship between the
reader and the person in the image. This would go well with an article just about
Aaron maybe about his past or something strongly relevant to his personal life. This is
why I like this image and why I chose it.
Image 8. Another photo just featuring Aaron. I was proud of myself for capturing this
picture and it being as clear as it is. It was really caught in the moment that’s why it
doesn’t look fake. Because Aaron was generally laughing and I caught be truly
passionate and true laugh. This is the main reason I chose this image as one of my
final 10. If Id of asked him to laugh it would have looked so fake and put on that I
would rather not feature it in my work. The lighting in the image works also. With the
main light being on Aaron even though it isn’t very bright. And a slight bit of
enhancement on the graffiti in the background.
Image 9. Originally I had planned one trimming Jacques out of this image because I
like the way at which Aaron is looking directly into the camera. But when I thought
about it, it actually worked really well with them both being in the image. As like I said
it almost shows of the fact they’re in a band together. And because there weren’t
many photos with them both in I thought it would work best. One of the main reasons
I chose it is the fact that Jacques looking away from the camera and Aaron is looking
at it. Similar to the one where Jacques is looking at the camera and Aaron is looking
away. It’s reversed. But works well either way. Both of them don’t have much
expression on their faces but this works on showing variance in my images which I like
I didn’t want them all being the same.
Image 10. I was unsure on this image but I hadn’t used one with this background it’s
got a lot of cool graffiti on it and it makes it more interesting. Jacques is the main
feature not looking at the camera. I used the red light again in this image and you
can see it reflecting in the white of his eye. All the images get tied quite well together
because they’re all of a similar style with the choice of lighting I used. This one shows
off that choice as the whole image is a vibrant red colour.
12. Techniques used
Image 1. The main technique in this one was positioning. I needed to make sure I had
the leaves in clear view but make sure I had all of what I wanted of Jacques in the
frame. This image is quite crisp as well purely because I had my flash on for it. The
images I took without flash were a little grainy. Also as there was a lot that could be
focused on in this mage I had to make sure Jacques was the main focus of to the lens
by manually focusing my camera I got it.
Image 2. All the factors in this image were basically the same as the one above.
Except for the fact I needed to stand further away to get more of Jacques in the
frame. As well as doing this I needed to avoid exposing too much of the actual tree
and only show the main branches and leaves I wanted.
Image 3. Getting this image centred and straight was irritating. When I originally took
the picture it did look fine but after examining it in Photoshop I noticed that it is slightly
off centre. Jacques is a little more to the left from the centre but if id of tried to crop
the image to get it centred it would’ve looked worse so I left it. I got him to stand
centre tracks and I stood not far in front of him. Its more the slight angle the image
was taken at which made it off. Apart from that I love it. This also was taken with the
flash present. It looked too blurred without it. The lighting was pretty important or you
wouldn’t have been able to understand the image. You wouldn’t know he was on
tracks and you wouldn’t be able to see any of the background.
Image 4. For this image I had the flash triggered. This was the last one I used the flash
on. Again it helped in being able to see a little bit of the background. When
positioning myself for this image I had to basically sit down a similar level to what
Jacques at. I also manually focused it because it was struggling focusing because of
how dark it was. I had to take a picture like this in this tunnel because it looked so
cool. The depth is great because you can see the other end of the tunnel and how
eerie it looks.
Image 5. With this one there was a lot to consider. I had to have the shutter speed
quite a lot slower for this image in order to capture the circle light trail in the middle. I
had it 1/2s which is the slowest I had during the shoot. It allowed enough time to get
the light painting in the middle and for the image to not blur as much as I thought it
would. I also thought it would have exposed more light into the image but it didn’t. I
had to put the ISO on the highest which is 3200 to try and prevent blurring as much as
possible. That’s why the image is so grainy. I also used the rule of thirds grid to get this
photo perfectly positioned it didn’t look that bad to start with actually as I had the
camera stabilised.
Image 6. As I didn’t have the flash active on this picture the majority of the camera
settings were a bit crazy. The shutter speed was slow at 1/4s and the ISO was at 3200.
It only worked well without the flash though this image so I had to figure out which
camera settings would be best. One thing what was hard to decide was who to have
the main focus on. As Aaron looks a little cheeky with the light further away it only
made sense to have him more in focus. It works better I would say because more
attention is drawn to him in the first place because of the light in his hand.
13. Image 7. The light positioning in this photo was the main thing I had to focus on. I had
one of my friends holding the red light at his face and another holding the white light
at the other side of his face. I was with my camera looking through the view finder
and telling them where they had the lights best. And because this image took a bit to
get right I just had to have Aaron stare into space to make it look mo0re affective. I
manually focused it before obviously to make sure that the focus didn’t keep
changing whilst we were trying to get the shot ready.
Image 8. With this image is where I turned down the ISO to 100 and the shutter speed
up to 1/100s. So that’s why this image is so much sharper. Preparation wise for this
image was that I had to get the camera back to a better and more reasonable
setting. I also had to get the lighting right. Just the red light was used in this image and
it actually lights up Aaron really well and a little bit of the background.
Image 9. Again this is another quite sharp looking image. Taken with the same ISO
Shutter Speed and Aperture as photo 8 above. Similar image just that there are 2
people in it. So therefore it was harder to get the both of them well lit with just one red
light. Managed to do it though and it does look effective.
Image 10. This images ISO and Shutter Speed was changed. Iso went up to 400 and
Shutter speed went to 1/4s. Surprisingly this image was taken with a higher exposure it
actually doesn’t look that grainy. It was a different location at which this one was
taken at so the changing of scenery may have played a part in this. Unlike the
majority of the above images I was stood up to Jacques head height when taking this
picture.
Strengths & suggested improvements
Image 1. Strength wise I would definitely say the vibrant colouring of the leaves, they
stand out and look great. And by making Jacques black and white rather than
colour added more to the overall feel of the image. Improvements maybe have
Jacques positioned differently. Even though when I did the shoot I took a selection of
similar images but just different positions and these were this was one of the best
natural looking ones.
Image 2. Again similar to the one above I love the vibrancy in the colours. As Jacques
is in colour in this one also makes it cool. It shows the slight variety in it this way.
Improvements maybe not include the smoking; people may feel it is encouraging
others to do it. And maybe to slightly switch it up as this image is quite similar to the
one above.
Image 3. With this image it is clear that Jacques is the main feature. There isn’t
anything else within the image which drags your attention away from him. You can
see a bit more of him as well and he is directly looking right into the camera as
though he is addressing you personally. I could maybe improve on the positioning of
the image and do a couple of different takes on the image next time to make sure it
is perfect. And also as this was taken on a fully functional train line I wouldn’t want
people thinking it is right and clever to mess about on train tracks. We were incredibly
sensible whilst taking these pictures. We timed it with the trains which had already
gone by and we always had someone on look out for trains approaching.
Image 4. I would say that the colouring in the image is strong.cc the positioning of the
14. image as well. Similar to image 3 this image had to be central or it wouldn’t look right
at all. And I also love how you can see right down the tunnel and to the end. It’s
really quite creepy and eerie looking. Maybe I could’ve done slightly more with the
image like played about with the rest of the colouring in the image and not just
putting it in black and white around Jacques.
Image 5. Composition wise this was one of the hardest to do. But it is one of my
favourites. Strength would definitely be managing to get the light trail circle in the
centre of the image without completely editing it in as though it was a separate
image. That circle was on the original picture when I took it. Even though this
would’ve been really hard to do whilst getting the middle part perfect is the quality of
the rest of the image. It would look so much better if it was clearer, not as grainy and
maybe if parts of it weren’t slightly blurred. That’s what I think I could’ve improved on.
Image 6. Again I really like the lighting in this. The fact it is more focused on Aaron as
he is holding the vibrant LED light just makes the picture quite strong. To me the
positioning is also a key strength. As Jacques is a lot closer to the camera but in a
different sort of position he is actually facing a different way to what Aaron is. And it is
as though they’re communicating whilst this picture was being taken. But as the
shutter speed and ISO levels were a bit crazy this image could’ve been improved
quality wise.
Image 7. I have mentioned this previously but this one is one of my favourite images
took that day. The lighting is just perfect and the body language on Aaron is just spot
on. There is no interaction with the camera at all and there is a real even mix of
colour from the different lights. An improvement maybe could be the overall tone of
the image could’ve been enhanced so it’s a little brighter.
Image 8. Strength of this image to me is the quality of it. It truly does make a photo
when it is really sharp and not grainy. This image is still quite dark so it will look slightly
grainy but there isn’t any blur or over graininess. It is just a little dark maybe the overall
red tint could’ve been enhanced.
Image 9. This picture is very similar to Image 8 but it is a little grainier. I think this is
because the red light had to stretch to get to 2 people in this image and not just to 1
person like in Image 8 so if I could improve I would try and get more external lighting
equipment.
Image 10. And image 10 strength wise I like the background and how it varies out the
images slightly. And as the light draws quite a lot of attention to it. As well as it boldly
focusing on Jacque’s the background is getting a fair bit of it. It looks cool and
different with the red light. Improvements I probably could have done more with the
overall picture. If the pose that Jacques is pulling didn’t look as fake as it does look it
could’ve been better.
Editing details
Image 1. I changed a couple of things within this image. The most obvious changes I
made are the black and white on a certain part of the image. I made Jacques black
and white and left the rest of the image with colour. I also enhanced the colouring on
the branches and leaves to make them look better and more vibrant. After I
changed the colouring on the image there were patches in the background which
15. looked messy so I cloned the black and covered them over. I didn’t want anything
snatching the attention away from the main features, the leaves and Jacques.
Image 2. This image is similar to image 1 style wise. However as this image had more
going on and had a stronger attitude I thought it was only right to have it all in colour.
I did a similar thing with the background. After I changed the colouring I also had to
do the same thing with the clone tool. To make the background completely black. I
enhanced the colour of Jacques and the leaves similar with image 1. I also cleaned
up Jacques face a little. He had a few spots which I went over and covered, he also
had slight facial hair which I got rid of as it looked messy.
Image 3. With image 3 I changed a couple of things. One of the first things I did was
change the exposure on Jacques. More on his skin rather than his body. It was the
slightest bit too bright and so by just bringing it doesn’t a little it worked really well.
After this I cropped the image because Jacque’s was off centre in the image which
really annoyed me. But by completely making it so he was in the middle of the frame
it made it look worse because the tracks on either side met at different points. I used
the rule of thirds grid to try and get it as good as I could. It looks better how it is now
than how it did so I’m happy. The last thing I did to this image was slightly change the
background. As it is a cool location I thought It would only be best to be able to
actually tell what it is. By just selecting the background I changed it and slightly
brightened it. So you could see. If I’d of done it too much it would’ve gone grainy so I
just did it a little and it worked better than it did.
Image 4. Again this similarly edited to the other ones above. I selected just Jacques
and enhanced the colour of him so it didn’t look all dull and bland. I then reversed
the selection and made the background black and white. I felt by doing this was the
best option as it draws more attention to Jacques, the main feature. It took me a
couple of tries to get the colouring of Jacques right. I then cleaned up his face again.
Got rid of a couple of spots and facial hair. There was also a little smoke in the shot
from my friend thinking it would be good to blow smoke in the way. He generally
thought it would look effective but I didn’t like it. So I tried my hardest to edit it out. It
may look slightly blurred around that area but I edited it as good as I could in the time
I had.
Image 5. The first thing I did when I started editing this image was clean up the circle
in the middle. There was a lot of blur around the thick main circle. So I used the clone
tool and selected the black parts of the image and went over it. I like both before it
was edited and after but I thought it would probably look tidier this way. I then
selected Jacques and Aaron separately to try and make them more visible. But
because the picture was quite dark in the first place because I had used my flash it
went quite grainy. So I had to find the best settings to have it on. By adjusting the
curves, colour balance and exposure I got there. And similar to image 1 and 2 there
was a lot of marks in the background due to the camera picking up slight bits of
colour. I then went over them as best as I could.
Image 6. With this image I struggled deciding how to edit it. I eventually started by
selecting the background and I made it black and white. Similar to how I’ve done it
on previous images and for similar reasons, I didn’t want there being too much
attention drawn to it and not that much on Aaron and Jacques. I then selected
Aaron singly to adjust him; I wanted him to stand out quite a lot as he is holding the
really strong LED light. But because it is quite a dark image it started going grainy. I
didn’t want this happening so I adjusted it as well as I could. I then selected Jacques.
16. As he isn’t the main focus of the image he does grad your attention mostly because
he is so close to the camera and got the bright red light directly hitting him. I also got
rid of Aarons dangly ear phones hanging from the neck of his t-shirt.
Image 7. This image is my favourite from the whole shoot. I love the lighting on it. This
wasn’t edited into the image. I had 2 lights and I had someone hold them up on
either side of Aaron. It looked so effective, I love it. Unlike in the majority of my other
images I actually kept the colouring in this background. I thought it just generally
looked better with that colour and focus. I enhanced it a little so it didn’t just look
normal. I also slightly adjusted the brightness of Aaron’s face which made it draw
slight more attention to it which is what I wanted. The rest of the background for this
image was already pretty much all already black. So I thought this looked effective
because you can only really see Aaron and a little section of the wall behind him.
Image 8. Not an awful lot was changed In this picture. I selected the background on
the right hand side of him and slightly enhanced it because you couldn’t see the
graffiti if I didn’t. And because I thought it really added to the images I thought I
would do it. I also just slightly touched up the colour balance. But I kind of liked it how
it was.
Image 9. Again I didn’t change an awful lot in this image. I just manually selected
Aaron and Jacques to individually enhance the colouring so it wasn’t so dark. But if
I’d of done it too much it would’ve gone grainy. I also used the Rule of thirds grid to
get the image right. I think I trimmed the image a little also.
Image 10. And the last one again doesn’t look like a lot was edited on it because I
used the red light. I did however manually select Jacques face and edited the
balances on it so it looked right then inverted the selection and did the same with the
background. I made the background a little darker as it looks more effective. As this
picture was taken at a slightly different location the background was different but still
had graffiti so I still wanted there to be a main focal point on the background as well
as on Jacques. Also as this image is quite clear and close up I edited out his face. Got
rid of spots and his facial hair. It looks so much cleaner and smoother this was.
Capture Log
Setting Shutter Speed ISO Aperture
Image 1. Manual
Image 2. Manual
Image 3. Manual
Image 4. Manual
Image 5. Manual
Image 6. Manual
Image 7. Manual
Image 1. 1/25
Image 2. 1/25
Image 3. 1/20
Image 4. 1/20
Image 5. 1/2
Image 6. 1/4
Image 7. 1/6
Image 1. 400
Image 2. 400
Image 3. 400
Image 4. 400
Image 5. 3200
Image 6. 3200
Image 7. 3200
Image 1. F/3.5
Image 2. F/5.6
Image 3. F/3.5
Image 4. F/3.5
Image 5. F/3.5
Image 6. F/3.5
Image 7. F/3.5