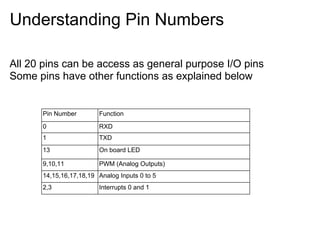
2. Kinds of Arduino Boards
There are Four kind of boards
● With USB port -Arduino UNO, Arduino MEGA
● With Serial Port - Arduino Severino (Lowest Cost)
● Small Size - Arduino Nano, Mini,Lilypad
● With some thing extra - Arduino BT, Arduino Ethernet
4. Which one do We use and why?
We use Arduino Severino.
Why?
● It is low cost. Costs less than
Rs 600/- for complete board
and PCB at just Rs 50/-
● Provide serial interface for
use with GSM or GPS
boards.
● Has all DIP parts, rework or
changes are easy.
5. And why we do not use others
● USB based boards and blank PCBs are expensive.
● Double sided boards can not be easily reworked.
● If boot loader gets corrupted (and it often does), it is difficult
to program further.
● Connecting GSM or GPS or Standalone blue tooth boards
are difficult (if not impossible)
6. And how to program it
We use low cost USB ASP programmer which can be
connected to any lap top on USB port.
With this programmer you do not even need boot loader and
any blank IC can work.
USB ASP programmers are also available for less than Rs
600/-
7. So what is the total cost for starting
Arduino Severino Clone - Rs 599/-
USB ASP Programmer - Rs 599/-
Serial port cable - Rs 75/-
USB Cable - Rs 75/-
12V / 300 mAmps power supply - 150/-
Total cost - Rs 1498/-
8. Install driver for USB ASP
Download USB ASP driver from http://www.fischl.de/usbasp/
Connect USB ASP, when Windows ask for driver, point to the
location where you have stored unzipped drivers.
On Device Manager, you can check LibUSB device.
(Linux and MAC does not need driver and skip this step)
9. Find Location of preference.txt file
Download Arduino from arduino.cc
Install on your PC with Windows, Linux or MAC
Unzip and start.
Open Arduino and click on preference in menu
10. specify programming method
Open preference.txt file.Search for text 'upload'
if you find a line like this
upload.using=bootloader
change it to usbasp if you will be using USBASP for
programming
upload.using=usbasp
or leave it as it is if you will be using bootloader for
programming
11. What is upload or programming
When we write program in C and click on UPLOAD the arduino
converts C program to machine code and generate a hex file.
This hex file will be transferred to micro controller.
there are two methods - one is via serial port (this needs micro
controller already burnt with bootloader program)
second is using a separate programmer like USBASP. This
does not need a micro controller. Please also note that when
you get a arduino board, this comes with pre-loaded
bootloader. However after you program with USBASP,
bootloader is over written.
13. Connect Hardware with USB Port
PC + Arduino Severino + USBASP + 12V Power Supply
If using Windows, check that USBLib is visible in Device
Manager. (If you do not know what is device manager, search it
yourself)
make sure that preference.txt file has
upload.using=usbasp
14. Connect hardware with RS232 port
PC with serial port + Arduino Sevnerino + 12V Power Supply
You need to have ATMEGA8 with bootloader
and preference file should have
upload.using=bootloader
15. Select Board, Verify and Then Upload
To select Board
Tools | Boards | Arduino NG or Older w/ATMEGA8
To select com port (when using with bootloader)
Tools | Serial Port | Select appropriate port number
To compile(verify the syntax)
Sketch | Verify or Compile
To download to the board
File | Upload to I/O Board
After uploading is over LED will start blinking at 1 Hz rate ie half
second on and half second off.
16. Some thing about bootloader
Bootloader is a program that allow more programs to be
uploaded with using external hardware.
At power on if bootloader is burnt into chip then program wait
for few seconds for data from serial port,
if data is available in some defined format that this is stored in
flash as program.
if nothing is coming from serial port then last uploaded program
starts.
More details about bootloader are available here
http://www.arduino.cc/en/Main/Bootloader
17. Modify The Program
You can change the time in parenthesis after delay and see
the difference in blinking.
The first time is time for LED ON and second is time for LED
OFF
This LED will blink as per program
18. Understand pin numbers
IC has some physical pin numbers. ATMEGA8 in 28 pin
package has 20 I/O lines and few pins for oscillator and power
supply etc. Physical pins are usually required for making circuit
and when probing using CRO or multimeter.
20 lines are given some names like PC6 where PC stand for
Port C and 6 is the bit 6 of port c. During programming in
C/Assembly we use PC6 and not the physical pin.
Arduino board has these 20 lines taken to a connector. These
connector pins are marked 0 to 19. In Arduino software we
refer to these pins ie 0 to 19 and not port pins or physical pins.
19. Understanding Pin Numbers
Some pins have dual purpose
For example Analog pin 0 is also digital pin 14.
Pin 0 is also Received data
Next few pages have more details and mapping of pin numbers
ie physical - logical - arduino
20. Understand Pin Numbers
This board has 20 I/O pins marked on pins.
all of them are I/O. Some have dual purpose.
21. Understanding Pin Numbers
All 20 pins can be access as general purpose I/O pins
Some pins have other functions as explained below
Pin Number Function
0 RXD
1 TXD
13 On board LED
9,10,11 PWM (Analog Outputs)
14,15,16,17,18,19 Analog Inputs 0 to 5
2,3 Interrupts 0 and 1
22. ATMEGA to Arduino Pin Mapping
ATMEGA has 28 physical pins.
In data sheets they are referred as Port and a number like PC5
In Arduino they are referred as numbers 0 to 19.
Mapping of all three is as below
23. Summary
This document explain the first day of experiments with Arduino
Board.
Total hardware cost of material used in less than Rs 1500/-
Not much can be done in this however this is a starting point.
Next addons could be relays, IR Sensors, Remote handset,
Temperature sensors, Light Sensors. Color LEDs, Buzzers.
All this material will cost less than Rs 1000/-
24. About Open.Embedded
This is an initiative of group of professionals, students and
hobbyists to share their knowledge among others using low
cost open source software.
We think it criminal when students are taught 8085 and 8051 in
college when world is moving forward and technology changes
are happening every where in the world.
Join us at facebook.com/open.embedded
Buy low cost kits at stores.ebay.in/openembedded