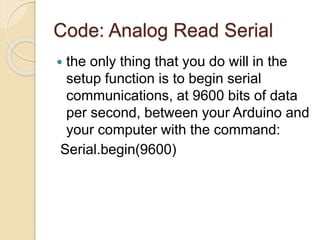
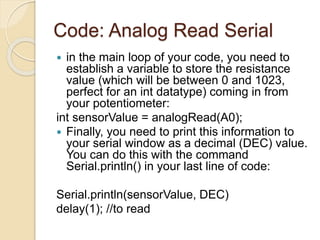
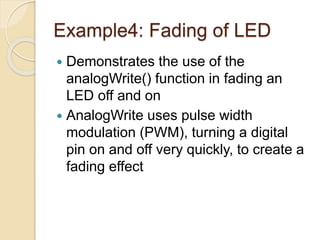
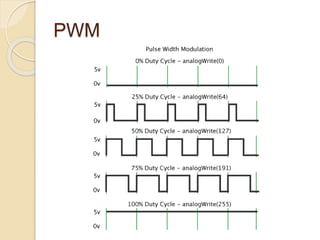
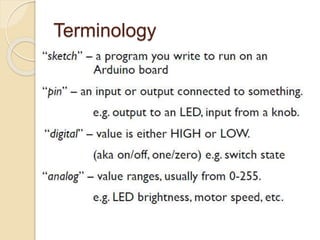
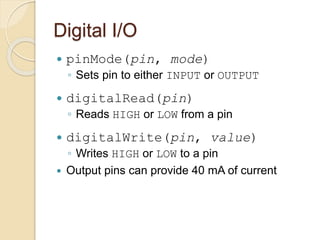
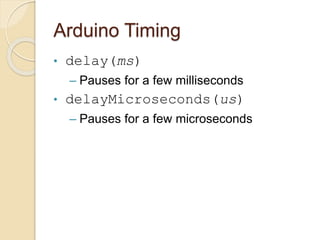
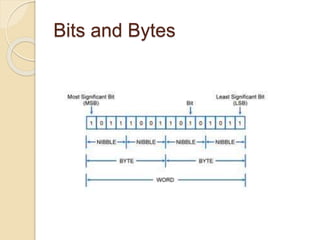
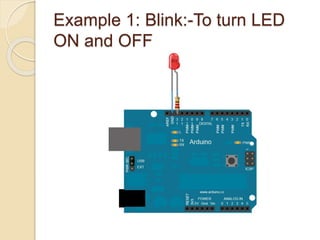
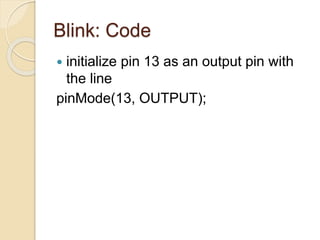
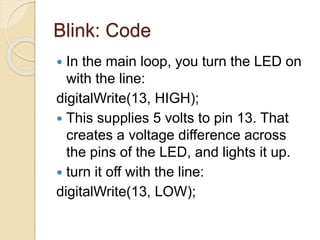
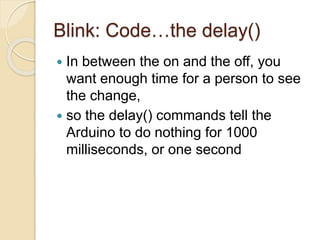
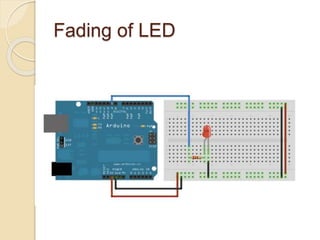
SlideShare a Scribd company logo
Fun with Arduino
(Arduino-Uno)
-By Prof.Ravikumar Tiwari, Assistant Professor,
G.H. Raisoni College of Engineering, Nagpur
ravikumar.tiwari@raisoni.net
http://twitter.com/RaviTiwari90
What we will be learning..
 Getting Started with Arduino
 Arduino IDE
 Programming the Arduino
 Practice examples to learn
Little bit about programming
• Code is case sensitive
• Statements are commands and must
end with a semi-colon
• Comments follow a // or begin with /*
and end with */
Terminology
Digital I/O
 pinMode(pin, mode)
◦ Sets pin to either INPUT or OUTPUT
 digitalRead(pin)
◦ Reads HIGH or LOW from a pin
 digitalWrite(pin, value)
◦ Writes HIGH or LOW to a pin
 Output pins can provide 40 mA of current
Arduino Timing
• delay(ms)
– Pauses for a few milliseconds
• delayMicroseconds(us)
– Pauses for a few microseconds
Bits and Bytes
Bits & Bytes
 “The world isn't run by weapons
anymore, or energy, or money. It's run
by little ones and zeroes, little bits of
data. It's all just electrons”
 For example, we measure weight with
"ounces" and "pounds" (or grams and
kilograms) and distances with
"inches," "feet," and "miles" (or
centimeters, meters and kilometers).
Information has its own system of
measurements:
Bits and Bytes
 A single bit is either a zero or a one.
 You can group bits together into 8 bits
which is 1 byte.
 1024 bytes (8192 bits) is one Kilobyte
(sometimes written KB).
 1024 KB (1048576 bytes) is one
Megabyte (MB)
 1024 MB is 1 Gigabyte (GB)
Bits and Bytes
 Quick quiz!
 If your hard disk is 200 Gigabytes,
how many bytes is that? Use a
calculator with lots of digits! (highlight
text below)
 200 GB * 1024 = 204800 MB
204800 MB * 1024 = 209715200 KB
209715200 KB * 1024 =
214748364800 bytes!
Basics to get started
 A program on Arduino is called as
Sketch.
 Structure of Sketch:
void setup() {
// put your setup code here, to run
once:
}
void loop() {
// put your main code here, to run
repeatedly:
}
setup() function
 to initialize variables, pin modes, start
using libraries, etc
 The setup function will only run once,
after each powerup or reset of the
Arduino board
Loop() function
 the loop() function does precisely what
its name suggests, and loops
consecutively, allowing your program
to change and respond as it runs
 Code in the loop() section of your
sketch is used to actively control the
Arduino board
 Any line that starts with two slashes
(//) will not be read by the compiler, so
you can write anything you want after
it
Example 1: Blink:-To turn LED
ON and OFF
Blink: Code
 initialize pin 13 as an output pin with
the line
pinMode(13, OUTPUT);
Blink: Code
 In the main loop, you turn the LED on
with the line:
digitalWrite(13, HIGH);
 This supplies 5 volts to pin 13. That
creates a voltage difference across
the pins of the LED, and lights it up.
 turn it off with the line:
digitalWrite(13, LOW);
Blink: Code…the delay()
 In between the on and the off, you
want enough time for a person to see
the change,
 so the delay() commands tell the
Arduino to do nothing for 1000
milliseconds, or one second
Uploading
 First click on tick button to verify the
code
 Click on the arrow button to upload the
code on arduino board
 Make sure that you have selected
right port and right board
Try this one
 Try generating some pattern on series
of LED’s (don’t use potentiometer)
Example2:Digital Read Serial
 This example shows you how to
monitor the state of a switch by
establishing serial communication
between your Arduino and your
computer over USB
 Connect three wires to the Arduino
board
 The first two to; connect to the two
long vertical rows on the side of the
breadboard to provide access to the 5
volt supply and ground
bb
 The third wire goes from digital pin 2
to one leg of the pushbutton
 That same leg of the button connects
through a pull-down resistor (1 to 10
KOhms) to ground
 The other leg of the button connects to
the 5 volt supply
Digital Read Serial
 Pushbuttons or switches connect two
points in a circuit when you press them.
 When the pushbutton is open
(unpressed) there is no connection
between the two legs of the pushbutton,
so the pin is connected to ground
(through the pull-down resistor) and
reads as LOW, or 0.
 When the button is closed (pressed), it
makes a connection between its two
legs, connecting the pin to 5 volts, so
that the pin reads as HIGH, or 1
Code: Digital Read Serial
 the very first thing that you do will in
the setup function is to begin serial
communications, at 9600 bits of data
per second, between your Arduino and
your computer with the line:
Serial.begin(9600);
 initialize digital pin 2, the pin that will
read the output from your button, as
an input:
pinMode(2,INPUT);
Quiz
 If the Arduino transfers data at 9600
bits per second and you're sending 12
bytes of data, how long does it take to
send over this information? (highlight
text below)
 12 bytes of data equals 12 * 8 = 96
bits of data. If we can transfer 9600
bits per second, then 96 bits takes
1/100th of a second!
Code: Digital Read Serial
 The first thing you need to do in the
main loop of your program is to
establish a variable to hold the
information coming in from your switch
 Call this variable sensorValue, and set
it to equal whatever is being read on
digital pin 2. You can accomplish all
this with just one line of code:
int sensorValue = digitalRead(2);
Code: Digital Read Serial
 Once the Arduino has read the input,
make it print this information back to
the computer as a decimal value. You
can do this with the command
Serial.println() in our last line of code:
Serial.println(sensorValue);
 Last use delay(1); // delay in between
reads
Example3: Analog Read
Serial
 This example shows you how to read
analog input from the physical world
using a potentiometer
 A potentiometer is a simple
mechanical device that provides a
varying amount of resistance when its
shaft is turned
 In this example you will monitor the
state of your potentiometer after
establishing serial communication
between your Arduino and your
computer
Analog Read Serial
 Connect the three
wires from the
potentiometer to your
Arduino board.
 The first goes to
ground from one of the
outer pins of the
potentiometer.
 The second goes from
5 volts to the other
outer pin of the
potentiometer.
 The third goes from
analog input 0 to the
middle pin of the
potentiometer.
Analog Read Serial
 The Arduino has a circuit inside called an
analog-to-digital converter that reads
this changing voltage and converts it to a
number between 0 and 1023
 When the shaft is turned all the way in
one direction, there are 0 volts going to
the pin, and the input value is 0
 When the shaft is turned all the way in
the opposite direction, there are 5 volts
going to the pin and the input value is
1023
Code: Analog Read Serial
 the only thing that you do will in the
setup function is to begin serial
communications, at 9600 bits of data
per second, between your Arduino and
your computer with the command:
Serial.begin(9600)
Code: Analog Read Serial
 in the main loop of your code, you need to
establish a variable to store the resistance
value (which will be between 0 and 1023,
perfect for an int datatype) coming in from
your potentiometer:
int sensorValue = analogRead(A0);
 Finally, you need to print this information to
your serial window as a decimal (DEC) value.
You can do this with the command
Serial.println() in your last line of code:
Serial.println(sensorValue, DEC)
delay(1); //to read
Example4: Fading of LED
 Demonstrates the use of the
analogWrite() function in fading an
LED off and on
 AnalogWrite uses pulse width
modulation (PWM), turning a digital
pin on and off very quickly, to create a
fading effect
Pulse Width Modulation
(PWM)
 Pulse Width Modulation, or PWM, is a
technique for getting analog results with
digital means
 This on-off pattern can simulate voltages
in between full on (5 Volts) and off (0
Volts) by changing the portion of the time
the signal spends on versus the time that
the signal spends off
 If you repeat this on-off pattern fast
enough with an LED for example, the
result is as if the signal is a steady
voltage between 0 and 5v controlling the
brightness of the LED
PWM
Fading of LED
Code
 /*
Fade
This example shows how to fade an LED on pin 9
using the analogWrite() function.
This example code is in the public domain.
*/
int led = 9; // the pin that the LED is attached to
int brightness = 0; // how bright the LED is
int fadeAmount = 5; // how many points to fade the LED by
// the setup routine runs once when you press reset:
void setup() {
// declare pin 9 to be an output:
pinMode(led, OUTPUT);
}
// the loop routine runs over and over again forever:
void loop() {
// set the brightness of pin 9:
analogWrite(led, brightness);
// change the brightness for next time through the loop:
brightness = brightness + fadeAmount;
// reverse the direction of the fading at the ends of the fade:
if (brightness == 0 || brightness == 255) {
fadeAmount = -fadeAmount ;
}
// wait for 30 milliseconds to see the dimming effect
delay(30);
}
Reference
 https://www.arduino.cc/en/Tutorial/Ho
mePage (great resource for arduino
beginner)

More Related Content

What's hot

Blinking a Single LED
Blinking a Single LEDBlinking a Single LED
Blinking a Single LED
Rihab Rahman
 
Arduino Workshop Day 2 - Advance Arduino & DIY
Arduino Workshop Day 2 - Advance Arduino & DIYArduino Workshop Day 2 - Advance Arduino & DIY
Arduino Workshop Day 2 - Advance Arduino & DIY
Vishnu
 
Using arduino and raspberry pi for internet of things
Using arduino and raspberry pi for internet of thingsUsing arduino and raspberry pi for internet of things
Using arduino and raspberry pi for internet of things
Sudar Muthu
 
binary arithmetic rules
binary arithmetic rulesbinary arithmetic rules
binary arithmetic rules
student
 
Encoder
EncoderEncoder
Arduino presentation by_warishusain
Arduino presentation by_warishusainArduino presentation by_warishusain
Arduino presentation by_warishusain
student
 
Arduino for beginners- Introduction to Arduino (presentation) - codewithgauri
Arduino for beginners- Introduction to Arduino (presentation) - codewithgauriArduino for beginners- Introduction to Arduino (presentation) - codewithgauri
Arduino for beginners- Introduction to Arduino (presentation) - codewithgauri
Gaurav Pandey
 
Ardui no
Ardui no Ardui no
Ardui no
Amol Sakhalkar
 
Introduction to arduino
Introduction to arduinoIntroduction to arduino
Introduction to arduinoAhmed Sakr
 
Introduction to Arduino Hardware and Programming
Introduction to Arduino Hardware and ProgrammingIntroduction to Arduino Hardware and Programming
Introduction to Arduino Hardware and Programming
Emmanuel Obot
 
Basic gates and functions
Basic gates and functionsBasic gates and functions
Basic gates and functions
pong_sk1
 
Introduction to Arduino and Hands on to Iot
Introduction to Arduino and Hands on to IotIntroduction to Arduino and Hands on to Iot
Introduction to Arduino and Hands on to Iot
Sachin S
 
Arduino
ArduinoArduino
Arduino
candrakur
 
Arduino- Serial communication
Arduino-  Serial communicationArduino-  Serial communication
Arduino- Serial communication
Jawaher Abdulwahab Fadhil
 
Digital electronics
Digital electronicsDigital electronics
Introduction to the Arduino
Introduction to the ArduinoIntroduction to the Arduino
Introduction to the ArduinoWingston
 
Introduction to Arduino
Introduction to ArduinoIntroduction to Arduino
Introduction to Arduino
Richard Rixham
 
Introduction to arduino ppt main
Introduction to  arduino ppt mainIntroduction to  arduino ppt main
Introduction to arduino ppt main
eddy royappa
 
Programming in Arduino (Part 2)
Programming in Arduino  (Part 2)Programming in Arduino  (Part 2)
Programming in Arduino (Part 2)
Niket Chandrawanshi
 

What's hot (20)

Blinking a Single LED
Blinking a Single LEDBlinking a Single LED
Blinking a Single LED
 
Arduino Workshop Day 2 - Advance Arduino & DIY
Arduino Workshop Day 2 - Advance Arduino & DIYArduino Workshop Day 2 - Advance Arduino & DIY
Arduino Workshop Day 2 - Advance Arduino & DIY
 
Introduction to Arduino
Introduction to ArduinoIntroduction to Arduino
Introduction to Arduino
 
Using arduino and raspberry pi for internet of things
Using arduino and raspberry pi for internet of thingsUsing arduino and raspberry pi for internet of things
Using arduino and raspberry pi for internet of things
 
binary arithmetic rules
binary arithmetic rulesbinary arithmetic rules
binary arithmetic rules
 
Encoder
EncoderEncoder
Encoder
 
Arduino presentation by_warishusain
Arduino presentation by_warishusainArduino presentation by_warishusain
Arduino presentation by_warishusain
 
Arduino for beginners- Introduction to Arduino (presentation) - codewithgauri
Arduino for beginners- Introduction to Arduino (presentation) - codewithgauriArduino for beginners- Introduction to Arduino (presentation) - codewithgauri
Arduino for beginners- Introduction to Arduino (presentation) - codewithgauri
 
Ardui no
Ardui no Ardui no
Ardui no
 
Introduction to arduino
Introduction to arduinoIntroduction to arduino
Introduction to arduino
 
Introduction to Arduino Hardware and Programming
Introduction to Arduino Hardware and ProgrammingIntroduction to Arduino Hardware and Programming
Introduction to Arduino Hardware and Programming
 
Basic gates and functions
Basic gates and functionsBasic gates and functions
Basic gates and functions
 
Introduction to Arduino and Hands on to Iot
Introduction to Arduino and Hands on to IotIntroduction to Arduino and Hands on to Iot
Introduction to Arduino and Hands on to Iot
 
Arduino
ArduinoArduino
Arduino
 
Arduino- Serial communication
Arduino-  Serial communicationArduino-  Serial communication
Arduino- Serial communication
 
Digital electronics
Digital electronicsDigital electronics
Digital electronics
 
Introduction to the Arduino
Introduction to the ArduinoIntroduction to the Arduino
Introduction to the Arduino
 
Introduction to Arduino
Introduction to ArduinoIntroduction to Arduino
Introduction to Arduino
 
Introduction to arduino ppt main
Introduction to  arduino ppt mainIntroduction to  arduino ppt main
Introduction to arduino ppt main
 
Programming in Arduino (Part 2)
Programming in Arduino  (Part 2)Programming in Arduino  (Part 2)
Programming in Arduino (Part 2)
 

Similar to Fun with arduino

Arduino اردوينو
Arduino اردوينوArduino اردوينو
Arduino اردوينو
salih mahmod
 
Physical prototyping lab2-analog_digital
Physical prototyping lab2-analog_digitalPhysical prototyping lab2-analog_digital
Physical prototyping lab2-analog_digital
Tony Olsson.
 
Physical prototyping lab2-analog_digital
Physical prototyping lab2-analog_digitalPhysical prototyping lab2-analog_digital
Physical prototyping lab2-analog_digital
Tony Olsson.
 
Arduino Slides With Neopixels
Arduino Slides With NeopixelsArduino Slides With Neopixels
Arduino Slides With Neopixels
sdcharle
 
Arduino Workshop (3).pptx
Arduino Workshop (3).pptxArduino Workshop (3).pptx
Arduino Workshop (3).pptx
HebaEng
 
Arduino programming
Arduino programmingArduino programming
Arduino programming
MdAshrafulAlam47
 
Arduino Programming Familiarization
Arduino Programming FamiliarizationArduino Programming Familiarization
Arduino Programming Familiarization
Amit Kumer Podder
 
Arduino intro.pptx
Arduino intro.pptxArduino intro.pptx
Arduino intro.pptx
SanthanaMari11
 
Arduino slides
Arduino slidesArduino slides
Arduino slides
sdcharle
 
Arduino Workshop Slides
Arduino Workshop SlidesArduino Workshop Slides
Arduino Workshop Slides
mkarlin14
 
Robotics Session day 1
Robotics Session day 1Robotics Session day 1
Robotics Session day 1Afzal Ahmad
 
Arduino windows remote control
Arduino windows remote controlArduino windows remote control
Arduino windows remote control
VilayatAli5
 
Arduino cic3
Arduino cic3Arduino cic3
Arduino cic3
Jeni Shah
 
Ch_2_8,9,10.pptx
Ch_2_8,9,10.pptxCh_2_8,9,10.pptx
Ch_2_8,9,10.pptx
yosikit826
 
Starting with Arduino
Starting with Arduino Starting with Arduino
Starting with Arduino
MajdyShamasneh
 
Arduino comic v0004
Arduino comic v0004Arduino comic v0004
Arduino comic v0004
DO!MAKERS
 
Arduino Comic-Jody Culkin-2011
Arduino Comic-Jody Culkin-2011Arduino Comic-Jody Culkin-2011
Arduino Comic-Jody Culkin-2011
ΚΔΑΠ Δήμου Θέρμης
 
arduinocourse-180308074529 (1).pdf
arduinocourse-180308074529 (1).pdfarduinocourse-180308074529 (1).pdf
arduinocourse-180308074529 (1).pdf
ssusere5db05
 

Similar to Fun with arduino (20)

Arduino اردوينو
Arduino اردوينوArduino اردوينو
Arduino اردوينو
 
Physical prototyping lab2-analog_digital
Physical prototyping lab2-analog_digitalPhysical prototyping lab2-analog_digital
Physical prototyping lab2-analog_digital
 
Physical prototyping lab2-analog_digital
Physical prototyping lab2-analog_digitalPhysical prototyping lab2-analog_digital
Physical prototyping lab2-analog_digital
 
Arduino Slides With Neopixels
Arduino Slides With NeopixelsArduino Slides With Neopixels
Arduino Slides With Neopixels
 
Arduino Workshop (3).pptx
Arduino Workshop (3).pptxArduino Workshop (3).pptx
Arduino Workshop (3).pptx
 
Arduino programming
Arduino programmingArduino programming
Arduino programming
 
publish manual
publish manualpublish manual
publish manual
 
Arduino Programming Familiarization
Arduino Programming FamiliarizationArduino Programming Familiarization
Arduino Programming Familiarization
 
Arduino intro.pptx
Arduino intro.pptxArduino intro.pptx
Arduino intro.pptx
 
Arduino slides
Arduino slidesArduino slides
Arduino slides
 
Arduino Workshop Slides
Arduino Workshop SlidesArduino Workshop Slides
Arduino Workshop Slides
 
Arduino Programming Basic
Arduino Programming BasicArduino Programming Basic
Arduino Programming Basic
 
Robotics Session day 1
Robotics Session day 1Robotics Session day 1
Robotics Session day 1
 
Arduino windows remote control
Arduino windows remote controlArduino windows remote control
Arduino windows remote control
 
Arduino cic3
Arduino cic3Arduino cic3
Arduino cic3
 
Ch_2_8,9,10.pptx
Ch_2_8,9,10.pptxCh_2_8,9,10.pptx
Ch_2_8,9,10.pptx
 
Starting with Arduino
Starting with Arduino Starting with Arduino
Starting with Arduino
 
Arduino comic v0004
Arduino comic v0004Arduino comic v0004
Arduino comic v0004
 
Arduino Comic-Jody Culkin-2011
Arduino Comic-Jody Culkin-2011Arduino Comic-Jody Culkin-2011
Arduino Comic-Jody Culkin-2011
 
arduinocourse-180308074529 (1).pdf
arduinocourse-180308074529 (1).pdfarduinocourse-180308074529 (1).pdf
arduinocourse-180308074529 (1).pdf
 

More from Ravikumar Tiwari

Course Outcome and Program Outcome Calculation(new method)
Course Outcome and Program Outcome Calculation(new method)Course Outcome and Program Outcome Calculation(new method)
Course Outcome and Program Outcome Calculation(new method)
Ravikumar Tiwari
 
ARM- Programmer's Model
ARM- Programmer's ModelARM- Programmer's Model
ARM- Programmer's Model
Ravikumar Tiwari
 
ARM Micro-controller
ARM Micro-controllerARM Micro-controller
ARM Micro-controller
Ravikumar Tiwari
 
8051 Addressing modes
8051 Addressing modes8051 Addressing modes
8051 Addressing modes
Ravikumar Tiwari
 
8051 Assembly Language Programming
8051 Assembly Language Programming8051 Assembly Language Programming
8051 Assembly Language Programming
Ravikumar Tiwari
 
8051 Microcontroller
8051 Microcontroller8051 Microcontroller
8051 Microcontroller
Ravikumar Tiwari
 
RISC Vs CISC, Harvard v/s Van Neumann
RISC Vs CISC, Harvard v/s Van NeumannRISC Vs CISC, Harvard v/s Van Neumann
RISC Vs CISC, Harvard v/s Van Neumann
Ravikumar Tiwari
 
Introducing Embedded Systems and the Microcontrollers
Introducing Embedded Systems and the MicrocontrollersIntroducing Embedded Systems and the Microcontrollers
Introducing Embedded Systems and the Microcontrollers
Ravikumar Tiwari
 

More from Ravikumar Tiwari (8)

Course Outcome and Program Outcome Calculation(new method)
Course Outcome and Program Outcome Calculation(new method)Course Outcome and Program Outcome Calculation(new method)
Course Outcome and Program Outcome Calculation(new method)
 
ARM- Programmer's Model
ARM- Programmer's ModelARM- Programmer's Model
ARM- Programmer's Model
 
ARM Micro-controller
ARM Micro-controllerARM Micro-controller
ARM Micro-controller
 
8051 Addressing modes
8051 Addressing modes8051 Addressing modes
8051 Addressing modes
 
8051 Assembly Language Programming
8051 Assembly Language Programming8051 Assembly Language Programming
8051 Assembly Language Programming
 
8051 Microcontroller
8051 Microcontroller8051 Microcontroller
8051 Microcontroller
 
RISC Vs CISC, Harvard v/s Van Neumann
RISC Vs CISC, Harvard v/s Van NeumannRISC Vs CISC, Harvard v/s Van Neumann
RISC Vs CISC, Harvard v/s Van Neumann
 
Introducing Embedded Systems and the Microcontrollers
Introducing Embedded Systems and the MicrocontrollersIntroducing Embedded Systems and the Microcontrollers
Introducing Embedded Systems and the Microcontrollers
 

Recently uploaded

Railway Signalling Principles Edition 3.pdf
Railway Signalling Principles Edition 3.pdfRailway Signalling Principles Edition 3.pdf
Railway Signalling Principles Edition 3.pdf
TeeVichai
 
CME397 Surface Engineering- Professional Elective
CME397 Surface Engineering- Professional ElectiveCME397 Surface Engineering- Professional Elective
CME397 Surface Engineering- Professional Elective
karthi keyan
 
weather web application report.pdf
weather web application report.pdfweather web application report.pdf
weather web application report.pdf
Pratik Pawar
 
Courier management system project report.pdf
Courier management system project report.pdfCourier management system project report.pdf
Courier management system project report.pdf
Kamal Acharya
 
Standard Reomte Control Interface - Neometrix
Standard Reomte Control Interface - NeometrixStandard Reomte Control Interface - Neometrix
Standard Reomte Control Interface - Neometrix
Neometrix_Engineering_Pvt_Ltd
 
NO1 Uk best vashikaran specialist in delhi vashikaran baba near me online vas...
NO1 Uk best vashikaran specialist in delhi vashikaran baba near me online vas...NO1 Uk best vashikaran specialist in delhi vashikaran baba near me online vas...
NO1 Uk best vashikaran specialist in delhi vashikaran baba near me online vas...
Amil Baba Dawood bangali
 
WATER CRISIS and its solutions-pptx 1234
WATER CRISIS and its solutions-pptx 1234WATER CRISIS and its solutions-pptx 1234
WATER CRISIS and its solutions-pptx 1234
AafreenAbuthahir2
 
HYDROPOWER - Hydroelectric power generation
HYDROPOWER - Hydroelectric power generationHYDROPOWER - Hydroelectric power generation
HYDROPOWER - Hydroelectric power generation
Robbie Edward Sayers
 
LIGA(E)11111111111111111111111111111111111111111.ppt
LIGA(E)11111111111111111111111111111111111111111.pptLIGA(E)11111111111111111111111111111111111111111.ppt
LIGA(E)11111111111111111111111111111111111111111.ppt
ssuser9bd3ba
 
road safety engineering r s e unit 3.pdf
road safety engineering  r s e unit 3.pdfroad safety engineering  r s e unit 3.pdf
road safety engineering r s e unit 3.pdf
VENKATESHvenky89705
 
The Benefits and Techniques of Trenchless Pipe Repair.pdf
The Benefits and Techniques of Trenchless Pipe Repair.pdfThe Benefits and Techniques of Trenchless Pipe Repair.pdf
The Benefits and Techniques of Trenchless Pipe Repair.pdf
Pipe Restoration Solutions
 
Vaccine management system project report documentation..pdf
Vaccine management system project report documentation..pdfVaccine management system project report documentation..pdf
Vaccine management system project report documentation..pdf
Kamal Acharya
 
Design and Analysis of Algorithms-DP,Backtracking,Graphs,B&B
Design and Analysis of Algorithms-DP,Backtracking,Graphs,B&BDesign and Analysis of Algorithms-DP,Backtracking,Graphs,B&B
Design and Analysis of Algorithms-DP,Backtracking,Graphs,B&B
Sreedhar Chowdam
 
在线办理(ANU毕业证书)澳洲国立大学毕业证录取通知书一模一样
在线办理(ANU毕业证书)澳洲国立大学毕业证录取通知书一模一样在线办理(ANU毕业证书)澳洲国立大学毕业证录取通知书一模一样
在线办理(ANU毕业证书)澳洲国立大学毕业证录取通知书一模一样
obonagu
 
Democratizing Fuzzing at Scale by Abhishek Arya
Democratizing Fuzzing at Scale by Abhishek AryaDemocratizing Fuzzing at Scale by Abhishek Arya
Democratizing Fuzzing at Scale by Abhishek Arya
abh.arya
 
power quality voltage fluctuation UNIT - I.pptx
power quality voltage fluctuation UNIT - I.pptxpower quality voltage fluctuation UNIT - I.pptx
power quality voltage fluctuation UNIT - I.pptx
ViniHema
 
Halogenation process of chemical process industries
Halogenation process of chemical process industriesHalogenation process of chemical process industries
Halogenation process of chemical process industries
MuhammadTufail242431
 
H.Seo, ICLR 2024, MLILAB, KAIST AI.pdf
H.Seo,  ICLR 2024, MLILAB,  KAIST AI.pdfH.Seo,  ICLR 2024, MLILAB,  KAIST AI.pdf
H.Seo, ICLR 2024, MLILAB, KAIST AI.pdf
MLILAB
 
ethical hacking-mobile hacking methods.ppt
ethical hacking-mobile hacking methods.pptethical hacking-mobile hacking methods.ppt
ethical hacking-mobile hacking methods.ppt
Jayaprasanna4
 
Automobile Management System Project Report.pdf
Automobile Management System Project Report.pdfAutomobile Management System Project Report.pdf
Automobile Management System Project Report.pdf
Kamal Acharya
 

Recently uploaded (20)

Railway Signalling Principles Edition 3.pdf
Railway Signalling Principles Edition 3.pdfRailway Signalling Principles Edition 3.pdf
Railway Signalling Principles Edition 3.pdf
 
CME397 Surface Engineering- Professional Elective
CME397 Surface Engineering- Professional ElectiveCME397 Surface Engineering- Professional Elective
CME397 Surface Engineering- Professional Elective
 
weather web application report.pdf
weather web application report.pdfweather web application report.pdf
weather web application report.pdf
 
Courier management system project report.pdf
Courier management system project report.pdfCourier management system project report.pdf
Courier management system project report.pdf
 
Standard Reomte Control Interface - Neometrix
Standard Reomte Control Interface - NeometrixStandard Reomte Control Interface - Neometrix
Standard Reomte Control Interface - Neometrix
 
NO1 Uk best vashikaran specialist in delhi vashikaran baba near me online vas...
NO1 Uk best vashikaran specialist in delhi vashikaran baba near me online vas...NO1 Uk best vashikaran specialist in delhi vashikaran baba near me online vas...
NO1 Uk best vashikaran specialist in delhi vashikaran baba near me online vas...
 
WATER CRISIS and its solutions-pptx 1234
WATER CRISIS and its solutions-pptx 1234WATER CRISIS and its solutions-pptx 1234
WATER CRISIS and its solutions-pptx 1234
 
HYDROPOWER - Hydroelectric power generation
HYDROPOWER - Hydroelectric power generationHYDROPOWER - Hydroelectric power generation
HYDROPOWER - Hydroelectric power generation
 
LIGA(E)11111111111111111111111111111111111111111.ppt
LIGA(E)11111111111111111111111111111111111111111.pptLIGA(E)11111111111111111111111111111111111111111.ppt
LIGA(E)11111111111111111111111111111111111111111.ppt
 
road safety engineering r s e unit 3.pdf
road safety engineering  r s e unit 3.pdfroad safety engineering  r s e unit 3.pdf
road safety engineering r s e unit 3.pdf
 
The Benefits and Techniques of Trenchless Pipe Repair.pdf
The Benefits and Techniques of Trenchless Pipe Repair.pdfThe Benefits and Techniques of Trenchless Pipe Repair.pdf
The Benefits and Techniques of Trenchless Pipe Repair.pdf
 
Vaccine management system project report documentation..pdf
Vaccine management system project report documentation..pdfVaccine management system project report documentation..pdf
Vaccine management system project report documentation..pdf
 
Design and Analysis of Algorithms-DP,Backtracking,Graphs,B&B
Design and Analysis of Algorithms-DP,Backtracking,Graphs,B&BDesign and Analysis of Algorithms-DP,Backtracking,Graphs,B&B
Design and Analysis of Algorithms-DP,Backtracking,Graphs,B&B
 
在线办理(ANU毕业证书)澳洲国立大学毕业证录取通知书一模一样
在线办理(ANU毕业证书)澳洲国立大学毕业证录取通知书一模一样在线办理(ANU毕业证书)澳洲国立大学毕业证录取通知书一模一样
在线办理(ANU毕业证书)澳洲国立大学毕业证录取通知书一模一样
 
Democratizing Fuzzing at Scale by Abhishek Arya
Democratizing Fuzzing at Scale by Abhishek AryaDemocratizing Fuzzing at Scale by Abhishek Arya
Democratizing Fuzzing at Scale by Abhishek Arya
 
power quality voltage fluctuation UNIT - I.pptx
power quality voltage fluctuation UNIT - I.pptxpower quality voltage fluctuation UNIT - I.pptx
power quality voltage fluctuation UNIT - I.pptx
 
Halogenation process of chemical process industries
Halogenation process of chemical process industriesHalogenation process of chemical process industries
Halogenation process of chemical process industries
 
H.Seo, ICLR 2024, MLILAB, KAIST AI.pdf
H.Seo,  ICLR 2024, MLILAB,  KAIST AI.pdfH.Seo,  ICLR 2024, MLILAB,  KAIST AI.pdf
H.Seo, ICLR 2024, MLILAB, KAIST AI.pdf
 
ethical hacking-mobile hacking methods.ppt
ethical hacking-mobile hacking methods.pptethical hacking-mobile hacking methods.ppt
ethical hacking-mobile hacking methods.ppt
 
Automobile Management System Project Report.pdf
Automobile Management System Project Report.pdfAutomobile Management System Project Report.pdf
Automobile Management System Project Report.pdf
 

Fun with arduino

  • 1. Fun with Arduino (Arduino-Uno) -By Prof.Ravikumar Tiwari, Assistant Professor, G.H. Raisoni College of Engineering, Nagpur ravikumar.tiwari@raisoni.net http://twitter.com/RaviTiwari90
  • 2. What we will be learning..  Getting Started with Arduino  Arduino IDE  Programming the Arduino  Practice examples to learn
  • 3. Little bit about programming • Code is case sensitive • Statements are commands and must end with a semi-colon • Comments follow a // or begin with /* and end with */
  • 5. Digital I/O  pinMode(pin, mode) ◦ Sets pin to either INPUT or OUTPUT  digitalRead(pin) ◦ Reads HIGH or LOW from a pin  digitalWrite(pin, value) ◦ Writes HIGH or LOW to a pin  Output pins can provide 40 mA of current
  • 6. Arduino Timing • delay(ms) – Pauses for a few milliseconds • delayMicroseconds(us) – Pauses for a few microseconds
  • 8. Bits & Bytes  “The world isn't run by weapons anymore, or energy, or money. It's run by little ones and zeroes, little bits of data. It's all just electrons”  For example, we measure weight with "ounces" and "pounds" (or grams and kilograms) and distances with "inches," "feet," and "miles" (or centimeters, meters and kilometers). Information has its own system of measurements:
  • 9. Bits and Bytes  A single bit is either a zero or a one.  You can group bits together into 8 bits which is 1 byte.  1024 bytes (8192 bits) is one Kilobyte (sometimes written KB).  1024 KB (1048576 bytes) is one Megabyte (MB)  1024 MB is 1 Gigabyte (GB)
  • 10. Bits and Bytes  Quick quiz!  If your hard disk is 200 Gigabytes, how many bytes is that? Use a calculator with lots of digits! (highlight text below)  200 GB * 1024 = 204800 MB 204800 MB * 1024 = 209715200 KB 209715200 KB * 1024 = 214748364800 bytes!
  • 11. Basics to get started  A program on Arduino is called as Sketch.  Structure of Sketch: void setup() { // put your setup code here, to run once: } void loop() { // put your main code here, to run repeatedly: }
  • 12. setup() function  to initialize variables, pin modes, start using libraries, etc  The setup function will only run once, after each powerup or reset of the Arduino board
  • 13. Loop() function  the loop() function does precisely what its name suggests, and loops consecutively, allowing your program to change and respond as it runs  Code in the loop() section of your sketch is used to actively control the Arduino board  Any line that starts with two slashes (//) will not be read by the compiler, so you can write anything you want after it
  • 14. Example 1: Blink:-To turn LED ON and OFF
  • 15. Blink: Code  initialize pin 13 as an output pin with the line pinMode(13, OUTPUT);
  • 16. Blink: Code  In the main loop, you turn the LED on with the line: digitalWrite(13, HIGH);  This supplies 5 volts to pin 13. That creates a voltage difference across the pins of the LED, and lights it up.  turn it off with the line: digitalWrite(13, LOW);
  • 17. Blink: Code…the delay()  In between the on and the off, you want enough time for a person to see the change,  so the delay() commands tell the Arduino to do nothing for 1000 milliseconds, or one second
  • 18. Uploading  First click on tick button to verify the code  Click on the arrow button to upload the code on arduino board  Make sure that you have selected right port and right board
  • 19. Try this one  Try generating some pattern on series of LED’s (don’t use potentiometer)
  • 20. Example2:Digital Read Serial  This example shows you how to monitor the state of a switch by establishing serial communication between your Arduino and your computer over USB
  • 21.  Connect three wires to the Arduino board  The first two to; connect to the two long vertical rows on the side of the breadboard to provide access to the 5 volt supply and ground
  • 22. bb  The third wire goes from digital pin 2 to one leg of the pushbutton  That same leg of the button connects through a pull-down resistor (1 to 10 KOhms) to ground  The other leg of the button connects to the 5 volt supply
  • 23. Digital Read Serial  Pushbuttons or switches connect two points in a circuit when you press them.  When the pushbutton is open (unpressed) there is no connection between the two legs of the pushbutton, so the pin is connected to ground (through the pull-down resistor) and reads as LOW, or 0.  When the button is closed (pressed), it makes a connection between its two legs, connecting the pin to 5 volts, so that the pin reads as HIGH, or 1
  • 24. Code: Digital Read Serial  the very first thing that you do will in the setup function is to begin serial communications, at 9600 bits of data per second, between your Arduino and your computer with the line: Serial.begin(9600);  initialize digital pin 2, the pin that will read the output from your button, as an input: pinMode(2,INPUT);
  • 25. Quiz  If the Arduino transfers data at 9600 bits per second and you're sending 12 bytes of data, how long does it take to send over this information? (highlight text below)  12 bytes of data equals 12 * 8 = 96 bits of data. If we can transfer 9600 bits per second, then 96 bits takes 1/100th of a second!
  • 26. Code: Digital Read Serial  The first thing you need to do in the main loop of your program is to establish a variable to hold the information coming in from your switch  Call this variable sensorValue, and set it to equal whatever is being read on digital pin 2. You can accomplish all this with just one line of code: int sensorValue = digitalRead(2);
  • 27. Code: Digital Read Serial  Once the Arduino has read the input, make it print this information back to the computer as a decimal value. You can do this with the command Serial.println() in our last line of code: Serial.println(sensorValue);  Last use delay(1); // delay in between reads
  • 28. Example3: Analog Read Serial  This example shows you how to read analog input from the physical world using a potentiometer  A potentiometer is a simple mechanical device that provides a varying amount of resistance when its shaft is turned  In this example you will monitor the state of your potentiometer after establishing serial communication between your Arduino and your computer
  • 29. Analog Read Serial  Connect the three wires from the potentiometer to your Arduino board.  The first goes to ground from one of the outer pins of the potentiometer.  The second goes from 5 volts to the other outer pin of the potentiometer.  The third goes from analog input 0 to the middle pin of the potentiometer.
  • 30. Analog Read Serial  The Arduino has a circuit inside called an analog-to-digital converter that reads this changing voltage and converts it to a number between 0 and 1023  When the shaft is turned all the way in one direction, there are 0 volts going to the pin, and the input value is 0  When the shaft is turned all the way in the opposite direction, there are 5 volts going to the pin and the input value is 1023
  • 31. Code: Analog Read Serial  the only thing that you do will in the setup function is to begin serial communications, at 9600 bits of data per second, between your Arduino and your computer with the command: Serial.begin(9600)
  • 32. Code: Analog Read Serial  in the main loop of your code, you need to establish a variable to store the resistance value (which will be between 0 and 1023, perfect for an int datatype) coming in from your potentiometer: int sensorValue = analogRead(A0);  Finally, you need to print this information to your serial window as a decimal (DEC) value. You can do this with the command Serial.println() in your last line of code: Serial.println(sensorValue, DEC) delay(1); //to read
  • 33. Example4: Fading of LED  Demonstrates the use of the analogWrite() function in fading an LED off and on  AnalogWrite uses pulse width modulation (PWM), turning a digital pin on and off very quickly, to create a fading effect
  • 34. Pulse Width Modulation (PWM)  Pulse Width Modulation, or PWM, is a technique for getting analog results with digital means  This on-off pattern can simulate voltages in between full on (5 Volts) and off (0 Volts) by changing the portion of the time the signal spends on versus the time that the signal spends off  If you repeat this on-off pattern fast enough with an LED for example, the result is as if the signal is a steady voltage between 0 and 5v controlling the brightness of the LED
  • 35. PWM
  • 37. Code  /* Fade This example shows how to fade an LED on pin 9 using the analogWrite() function. This example code is in the public domain. */ int led = 9; // the pin that the LED is attached to int brightness = 0; // how bright the LED is int fadeAmount = 5; // how many points to fade the LED by // the setup routine runs once when you press reset: void setup() { // declare pin 9 to be an output: pinMode(led, OUTPUT); } // the loop routine runs over and over again forever: void loop() { // set the brightness of pin 9: analogWrite(led, brightness); // change the brightness for next time through the loop: brightness = brightness + fadeAmount; // reverse the direction of the fading at the ends of the fade: if (brightness == 0 || brightness == 255) { fadeAmount = -fadeAmount ; } // wait for 30 milliseconds to see the dimming effect delay(30); }