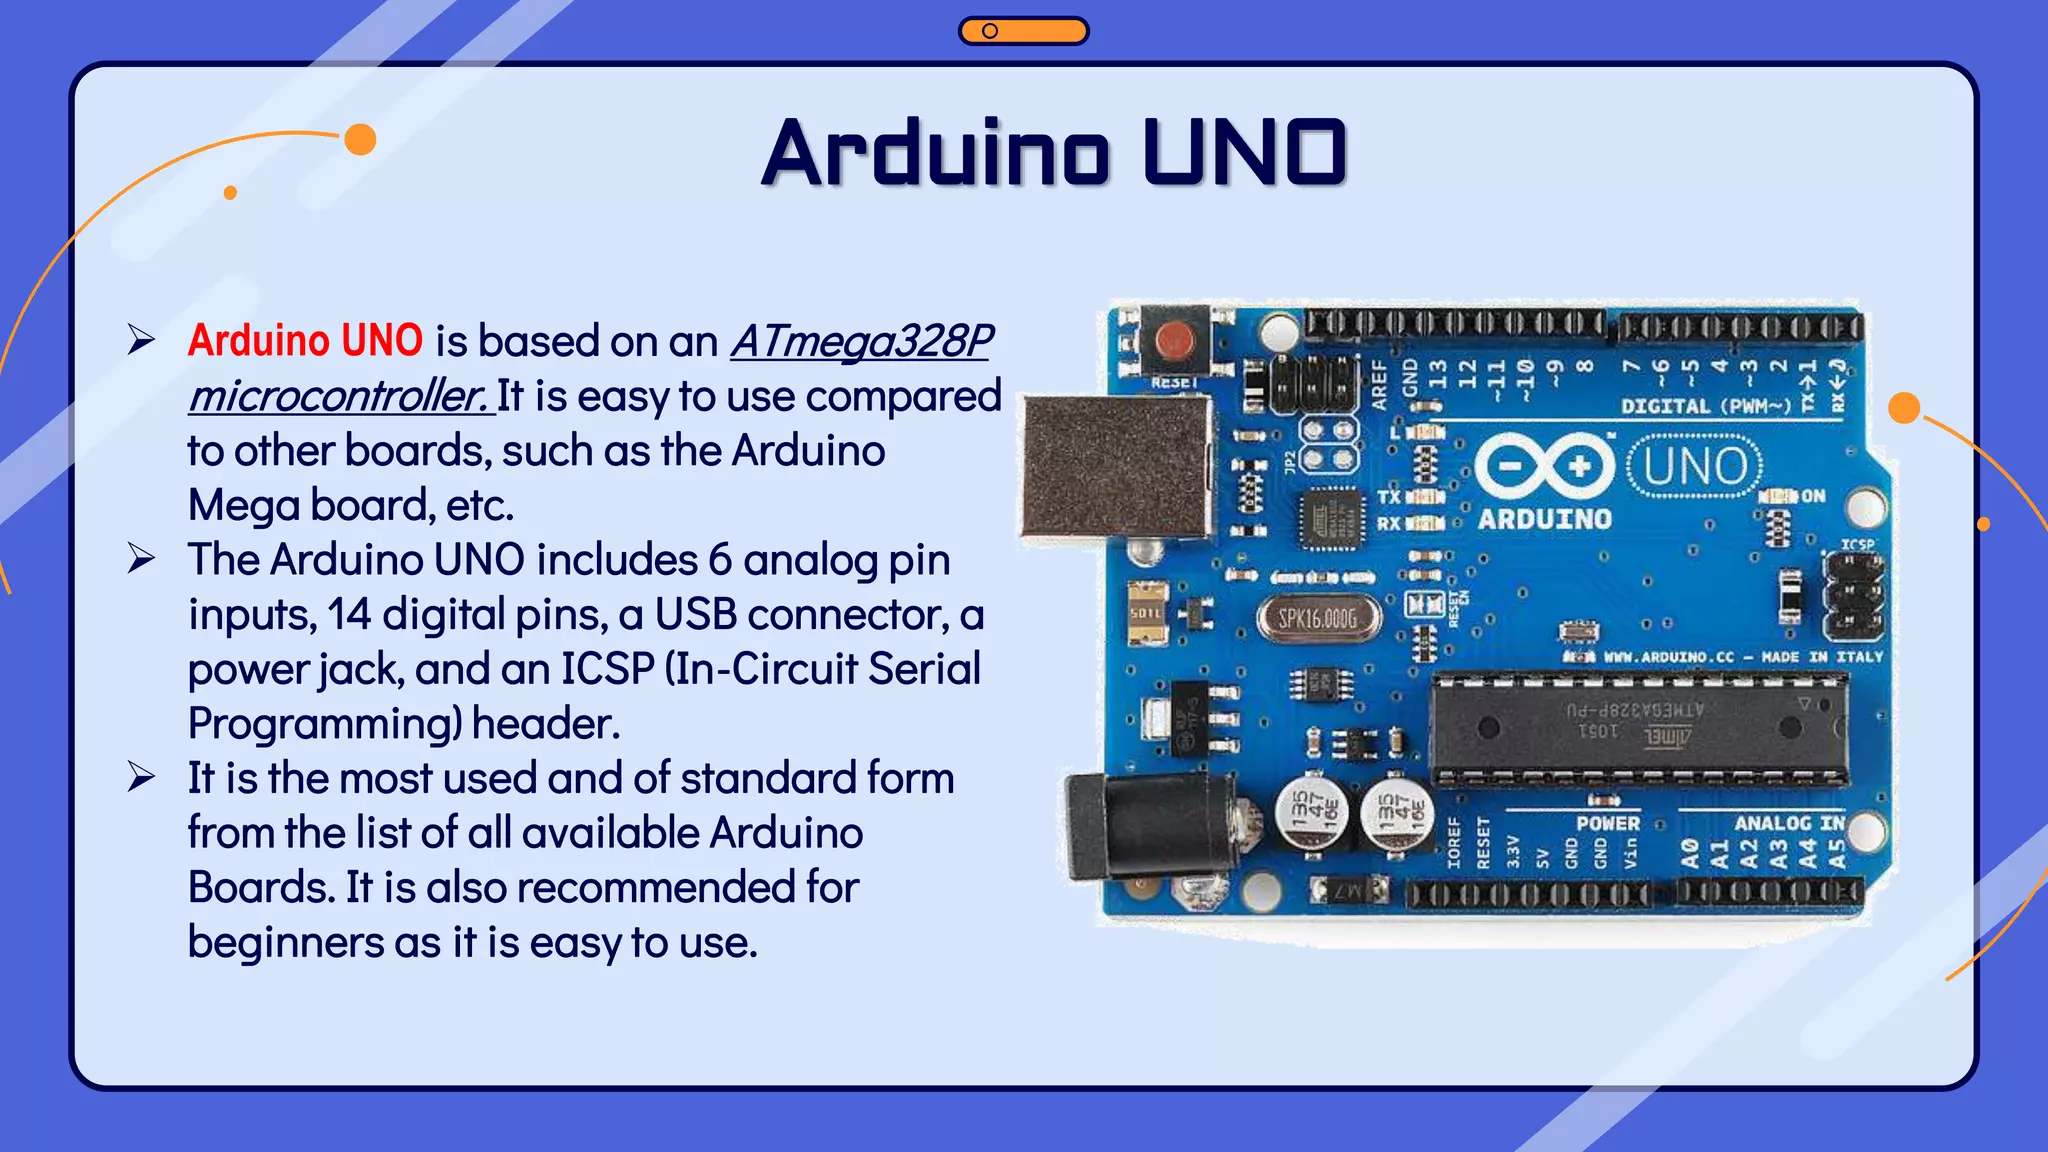
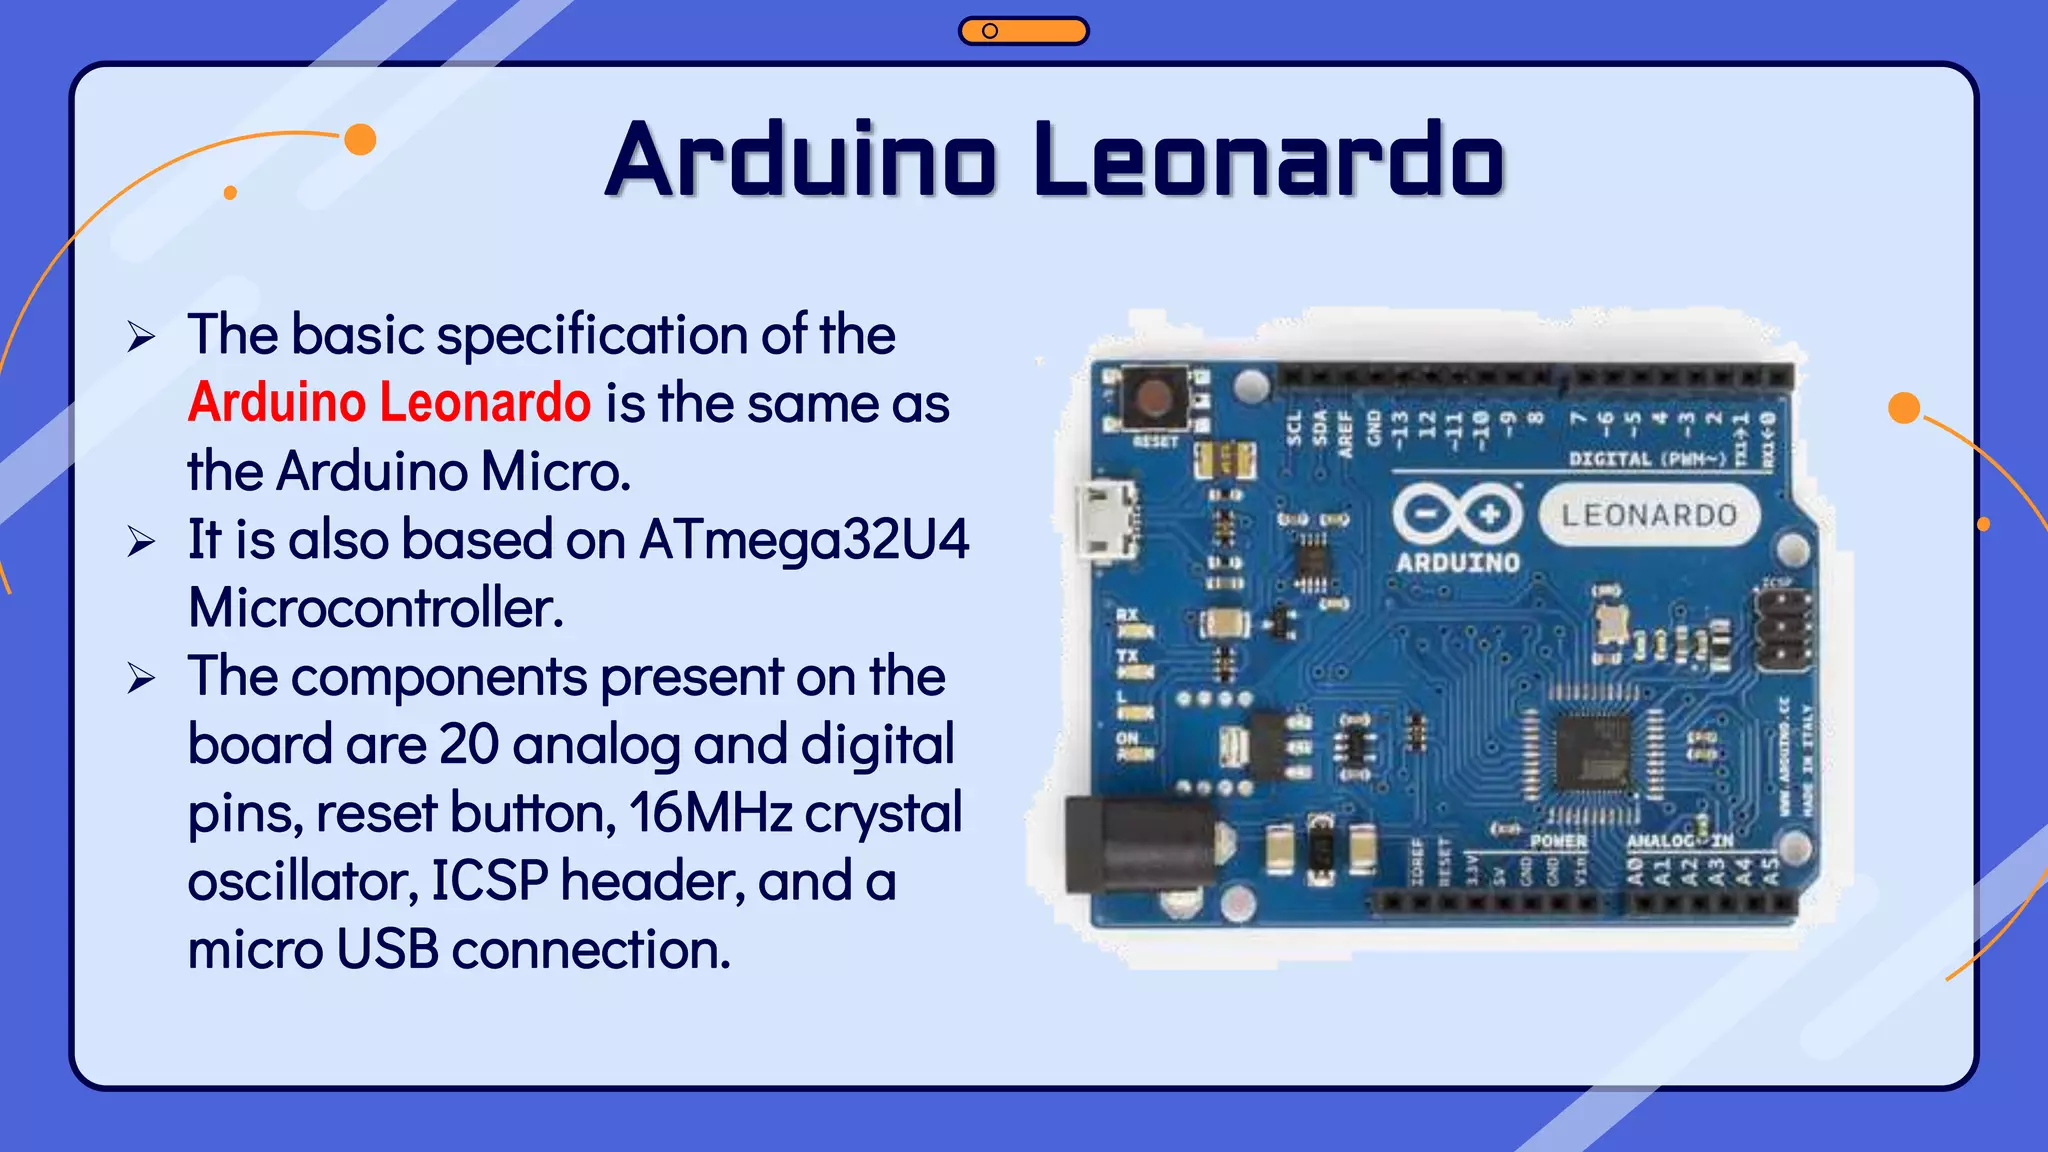
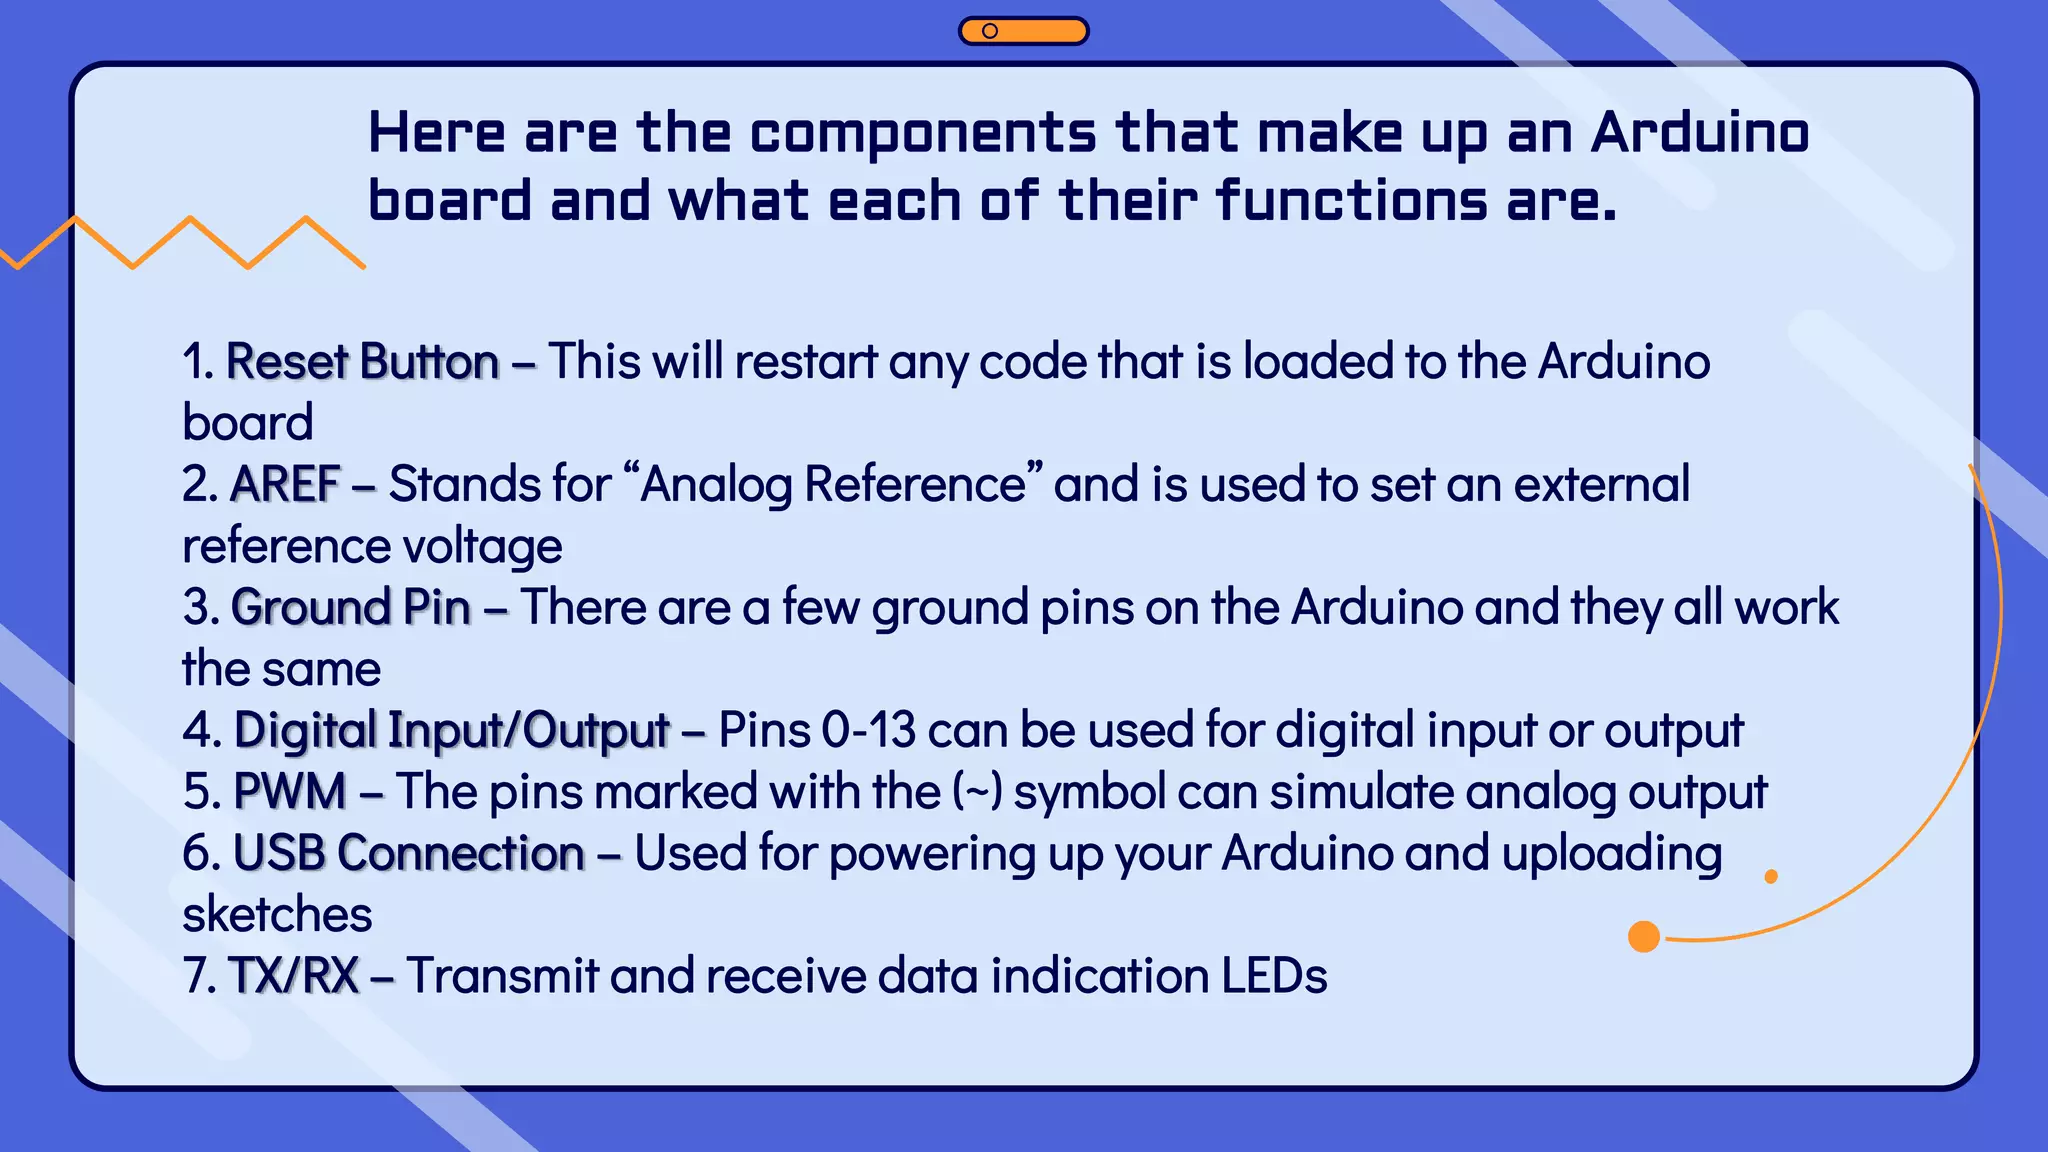
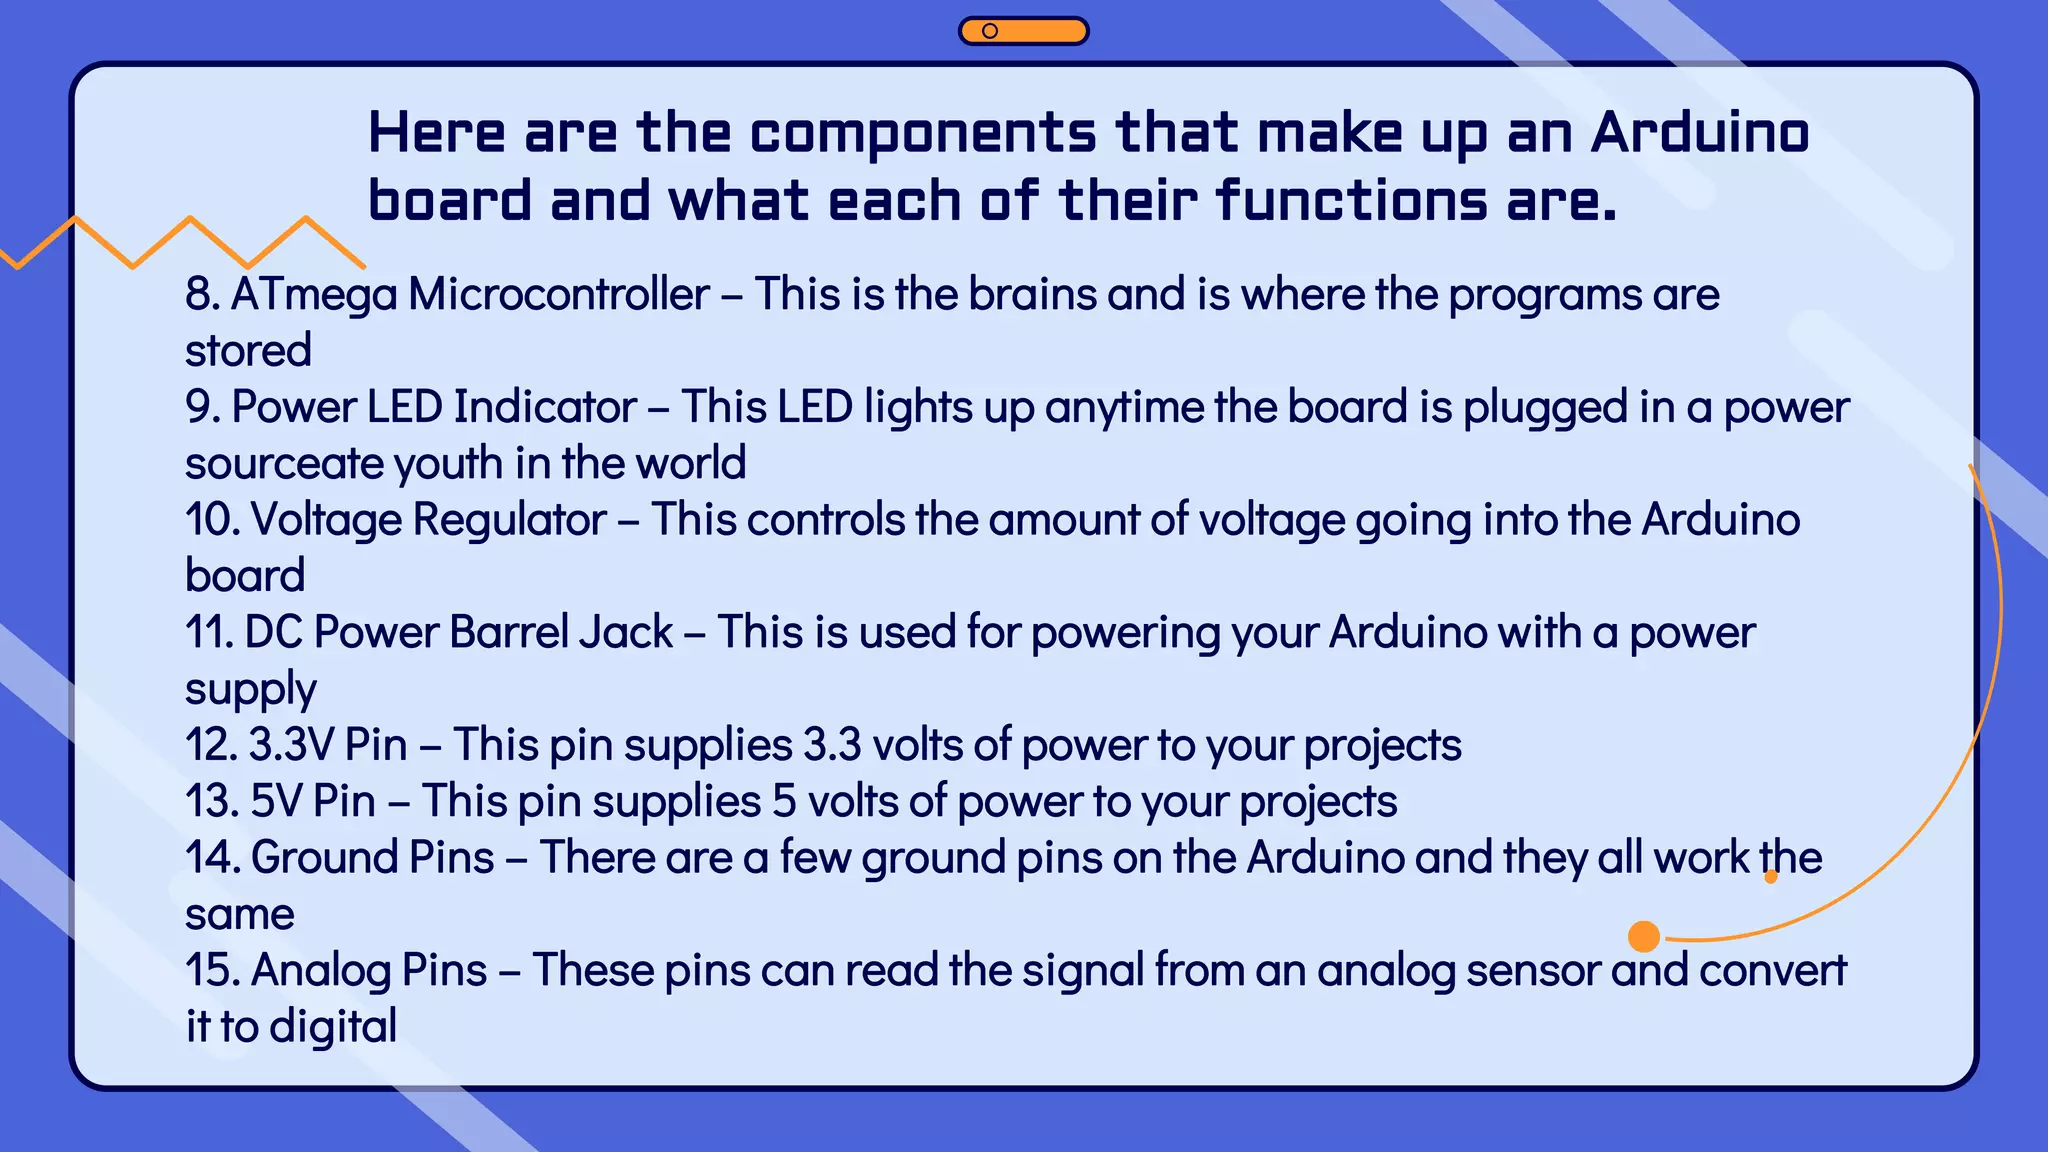
The document provides an overview of the Arduino hardware and software platform. It discusses that Arduino is an open-source electronics platform that can read inputs and turn them into outputs. Some common Arduino boards are then described, including the Arduino UNO, Nano, Leonardo, and Micro. The Arduino UNO is highlighted as one of the most popular boards due to its extensive documentation and tutorials available. The key components of the Arduino UNO board are then outlined.
Introduction to Arduino Hardware and ProgrammingEmmanuel Obot
Introduction to Arduino Hardware and Programming:
Arduino is an open-source electronics platform based on easy-to-use hardware and software. It's intended for anyone making interactive projects.
Teachers and students use it to build low cost scientific instruments, to prove chemistry and physics principles, or to get started with programming and robotics. Designers and architects build interactive prototypes, musicians and artists use it for installations and to experiment with new musical instruments. Makers, of course, use it to build many of the projects exhibited at the Maker Faire. Arduino is a key tool to learn new things. Anyone - children, hobbyists, artists, programmers can use it to build an interactive device.
Arduino Workshop Day 1 Slides
Basics of Arduino - Introduction, Basics of Circuits, Signals & Electronics, LED Interfacing, Switch, Buzzer, LCD & Bluetooth Communication.
1. Interface a sensor/s, device/s with Arduino for data acquisition and display the data.
2. Interface Actuators with Arduino to Control motion to build an application.
3. Build a mechatronic system using Arduino, sensors, actuators and modules.
Arduino for beginners- Introduction to Arduino (presentation) - codewithgauriGaurav Pandey
Arduino for beginners- Introduction to Arduino presentation
Learn Arduino basics in easy steps. Arduino for beginners course series.Arduino is an open-source platform used for building electronics projects. All Arduino boards have a microcontroller.
A microcontroller is basically a really small computer.
Humidity and Temperature Measurement Using Arduinodollonhaider
Humidity and temperature are common parameters to measure environmental conditions. In this Arduino based project we are going to measure ambient temperature and humidity and display it on a LCD screen.
Patient Health Monitoring System Using Arduino & ESP8266Rishav Pandey
Sometimes it happens when patients struggles to find hospital beds but due to high number of covid patients they are forced to stay at home and aren't monitored by any doctor. This Health Monitoring System designed with the help of Arduino UNO board and ESP8266 wifi microchip helps the doctor to monitor the patient remotely (connected via an IoT based platform ThingSpeak). ESP8266 wi-fi microchip is used to provide internet connectivity to our project (or we can connect our project to any wifi using same). The system consists of a pulse sensor and and an LM35 temperature sensor which measures the patient's heart beats per minute and body temperature respectively. The Arduino reads the sensor data, converts them into string, passes them to the IoT platform (ThingSpeak) and also displays the BPM and body temperature on LCD display.
In this way a doctor can remotely monitor the patients and take appropriate actions when required.
Class materials for teaching the basic use of Arduino with LED, button, debouncing concept and Serial output. These materials were originally used in Startathon 2016.
The code is available here. https://github.com/SustainableLivingLab/intro-to-arduino
Getting started with Arduino Programming can be daunting. These are slides I used in my classes which introduced programming concepts to non-engineers, non-programmers, but totally people who wanted to learn more about electronics.
Arduino Workshop Day 2 - Advance Arduino & DIYVishnu
Arduino Workshop Day 2 - IR, Ultrasonic & Temperature - Humidity Sensor Interfacing & Do It Yourself - Line Follower, Light Follower & Obstacle Avoider.
Internet of Things (IoT) conceptualizes the idea of remotely connecting and monitoring real world objects (things) through the Internet [1]. When it comes to our house, this concept can be aptly incorporated to make it smarter, safer and automated. This IoT project focuses on building a smart wireless home security system which sends alerts to the owner by using Internet in case of any trespass and raises an alarm optionally. Besides, the same can also be utilized for home automation by making use of the same set of sensors. The leverage obtained by prefering this system over the similar kinds of existing systems is that the alerts and the status sent by the wifi connected microcontroller managed system can be received by the user on his phone from any distance irrespective of whether his mobile phone is connected to the internet. The microcontroller used in the current prototype is the TI-CC3200 Launchpad board which comes with an embedded micro-controller and an onboard Wi-Fi shield making use of which all the elctrical appliances inside the home can be controlled and managed.
Arduino is an open-source platform that allows users to create interactive electronics projects. It consists of a microcontroller board, which is essentially a small computer, and various input and output pins that can be programmed using the Arduino Integrated Development Environment (IDE). The platform is relatively inexpensive and easy to use, making it popular among hobbyists, students, and professionals alike.
The Arduino board is the heart of the platform, and it comes in different variations that cater to different projects. At the center of the board is a microcontroller, which is essentially a small computer that controls the inputs and outputs of the board.
In addition to the microcontroller, the board also has various input and output pins that can be used to connect different sensors and actuators to the board. These pins allow the board to interact with the outside world and perform different functions depending on the project.
Visit https://robomart.com/ for more info
Arduino UNO R3 - Buy Online Arduino UNO R3 Compatible Board-AR-134-D at Lowest Price in India at Campus Component.
This Article Discusses about Different Types of Arduino Boards like the Arduino UNO (R3), LilyPad, Red Board, Mega (R3) & Arduino Leonardo.
Visit- https://www.campuscomponent.com/categories/arduino_board/2208614000002321121
Arduino first and foremost is an open-source computer hardware and software company. The Arduino Communityrefers to the project and user community that designs and utilizes microcontroller-based development boards. These development boards are known as Arduino Modules, which are open-source prototyping platforms.
This presentation gives overview of arduino, arduino board types and arduino software (IDE)
https://www.arduino.cc/en/guide/introduction
https://www.elprocus.com/different-types-of-arduino-boards/
Kubernetes & AI - Beauty and the Beast !?! @KCD Istanbul 2024Tobias Schneck
As AI technology is pushing into IT I was wondering myself, as an “infrastructure container kubernetes guy”, how get this fancy AI technology get managed from an infrastructure operational view? Is it possible to apply our lovely cloud native principals as well? What benefit’s both technologies could bring to each other?
Let me take this questions and provide you a short journey through existing deployment models and use cases for AI software. On practical examples, we discuss what cloud/on-premise strategy we may need for applying it to our own infrastructure to get it to work from an enterprise perspective. I want to give an overview about infrastructure requirements and technologies, what could be beneficial or limiting your AI use cases in an enterprise environment. An interactive Demo will give you some insides, what approaches I got already working for real.
The Art of the Pitch: WordPress Relationships and SalesLaura Byrne
Clients don’t know what they don’t know. What web solutions are right for them? How does WordPress come into the picture? How do you make sure you understand scope and timeline? What do you do if sometime changes?
All these questions and more will be explored as we talk about matching clients’ needs with what your agency offers without pulling teeth or pulling your hair out. Practical tips, and strategies for successful relationship building that leads to closing the deal.
Accelerate your Kubernetes clusters with Varnish CachingThijs Feryn
A presentation about the usage and availability of Varnish on Kubernetes. This talk explores the capabilities of Varnish caching and shows how to use the Varnish Helm chart to deploy it to Kubernetes.
This presentation was delivered at K8SUG Singapore. See https://feryn.eu/presentations/accelerate-your-kubernetes-clusters-with-varnish-caching-k8sug-singapore-28-2024 for more details.
Securing your Kubernetes cluster_ a step-by-step guide to success !KatiaHIMEUR1
Today, after several years of existence, an extremely active community and an ultra-dynamic ecosystem, Kubernetes has established itself as the de facto standard in container orchestration. Thanks to a wide range of managed services, it has never been so easy to set up a ready-to-use Kubernetes cluster.
However, this ease of use means that the subject of security in Kubernetes is often left for later, or even neglected. This exposes companies to significant risks.
In this talk, I'll show you step-by-step how to secure your Kubernetes cluster for greater peace of mind and reliability.
GDG Cloud Southlake #33: Boule & Rebala: Effective AppSec in SDLC using Deplo...James Anderson
Effective Application Security in Software Delivery lifecycle using Deployment Firewall and DBOM
The modern software delivery process (or the CI/CD process) includes many tools, distributed teams, open-source code, and cloud platforms. Constant focus on speed to release software to market, along with the traditional slow and manual security checks has caused gaps in continuous security as an important piece in the software supply chain. Today organizations feel more susceptible to external and internal cyber threats due to the vast attack surface in their applications supply chain and the lack of end-to-end governance and risk management.
The software team must secure its software delivery process to avoid vulnerability and security breaches. This needs to be achieved with existing tool chains and without extensive rework of the delivery processes. This talk will present strategies and techniques for providing visibility into the true risk of the existing vulnerabilities, preventing the introduction of security issues in the software, resolving vulnerabilities in production environments quickly, and capturing the deployment bill of materials (DBOM).
Speakers:
Bob Boule
Robert Boule is a technology enthusiast with PASSION for technology and making things work along with a knack for helping others understand how things work. He comes with around 20 years of solution engineering experience in application security, software continuous delivery, and SaaS platforms. He is known for his dynamic presentations in CI/CD and application security integrated in software delivery lifecycle.
Gopinath Rebala
Gopinath Rebala is the CTO of OpsMx, where he has overall responsibility for the machine learning and data processing architectures for Secure Software Delivery. Gopi also has a strong connection with our customers, leading design and architecture for strategic implementations. Gopi is a frequent speaker and well-known leader in continuous delivery and integrating security into software delivery.
Dev Dives: Train smarter, not harder – active learning and UiPath LLMs for do...UiPathCommunity
💥 Speed, accuracy, and scaling – discover the superpowers of GenAI in action with UiPath Document Understanding and Communications Mining™:
See how to accelerate model training and optimize model performance with active learning
Learn about the latest enhancements to out-of-the-box document processing – with little to no training required
Get an exclusive demo of the new family of UiPath LLMs – GenAI models specialized for processing different types of documents and messages
This is a hands-on session specifically designed for automation developers and AI enthusiasts seeking to enhance their knowledge in leveraging the latest intelligent document processing capabilities offered by UiPath.
Speakers:
👨🏫 Andras Palfi, Senior Product Manager, UiPath
👩🏫 Lenka Dulovicova, Product Program Manager, UiPath
Connector Corner: Automate dynamic content and events by pushing a buttonDianaGray10
Here is something new! In our next Connector Corner webinar, we will demonstrate how you can use a single workflow to:
Create a campaign using Mailchimp with merge tags/fields
Send an interactive Slack channel message (using buttons)
Have the message received by managers and peers along with a test email for review
But there’s more:
In a second workflow supporting the same use case, you’ll see:
Your campaign sent to target colleagues for approval
If the “Approve” button is clicked, a Jira/Zendesk ticket is created for the marketing design team
But—if the “Reject” button is pushed, colleagues will be alerted via Slack message
Join us to learn more about this new, human-in-the-loop capability, brought to you by Integration Service connectors.
And...
Speakers:
Akshay Agnihotri, Product Manager
Charlie Greenberg, Host
UiPath Test Automation using UiPath Test Suite series, part 4DianaGray10
Welcome to UiPath Test Automation using UiPath Test Suite series part 4. In this session, we will cover Test Manager overview along with SAP heatmap.
The UiPath Test Manager overview with SAP heatmap webinar offers a concise yet comprehensive exploration of the role of a Test Manager within SAP environments, coupled with the utilization of heatmaps for effective testing strategies.
Participants will gain insights into the responsibilities, challenges, and best practices associated with test management in SAP projects. Additionally, the webinar delves into the significance of heatmaps as a visual aid for identifying testing priorities, areas of risk, and resource allocation within SAP landscapes. Through this session, attendees can expect to enhance their understanding of test management principles while learning practical approaches to optimize testing processes in SAP environments using heatmap visualization techniques
What will you get from this session?
1. Insights into SAP testing best practices
2. Heatmap utilization for testing
3. Optimization of testing processes
4. Demo
Topics covered:
Execution from the test manager
Orchestrator execution result
Defect reporting
SAP heatmap example with demo
Speaker:
Deepak Rai, Automation Practice Lead, Boundaryless Group and UiPath MVP
UiPath Test Automation using UiPath Test Suite series, part 3DianaGray10
Welcome to UiPath Test Automation using UiPath Test Suite series part 3. In this session, we will cover desktop automation along with UI automation.
Topics covered:
UI automation Introduction,
UI automation Sample
Desktop automation flow
Pradeep Chinnala, Senior Consultant Automation Developer @WonderBotz and UiPath MVP
Deepak Rai, Automation Practice Lead, Boundaryless Group and UiPath MVP
Key Trends Shaping the Future of Infrastructure.pdfCheryl Hung
Keynote at DIGIT West Expo, Glasgow on 29 May 2024.
Cheryl Hung, ochery.com
Sr Director, Infrastructure Ecosystem, Arm.
The key trends across hardware, cloud and open-source; exploring how these areas are likely to mature and develop over the short and long-term, and then considering how organisations can position themselves to adapt and thrive.
Software Delivery At the Speed of AI: Inflectra Invests In AI-Powered QualityInflectra
In this insightful webinar, Inflectra explores how artificial intelligence (AI) is transforming software development and testing. Discover how AI-powered tools are revolutionizing every stage of the software development lifecycle (SDLC), from design and prototyping to testing, deployment, and monitoring.
Learn about:
• The Future of Testing: How AI is shifting testing towards verification, analysis, and higher-level skills, while reducing repetitive tasks.
• Test Automation: How AI-powered test case generation, optimization, and self-healing tests are making testing more efficient and effective.
• Visual Testing: Explore the emerging capabilities of AI in visual testing and how it's set to revolutionize UI verification.
• Inflectra's AI Solutions: See demonstrations of Inflectra's cutting-edge AI tools like the ChatGPT plugin and Azure Open AI platform, designed to streamline your testing process.
Whether you're a developer, tester, or QA professional, this webinar will give you valuable insights into how AI is shaping the future of software delivery.
DevOps and Testing slides at DASA ConnectKari Kakkonen
My and Rik Marselis slides at 30.5.2024 DASA Connect conference. We discuss about what is testing, then what is agile testing and finally what is Testing in DevOps. Finally we had lovely workshop with the participants trying to find out different ways to think about quality and testing in different parts of the DevOps infinity loop.
2. At the end of this module students must:
Know what is Arduino
Identify the reasons why Arduino is commonly used
Identify and understand the Hardware needed in
creating Arduino projects
Know how to Install Arduino IDE
Learning Outcomes
4. Arduino is an open-source electronics platform
based on easy-to-use hardware and software.
Arduino boards are able to read inputs - light
on a sensor, a finger on a button, or a Twitter
message - and turn it into an output - activating
a motor, turning on an LED, publishing
something online.
5. You can tell your board what to do by sending
a set of instructions to the microcontroller on
the board.
To do so you use the Arduino programming
language (based on Wiring), and the Arduino
Software (IDE), based on Processing.
6. INTRODUCTION
Over the years Arduino has been the
brain of thousands of projects, from
everyday objects to complex scientific
instruments.
A worldwide community of makers -
students, hobbyists, artists,
programmers, and professionals - has
gathered around this opensource
platform, their contributions have added
up to an incredible amount of accessible
knowledge that can be of great help to
novices and experts alike.
7. ORIGIN OF ARDUINO
The Arduino board started
changing to adapt to new
needs and challenges,
differentiating its offer from
simple 8-bit boards to
products for IoT applications,
wearable, 3D printing, and
embedded environments
All Arduino boards are
completely open-source,
empowering users to
build them independently
and eventually adapt them
to their particular needs.
The software, too, is
open-source, and it is
growing through the
contributions of users
worldwide.
Arduino was born at the
Ivrea Interaction Design
Institute as an easy tool
for fast prototyping,
aimed at students
without a background in
electronics and
programming.
8. It runs on Mac,
Windows, and Linux.
Teachers and students
use it to build low cost
scientific instruments,
to prove chemistry and
physics principles, or
to get started with
programming and
robotics.
WHY ARDUINO?
Its simple and
accessible user
experience, Arduino
has been used in
thousands of
different projects and
applications.
9. WHY ARDUINO?
Arduino is a key tool to learn new things.
Anyone - children, hobbyists, artists,
programmers - can start tinkering just
following the step by step instructions of
a kit, or sharing ideas online with other
members of the Arduino community.
Designers and
architects build
interactive
prototypes, musicians
and artists use it for
installations and to
experiment with new
musical instruments.
10. Arduino also simplifies the process of working
with microcontrollers, but it offers some advantage
for teachers, students, and interested amateurs
over other systems:
11. 1) Inexpensive - Arduino
boards are relatively
inexpensive compared to
other microcontroller
platforms. The least
expensive version of the
Arduino module can be
assembled by hand, and
even the pre-assembled
Arduino modules cost
less than Php 2,500.00
Advantages of Arduino
12. 2) Cross-platform -
The Arduino Software
(IDE) runs on
Windows, Macintosh
OSX, and Linux
operating systems.
Most microcontroller
systems are limited
to Windows
13. 3)Simple, clear programming
environment - The Arduino
Software (IDE) is easy-to-use
for beginners, yet flexible
enough for advanced users to
take advantage of as well.
For teachers, it's conveniently
based on the Processing
programming environment, so
students learning to program in
that environment will be
familiar with how the Arduino
IDE works.
14. 4) Open source and extensible
software - The Arduino software is
published as open source tools, available
for extension by experienced
programmers.
The language can be expanded through
C++ libraries, and people wanting to
understand the technical details can
make the leap from Arduino to the AVR C
programming language on which it's
based. Similarly, you can add AVR-C code
directly into your Arduino programs if you
want to.
15. 5) Open source and
extensible hardware -
The plans of the Arduino
boards are published under a
Creative Commons license,
so experienced circuit
designers can make their
own version of the module,
extending it and improving it.
Even relatively inexperienced
users can build the
breadboard version of the
module in order to
understand how it works and
save money.
17. Types of Arduino Boards
Arduino is a great platform for prototyping projects and
inventions but can be confusing when having to choose the
right board.
If you’re brand new to this, you might have always thought that
there was just one “Arduino” board and that’s it.
In reality, there are many variations of the official Arduino
boards and then there are hundreds more from competitors who
offer clones.
The boards with the name Arduino on them are the official
boards but there are also a lot of really great clones on the
market as well.
One of the best reasons to buy a clone is the fact they are
generally less expensive than their official counterpart.
18. Arduino UNO
Arduino UNO is based on an ATmega328P
microcontroller. It is easy to use compared
to other boards, such as the Arduino
Mega board, etc.
The Arduino UNO includes 6 analog pin
inputs, 14 digital pins, a USB connector, a
power jack, and an ICSP (In-Circuit Serial
Programming) header.
It is the most used and of standard form
from the list of all available Arduino
Boards. It is also recommended for
beginners as it is easy to use.
19. Arduino Nano
The Arduino Nano is a small Arduino board
based on ATmega328P or ATmega628
Microcontroller.
The connectivity is the same as the
Arduino UNO board.
The Nano board is defined as a
sustainable, small, consistent, and flexible
microcontroller board.
It is small in size compared to the UNO
board.
The devices required to start our projects
using the Arduino Nano board are
Arduino IDE and mini USB.
The Arduino Nano includes an I/O pin
set of 14 digital pins and 8 analog
pins. It also includes 6 Power pins and
2 Reset pins.
20. Arduino Leonardo
The basic specification of the
Arduino Leonardo is the same as
the Arduino Micro.
It is also based on ATmega32U4
Microcontroller.
The components present on the
board are 20 analog and digital
pins, reset button, 16MHz crystal
oscillator, ICSP header, and a
micro USB connection.
21. Arduino MICRO
The Arduino Micro is based on the
ATmega32U4 Microcontroller.
It consists of 20 sets of pins. The 7
pins from the set are PWM (Pulse
Width Modulation) pins, while 12 pins
are analog input pins. The other
components on board are reset
button, 16MHz crystal oscillator, ICSP
header, and a micro USB connection.
The USB is inbuilt in the Arduino
Micro board.
The Arduino Micro is also called as the
shrunk version of Arduino Leonardo.
22. Arduino Lilypad
The Arduino LilyPad was initially created for
wearable projects and e-textiles. It is based
on the ATmega168 Microcontroller.
The functionality of Lilypad is the same as
other Arduino Boards.
It is a round, light-weight board with a
minimal number of components to keep the
size of board small.
The Arduino Lilypad board was designed
by Sparkfun and Leah. It was developed by Leah
Buechley.
It has 9 digital I/O pins.
23. Other Arduino boards
are Arduino Shields,
Arduino Bluetooth
Arduino Diecimila
Arduino Robot Arduino
Ethernet Arduino Zero
Arduino Esplora
Arduino Pro Micro and
many more.
24. One of the most popular Arduino
boards out there is the Arduino
Uno. While it was not actually the
first board to be released, it
remains to be the most actively
used and most widely
documented on the market.
Because of its extreme
popularity, the Arduino Uno has a
ton of project tutorials and
forums around the web that can
help you get started or out of a
jam.
The Arduino UNO
Board Breakdown
25. Here are the components that make up an Arduino
board and what each of their functions are.
1. Reset Button – This will restart any code that is loaded to the Arduino
board
2. AREF – Stands for “Analog Reference” and is used to set an external
reference voltage
3. Ground Pin – There are a few ground pins on the Arduino and they all work
the same
4. Digital Input/Output – Pins 0-13 can be used for digital input or output
5. PWM – The pins marked with the (~) symbol can simulate analog output
6. USB Connection – Used for powering up your Arduino and uploading
sketches
7. TX/RX – Transmit and receive data indication LEDs
26. Here are the components that make up an Arduino
board and what each of their functions are.
8. ATmega Microcontroller – This is the brains and is where the programs are
stored
9. Power LED Indicator – This LED lights up anytime the board is plugged in a power
sourceate youth in the world
10. Voltage Regulator – This controls the amount of voltage going into the Arduino
board
11. DC Power Barrel Jack – This is used for powering your Arduino with a power
supply
12. 3.3V Pin – This pin supplies 3.3 volts of power to your projects
13. 5V Pin – This pin supplies 5 volts of power to your projects
14. Ground Pins – There are a few ground pins on the Arduino and they all work the
same
15. Analog Pins – These pins can read the signal from an analog sensor and convert
it to digital