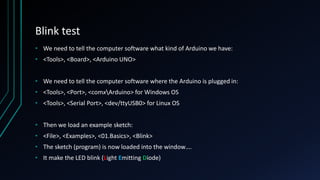
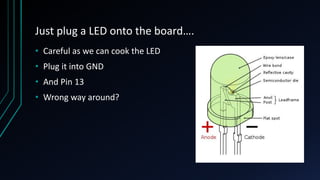
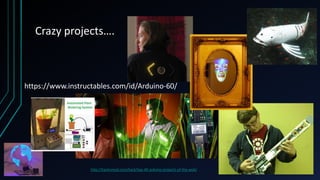
An Arduino Workshop
A MICROCONTROLLER
What is Arduino?
• An open source platform (from Italy)
• At its heart is a microcontroller, a computer on a chip
• It is in effect a small computer
• A microcontroller (sometimes abbreviated µC, uC or MCU) is a small
computer on a single integrated circuit containing a processor core,
memory, and programmable input/output peripherals.
• The majority of microcontrollers in use today are embedded in other
machinery, such as automobiles, telephones, appliances, and peripherals
for computer systems
• www.Arduino.cc – Free 140MB download
Robotics at University
Thingiverse.com
USB Interface chip Digital Connections
Microcontroller
(Atmega 328)
Reset Button
USB Port
Crystal
5V regulator
Power
(7-12V DC input)
Power Connectors Analog Inputs
Serial
Programming
Connector
Transmit (TX)
Receive (RX)
In more detail
• Digital pins 3,5,6,9,10 &
11 can do pulse with
modulation PWM
(variable output) can
be noted ~
• ‘add 14’
Arduino can do 16 million
instructions per second (16MHz)
How much do they cost?
• $75 for a kit
Where to start?
• Come up with your own little project
• Explore some crazy ideas
• Look it up on the internet
• Modify others’ blocks of code to your purposes
• Then expand, get a kit, learn some more tools and try some more
projects
There is more than a few types….
Before we start, handling the boards…
• Once they are powered up please don’t touch the boards
• Our fingers can create a short circuit on the board and ZAP it
‘Hello’ – of in our case Mr Blinky
• We are going to plug our Arduino into the computer.
• Then we create or load a sketch (program) and then upload it to the
Arduino.
• A lot of software programs use a hello command as a test when you
first start.
• The programming language we use with Arduino is called C
• In our case we are going to do a blink test.
Blink test
• We need to tell the computer software what kind of Arduino we have:
• <Tools>, <Board>, <Arduino UNO>
• We need to tell the computer software where the Arduino is plugged in:
• <Tools>, <Port>, <comxArduino> for Windows OS
• <Tools>, <Serial Port>, <dev/ttyUSB0> for Linux OS
• Then we load an example sketch:
• <File>, <Examples>, <01.Basics>, <Blink>
• The sketch (program) is now loaded into the window….
• It make the LED blink (Light Emitting Diode)
‘ello, ‘ello, ‘ello, wot ‘ave we here….
• */ is a comments section
• // are comments (the sign of good coding practice!)
• Void setup is run once at the start to set up the environment
• Void Loop is where the sketch program is mainly written and does
all the work
What does it all mean?
• Arduino is a 5V system, if we plug in a 9V battery we fry things (up
in smoke)
• pinMode sets a particular pin to be either an input or an output
• HIGH means ‘give all she's got Scotty’ = 5V
• LOW means turn ‘off’ = 0V
• Delay means to wait for ‘x’ milli seconds
• digitalWrite is a name of something
Programming Language (jargon)
• pinMode is an Output in this example (rather than an input)
• HIGH and LOW are arguments. They are passed to a function when it is
called.
• Delay is a singular argument. We can split arguments up with comma’s
• digitalWrite is a name of a built-in function, it needs to know where to
pass the information to when it is called. We put this in parentheses {} to
define what is being called.
• The parentheses and the code in between them are know as a block of
code
• We then compile our code and upload it to the Arduino
Compile and Upload
So lets mix it up
• What might happen when you change the delay times?
• Try it
• Change the delay time and upload it to the Arduino
• Observe what happens to the blink rates
Just plug a LED onto the board….
• Careful as we can cook the LED
• Plug it into GND
• And Pin 13
• Wrong way around?
IR Sensor
• <File>, <Examples>, <01.Basics>, <AnalogReadSerial>
• Black = ground
• Red = power
• Other (white) = A0
• Our sensor uses near I/R (black & white)
• Far I/R = heat sensor
Serial Monitor
• Open the serial monitor, the small magnifying glass in the top right
hand corner
• What do we see?
• What happens when you move your hand towards the sensor?
• Why does it stop if you put your hand on it and leave it there?
Make the LED…..
• <File>, <Examples>, <05.Control>, <IfStatementConditional>
• What happens now?
• The LED comes on as we trigger the sensor
Time to get moving….
• <File>, <Examples>, <Servo>, <Sweep>
• 180 servo, what does that mean?
• Red/yellow = power
• Black/brown = ground
• ‘other’ (orange) = comm’s
• Which pin do we use for the orange connector?
• Pin 9
Move when I move….
• <File>, <Examples>, <Servo>, <Knob>
• The servo now changes drive direction based on you triggering the
sensor
The problem with servos….
• They make bad wheels!
• Replace the 180 servo with an unlimited servo
Lets make some noise
• Replace the LED with a speaker
• <File>, <Examples>, <0.1Basic>, <Blink>
• Why does it work?
• How does it work? What are sound waves?
Sounds good to me…
• <File>, <Examples>, <02.Digital>, <toneMelody>
• Read the sketch
• Change the numbers and modify the tune
Ta Da!
• We have added sensors and had things respond to the world
around them
• We have modified code
• We have repurposed code to what we want it to do
• https://circuits.io/
Crazy projects….
http://hacknmod.com/hack/top-40-arduino-projects-of-the-web/
https://www.instructables.com/id/Arduino-60/

13223971.ppt

  • 1.
    An Arduino Workshop AMICROCONTROLLER
  • 2.
    What is Arduino? •An open source platform (from Italy) • At its heart is a microcontroller, a computer on a chip • It is in effect a small computer • A microcontroller (sometimes abbreviated µC, uC or MCU) is a small computer on a single integrated circuit containing a processor core, memory, and programmable input/output peripherals. • The majority of microcontrollers in use today are embedded in other machinery, such as automobiles, telephones, appliances, and peripherals for computer systems • www.Arduino.cc – Free 140MB download
  • 3.
  • 4.
  • 6.
    USB Interface chipDigital Connections Microcontroller (Atmega 328) Reset Button USB Port Crystal 5V regulator Power (7-12V DC input) Power Connectors Analog Inputs Serial Programming Connector Transmit (TX) Receive (RX)
  • 7.
    In more detail •Digital pins 3,5,6,9,10 & 11 can do pulse with modulation PWM (variable output) can be noted ~ • ‘add 14’ Arduino can do 16 million instructions per second (16MHz)
  • 8.
    How much dothey cost? • $75 for a kit
  • 9.
    Where to start? •Come up with your own little project • Explore some crazy ideas • Look it up on the internet • Modify others’ blocks of code to your purposes • Then expand, get a kit, learn some more tools and try some more projects
  • 10.
    There is morethan a few types….
  • 11.
    Before we start,handling the boards… • Once they are powered up please don’t touch the boards • Our fingers can create a short circuit on the board and ZAP it
  • 12.
    ‘Hello’ – ofin our case Mr Blinky • We are going to plug our Arduino into the computer. • Then we create or load a sketch (program) and then upload it to the Arduino. • A lot of software programs use a hello command as a test when you first start. • The programming language we use with Arduino is called C • In our case we are going to do a blink test.
  • 13.
    Blink test • Weneed to tell the computer software what kind of Arduino we have: • <Tools>, <Board>, <Arduino UNO> • We need to tell the computer software where the Arduino is plugged in: • <Tools>, <Port>, <comxArduino> for Windows OS • <Tools>, <Serial Port>, <dev/ttyUSB0> for Linux OS • Then we load an example sketch: • <File>, <Examples>, <01.Basics>, <Blink> • The sketch (program) is now loaded into the window…. • It make the LED blink (Light Emitting Diode)
  • 15.
    ‘ello, ‘ello, ‘ello,wot ‘ave we here…. • */ is a comments section • // are comments (the sign of good coding practice!) • Void setup is run once at the start to set up the environment • Void Loop is where the sketch program is mainly written and does all the work
  • 16.
    What does itall mean? • Arduino is a 5V system, if we plug in a 9V battery we fry things (up in smoke) • pinMode sets a particular pin to be either an input or an output • HIGH means ‘give all she's got Scotty’ = 5V • LOW means turn ‘off’ = 0V • Delay means to wait for ‘x’ milli seconds • digitalWrite is a name of something
  • 17.
    Programming Language (jargon) •pinMode is an Output in this example (rather than an input) • HIGH and LOW are arguments. They are passed to a function when it is called. • Delay is a singular argument. We can split arguments up with comma’s • digitalWrite is a name of a built-in function, it needs to know where to pass the information to when it is called. We put this in parentheses {} to define what is being called. • The parentheses and the code in between them are know as a block of code • We then compile our code and upload it to the Arduino
  • 18.
  • 19.
    So lets mixit up • What might happen when you change the delay times? • Try it • Change the delay time and upload it to the Arduino • Observe what happens to the blink rates
  • 20.
    Just plug aLED onto the board…. • Careful as we can cook the LED • Plug it into GND • And Pin 13 • Wrong way around?
  • 21.
    IR Sensor • <File>,<Examples>, <01.Basics>, <AnalogReadSerial> • Black = ground • Red = power • Other (white) = A0 • Our sensor uses near I/R (black & white) • Far I/R = heat sensor
  • 22.
    Serial Monitor • Openthe serial monitor, the small magnifying glass in the top right hand corner • What do we see? • What happens when you move your hand towards the sensor? • Why does it stop if you put your hand on it and leave it there?
  • 23.
    Make the LED….. •<File>, <Examples>, <05.Control>, <IfStatementConditional> • What happens now? • The LED comes on as we trigger the sensor
  • 24.
    Time to getmoving…. • <File>, <Examples>, <Servo>, <Sweep> • 180 servo, what does that mean? • Red/yellow = power • Black/brown = ground • ‘other’ (orange) = comm’s • Which pin do we use for the orange connector? • Pin 9
  • 25.
    Move when Imove…. • <File>, <Examples>, <Servo>, <Knob> • The servo now changes drive direction based on you triggering the sensor
  • 26.
    The problem withservos…. • They make bad wheels! • Replace the 180 servo with an unlimited servo
  • 27.
    Lets make somenoise • Replace the LED with a speaker • <File>, <Examples>, <0.1Basic>, <Blink> • Why does it work? • How does it work? What are sound waves?
  • 28.
    Sounds good tome… • <File>, <Examples>, <02.Digital>, <toneMelody> • Read the sketch • Change the numbers and modify the tune
  • 29.
    Ta Da! • Wehave added sensors and had things respond to the world around them • We have modified code • We have repurposed code to what we want it to do • https://circuits.io/
  • 30.