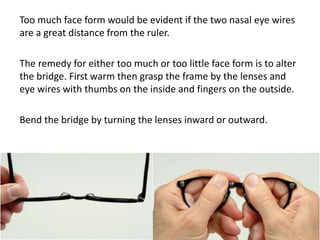
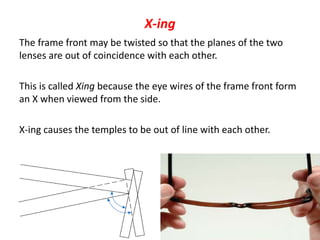
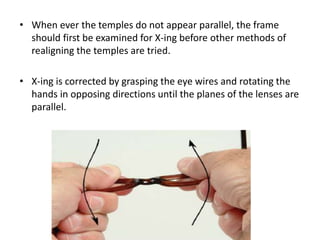
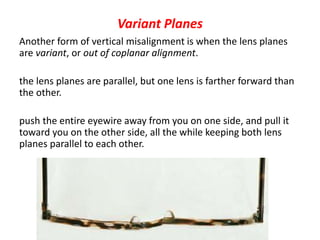
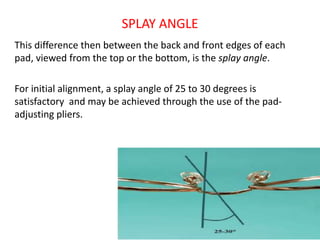
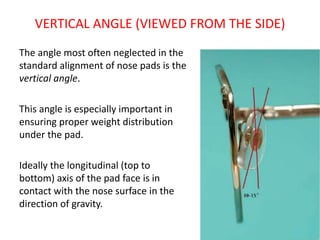
2. STANDARD ALIGNMENT OR “TRUING” OF FRAMES
- adjusted to certain impersonal standards that are
independent of the type of face to which it is to be fitted.
- The best time to pre adjust is when the prescription is being
verified.
3. “Truing” spectacles is a good starting point for adjusting them,
especially spectacles that have been worn for a long time
without recent adjustment.
A general rule for standard alignment is to begin with the bridge,
then work with the end pieces, and handle the temples last.
4. • Obviously, changes made in one part of a frame may influence
the alignment in another part.
• Bending the bridge, for example, may change the relationship
of the temples.
• Handling the bridge first, and the other parts in order, helps to
eliminate having to go back and realign parts.
5. Adjustable plastic frames must almost always be heated to be
aligned.
Metal frames and parts do not require heating, except for metal
parts that are covered with plastic.
6. Standard Alignment of Plastic Frames
HEATING THE FRAME
Standard plastic frames must be heated for any alignment.
Standard procedure for adjusting the frame should be followed,
beginning with the bridge.
Only that area of the frame requiring adjustment should be
heated to avoid the possibility of disturbing an aligned area by
mistake.
7.
8. THE BRIDGE
Readjusting the lenses to their proper planes is accomplished by
first heating the bridge area, then grasping the frame by the lens
areas and adjusting according to the correction desired.
When using a salt pan to heat the bridge, stir the salt in the pan
and form it into a centrally located peak running across the pan.
9. • Place the frame in the pan, temples up, and draw the bridge
through the peak of the salt mound.
• Repeat until the bridge is pliable enough to be bent.
10. Move the bridge through the hot air stream until it becomes
pliable.
If one lens is higher than the other, they are said to be out of
horizontal alignment.
If one lens appears to be farther forward or backward than the
other, they are said to be out of vertical alignment.
11. Horizontal Alignment
It is not easy to check for horizontal alignment of a plastic frame
because there are not always clear reference points.
To check for horizontal alignment, place a ruler or straight edge
across the back of the frame at the top of the pads.
Both endpieces should be equidistant.
Causes: Rotated Lens
Skewed Bridge
12. Vertical Alignment (Four-Point Touch)
To check place a ruler or straight edge so that its edge goes
across the inside of the entire front of the spectacles below the
nose pad area.
Theoretically the frame eyewire should touch at four points on
the ruler
13. Face Form
Face form or wraparound is when the frame front is just slightly
rounded to the form of the face.
Frames with face form will not conform to the four point touch
test, but must be symmetrical nonetheless.
The temporal sides of the eyewires should touch, and the nasal
sides should be equidistant from the ruler.
14. Too much face form would be evident if the two nasal eye wires
are a great distance from the ruler.
The remedy for either too much or too little face form is to alter
the bridge. First warm then grasp the frame by the lenses and
eye wires with thumbs on the inside and fingers on the outside.
Bend the bridge by turning the lenses inward or outward.
15. X-ing
The frame front may be twisted so that the planes of the two
lenses are out of coincidence with each other.
This is called Xing because the eye wires of the frame front form
an X when viewed from the side.
X-ing causes the temples to be out of line with each other.
16. • When ever the temples do not appear parallel, the frame
should first be examined for X-ing before other methods of
realigning the temples are tried.
• X-ing is corrected by grasping the eye wires and rotating the
hands in opposing directions until the planes of the lenses are
parallel.
17. Variant Planes
Another form of vertical misalignment is when the lens planes
are variant, or out of coplanar alignment.
the lens planes are parallel, but one lens is farther forward than
the other.
push the entire eyewire away from you on one side, and pull it
toward you on the other side, all the while keeping both lens
planes parallel to each other.
18. THE TEMPLES
The open temple spread is checked first because the
adjustments may affect the end pieces.
After this, temple parallelism is considered, followed by
alignment of the temple ends.
Finally the temple fold angle is corrected.
.
19. Open Temple Spread
The open temple spread, or let-back, is that angle that each open
temple forms in relationship to the front of the frame.
To afford a true picture of the temple spread initially, the temple
shafts must be straight.
Any curve to the temple shaft should be eliminated by heating
the temple and straightening it with the hands.
It is the normal condition of the temple to be opened out
slightly farther than a 90-degree angle; usually 94-95 degrees.
20. Temple Parallelism
For frames to be in standard alignment, the temples need to be
parallel to one another and should not be angled down more than
the other.
When looking at the glasses from the side, the angles the temples
make with the frame front determine temple parallelism.
Pantoscopic angle is the angle the frame front deviates from the
vertical when the glasses are held with the temples horizontal.
Viewing the frames from the side, when the lower rims of the frame
front are closer to the face than are the upper rims.
21. • A proper pantoscopic angle may vary from as little as 4
degrees up to 18 degrees.
• If the glasses were to be adjusted so that the lower rims are
tilted outward from the face, the glasses are said to have
“retroscopic” instead of pantoscopic tilt.
• In any case, to test whether or not the temples are parallel,
position the glasses upside-down on a flat surface with the
temples open.
22. if both temples sit flat or if one temple is not touching the flat
surface.
If it is difficult to tell, first touch one temple and then the other
to see if the frame wobbles back and forth or if it sits solidly.
This procedure is known as the flat surface touch test. If the
frame wobbles, it needs correction or it will sit on the face at an
angle.
23. Temple-Fold Angle
The final alignment step is to fold the temples to the closed
position and observe the angle formed as the temples cross.
The temples should fold so that they are parallel to one another
or form slight angles from parallel.
These angles should be symmetrical and should cross each other
exactly in the center of the frame, in line with the center of the
bridge.
Proper adjustment to this confi guration permits the spectacle to
easily fit into a standard case for glasses.
24. Standard Alignment of Metal Frames
The primary difference lies in the methods of manipulation used
to bring the frame into alignment and the presence of adjustable
nose pads.
Metal frames require heating only in those places where plastic
coats the metal.
All other bends are done “cold.” Pliers are used for the majority
of adjustments.
25. THE BRIDGE
Horizontal Alignment
To check for horizontal alignment of a metal frame, place a ruler
or straight edge across the front of the frame at the point of
attachment of the pad arms.
In most frames, the endpieces will be considerably higher than
the level of the pad arms, making the horizontal alignment
judgment difficult.
The end pieces should be equidistant from the ruler.
Causes : Rotated Lens
Skewed Bridge
26. Vertical Alignment (Four-Point Touch)
As when performing the four-point touch test with plastic
frames, a ruler or straight edge is necessary to determine
whether or not the frame is in alignment.
Metal frame construction is so varied, however, that establishing
a four-point touch when straddling the inner parts of the frame
eye wires is more often impossible than possible.
The test is used to analyze the symmetry of the frame front.
27. Face Form
Metal frames are usually designed with face form, especially in the
larger eye sizes.
When checking vertical alignment, there are two questions to keep
in mind:
1. Does the frame have a four-point touch or a face form curve?
2. If the frame has face form, are the two nasal eye wires
equidistant from the ruler or is one farther from it than the other?
28. Standard Alignment of Nose pads
final adjustment of the pads will vary extensively with the
individual shape and flare of the nose of the intended wearer.
There are three basic angles that are used for reference when
aligning nose pads.
These are the frontal, splay, and vertical angles.
29. FRONTAL ANGLE (VIEWED FROM THE FRONT)
The frontal angle of the nose pads refers to the vertical position of the
pads in relation to each other when viewed from the front.
The tops of the pads should be closer together than the bottoms,
angling in toward each other approximately 20 degrees from a true
vertical.
Most pads can be “rocked” about a swivel joint. The pads should be
slanted for the frontal angle by the same amount.
30. Pad Spacing
While viewing the frontal angle, observe the amount of space
between the eye wires and pads.
Both pads should be equidistant from their respective eye wires.
An estimated ideal position is for the face of the pads to appear
approximately 1 mm closer to the nose than the eye wire itself.
31. Pad Height
A third point of observation is whether or not both pads occupy
the same horizontal plane.
If one pad appears higher than the other, the pad arm may be
bent upward.
It is essential that both pads be in identical rocking positions
because if one is erect and one is slanted, their heights may
appear dissimilar.
32. SPLAY ANGLE
This difference then between the back and front edges of each
pad, viewed from the top or the bottom, is the splay angle.
For initial alignment, a splay angle of 25 to 30 degrees is
satisfactory and may be achieved through the use of the pad-
adjusting pliers.
33. VERTICAL ANGLE (VIEWED FROM THE SIDE)
The angle most often neglected in the
standard alignment of nose pads is the
vertical angle.
This angle is especially important in
ensuring proper weight distribution
under the pad.
Ideally the longitudinal (top to
bottom) axis of the pad face is in
contact with the nose surface in the
direction of gravity.
34. Standard Alignment of Rimless Eyewear
RIMLESS CONSTRUCTION AND LENS MATERIALS
Rimless are still more difficult to adjust than plastic and metal
frames.
Newer mountings use a variety of methods to give extra stability
to the mounting.
In the past, the lens was held in place with one hole nasally and
one hole temporally.
Now there may be more than one hole, or a hole and an edge
notch used in combination.
35. Appropriate Lens Materials
If appropriate lens materials are used for rimless mountings, lens
chipping is vastly reduced.
the best lens materials for rimless mountings are Trivex and
polycarbonate.
36. ALIGNING THE BRIDGE
Whereas the bridge or pad arm origins and the end pieces serve
as the line of reference for frames, the mounting line serves as a
line of reference for rimless mountings.
The mounting line is defined as “the line which passes through
the points on the eye wires or straps at which the pad arms are
attached.
The end pieces may be attached on this line, or as may be the
case, above or below this line.
37. RIMLESS ADJUSTMENTS
Rimless Nose pad Alignment
The chief distinction in technique is
that the bending of the pad arms
should not be attempted unless the
base of the pad arm is sufficiently
supported to prevent stress on the
mounting point and lens.
This support can be given by holding
the mounting point with rimless
bracing pliers while adjusting the pads
with pad adjusting pliers.
39. Workshop practice guideline
1. Identify lens material.
a. glass b. plastic
2. Identify frame material.
a. plastic( different type) b. metal (different type)
3. Measure spherical SVL? (at least 5 lenses)
4. Measure sphero cyl SVL? ( at least 5 lenses)
5. Measure bifocals? ( at least 3 lenses )
6. Measure progressives? ( at least 2 lenses )
7. Frame selectin, alignment and adjustment?