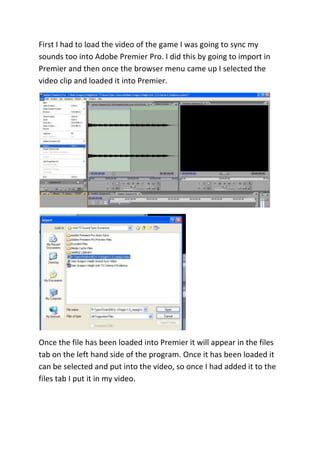
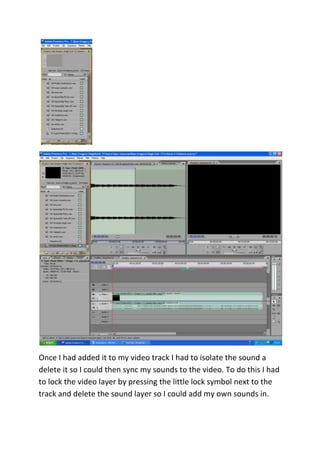
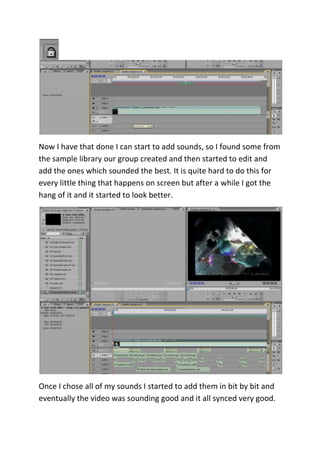
First I had to load the video of the game I was going to sync my
sounds too into Adobe Premier Pro. I did this by going to import in
Premier and then once the browser menu came up I selected the
video clip and loaded it into Premier.


Once the file has been loaded into Premier it will appear in the files
tab on the left hand side of the program. Once it has been loaded it
can be selected and put into the video, so once I had added it to the
files tab I put it in my video.
Once I had added it to my video track I had to isolate the sound a
delete it so I could then sync my sounds to the video. To do this I had
to lock the video layer by pressing the little lock symbol next to the
track and delete the sound layer so I could add my own sounds in.
Now I have that done I can start to add sounds, so I found some from
the sample library our group created and then started to edit and
add the ones which sounded the best. It is quite hard to do this for
every little thing that happens on screen but after a while I got the
hang of it and it started to look better.


Once I chose all of my sounds I started to add them in bit by bit and
eventually the video was sounding good and it all synced very good.
It was at this point I had to render the video.


To render the video I went to file and pressed export and went to the
Adobe Media encoder. Once I did this a window popped up so I could
change my settings and get the video how I wanted it, once I checked
that the settings were ok I pressed ok.


Once I pressed ok the video started to render and once it has fully
rendered I uploaded it to youtube.

Sound Sync Annotations

  • 1.
    First I hadto load the video of the game I was going to sync my sounds too into Adobe Premier Pro. I did this by going to import in Premier and then once the browser menu came up I selected the video clip and loaded it into Premier. Once the file has been loaded into Premier it will appear in the files tab on the left hand side of the program. Once it has been loaded it can be selected and put into the video, so once I had added it to the files tab I put it in my video.
  • 2.
    Once I hadadded it to my video track I had to isolate the sound a delete it so I could then sync my sounds to the video. To do this I had to lock the video layer by pressing the little lock symbol next to the track and delete the sound layer so I could add my own sounds in.
  • 3.
    Now I havethat done I can start to add sounds, so I found some from the sample library our group created and then started to edit and add the ones which sounded the best. It is quite hard to do this for every little thing that happens on screen but after a while I got the hang of it and it started to look better. Once I chose all of my sounds I started to add them in bit by bit and eventually the video was sounding good and it all synced very good.
  • 4.
    It was atthis point I had to render the video. To render the video I went to file and pressed export and went to the Adobe Media encoder. Once I did this a window popped up so I could change my settings and get the video how I wanted it, once I checked that the settings were ok I pressed ok. Once I pressed ok the video started to render and once it has fully rendered I uploaded it to youtube.