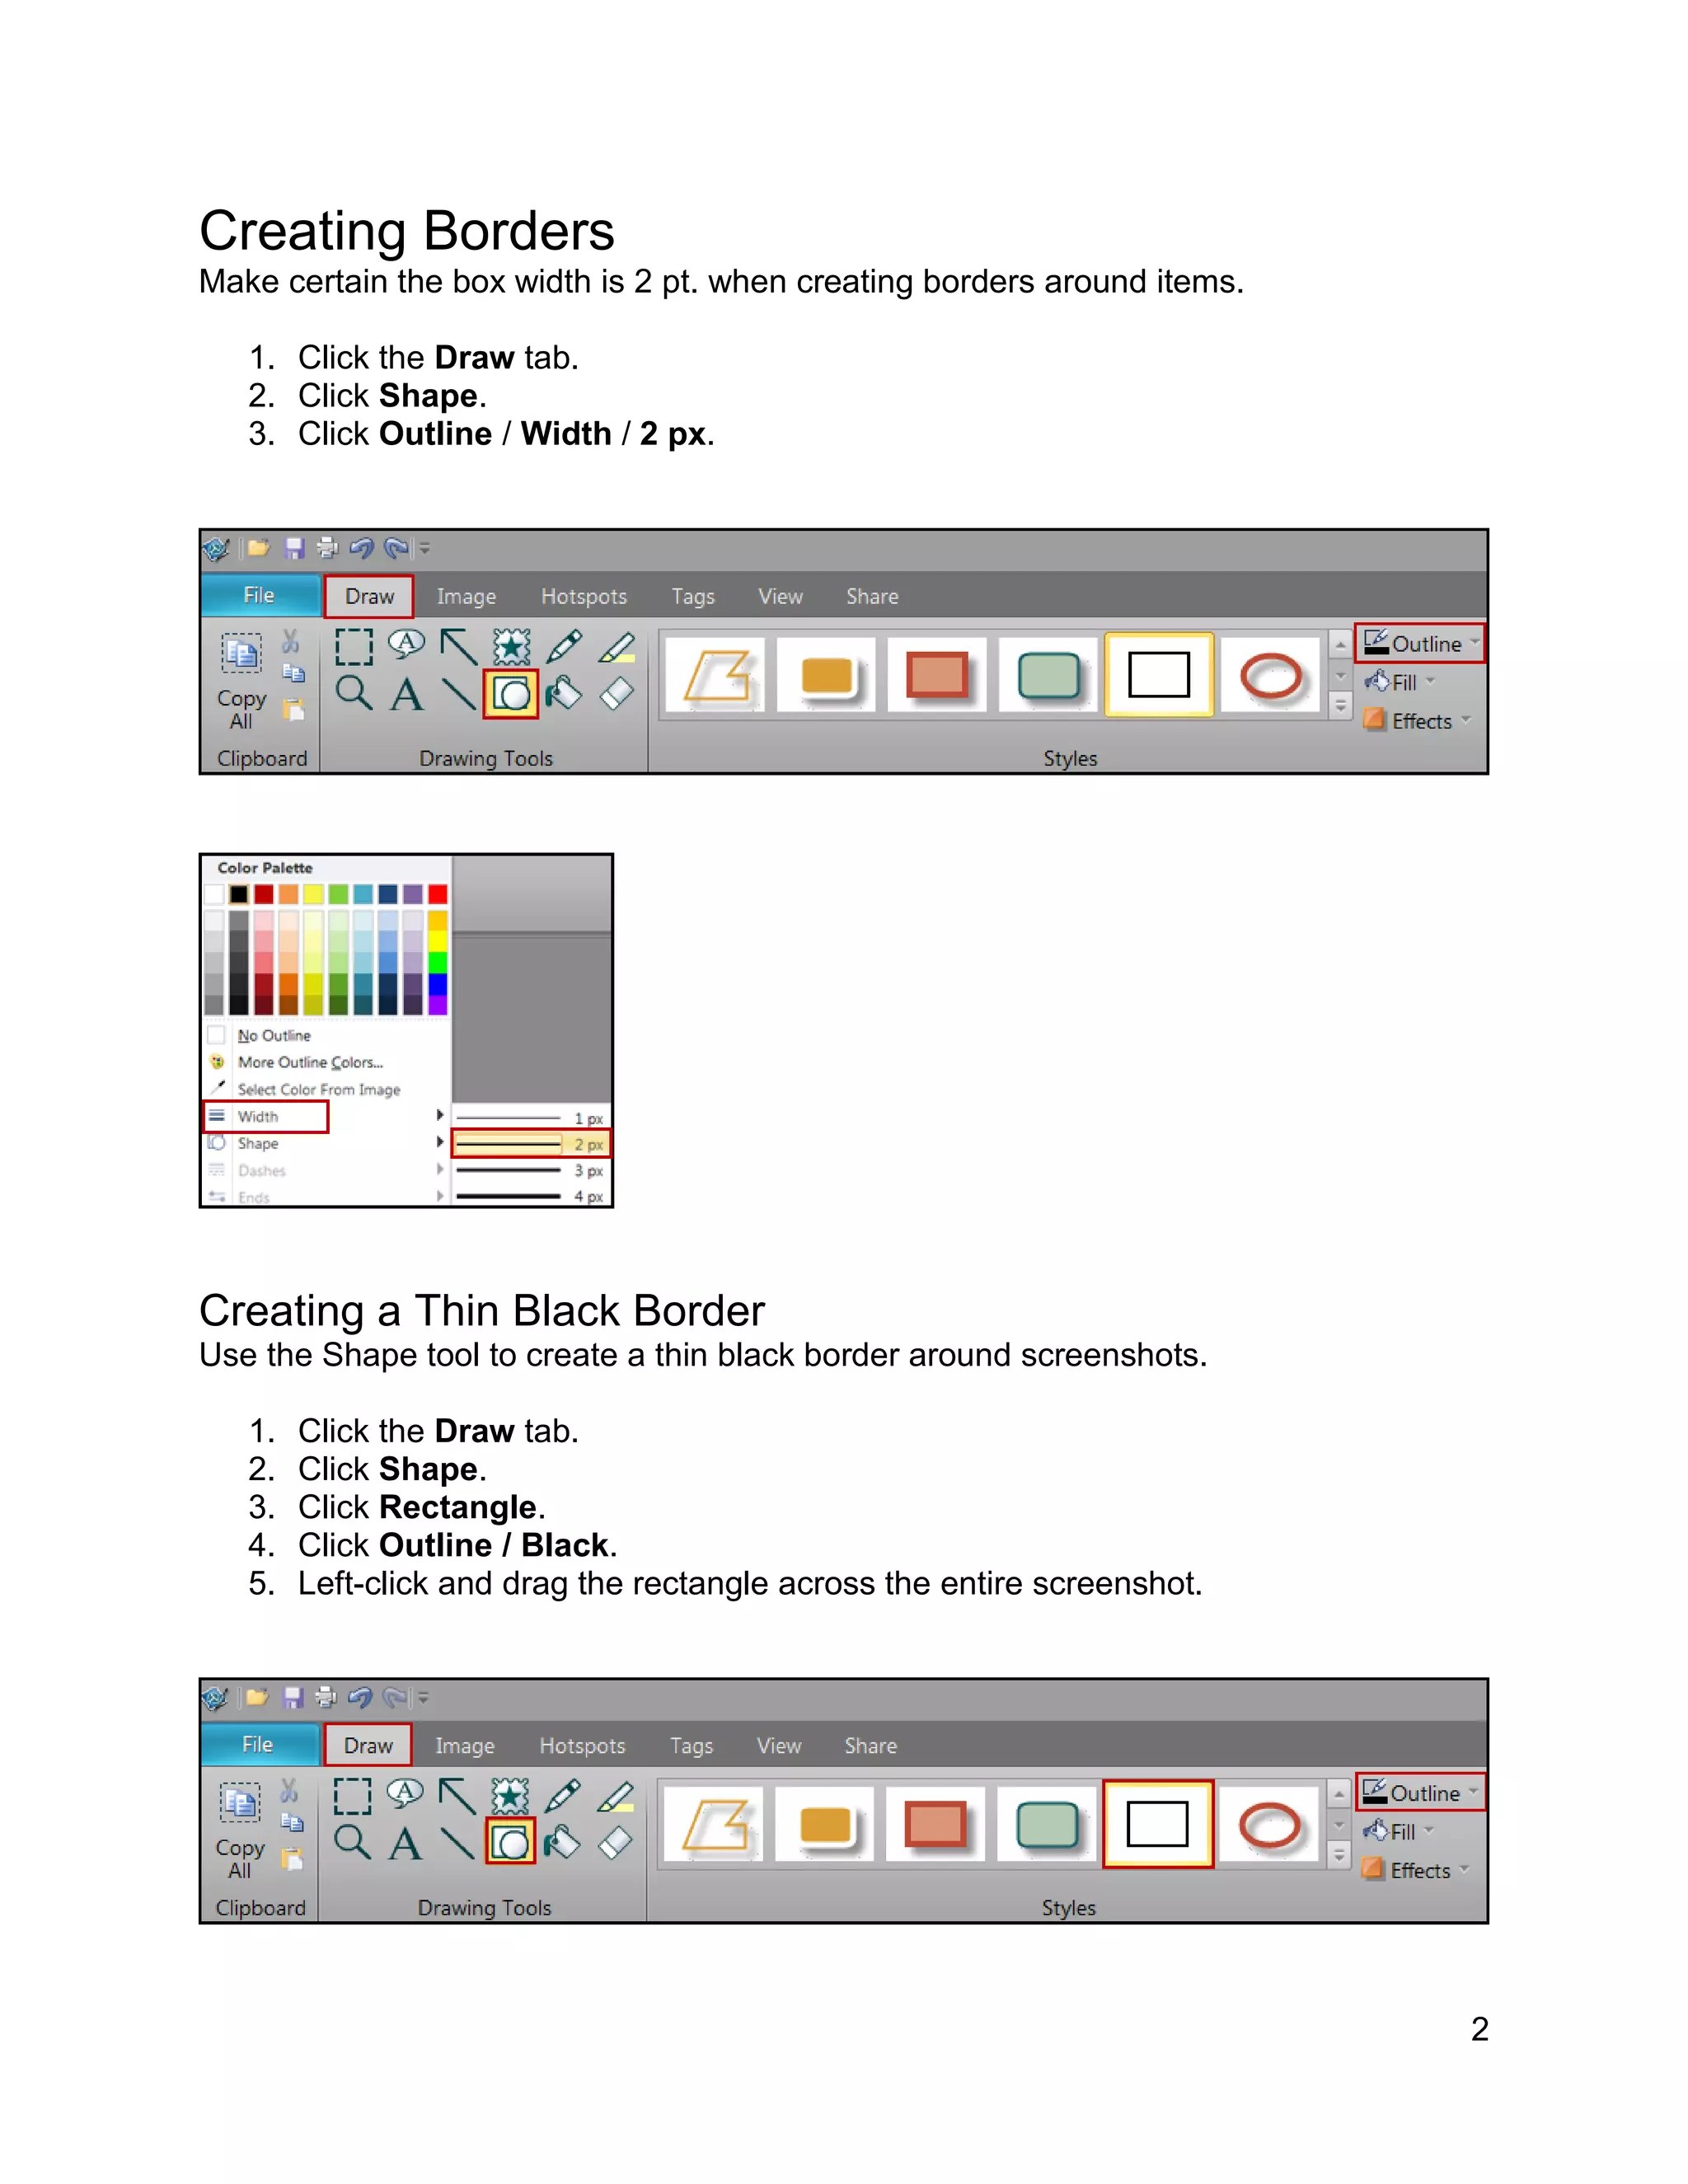
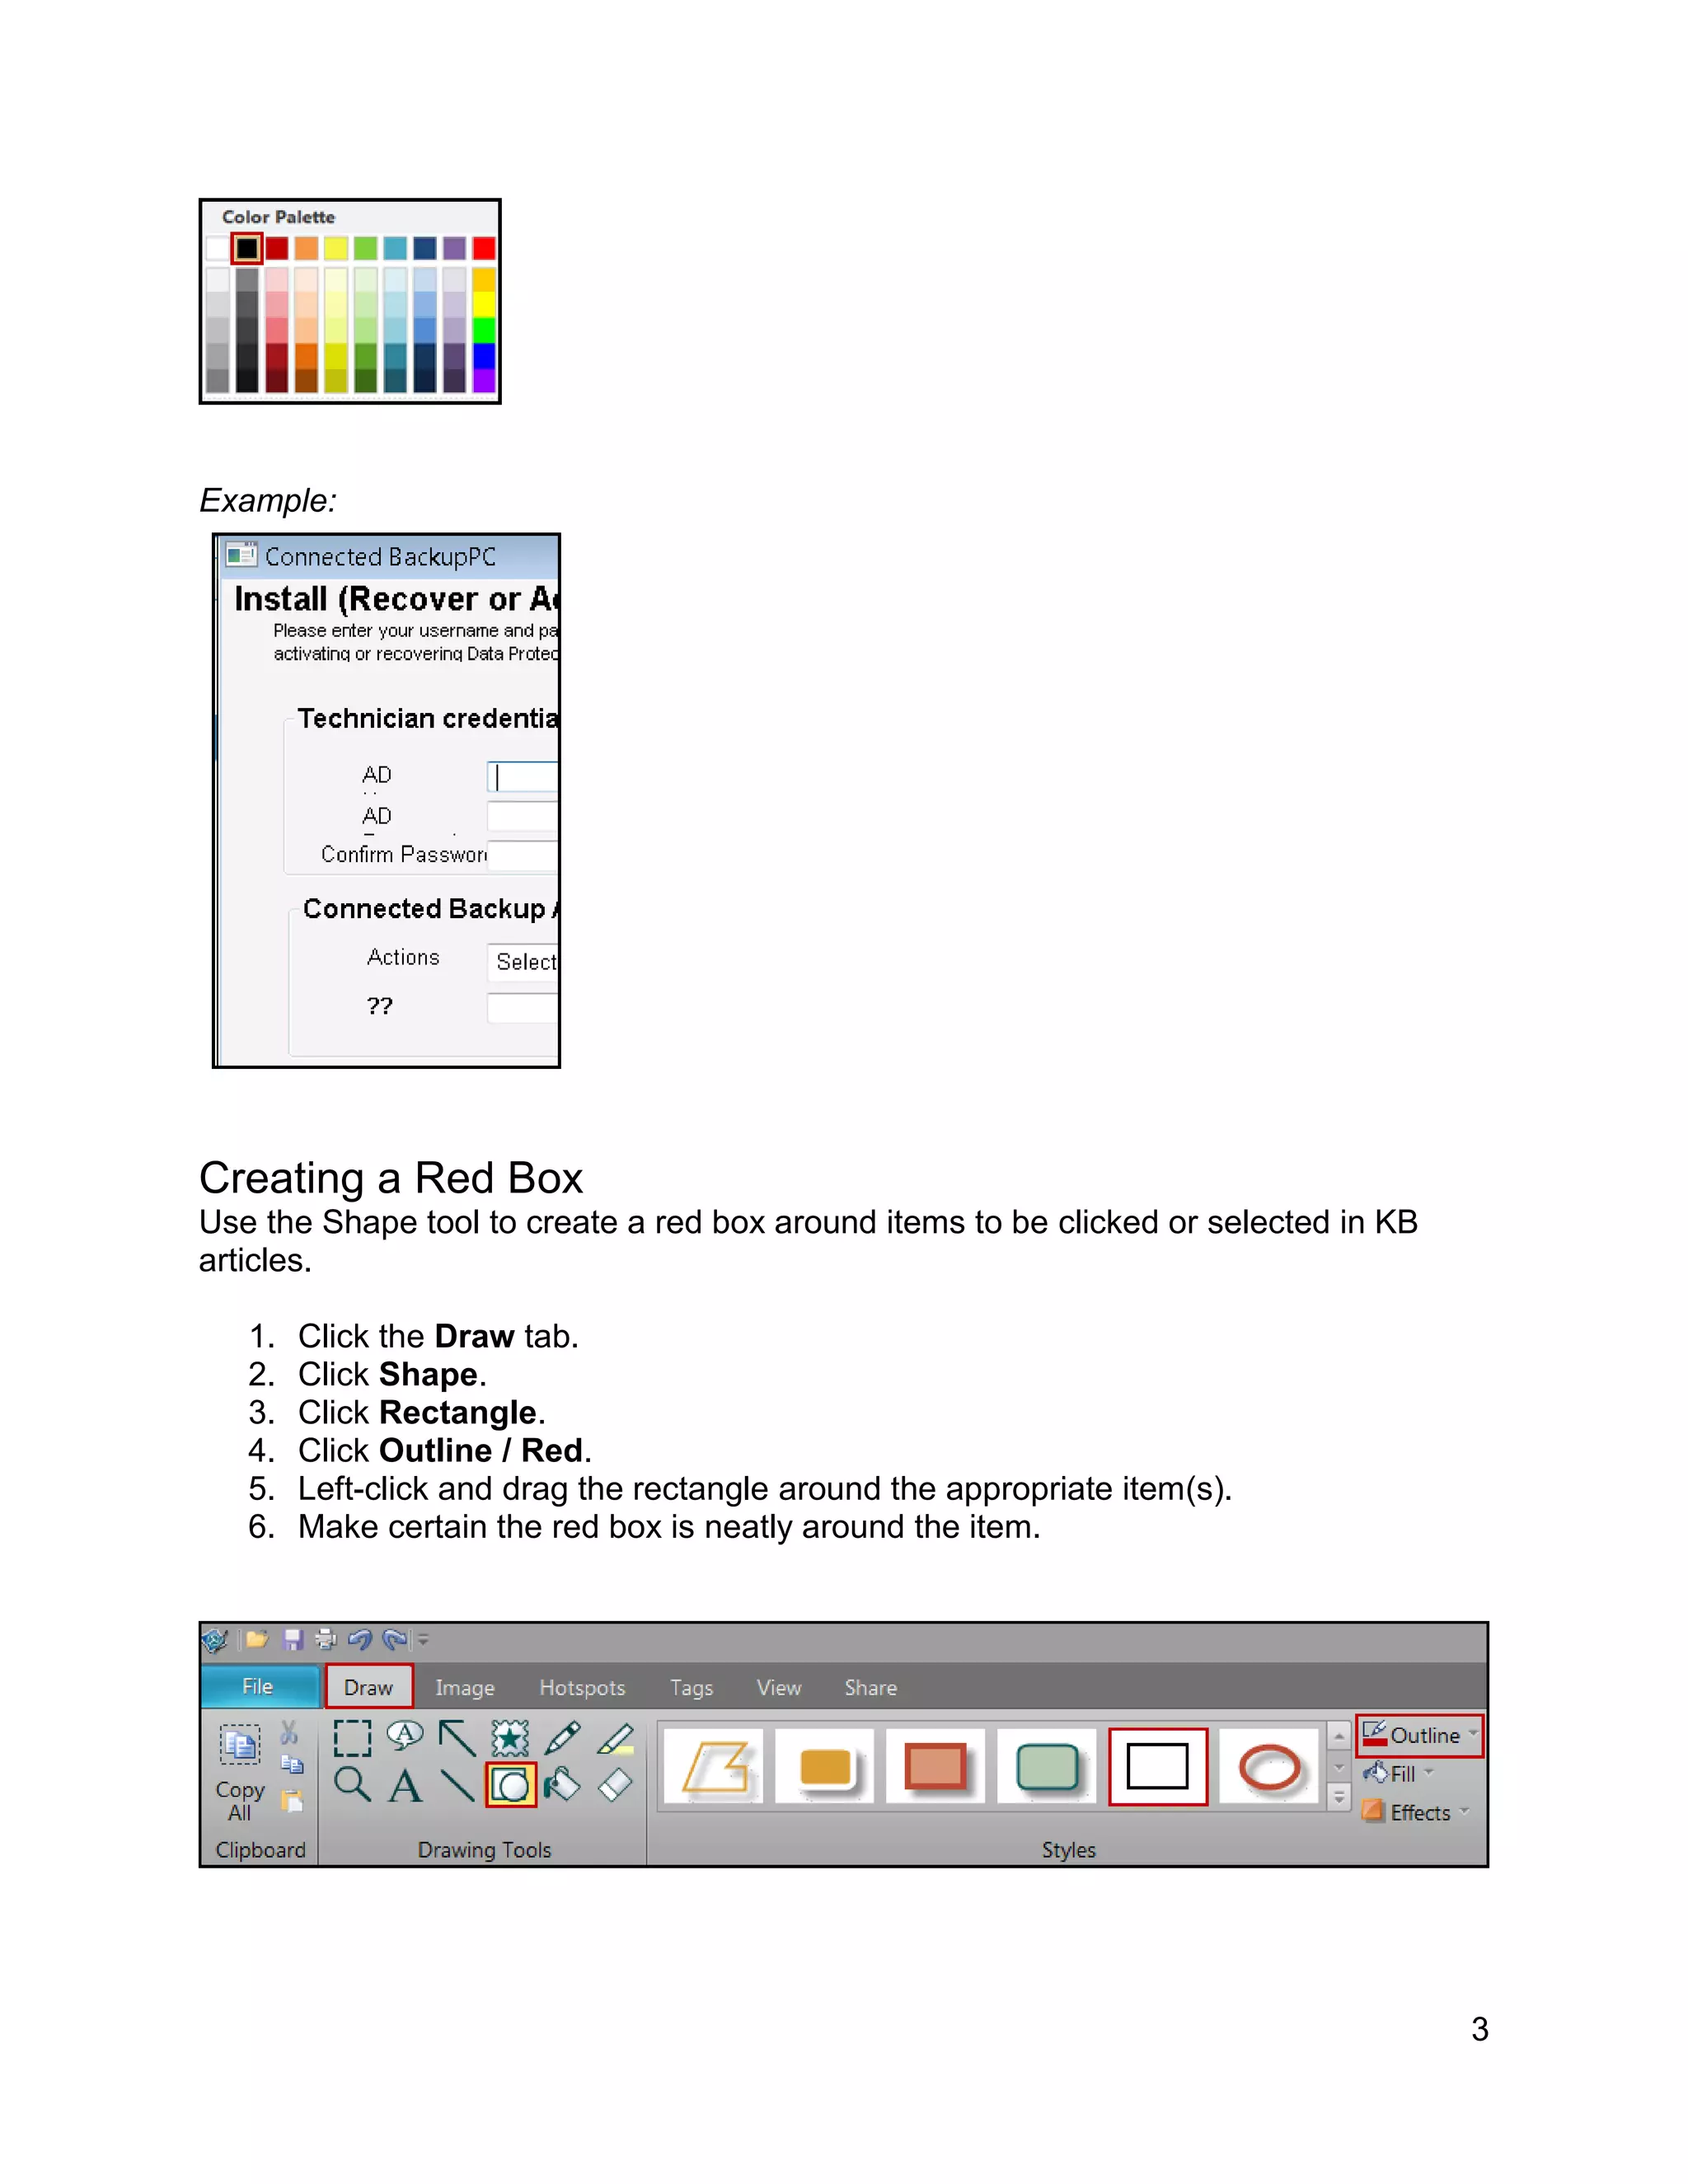
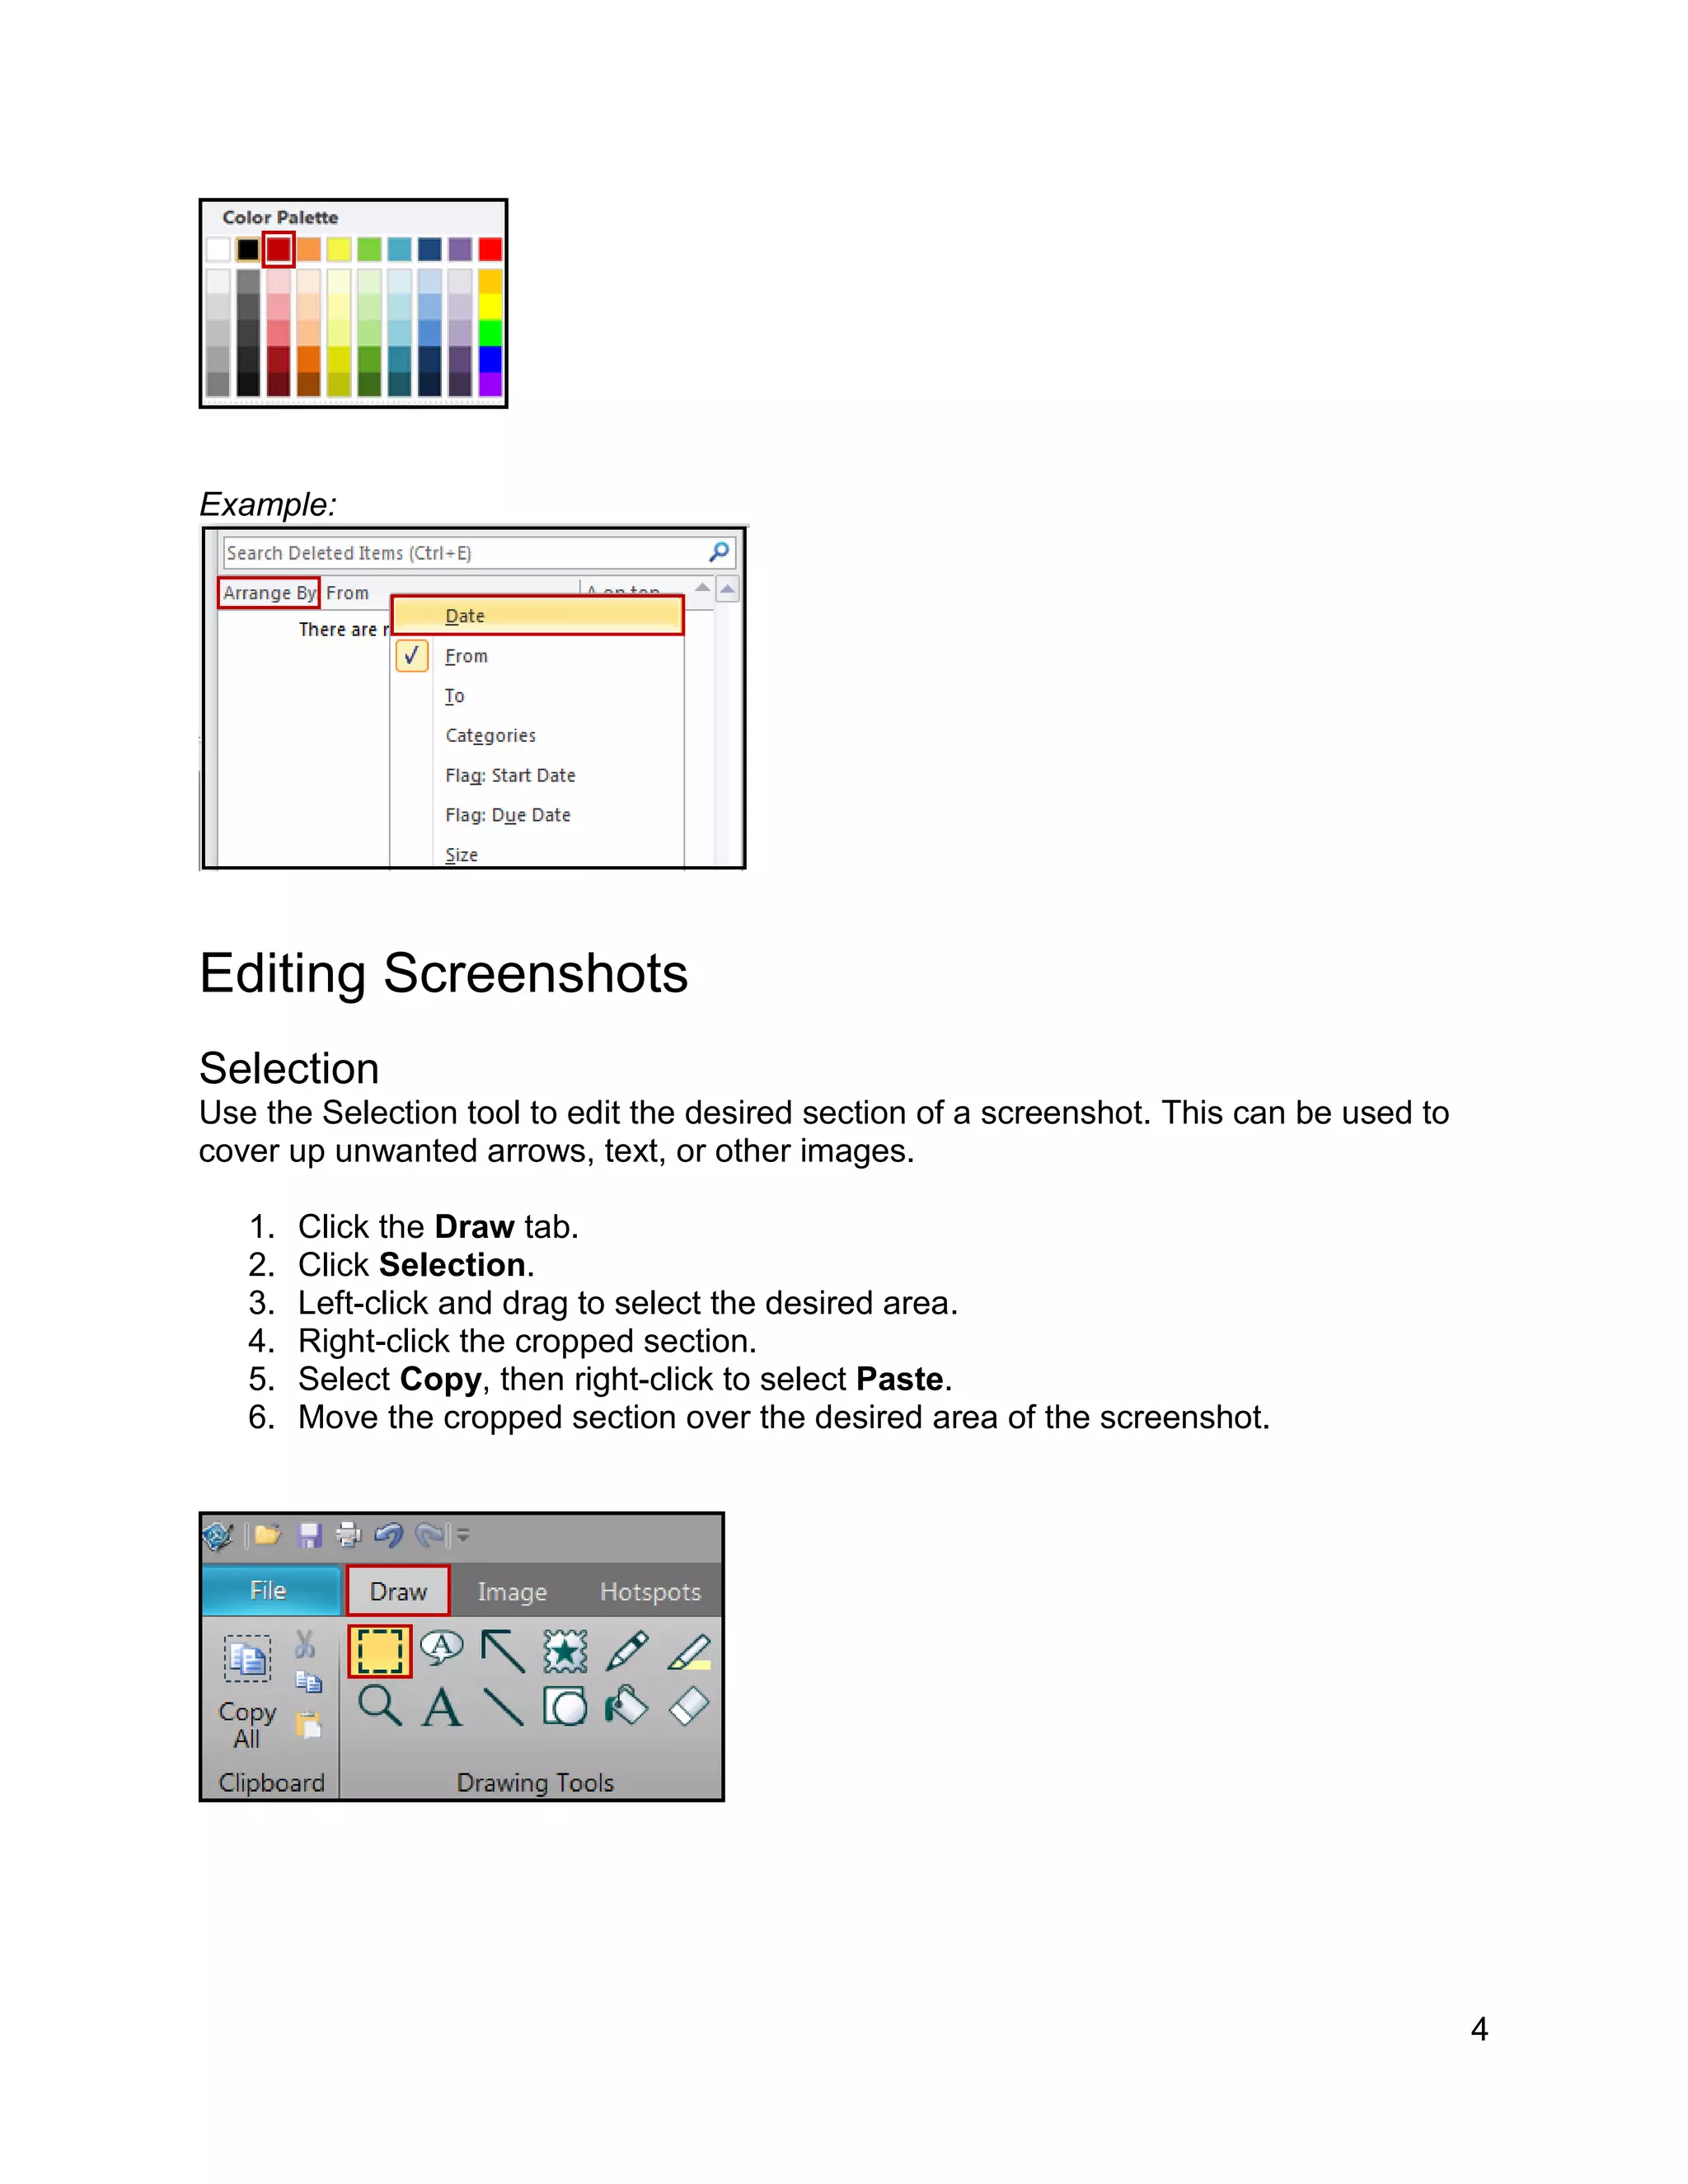
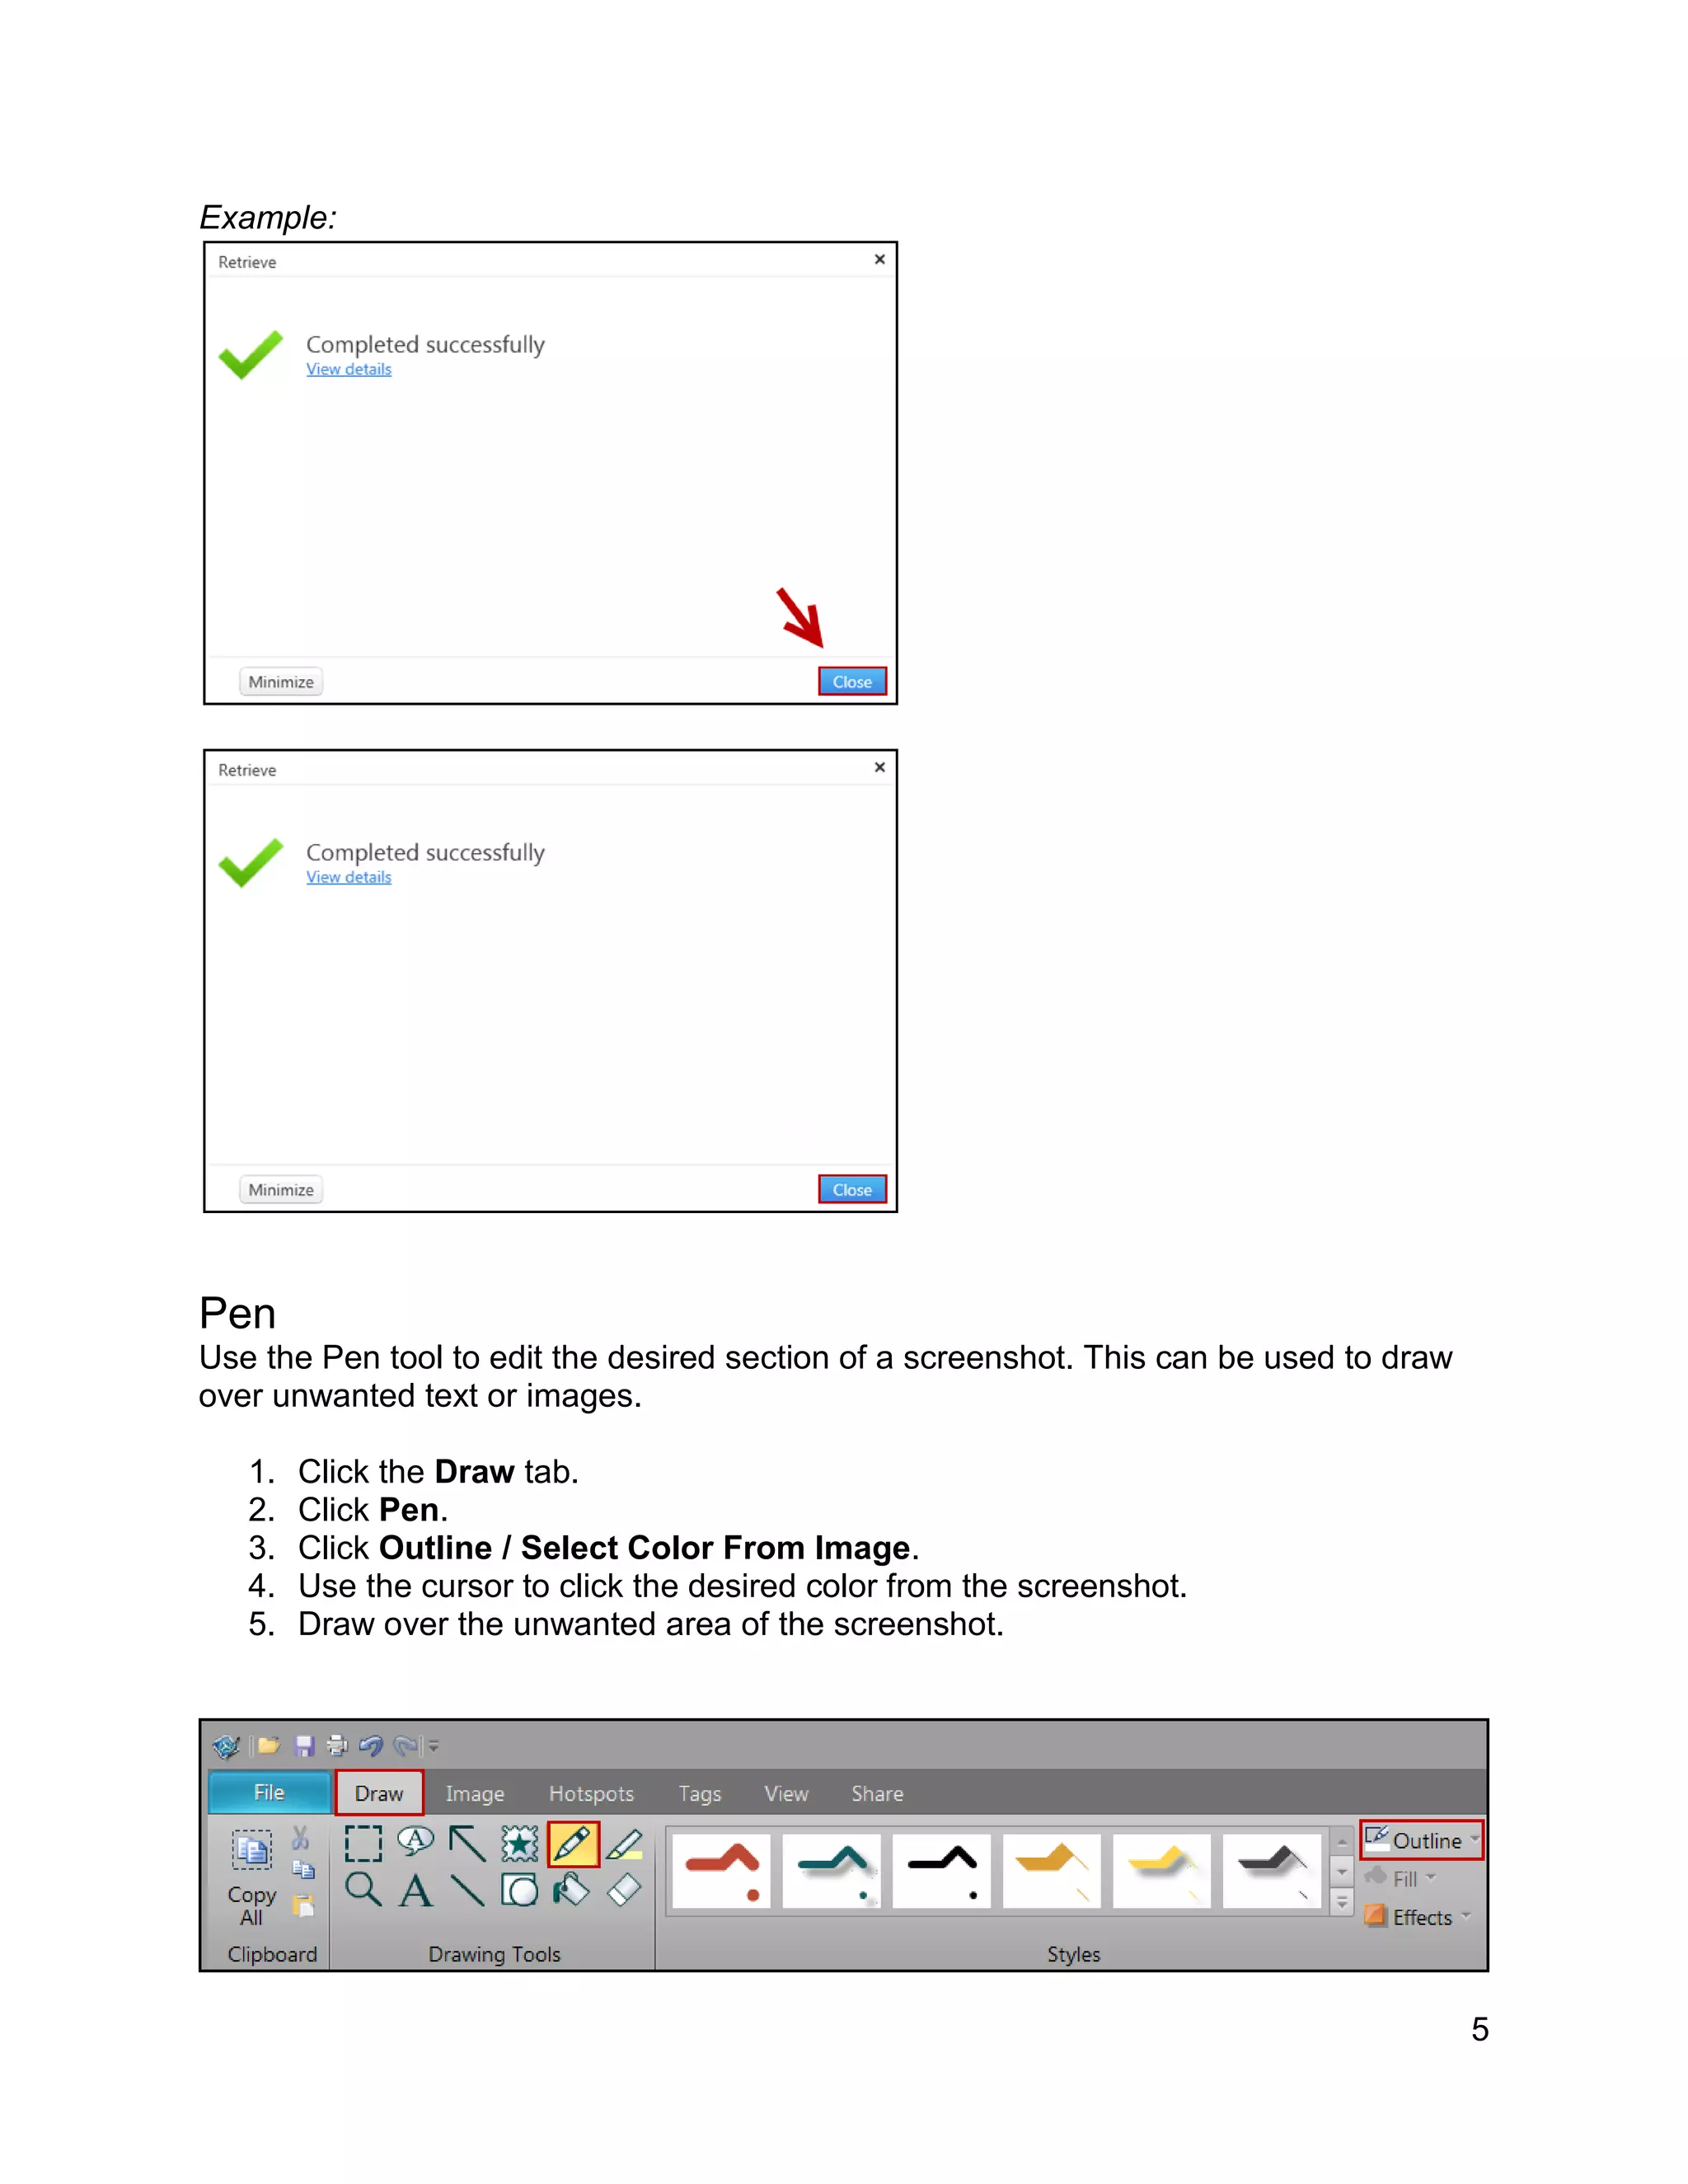
This document provides instructions for using various tools in SnagIt to edit screenshots and images. It describes how to use the shape tool to add borders or boxes, the selection tool to crop areas, the pen tool to draw over unwanted areas, and the resize and crop tools to adjust image size. It concludes by informing the reader that additional help for SnagIt can be found by opening the program's HTML help window.
Get acquainted with the key principles of management. Learn the basic essential principles and prepare excellent management assignments with help & advices from experts
Эффективная мобильная стратегия: что работает и что не работает в mobileOleg Onegov
Почему мобайл - это уже не просто часть маркетинговой стратегии, а ее основа? Как правильно разработать мобильную стратегию: с чего начать, как выбирать площадки и форматы, какие таргетинги использовать? Об этом наш New Busuness Director Иван Федоров рассказывал на iForum 20 апреля.
in this tutorial, we'll learn the essentials of working with----Palettes,Toolbox,Selection Tools,Alteration Tools,Drawing and Selection Tools,Assisting Tools,Color Boxes and Modes,Basic Image Editing ,Cropping, Re-sizing,Correcting,Sharpening/Softening,Saving....
In this tutorial, we'll learn the essentials of working with layers in Photoshop! We'll start by learning how to use the tools -
: Selection Tools,Alteration Tools, Drawing and Selection Tools, Assisting Tools, Color Boxes and Modes, Basic Image Editing, Cropping, Re sizing, Correcting, Sharpening/Softening, Saving
An introductory walkthrough/class, originally designed for tweens (ages 9-12), on using the open-source photo editing program GIMP. The lesson provides an overview of GIMP and walks you through the steps for creating a simple composite image.
Introduction to Adobe Illustrator Basics. Adobe Illustrator lessons (high school level). Explains the difference between bitmap and jpeg. Explains the uses of Adobe Illustrator in the Graphic Design market.
This is a revised session hand out that introduces the basics of image editing to educators. PIXLR Editor is used because, it is Free, intuitive and online.
2. 2
Creating Borders
Make certain the box width is 2 pt. when creating borders around items.
1. Click the Draw tab.
2. Click Shape.
3. Click Outline / Width / 2 px.
Creating a Thin Black Border
Use the Shape tool to create a thin black border around screenshots.
1. Click the Draw tab.
2. Click Shape.
3. Click Rectangle.
4. Click Outline / Black.
5. Left-click and drag the rectangle across the entire screenshot.
3. 3
Example:
Creating a Red Box
Use the Shape tool to create a red box around items to be clicked or selected in KB
articles.
1. Click the Draw tab.
2. Click Shape.
3. Click Rectangle.
4. Click Outline / Red.
5. Left-click and drag the rectangle around the appropriate item(s).
6. Make certain the red box is neatly around the item.
4. 4
Example:
Editing Screenshots
Selection
Use the Selection tool to edit the desired section of a screenshot. This can be used to
cover up unwanted arrows, text, or other images.
1. Click the Draw tab.
2. Click Selection.
3. Left-click and drag to select the desired area.
4. Right-click the cropped section.
5. Select Copy, then right-click to select Paste.
6. Move the cropped section over the desired area of the screenshot.
5. 5
Example:
Pen
Use the Pen tool to edit the desired section of a screenshot. This can be used to draw
over unwanted text or images.
1. Click the Draw tab.
2. Click Pen.
3. Click Outline / Select Color From Image.
4. Use the cursor to click the desired color from the screenshot.
5. Draw over the unwanted area of the screenshot.
7. 7
Resizing an Image
Use the Resize tool to adjust the size of an image. The Pixel Dimensions, Print
Dimensions, and Image Detail can be changed within the Resize Image window.
1. Click the Image tab.
2. Click Resize / Resize Image.
3. Change the appropriate dimensions.
Example:
Cropping an Image
Use the Crop tool to adjust the viewable section of an image.
1. Click the Image tab.
2. Left-click and drag across the image to select the area to be cropped.
3. Click Crop to adjust the size of the image.
8. 8
Example:
Additional Information
For additional information, visit HTML Help in SnagIt.
1. Open SnagIt.
2. Hover over the red capture icon at the top of the screen.
3. Click the Additional options and help icon, and then select Help.
NOTE:
The HTML Help window will now display.