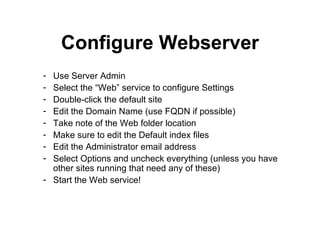
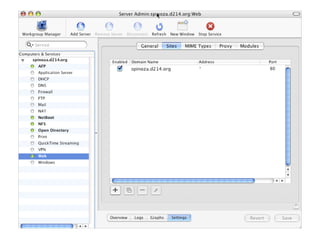
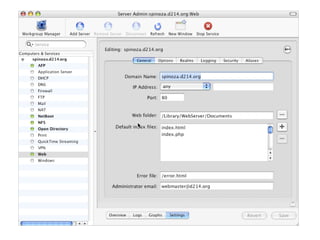
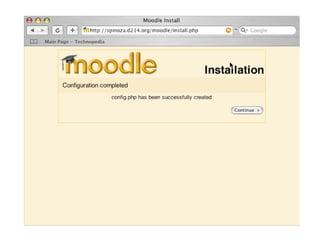
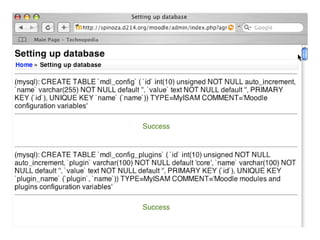
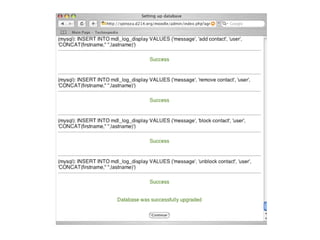
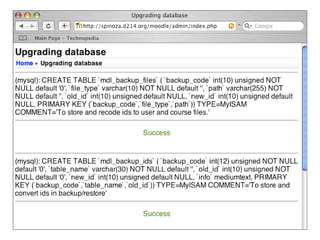
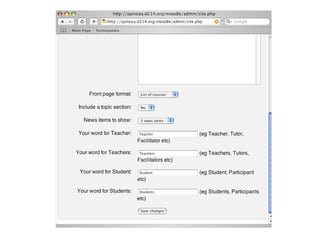
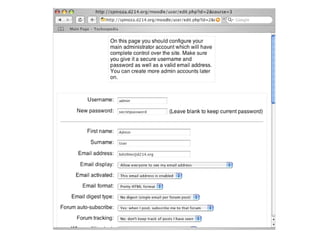
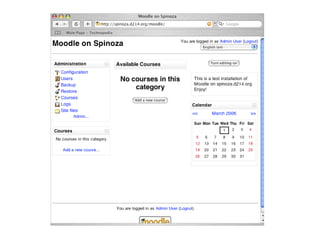
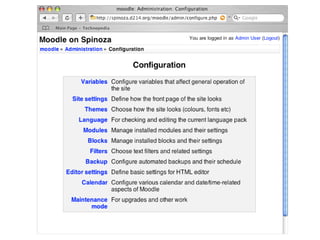
Presented by Diana Clarke and Brian Dichter Behind the Scenes– Serving Moodle
Introduction Moodle is Open Source and relies on several key Open Source applications to do its magic. MySQL database. PHP is server-side scripting language that works especially well with MySQL. Apache is the webserver software on Mac OS X.
Assumptions You know that Moodle is a “software package for producing internet-based courses and web sites, supporting a social constructionist framework of education”. Brand new “vanilla” Mac OS X Server Or, server without PHP/MySQL configured Administrator access to Mac OS X Server Use both GUI and Terminal
Downloads Moodle-latest build (1.5.3+) http://download.moodle.org/ PHP (4.3.11 for Apache 1.3) http://www.entropy.ch/software/macosx/php/ MySQL (Standard 4.0.26) http://dev.mysql.com/downloads/mysql/4.0.html Apache (1.33) Already installed on Mac OS X Server
Downloads–Optional phpMyAdmin http://www.phpmyadmin.net/home_page/index.php MyS QL Administrator http://www.mysql.com/products/tools/administrator/ MySQL Query Browser http://dev.mysql.com/downloads/query-browser/1.1.html
Configure Webserver Use Server Admin Select the “Web” service to configure Settings Double-click the default site Edit the Domain Name (use FQDN if possible) Take note of the Web folder location Make sure to edit the Default index files Edit the Administrator email address Select Options and uncheck everything (unless you have other sites running that need any of these) Start the Web service!


Configure Webserver Visit your site in a browser to test that it’s working (you should see the Apache manual) Clean up your Web folder (I usually delete all of the Apache files…actually, I usually delete everything except the error page)
Install and Test PHP Install the PHP package Create a text file in your Web folder named “info.php” containing the following code: <?php> phpinfo(); ?> Open this page in your browser to test PHP http://yoursite.org/info.php - After successfully testing, delete the “info.php” file.
 
 
Install and Test MySQL Install the MySQL package and the startup item package. User Terminal to start the MySQL server. $ sudo /Library/StartupItems/MySQL/MySQL start Use Terminal and the MySQL Monitor program to check that it’s running (most common error is forgetting to start the server). $ mysql -u root Set and secure the root password. mysql> set password for    > root@localhost=password(‘------’);
 
Install and Test MySQL Delete anonymous accounts. mysql> use mysql; mysql> delete from user where User=‘’; mysql> delete from db where User=‘’; mysql> flush privileges;
 
Install and Test MySQL Create Moodle database and account. mysql> CREATE DATABASE moodle; mysql> GRANT SELECT,INSERT,DELETE,CREATE,DROP,INDEX, > ALTER ON moodle.* TO moodleuser@localhost  > IDENTIFIED BY ‘somesecretpassword’; > quit $ mysqladmin -u root -p reload
Install and Test MySQL Test your new account. $ mysql -u moodleuser -p
Prepare to Install Moodle Create a data directory. $ sudo mkdir /Library/WebServer/moodle-data Change the owner and permissions on the data directory. $ sudo chown www:www /Library/WebServer/moodle-data $ sudo chmod 700 /Library/WebServer/moodle-data
Prepare to Install Moodle Move your Moodle download into your Web folder. Use the Terminal to extract the files (there are a lot of files!). $ tar xvf moodle-latest-15.tar Change the owner of the Moodle directory (or you may get an error). $ sudo chown www:www /Library/WebServer/Documents/moodle
Install Moodle Open the install.php file in your web browser. Follow the instructions on each page until you’re done!


Moodle Database Backup Create a simple backup script to backup your database. Create a folder where you will store your database backups (for example: /Library/WebServer/db) Create a text file (plain text, not rtf!) named “dbBot” containing the following code: #!/bin/bash cd /Library/WebServer/db mysqldump -u root -psecretpassword  moodle > moodle-backup.sql.`date +%m%d%Y`
Moodle Database Backup Change the permissions of this file so root owns, noone can read. $ sudo chown root dbBot $ sudo chmod 700 dbBot Test the script. $ sudo sh dbBot A test should produce something like this in /Library/WebServer/db: moodle-backup.sql.02282006 moodle-backup.sql.03012006
Moodle Database Backup Restoring a database is fairly easy. mysqldump -u root -psecretpassword  moodle < moodle-backup.sql.03012006
Automate Backup and Tasks We use Cron to automate backups and Moodle tasks. Use Terminal! $ sudo pico /etc/crontab You will see this: # /etc/crontab SHELL=/bin/sh PATH=/etc:/bin:/sbin:/usr/bin:/usr/sbin HOME=/var/log # #minute hour  mday  month  wday  who  command # #*/5  *  *  *  *  root  /usr/libexec/atrun # # Run daily/weekly/monthly jobs. 15  3  *  *  *  root  periodic daily 30  4  *  *  6  root  periodic weekly 30  5  1  *  *  root  periodic monthly
Automate Backup and Tasks Add the following sections with comments at the end and exit pico (control-x) and save the file (y to save, hit enter): # run Moodle cron script */5 * * * * wget -q -O /dev/null http://yoursite.org/moodle/admin/cron.php # run dbBot to backup Moodle database in MySQL every day at 6:15am 15 6 * * * root /System/bin/dbBot
Summary Download the Open Source applications. Configure the webserver. Install and test PHP. Install and test MySQL. Create a Moodle database and user. Create a data folder. Install and test Moodle. Create a custom MySQL database backup script. Automate backup and Moodle tasks with Cron.
Configure Themes/Courses Configure Themes Add Courses
Resources Moodle Documentation http://docs.moodle.org/ Moodle Support (Free Community Support) http://moodle.org/course/view.php?id=5 Moodle Philosophy http://docs.moodle.org/en/Philosophy Presentation files and other docs http://helpdesk.d214.org/projects/ice06/ Diana Clarke  [email_address] Brian Dichter  [email_address]
Q & A

Serving Moodle Presentation

  • 1.
    Presented by DianaClarke and Brian Dichter Behind the Scenes– Serving Moodle
  • 2.
    Introduction Moodle isOpen Source and relies on several key Open Source applications to do its magic. MySQL database. PHP is server-side scripting language that works especially well with MySQL. Apache is the webserver software on Mac OS X.
  • 3.
    Assumptions You knowthat Moodle is a “software package for producing internet-based courses and web sites, supporting a social constructionist framework of education”. Brand new “vanilla” Mac OS X Server Or, server without PHP/MySQL configured Administrator access to Mac OS X Server Use both GUI and Terminal
  • 4.
    Downloads Moodle-latest build(1.5.3+) http://download.moodle.org/ PHP (4.3.11 for Apache 1.3) http://www.entropy.ch/software/macosx/php/ MySQL (Standard 4.0.26) http://dev.mysql.com/downloads/mysql/4.0.html Apache (1.33) Already installed on Mac OS X Server
  • 5.
    Downloads–Optional phpMyAdmin http://www.phpmyadmin.net/home_page/index.phpMyS QL Administrator http://www.mysql.com/products/tools/administrator/ MySQL Query Browser http://dev.mysql.com/downloads/query-browser/1.1.html
  • 6.
    Configure Webserver UseServer Admin Select the “Web” service to configure Settings Double-click the default site Edit the Domain Name (use FQDN if possible) Take note of the Web folder location Make sure to edit the Default index files Edit the Administrator email address Select Options and uncheck everything (unless you have other sites running that need any of these) Start the Web service!
  • 7.
  • 8.
  • 9.
  • 10.
    Configure Webserver Visityour site in a browser to test that it’s working (you should see the Apache manual) Clean up your Web folder (I usually delete all of the Apache files…actually, I usually delete everything except the error page)
  • 11.
    Install and TestPHP Install the PHP package Create a text file in your Web folder named “info.php” containing the following code: <?php> phpinfo(); ?> Open this page in your browser to test PHP http://yoursite.org/info.php - After successfully testing, delete the “info.php” file.
  • 12.
  • 13.
  • 14.
    Install and TestMySQL Install the MySQL package and the startup item package. User Terminal to start the MySQL server. $ sudo /Library/StartupItems/MySQL/MySQL start Use Terminal and the MySQL Monitor program to check that it’s running (most common error is forgetting to start the server). $ mysql -u root Set and secure the root password. mysql> set password for > root@localhost=password(‘------’);
  • 15.
  • 16.
    Install and TestMySQL Delete anonymous accounts. mysql> use mysql; mysql> delete from user where User=‘’; mysql> delete from db where User=‘’; mysql> flush privileges;
  • 17.
  • 18.
    Install and TestMySQL Create Moodle database and account. mysql> CREATE DATABASE moodle; mysql> GRANT SELECT,INSERT,DELETE,CREATE,DROP,INDEX, > ALTER ON moodle.* TO moodleuser@localhost > IDENTIFIED BY ‘somesecretpassword’; > quit $ mysqladmin -u root -p reload
  • 19.
    Install and TestMySQL Test your new account. $ mysql -u moodleuser -p
  • 20.
    Prepare to InstallMoodle Create a data directory. $ sudo mkdir /Library/WebServer/moodle-data Change the owner and permissions on the data directory. $ sudo chown www:www /Library/WebServer/moodle-data $ sudo chmod 700 /Library/WebServer/moodle-data
  • 21.
    Prepare to InstallMoodle Move your Moodle download into your Web folder. Use the Terminal to extract the files (there are a lot of files!). $ tar xvf moodle-latest-15.tar Change the owner of the Moodle directory (or you may get an error). $ sudo chown www:www /Library/WebServer/Documents/moodle
  • 22.
    Install Moodle Openthe install.php file in your web browser. Follow the instructions on each page until you’re done!
  • 23.
  • 24.
  • 25.
  • 26.
  • 27.
  • 28.
  • 29.
  • 30.
  • 31.
  • 32.
  • 33.
  • 34.
  • 35.
  • 36.
  • 37.
  • 38.
  • 39.
  • 40.
  • 41.
  • 42.
  • 43.
    Moodle Database BackupCreate a simple backup script to backup your database. Create a folder where you will store your database backups (for example: /Library/WebServer/db) Create a text file (plain text, not rtf!) named “dbBot” containing the following code: #!/bin/bash cd /Library/WebServer/db mysqldump -u root -psecretpassword moodle > moodle-backup.sql.`date +%m%d%Y`
  • 44.
    Moodle Database BackupChange the permissions of this file so root owns, noone can read. $ sudo chown root dbBot $ sudo chmod 700 dbBot Test the script. $ sudo sh dbBot A test should produce something like this in /Library/WebServer/db: moodle-backup.sql.02282006 moodle-backup.sql.03012006
  • 45.
    Moodle Database BackupRestoring a database is fairly easy. mysqldump -u root -psecretpassword moodle < moodle-backup.sql.03012006
  • 46.
    Automate Backup andTasks We use Cron to automate backups and Moodle tasks. Use Terminal! $ sudo pico /etc/crontab You will see this: # /etc/crontab SHELL=/bin/sh PATH=/etc:/bin:/sbin:/usr/bin:/usr/sbin HOME=/var/log # #minute hour mday month wday who command # #*/5 * * * * root /usr/libexec/atrun # # Run daily/weekly/monthly jobs. 15 3 * * * root periodic daily 30 4 * * 6 root periodic weekly 30 5 1 * * root periodic monthly
  • 47.
    Automate Backup andTasks Add the following sections with comments at the end and exit pico (control-x) and save the file (y to save, hit enter): # run Moodle cron script */5 * * * * wget -q -O /dev/null http://yoursite.org/moodle/admin/cron.php # run dbBot to backup Moodle database in MySQL every day at 6:15am 15 6 * * * root /System/bin/dbBot
  • 48.
    Summary Download theOpen Source applications. Configure the webserver. Install and test PHP. Install and test MySQL. Create a Moodle database and user. Create a data folder. Install and test Moodle. Create a custom MySQL database backup script. Automate backup and Moodle tasks with Cron.
  • 49.
  • 50.
    Resources Moodle Documentationhttp://docs.moodle.org/ Moodle Support (Free Community Support) http://moodle.org/course/view.php?id=5 Moodle Philosophy http://docs.moodle.org/en/Philosophy Presentation files and other docs http://helpdesk.d214.org/projects/ice06/ Diana Clarke [email_address] Brian Dichter [email_address]
  • 51.