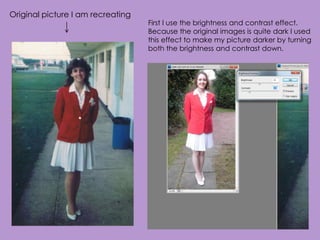
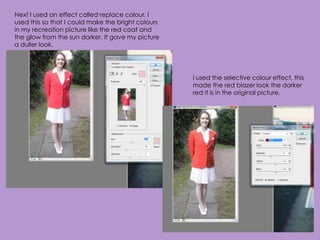
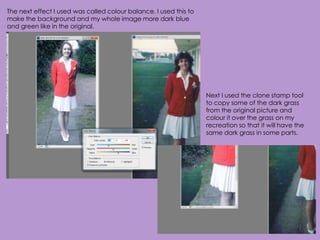
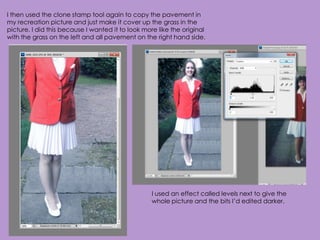
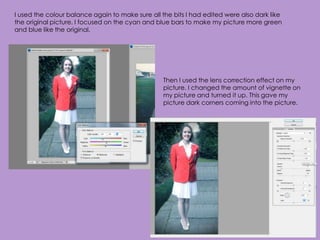
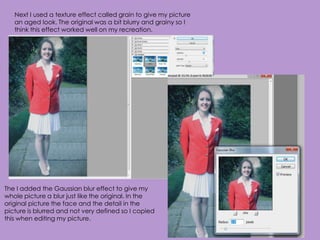
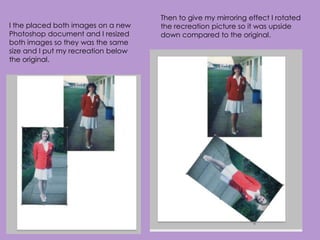
Second recreation – Butlins
         Photo
Original picture I am recreating
                                   First I use the brightness and contrast effect.
                                   Because the original images is quite dark I used
                                   this effect to make my picture darker by turning
                                   both the brightness and contrast down.
Next I used an effect called replace colour. I
used this so that I could make the bright colours
in my recreation picture like the red coat and
the glow from the sun darker. It gave my picture
a duller look.


                                                    I used the selective colour effect, this
                                                    made the red blazer look the darker
                                                    red it is in the original picture.
The next effect I used was called colour balance. I used this to
make the background and my whole image more dark blue
and green like in the original.


                                                                   Next I used the clone stamp tool
                                                                   to copy some of the dark grass
                                                                   from the original picture and
                                                                   colour it over the grass on my
                                                                   recreation so that it will have the
                                                                   same dark grass in some parts.
I then used the clone stamp tool again to copy the pavement in
my recreation picture and just make it cover up the grass in the
picture. I did this because I wanted it to look more like the original
with the grass on the left and all pavement on the right hand side.


                                                   I used an effect called levels next to give the
                                                   whole picture and the bits I’d edited darker.
I used the colour balance again to make sure all the bits I had edited were also dark like
the original picture. I focused on the cyan and blue bars to make my picture more green
and blue like the original.


                                                  Then I used the lens correction effect on my
                                                  picture. I changed the amount of vignette on
                                                  my picture and turned it up. This gave my
                                                  picture dark corners coming into the picture.
Next I used a texture effect called grain to give my picture
   an aged look. The original was a bit blurry and grainy so I
   think this effect worked well on my recreation.


The I added the Gaussian blur effect to give my
whole picture a blur just like the original. In the
original picture the face and the detail in the
picture is blurred and not very defined so I copied
this when editing my picture.
Then to give my mirroring effect I rotated
I the placed both images on a new    the recreation picture so it was upside
Photoshop document and I resized     down compared to the original.
both images so they was the same
size and I put my recreation below
the original.

Second Recreation Editing Butlins Photo

  • 1.
    Second recreation –Butlins Photo
  • 2.
    Original picture Iam recreating First I use the brightness and contrast effect. Because the original images is quite dark I used this effect to make my picture darker by turning both the brightness and contrast down.
  • 3.
    Next I usedan effect called replace colour. I used this so that I could make the bright colours in my recreation picture like the red coat and the glow from the sun darker. It gave my picture a duller look. I used the selective colour effect, this made the red blazer look the darker red it is in the original picture.
  • 4.
    The next effectI used was called colour balance. I used this to make the background and my whole image more dark blue and green like in the original. Next I used the clone stamp tool to copy some of the dark grass from the original picture and colour it over the grass on my recreation so that it will have the same dark grass in some parts.
  • 5.
    I then usedthe clone stamp tool again to copy the pavement in my recreation picture and just make it cover up the grass in the picture. I did this because I wanted it to look more like the original with the grass on the left and all pavement on the right hand side. I used an effect called levels next to give the whole picture and the bits I’d edited darker.
  • 6.
    I used thecolour balance again to make sure all the bits I had edited were also dark like the original picture. I focused on the cyan and blue bars to make my picture more green and blue like the original. Then I used the lens correction effect on my picture. I changed the amount of vignette on my picture and turned it up. This gave my picture dark corners coming into the picture.
  • 7.
    Next I useda texture effect called grain to give my picture an aged look. The original was a bit blurry and grainy so I think this effect worked well on my recreation. The I added the Gaussian blur effect to give my whole picture a blur just like the original. In the original picture the face and the detail in the picture is blurred and not very defined so I copied this when editing my picture.
  • 8.
    Then to givemy mirroring effect I rotated I the placed both images on a new the recreation picture so it was upside Photoshop document and I resized down compared to the original. both images so they was the same size and I put my recreation below the original.