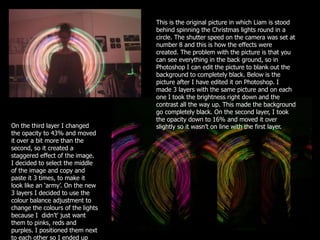
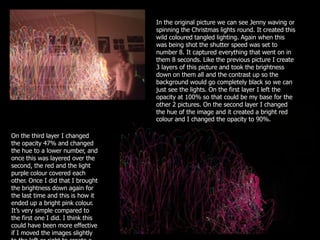
LIGHT
PAINTING
  BECKY DOYLE
FAMOUS LIGHT PAINTERS.


PABLO PICASSO
This is the original picture in which Liam is stood
                                   behind spinning the Christmas lights round in a
                                   circle. The shutter speed on the camera was set at
                                   number 8 and this is how the effects were
                                   created. The problem with the picture is that you
                                   can see everything in the back ground, so in
                                   Photoshop I can edit the picture to blank out the
                                   background to completely black. Below is the
                                   picture after I have edited it on Photoshop. I
                                   made 3 layers with the same picture and on each
                                   one I took the brightness right down and the
                                   contrast all the way up. This made the background
                                   go completely black. On the second layer, I took
                                   the opacity down to 16% and moved it over
On the third layer I changed       slightly so it wasn’t on line with the first layer.
the opacity to 43% and moved
it over a bit more than the
second, so it created a
staggered effect of the image.
I decided to select the middle
of the image and copy and
paste it 3 times, to make it
look like an ‘army’. On the new
3 layers I decided to use the
colour balance adjustment to
change the colours of the lights
because I didn’t' just want
them to pinks, reds and
purples. I positioned them next
to each other so I ended up
In the original picture we can see Jenny waving or
                                    spinning the Christmas lights round. It created this
                                    wild coloured tangled lighting. Again when this
                                    was being shot the shutter speed was set to
                                    number 8. It captured everything that went on in
                                    them 8 seconds. Like the previous picture I create
                                    3 layers of this picture and took the brightness
                                    down on them all and the contrast up so the
                                    background would go completely black so we can
                                    just see the lights. On the first layer I left the
                                    opacity at 100% so that could be my base for the
                                    other 2 pictures. On the second layer I changed
                                    the hue of the image and it created a bright red
                                    colour and I changed the opacity to 90%.

On the third layer I changed
the opacity 47% and changed
the hue to a lower number, and
once this was layered over the
second, the red and the light
purple colour covered each
other. Once I did that I brought
the brightness down again for
the last time and this is how it
ended up a bright pink colour.
It’s very simple compared to
the first one I did. I think this
could have been more effective
if I moved the images slightly
The original picture for this is darker than the
                                   others because we used a different type of light.
                                   For this Liam and Carrie were throwing glow sticks
                                   to each other, and the effect it created was that it
                                   looks like they are having a dual. You would see
                                   this sort of light painting in films such as Harry
                                   Potter, because it looks very magical and surreal.
                                   Like the other two I created three layers of the
                                   original picture and took the brightness right down
                                   and the contrast up. This was to get a black
                                   background so the light stood out more. On the
                                   second layer I change the hue and colour balance
                                   so it ended up yellow.


I think green and yellow go
together well and this photo
looks really good. On the third
layer I took the brightness
down again and change the
opacity to 50& and I moved it
to the right so created a
blurred effect. It looks fantasy
like and I like the way the
glows ticks really stand out in
the picture, and then when the
sticks actually move I like the
way they are faded compared

Light painting presentation

  • 1.
  • 2.
  • 3.
    This is theoriginal picture in which Liam is stood behind spinning the Christmas lights round in a circle. The shutter speed on the camera was set at number 8 and this is how the effects were created. The problem with the picture is that you can see everything in the back ground, so in Photoshop I can edit the picture to blank out the background to completely black. Below is the picture after I have edited it on Photoshop. I made 3 layers with the same picture and on each one I took the brightness right down and the contrast all the way up. This made the background go completely black. On the second layer, I took the opacity down to 16% and moved it over On the third layer I changed slightly so it wasn’t on line with the first layer. the opacity to 43% and moved it over a bit more than the second, so it created a staggered effect of the image. I decided to select the middle of the image and copy and paste it 3 times, to make it look like an ‘army’. On the new 3 layers I decided to use the colour balance adjustment to change the colours of the lights because I didn’t' just want them to pinks, reds and purples. I positioned them next to each other so I ended up
  • 4.
    In the originalpicture we can see Jenny waving or spinning the Christmas lights round. It created this wild coloured tangled lighting. Again when this was being shot the shutter speed was set to number 8. It captured everything that went on in them 8 seconds. Like the previous picture I create 3 layers of this picture and took the brightness down on them all and the contrast up so the background would go completely black so we can just see the lights. On the first layer I left the opacity at 100% so that could be my base for the other 2 pictures. On the second layer I changed the hue of the image and it created a bright red colour and I changed the opacity to 90%. On the third layer I changed the opacity 47% and changed the hue to a lower number, and once this was layered over the second, the red and the light purple colour covered each other. Once I did that I brought the brightness down again for the last time and this is how it ended up a bright pink colour. It’s very simple compared to the first one I did. I think this could have been more effective if I moved the images slightly
  • 5.
    The original picturefor this is darker than the others because we used a different type of light. For this Liam and Carrie were throwing glow sticks to each other, and the effect it created was that it looks like they are having a dual. You would see this sort of light painting in films such as Harry Potter, because it looks very magical and surreal. Like the other two I created three layers of the original picture and took the brightness right down and the contrast up. This was to get a black background so the light stood out more. On the second layer I change the hue and colour balance so it ended up yellow. I think green and yellow go together well and this photo looks really good. On the third layer I took the brightness down again and change the opacity to 50& and I moved it to the right so created a blurred effect. It looks fantasy like and I like the way the glows ticks really stand out in the picture, and then when the sticks actually move I like the way they are faded compared