Resin
Casting
Prepared by:
Dela Cruz, Fernando
Miciano, Jan Ciprianne
Rafinian, Louie Kee
Robles, Henry
Roma, Reuben Elijah
Soliguen, Zharlene
Tingson, Roland
Resin
Resin, in the most specific meaning of the term, is
a hydrocarbon secretion of many plants, particularly coniferous
trees. It is distinct from other liquid compounds found inside
plants or exuded by plants, such as sap, latex, or mucilage. More
broadly, the term "resin" is also used for many thick liquids,
some of them artificial polymer bases (synthetic resins), that
during normal use, harden into transparent or opaque solids.
Resin Casting
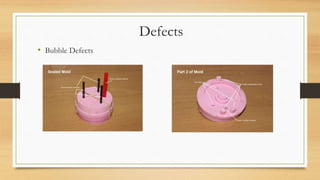
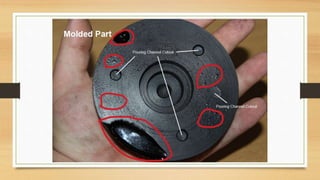
Resin casting is a method of plastic casting where a mold is
filled with a liquid synthetic resin, which then hardens. It is
primarily used for small-scale production like industrial
prototypes and dentistry. It can be done by
amateur hobbyists with little initial investment, and is used in
the production of collectible toys, models and figures, as well as
small-scale jewelry production.
Process
• MEASURE RESIN
Determine the number of layers to be poured and the amount of
resin required for your first layer. If the mold you are using does
not state the number of ounces it contains, fill the mold with
water and then pour into a measuring cup to determine the total
amount of resin that will be needed.
• ADD CATALYST
The size of the mold, the depth of the pour and your room
temperature will determine the amount of catalyst used.
• MIX THOROUGHLY
Using a stir stick or tongue depressor, mix resin and catalyst
thoroughly and vigorously for at least one minute. Scrape the
sides and bottom of cup with your stir stick to insure proper
mixing of resin and catalyst.
• POUR INTO MOLD
Make sure mold is clean, dry and level before pouring. Do not pick up or move
the mold once you have poured the first layer.
• ALLOW TO GEL
Resin will gel [to consistency of set Jell-O TM) in about 15 to
25 minutes. Test the surface with a stir stick. There must be
sufficient firmness to support the weight of your embedment’s. If
surface has not reached a firm gel, wait a few more minutes and
test again with your stir stick.
• PLACE YOUR EMBEDMENTS
REMEMBER… you are layering in reverse. The first layer you
pour becomes the front of your cast piece.
Put embedment’s in place face down on top of the gelled layer.
• POUR ADDITIONAL LAYERS
Additional layers of embedment’s will give the appearance of
greater depth and a dimensional 'floating' look.
• FINISH BACK OF CASTING
It is normal for the final surface layer to have a slightly textured
orange peel' appearance.
To protect table tops and provide a more finished look, you
may want to cut a piece of felt or sheet cork and glue it to the
base of your cast piece. Epoxy glue or bond cement works well.
To remove minor blemishes such as fingerprints, spray with
several coats of Resin Craft Surface Coat spray, which is a clear
acrylic sealer.
Defects
• Bubble Defects
TIPS TO PREVENT TRAPPING
AIR BUBBLES
• When embedding items that may entrap air bubbles on their 'face', pour half
of your next batch of catalyzed resin into the mold before placing the
embedment’s. Then, lower embedment’s slowly into the resin to expel air
bubbles.
• For a dimensional object such as a dried flower, dip it into your next batch
of catalyzed resin before placing face down onto the gelled surface.
• Gently press embedment’s with your stir stick to free trapped
bubbles.

Resin casting

  • 1.
    Resin Casting Prepared by: Dela Cruz,Fernando Miciano, Jan Ciprianne Rafinian, Louie Kee Robles, Henry Roma, Reuben Elijah Soliguen, Zharlene Tingson, Roland
  • 2.
    Resin Resin, in themost specific meaning of the term, is a hydrocarbon secretion of many plants, particularly coniferous trees. It is distinct from other liquid compounds found inside plants or exuded by plants, such as sap, latex, or mucilage. More broadly, the term "resin" is also used for many thick liquids, some of them artificial polymer bases (synthetic resins), that during normal use, harden into transparent or opaque solids.
  • 4.
    Resin Casting Resin castingis a method of plastic casting where a mold is filled with a liquid synthetic resin, which then hardens. It is primarily used for small-scale production like industrial prototypes and dentistry. It can be done by amateur hobbyists with little initial investment, and is used in the production of collectible toys, models and figures, as well as small-scale jewelry production.
  • 5.
    Process • MEASURE RESIN Determinethe number of layers to be poured and the amount of resin required for your first layer. If the mold you are using does not state the number of ounces it contains, fill the mold with water and then pour into a measuring cup to determine the total amount of resin that will be needed.
  • 6.
    • ADD CATALYST Thesize of the mold, the depth of the pour and your room temperature will determine the amount of catalyst used. • MIX THOROUGHLY Using a stir stick or tongue depressor, mix resin and catalyst thoroughly and vigorously for at least one minute. Scrape the sides and bottom of cup with your stir stick to insure proper mixing of resin and catalyst.
  • 7.
    • POUR INTOMOLD Make sure mold is clean, dry and level before pouring. Do not pick up or move the mold once you have poured the first layer.
  • 8.
    • ALLOW TOGEL Resin will gel [to consistency of set Jell-O TM) in about 15 to 25 minutes. Test the surface with a stir stick. There must be sufficient firmness to support the weight of your embedment’s. If surface has not reached a firm gel, wait a few more minutes and test again with your stir stick.
  • 9.
    • PLACE YOUREMBEDMENTS REMEMBER… you are layering in reverse. The first layer you pour becomes the front of your cast piece. Put embedment’s in place face down on top of the gelled layer. • POUR ADDITIONAL LAYERS Additional layers of embedment’s will give the appearance of greater depth and a dimensional 'floating' look.
  • 10.
    • FINISH BACKOF CASTING It is normal for the final surface layer to have a slightly textured orange peel' appearance. To protect table tops and provide a more finished look, you may want to cut a piece of felt or sheet cork and glue it to the base of your cast piece. Epoxy glue or bond cement works well. To remove minor blemishes such as fingerprints, spray with several coats of Resin Craft Surface Coat spray, which is a clear acrylic sealer.
  • 11.
  • 13.
    TIPS TO PREVENTTRAPPING AIR BUBBLES • When embedding items that may entrap air bubbles on their 'face', pour half of your next batch of catalyzed resin into the mold before placing the embedment’s. Then, lower embedment’s slowly into the resin to expel air bubbles. • For a dimensional object such as a dried flower, dip it into your next batch of catalyzed resin before placing face down onto the gelled surface. • Gently press embedment’s with your stir stick to free trapped bubbles.