This document provides steps for installing and configuring a Ceragon 0.6m radio system. It outlines procedures for mounting the antenna and radio equipment, installing cables, configuring the indoor and outdoor units, and aligning the radio link. Notes are included on checking equipment specifications and documenting installation details for applications, estimates, and technical reports.
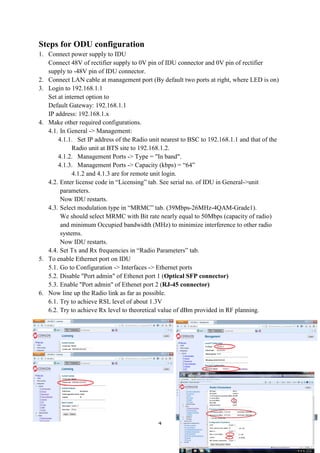
![5
Notes for Loading:
1. Check frequency range of ODU and ch
2. Check nuts for rack.
3. Write Link name, IP address and Tx/R
Before Installation:
1. Prepare Estimate
After Installation:
1. h8fg l/kf]6
2. Technical Report
3. HofdL ekf{O
4. Application
To ah]6 (main)
1. Application
2. :jLs[t Estimate
3. h8fg k|ltj]bg
4. dfu kmf/d
5. HofdL ekf{O
6. Ef|d0f cfb]z
For e|d0f lan
1. lgj]bg
2. e|d0f cfb]z
3. e|d0f lan
To Transmission
1. Technical Report
2. h8fg k|ltj]bg
To Store
1. h8fg k|ltj]bg
2. dfu kmf/d](https://image.slidesharecdn.com/radioinstallation-130629122307-phpapp02/85/Radio-installation-5-320.jpg)