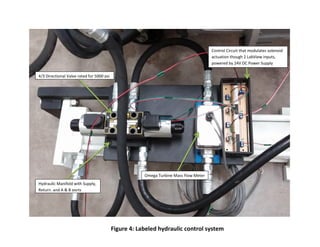
Computer-Controlled Hydraulic Cylinder Actuation Research 
Valparaiso University 
Eaton Corporation 
Spring 2014 
RESEARCH STUDENT: Garret Stec 
RESEARCH ADVISOR: Professor Shahin S. Nudehi
Abstract 
Create a compact hydraulic setup that can actuate a high-pressure hydraulic cylinder forwards and backwards from a user control in LabView. 
Introduction 
The purpose of this project was to develop a hydraulic system that could actuate a cylinder both forwards and backwards using an electronic valve. This system would be used to test a goal proposed by Eaton Corporation, to design a control feedback loop to position a 60 meter cylinder within 0.5 millimeter accuracy with leakage occurring in the cylinder. Due to the complexity of a cylinder of that size, the hypothesis would be tested on two smaller cylinders provided by Eaton. The system developed this semester can actuate a cylinder safely from a computer, monitor pressure and flow rate, and can be applied to future iterations to verify or deny Eaton’s hypothesis. 
Overview 
During the spring semester of 2014, a hydraulic setup was created to further develop a control feedback loop that would allow for accurate positioning of a hydraulic cylinder. This setup features a 4/3 Directional Tandem Valve that is solenoid actuated. This valve’s maximum operating pressure is 5000 Psi and has maximum tank pressure of 3000 Psi. An Omega PX303- 3KG5V Pressure Transducer monitors the pressure and is energized by a 24V power supply. The flow of the outbound fluid is measured by an Omega Turbine Flow Meter that is also powered by a 24V power supply. With these components, the pump drives fluid to the 4/3 valve where it is directed to either side of the hydraulic cylinder. The pressure created in back or in front of the cylinder dictates the direction of motion. As the fluid leaves the port acting as the outlet from the cylinder, it is directed through the outlet port of the manifold where it then passes through the turbine flow meter. The fluid enters the tank where it then goes through the process again. The overall setup is shown in Figure 1 and the flow diagram is shown in Appendix A. The system offers the capability to control a hydraulic cylinder’s direction from a user interface in LabView on a computer. 
System Details 
The directional valve is a 4/3 spring centered valve, allowing fluid to flow through its manifold and back into the reservoir while it is in the neutral position. It also allows for the mass flow meter to be positioned on the low pressure side of the manifold at all times. This is because of the configuration of the valve, which allows the exiting fluid to leave the same port on the manifold no matter what direction the cylinder is being driven. The direction of its activation can be controlled from the LabView user interface, which sends a 20mA signal that is
excited to 5V. This signal is sent to a transistor circuit, where it then goes to the necessary terminal on the valve. 
The pressure transducer, labeled PT on the flow diagram in Appendix A and seen in Figure 1, is located on the pressurized side of the manifold. This sends an analog signal between 0V and 5V to the National Instruments Compact DAQ. The calibrated signal value is displayed on the LabView user interface as absolute pressure (Figure 2). By interfacing the pressure transducer with LabView, safety mechanisms can be installed so that if the pressure rapidly increases, cutoffs will initiate to center the valve and lower the pressure. 
Similarly, the turbine flow meter outputs a 24V pulse for every revolution of the turbine inside its housing. Using a conversion factor, the signal is translated to a frequency. It was important to locate the flow meter on the outlet side of the manifold so that it is always at atmospheric pressure, alleviating the need for a high pressure turbine flow meter. 
To ensure safety, a variety of measures were implemented to prevent injury or damage to the system. These measures included a bypass valve, pressure gage, and a pressure transducer. A bypass valve was installed to prevent over pressurization in the event of a pressure spike. The pressure could spike if the cylinder reaches its minimum or maximum extension. A pressure gage is also installed and gives a real-time manual reading, which is beneficial if the pressure transducer were to malfunction. The pressure transducer is also beneficial because its signal is sent through the Compact DAQ to LabView. Once in LabView, a pressure tolerance can be integrated that will neutralize the solenoid position and lower pressure. Later, limit switches will be integrated that will change the direction of the cylinder’s actuation once a minimum or maximum has been reached to prevent over pressurization. 
Three major components control the function of the setup: the power supply, Compact DAQ, and the transistor circuit. Due to the voltage and current requirements of the directional valve, an outside power source was needed to provide 24V and 1.38A. Because the Compact DAQ cannot provide these requirements, a transistor circuit was created to modulate the supplied voltage and current. The transistors receive the signal from LabView and direct the voltage to the intended solenoid in the valve. LED’s were incorporated into the circuit to further indicate which solenoid was activated. The schematic of the transistor circuit can be referenced in Appendix B. The signals from the three peripherals are all acquired through the Compact DAQ (Figure 3) and are displayed on the LabView user interface. The wiring diagrams for the Solenoid DAQ Module, Mass Flow Meter DAQ Module, and Pressure Transducer DAQ Module can be seen in Appendix C. 
The user interface created in LabView features a variety of signal displays and controls. A virtual 2-position toggle switch controls the direction of the valve, while a “Neutral” button
centers the valve to cycle fluid through the manifold to the tank. This can be seen in Figure 2. The waveform graph shows the pulse signal generated by the turbine flow meter. The absolute pressure is also shown below the graph, displayed as an updating value 
Holding the hydraulic setup is a compact steel stand. This stand is bolted to the rear of the hydraulic cylinder and is held together with 5/8” bolts and welds. The stand also holds the valve and manifold assembly, as well as the mass flow meter over the cylinder itself, making it compact. An automotive grade, oil resistant paint was used to seal the steel plate to prevent corrosion or degradation due to oil. This setup can be seen in Figure 4. 
Conclusion 
Through this project a compact, laboratory ready hydraulic testing setup was developed. With the foundation for a hydraulic controls system laid, further research will be able to be performed in the areas of both hydraulics and controls. This project will further be used to develop a control feedback loop to perform research to test Eaton’s goal of controlling a 60 meter hydraulic cylinder.
Figure 1: Labeled power unit and hydraulic cylinder assembly 
Pressure Gauge 
Bypass Valve 
Power Unit 
Hydraulic Cylinder 
Hydraulic Cylinder Control Unit 
Pressure Transducer
Figure 2: LabView User Interface
Figure 3: National Instruments Compact DAQ
4/3 Directional Valve rated for 5000 psi 
Control Circuit that modulates solenoid actuation though 2 LabView inputs, powered by 24V DC Power Supply 
Hydraulic Manifold with Supply, Return, and A & B ports 
Omega Turbine Mass Flow Meter 
Figure 4: Labeled hydraulic control system
Appendix A – Flow Diagram 
Tank 
PT 
4/3 Tandem Directional Valve on Manifold 
Pump 
Legend 
Low Pressure 
High Pressure 
A 
B 
P 
T 
Bypass Valve 
Turbine Mass Flow Meter 
Hydraulic Cylinder
Appendix B – Transistor Circuit 
Transistor A 
Transistor B 
Solenoid A Input 
Solenoid B Input 
LabView A Input 
LabView B Input
Appendix C – Wiring for DAQ to Solenoids 
AO 
AO 0 
AO 1 
AO 2 
AO 3 
COM 0 
COM 1 
COM 2 
COM 3 
COM 
SUPP 
Solenoid A 
Solenoid B 
24V 
GND 
4.7K ohm Resistor 
4.7K ohm Resistor
Appendix C – Wiring for Mass Flow Meter to DAQ 
DI 
DI 0 
DI 2 
DI 4 
DI 6 
DI 1 
DI 3 
DI 5 
DI 7 
COM 
24V 
GND 
Mass Flow Meter 
1K ohm Resistor 
DI 8
Appendix C – Wiring for Pressure Transducer to DAQ 
AI 
AI 0 
AI 2 
AI 4 
AI 6 
AI 1 
AI 3 
AI 5 
AI 7 
COM 
24V 
GND 
Pressure Transducer 
AI 8

Project Report - Spring 2014

  • 1.
    Computer-Controlled Hydraulic CylinderActuation Research Valparaiso University Eaton Corporation Spring 2014 RESEARCH STUDENT: Garret Stec RESEARCH ADVISOR: Professor Shahin S. Nudehi
  • 2.
    Abstract Create acompact hydraulic setup that can actuate a high-pressure hydraulic cylinder forwards and backwards from a user control in LabView. Introduction The purpose of this project was to develop a hydraulic system that could actuate a cylinder both forwards and backwards using an electronic valve. This system would be used to test a goal proposed by Eaton Corporation, to design a control feedback loop to position a 60 meter cylinder within 0.5 millimeter accuracy with leakage occurring in the cylinder. Due to the complexity of a cylinder of that size, the hypothesis would be tested on two smaller cylinders provided by Eaton. The system developed this semester can actuate a cylinder safely from a computer, monitor pressure and flow rate, and can be applied to future iterations to verify or deny Eaton’s hypothesis. Overview During the spring semester of 2014, a hydraulic setup was created to further develop a control feedback loop that would allow for accurate positioning of a hydraulic cylinder. This setup features a 4/3 Directional Tandem Valve that is solenoid actuated. This valve’s maximum operating pressure is 5000 Psi and has maximum tank pressure of 3000 Psi. An Omega PX303- 3KG5V Pressure Transducer monitors the pressure and is energized by a 24V power supply. The flow of the outbound fluid is measured by an Omega Turbine Flow Meter that is also powered by a 24V power supply. With these components, the pump drives fluid to the 4/3 valve where it is directed to either side of the hydraulic cylinder. The pressure created in back or in front of the cylinder dictates the direction of motion. As the fluid leaves the port acting as the outlet from the cylinder, it is directed through the outlet port of the manifold where it then passes through the turbine flow meter. The fluid enters the tank where it then goes through the process again. The overall setup is shown in Figure 1 and the flow diagram is shown in Appendix A. The system offers the capability to control a hydraulic cylinder’s direction from a user interface in LabView on a computer. System Details The directional valve is a 4/3 spring centered valve, allowing fluid to flow through its manifold and back into the reservoir while it is in the neutral position. It also allows for the mass flow meter to be positioned on the low pressure side of the manifold at all times. This is because of the configuration of the valve, which allows the exiting fluid to leave the same port on the manifold no matter what direction the cylinder is being driven. The direction of its activation can be controlled from the LabView user interface, which sends a 20mA signal that is
  • 3.
    excited to 5V.This signal is sent to a transistor circuit, where it then goes to the necessary terminal on the valve. The pressure transducer, labeled PT on the flow diagram in Appendix A and seen in Figure 1, is located on the pressurized side of the manifold. This sends an analog signal between 0V and 5V to the National Instruments Compact DAQ. The calibrated signal value is displayed on the LabView user interface as absolute pressure (Figure 2). By interfacing the pressure transducer with LabView, safety mechanisms can be installed so that if the pressure rapidly increases, cutoffs will initiate to center the valve and lower the pressure. Similarly, the turbine flow meter outputs a 24V pulse for every revolution of the turbine inside its housing. Using a conversion factor, the signal is translated to a frequency. It was important to locate the flow meter on the outlet side of the manifold so that it is always at atmospheric pressure, alleviating the need for a high pressure turbine flow meter. To ensure safety, a variety of measures were implemented to prevent injury or damage to the system. These measures included a bypass valve, pressure gage, and a pressure transducer. A bypass valve was installed to prevent over pressurization in the event of a pressure spike. The pressure could spike if the cylinder reaches its minimum or maximum extension. A pressure gage is also installed and gives a real-time manual reading, which is beneficial if the pressure transducer were to malfunction. The pressure transducer is also beneficial because its signal is sent through the Compact DAQ to LabView. Once in LabView, a pressure tolerance can be integrated that will neutralize the solenoid position and lower pressure. Later, limit switches will be integrated that will change the direction of the cylinder’s actuation once a minimum or maximum has been reached to prevent over pressurization. Three major components control the function of the setup: the power supply, Compact DAQ, and the transistor circuit. Due to the voltage and current requirements of the directional valve, an outside power source was needed to provide 24V and 1.38A. Because the Compact DAQ cannot provide these requirements, a transistor circuit was created to modulate the supplied voltage and current. The transistors receive the signal from LabView and direct the voltage to the intended solenoid in the valve. LED’s were incorporated into the circuit to further indicate which solenoid was activated. The schematic of the transistor circuit can be referenced in Appendix B. The signals from the three peripherals are all acquired through the Compact DAQ (Figure 3) and are displayed on the LabView user interface. The wiring diagrams for the Solenoid DAQ Module, Mass Flow Meter DAQ Module, and Pressure Transducer DAQ Module can be seen in Appendix C. The user interface created in LabView features a variety of signal displays and controls. A virtual 2-position toggle switch controls the direction of the valve, while a “Neutral” button
  • 4.
    centers the valveto cycle fluid through the manifold to the tank. This can be seen in Figure 2. The waveform graph shows the pulse signal generated by the turbine flow meter. The absolute pressure is also shown below the graph, displayed as an updating value Holding the hydraulic setup is a compact steel stand. This stand is bolted to the rear of the hydraulic cylinder and is held together with 5/8” bolts and welds. The stand also holds the valve and manifold assembly, as well as the mass flow meter over the cylinder itself, making it compact. An automotive grade, oil resistant paint was used to seal the steel plate to prevent corrosion or degradation due to oil. This setup can be seen in Figure 4. Conclusion Through this project a compact, laboratory ready hydraulic testing setup was developed. With the foundation for a hydraulic controls system laid, further research will be able to be performed in the areas of both hydraulics and controls. This project will further be used to develop a control feedback loop to perform research to test Eaton’s goal of controlling a 60 meter hydraulic cylinder.
  • 5.
    Figure 1: Labeledpower unit and hydraulic cylinder assembly Pressure Gauge Bypass Valve Power Unit Hydraulic Cylinder Hydraulic Cylinder Control Unit Pressure Transducer
  • 6.
    Figure 2: LabViewUser Interface
  • 7.
    Figure 3: NationalInstruments Compact DAQ
  • 8.
    4/3 Directional Valverated for 5000 psi Control Circuit that modulates solenoid actuation though 2 LabView inputs, powered by 24V DC Power Supply Hydraulic Manifold with Supply, Return, and A & B ports Omega Turbine Mass Flow Meter Figure 4: Labeled hydraulic control system
  • 9.
    Appendix A –Flow Diagram Tank PT 4/3 Tandem Directional Valve on Manifold Pump Legend Low Pressure High Pressure A B P T Bypass Valve Turbine Mass Flow Meter Hydraulic Cylinder
  • 10.
    Appendix B –Transistor Circuit Transistor A Transistor B Solenoid A Input Solenoid B Input LabView A Input LabView B Input
  • 11.
    Appendix C –Wiring for DAQ to Solenoids AO AO 0 AO 1 AO 2 AO 3 COM 0 COM 1 COM 2 COM 3 COM SUPP Solenoid A Solenoid B 24V GND 4.7K ohm Resistor 4.7K ohm Resistor
  • 12.
    Appendix C –Wiring for Mass Flow Meter to DAQ DI DI 0 DI 2 DI 4 DI 6 DI 1 DI 3 DI 5 DI 7 COM 24V GND Mass Flow Meter 1K ohm Resistor DI 8
  • 13.
    Appendix C –Wiring for Pressure Transducer to DAQ AI AI 0 AI 2 AI 4 AI 6 AI 1 AI 3 AI 5 AI 7 COM 24V GND Pressure Transducer AI 8