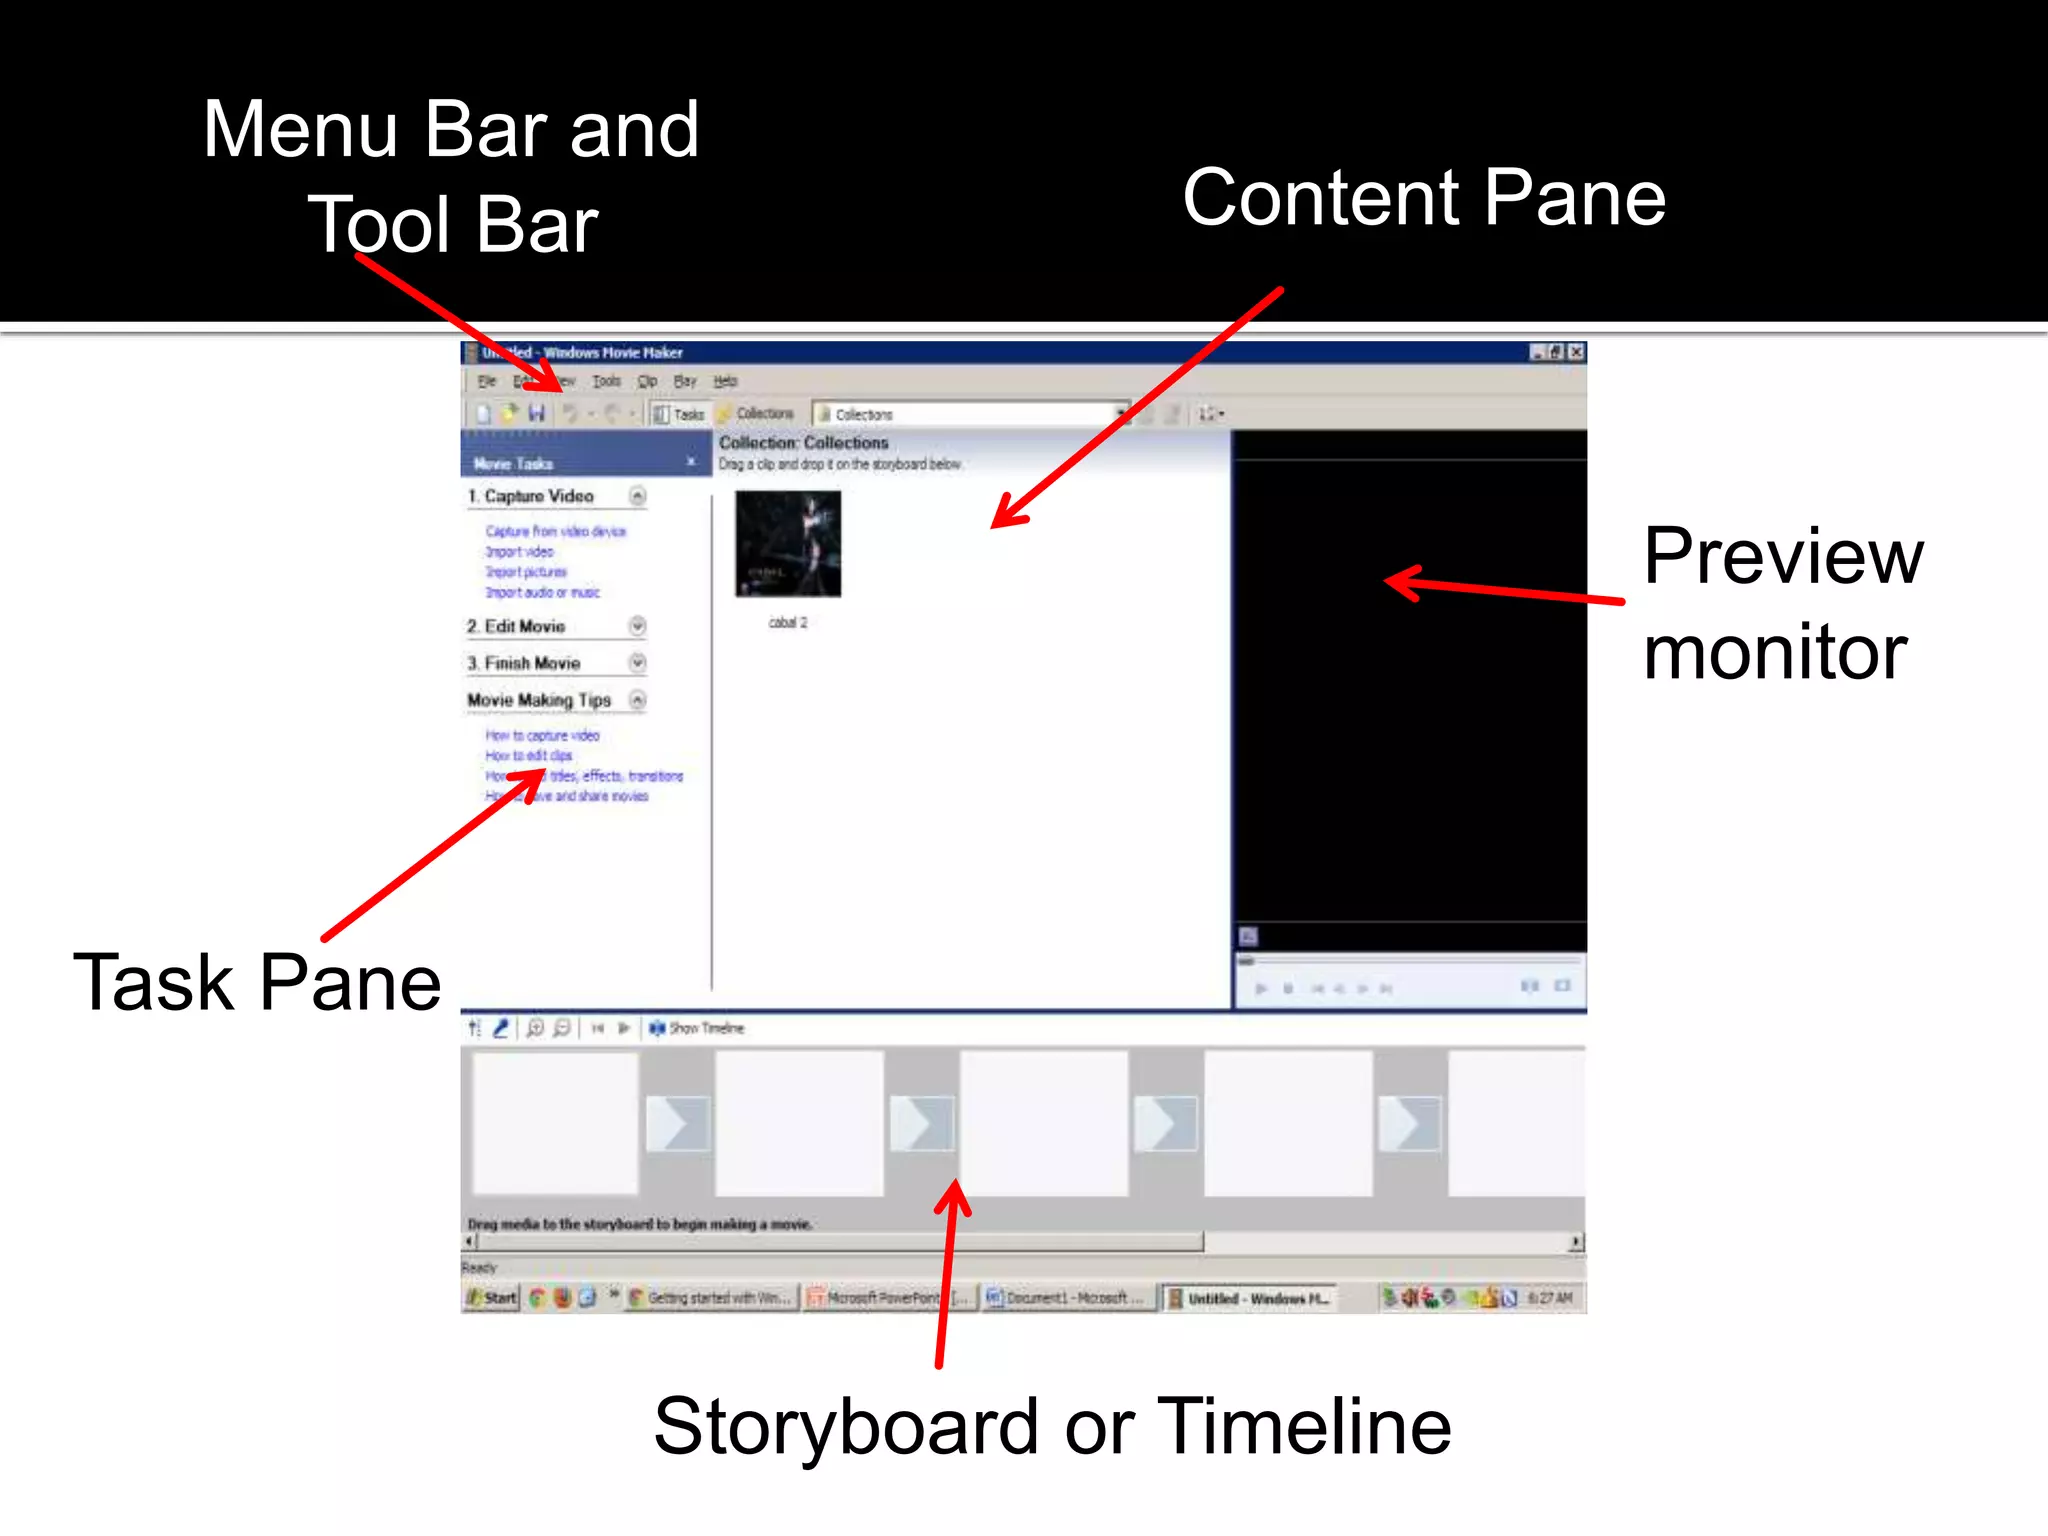
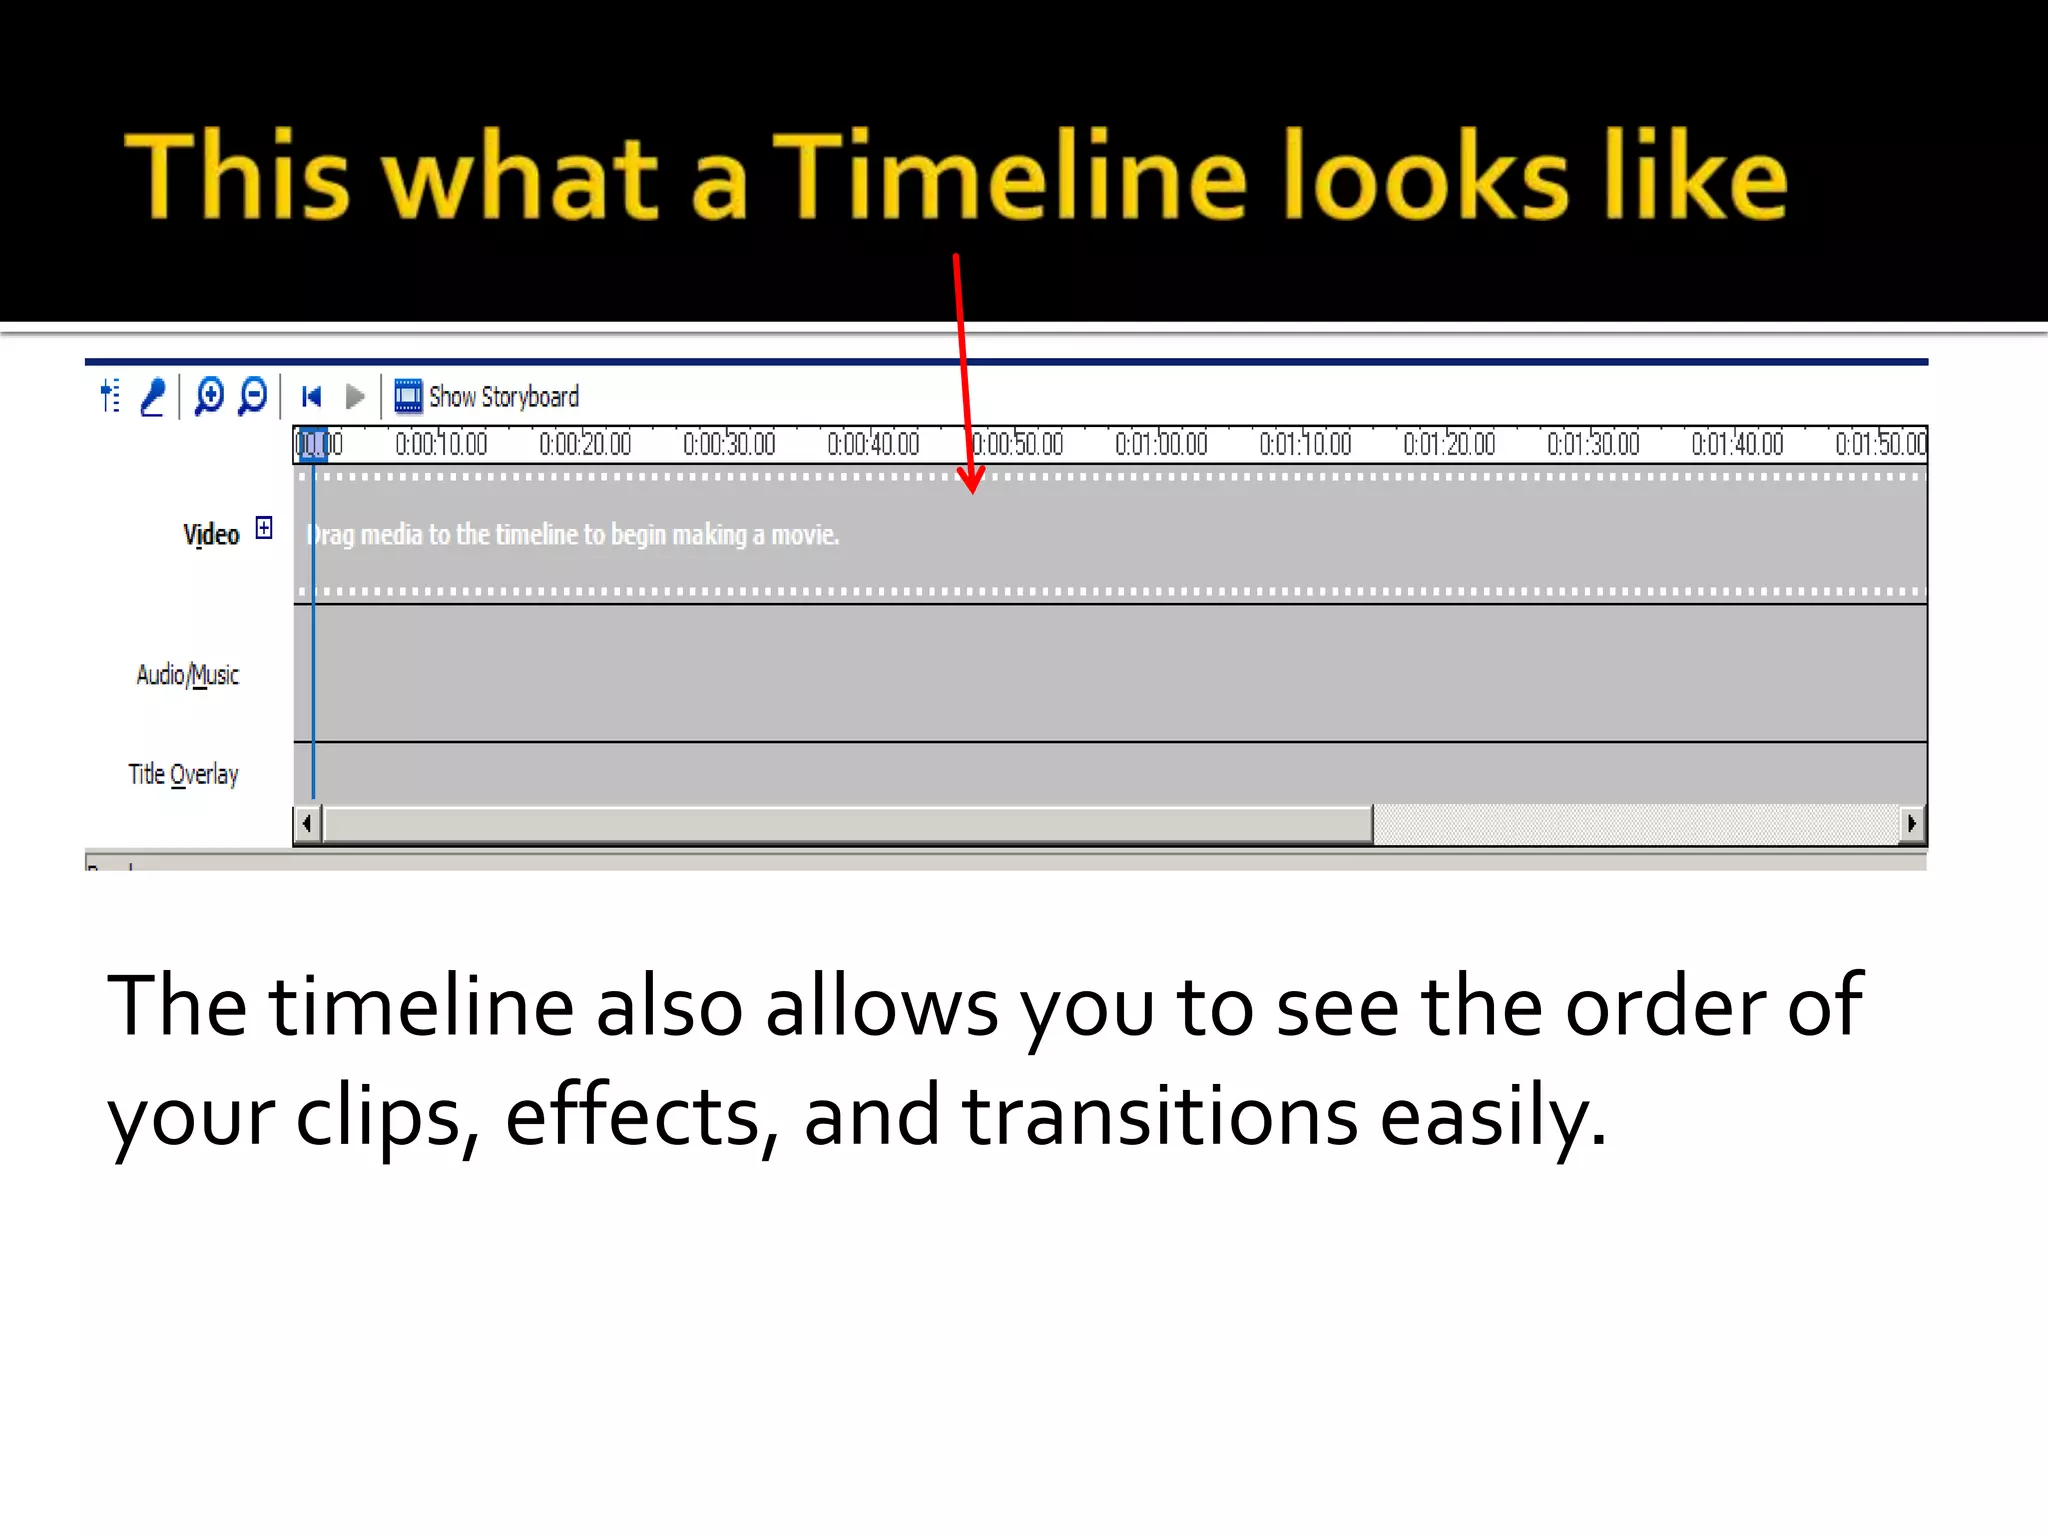
Windows Movie Maker
 freeware video editing software by Microsoft. It is a part
ofWindows Essentials software suite and offers the
ability to create and edit videos as well as to publish
them on SkyDrive, Facebook,YouTube, and Flickr.
 Windows Live Movie Maker, codenamed Sundance
 feature ofWindowsVista that enables you to create
home movies and slide shows on your computer,
complete with professional-looking titles, transitions,
effects, music, and even narration. And when you’re
ready, you can useWindows Movie Maker to publish
your movie and share it with your friends and family.
The Panes,
The Storyboard/Timeline,
The Preview Monitor.
Content Pane
Task Pane
Preview
monitor
Menu Bar and
Tool Bar
Storyboard or Timeline
The Movie Tasks pane is
designed to step you through
the process of creating a
movie, from importing video
clips to exporting the final
product for viewing. You
probably won't need to
complete all the steps — just
start at the top and work
down, missing out the steps
that don't apply to you.
 This section lets you bring source clips (video,
audio, etc) into your project.The first option
lets you connect to a compatible video
camera and record the footage to your hard
drive.The next three options all open browse
windows and let you choose files that are
already on your hard drive.
 The first three options in this section determine what is
displayed in the Contents pane.You may want to move
backwards and forwards though these displays a few
times, choosing and adding things to the timeline.
 The fourth option opens the title wizard which helps you
create titles for the movie.
 The last option opens the AutoMovie wizard which does
all the hard work and puts together a movie timeline for
you.This works fine in some cases but if you want any
sort of control you'll need to skip this step and edit the
timeline manually.
 This section provides various options for
creating and delivering the final movie.This is
where you can specify settings for the exported
movie and save it, burn to CD, email it or publish
it on the web.There is also an option to send the
movie back to your DV camera, which can be a
handy way to connect and view it on a
television.
 There is no option in version 2 to burn to DVD —
you will need some other software to do this.
 How to capture video
 How to edit clips
 How to add titles, effects, transitions
 How to save and share movies
Self-explanatory, this section provides various
help files.
 The storyboard allows you to see change the order
that you have arranged your clips in quickly and
easily. It also allows you to see what transitions and
effects you have applied to your clips. If you hover
your mouse over them, the small star boxes at the
bottom left of each clip show which effects you
have applied (if any), and the boxes in between
each pair of clips shows what transition you have
applied.
 The storyboard is mostly used for planning out the
order of a video.
You can easily use it to see which clips will play in what
order and how they will transition to the next clip.
However, the storyboard is not very useful for actually
editing the clips in your video. For most editing tasks,
you will need to use the timeline
The timeline also allows you to see the order of
your clips, effects, and transitions easily.
 . default tracks in Windows Movie Maker
▪ Video track,
▪ Audio/Music track,
▪ Title Overlay track
 Windows Movie Maker will also display
a Transition track and a second Audio track for
ambient audio if you add background music to
your video. However, if you can open or close
those tracks by pressing the plus or minus
button (depending on whether you have the
tracks displayed or not) next to Video.
You can use the commands in the menu bar to
perform tasks in Windows Movie Maker.The
procedures for completing tasks are described
throughout Help by using the menu commands.
Menu Bar
Tool Bar
 The toolbar provides an alternative to
selecting commands on the menus.You can
use the toolbar to perform common tasks
quickly.
 To show or hide the toolbar, on
the View menu, click Toolbar. A check mark
appears next to the Toolbar command on the
menu when the toolbar is displayed.
 The Contents pane displays the clips
that are contained in the collection that
is selected in the Collections pane.The
Contents pane displays all of the video,
audio, pictures, video transitions, and
video effects that can be added to the
storyboard/timeline to include in your
movie.
 Details. Displays information about the clips
displayed in the Contents pane.The specific
details depend on the type of clip that is
displayed. In this view, you can sort items by
clicking the column you want to sort by.
 Thumbnails. Displays a small image of the
selected clips based on the selected collection
and the type of clips that are stored in it.
 Use the monitor to view individual clips or an
entire project. By using the monitor, you can
preview your project before saving it as a movie.
 You can use the playback controls to navigate
through an individual clip or an entire project.
You can also use the buttons on the monitor to
perform functions such as splitting a video or
audio clip into two smaller clips or taking a
picture of the current frame that is displayed in
the monitor.
Monitor
Seek Bar Playback controls
Moviemaker report

Moviemaker report

  • 1.
  • 3.
     freeware videoediting software by Microsoft. It is a part ofWindows Essentials software suite and offers the ability to create and edit videos as well as to publish them on SkyDrive, Facebook,YouTube, and Flickr.  Windows Live Movie Maker, codenamed Sundance  feature ofWindowsVista that enables you to create home movies and slide shows on your computer, complete with professional-looking titles, transitions, effects, music, and even narration. And when you’re ready, you can useWindows Movie Maker to publish your movie and share it with your friends and family.
  • 4.
  • 5.
    Content Pane Task Pane Preview monitor MenuBar and Tool Bar Storyboard or Timeline
  • 6.
    The Movie Taskspane is designed to step you through the process of creating a movie, from importing video clips to exporting the final product for viewing. You probably won't need to complete all the steps — just start at the top and work down, missing out the steps that don't apply to you.
  • 7.
     This sectionlets you bring source clips (video, audio, etc) into your project.The first option lets you connect to a compatible video camera and record the footage to your hard drive.The next three options all open browse windows and let you choose files that are already on your hard drive.
  • 8.
     The firstthree options in this section determine what is displayed in the Contents pane.You may want to move backwards and forwards though these displays a few times, choosing and adding things to the timeline.  The fourth option opens the title wizard which helps you create titles for the movie.  The last option opens the AutoMovie wizard which does all the hard work and puts together a movie timeline for you.This works fine in some cases but if you want any sort of control you'll need to skip this step and edit the timeline manually.
  • 9.
     This sectionprovides various options for creating and delivering the final movie.This is where you can specify settings for the exported movie and save it, burn to CD, email it or publish it on the web.There is also an option to send the movie back to your DV camera, which can be a handy way to connect and view it on a television.  There is no option in version 2 to burn to DVD — you will need some other software to do this.
  • 10.
     How tocapture video  How to edit clips  How to add titles, effects, transitions  How to save and share movies Self-explanatory, this section provides various help files.
  • 11.
     The storyboardallows you to see change the order that you have arranged your clips in quickly and easily. It also allows you to see what transitions and effects you have applied to your clips. If you hover your mouse over them, the small star boxes at the bottom left of each clip show which effects you have applied (if any), and the boxes in between each pair of clips shows what transition you have applied.  The storyboard is mostly used for planning out the order of a video.
  • 12.
    You can easilyuse it to see which clips will play in what order and how they will transition to the next clip. However, the storyboard is not very useful for actually editing the clips in your video. For most editing tasks, you will need to use the timeline
  • 13.
    The timeline alsoallows you to see the order of your clips, effects, and transitions easily.
  • 14.
     . defaulttracks in Windows Movie Maker ▪ Video track, ▪ Audio/Music track, ▪ Title Overlay track  Windows Movie Maker will also display a Transition track and a second Audio track for ambient audio if you add background music to your video. However, if you can open or close those tracks by pressing the plus or minus button (depending on whether you have the tracks displayed or not) next to Video.
  • 15.
    You can usethe commands in the menu bar to perform tasks in Windows Movie Maker.The procedures for completing tasks are described throughout Help by using the menu commands. Menu Bar Tool Bar
  • 16.
     The toolbarprovides an alternative to selecting commands on the menus.You can use the toolbar to perform common tasks quickly.  To show or hide the toolbar, on the View menu, click Toolbar. A check mark appears next to the Toolbar command on the menu when the toolbar is displayed.
  • 17.
     The Contentspane displays the clips that are contained in the collection that is selected in the Collections pane.The Contents pane displays all of the video, audio, pictures, video transitions, and video effects that can be added to the storyboard/timeline to include in your movie.
  • 18.
     Details. Displaysinformation about the clips displayed in the Contents pane.The specific details depend on the type of clip that is displayed. In this view, you can sort items by clicking the column you want to sort by.  Thumbnails. Displays a small image of the selected clips based on the selected collection and the type of clips that are stored in it.
  • 19.
     Use themonitor to view individual clips or an entire project. By using the monitor, you can preview your project before saving it as a movie.  You can use the playback controls to navigate through an individual clip or an entire project. You can also use the buttons on the monitor to perform functions such as splitting a video or audio clip into two smaller clips or taking a picture of the current frame that is displayed in the monitor.
  • 20.