DEFINITION OF TERMS:
1.Bed Making: The technique of preparing different types of bed making patients / clients comfortable in his/ her suitable position for a
particular condition.
2. Fanfold: Specifically folding the edge of the sheet used in the bed 6-8 inches outward.
3. Mitered corner: a means of anchoring مثبتsheet on mattresses.
4. Toe pleat: a fold made in the top bed clothes to provide additional space for patients toes.
5. Foot drop: plantar flexion of the foot with permanent contracture of the gastronomies (calf) muscle and tendon.
6. Bed cradle: is a curved, semi- circular made of metal that can be placed over a portion of the patient's body.
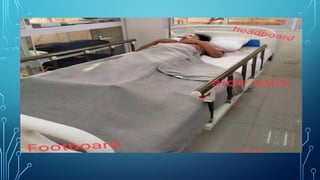
7. Hospital bed: It's usually about 26-28 inches (65-70) cm above to floor.
• - The ideal hospital bed should be selected for its impact on patients comfort, safety, medical condition, and ability to change position.
4.
OBJECTIVES:
• To beable to know the importance of bed making
• To identify different types of beds and their use • To be able to perform
proper procedures for bed making with proper body mechanics
• To know the principles of bed making along with infection control.
5.
Bed Making:
It isthe technique of preparing different types of beds in making a patient/client comfortable or his/her
position suitable for a particular condition.
6.
PURPOSE:
• To providethe client with a safe & comfortable bed to take rest & sleep
• To keep the ward neat and tidy and prevent cross-infection
• To observe and adapt to the needs of the client and to be ready for any
emergency or critical condition or illness
• To economize time, material & effort.
• To prevent bedsores.
• For treatment of certain conditions.
7.
TYPES OF BED:
1.Open bed/Admission bed -It is a bed, made when it is about to be
occupied by either anew patient or an ambulatory patient. This is the
bed prepared to receive a newly admitted patient.
•Purpose
• To welcome the patient
• To provide immediate care, safety and comfort
• To protect the bed linen while giving bath on admission
8.
2. Closed bed-Itis an unoccupied or empty bed made to receive
the patient and is fully covered with a counterpane to protect
it from dust and dirt. On admission of the patient, the closed
bed is converted into an open bed.
•Purpose
• To keep the bed ready for occupancy.
• To provide a neat and tidy appearance to the unit
9.
3. Occupied bed-This bed is made with the patient in it.
•Purpose
• To make a bed with the least possible discomfort to the
patient.
• To handle the bedclothes skillfully while the patient is on
the bed, giving the least disturbance to the occupant.
• To provide a neat, clean and tidy appearance.
10.
4. Post-operative bed-Itis a bed prepared for a patient who is recovering from the effects of
anesthesia following surgery.
•Purpose
• To receive the patient conveniently
• To provide warmth and comfort
• To prevent shock
• To prevent injury
• To prevent soiling of the bed
• To meet any emergency
11.
5. Cardiac bed-Abed prepared for patients with
cardiac diseases.
•Purpose:
•To prepare the bed for the cardiac patients
•To relieve dyspnea
12.
6. Amputation bed/dividedbed-It is a bed in which top linen is
divided into two parts to visualize the amputated part of the lower
limbs without disturbing the patient.
•Purpose
• To watch the stump for hemorrhage and apply tourniquet
instantly
• To take the weight of the bed clothes off the patient.
• To keep the stump in position
13.
7. Fracture bed-Itis a bed which is prepared for patients with
fracture, bone diseases and deformity.
•Purpose
• To prevent undue sagging of mattress
• To immobilize the fractured part
• To restrict sudden jerky movements
• To keep the traction in position
14.
8. Therapeutic bed(renal bed, rheumatism bed, blanket bed- it is a bed
made for patients suffering from rheumatism or renal disease.
•Purpose
• To carry the weight of the bed clothes off the painful joints
• To keep the patient warm
• To induce sweating
15.
•Hospital Beds basedon their Functioning & Source of Power:
1. Manual Beds
2. Semi-Electric Beds
3. Electric Beds
•Hospital Beds designed for Specific Purposes:
1. Bariatric Beds
2. Low Beds
3. Hospital Cribs
4. Gatch Beds
5. Fluid-Air Beds
6. Freedom Beds
16.
•Important Features ofa Hospital Bed:
1.Positioning Options
2.Side Rails
3.Weigh Scale
4.Trapeze
5.Gap Protection
6.Storage Space
17.
PRINCIPLES OF INFECTIONCONTROL IN BED MAKING
• Important to limit the movement of organisms and
•spread of infection while in bed
• Roll the dirty or soiled linen while removing it from bed
• Hold dirty linen away from your body
• Place dirty linen in hamper/cart/bag immediately
18.
• Never placelinen on the floor
• Wash your hands after handling dirty linen
• Never bring extra linen into a patient’s room
• Linen is considered contaminated once it is in a
room and cannot be used for another
•person
19.
• Avoid shakingclean sheets to place them on
the bed
• Unfold them gently to inhibit the flow of
microorganisms
• Place the open end of pillowcase away from
the door
20.
• This looksneater and also helps prevents the entrance
of organisms from the hall •
•Observe universal precautions if linen is
contaminated by blood or body fluids •
•Wash hands frequently and wear gloves while
handling linen
• Follow agency policy for proper disposal of linen
21.
BODY MECHANICS
1.Good bodymechanisms maintain body
alignment and prevent fatigue. It is also
important to conserve time and energy.
2.During bed making use safe patient handling
procedures and proper body mechanics.
22.
3. The stabilityof the body is assured by
keeping its center of gravity over its base.
When the base is wide it ensures that the
center of gravity will fall through its base.
In standing position, the nurse can have a
wide base by separating her feet.
23.
4. The nearerto center of gravity a
weight is held, the less is the strain
produced. (Eg. When opening the
linen, it should be placed on the edge
of the bed rather than holding it
above the shoulder level).
24.
5.Always raise thebed to the appropriate height before
changing linen so you do not haveto bend or stretch
over the mattress. You move back and forth to opposite
sides of the bed while applying new linen.
6.Body mechanics and safe handling are also important
when turning or repositioning the patient in bed.
25.
7. When tuckingthe sheets under the mattress, flexing is
done by knees and hips. Thisposition shifts the work to the
long and strong muscles of the thighs and keep the back in
good alignment. This reduces strain on the back.
8. When placing the linen on the bed and tucking them
under the mattress face thedirection of work and move with
the work rather than twisting the body and over reaching.
26.
9. Keep linenarranged in order of use. Make
bed completely on one side before doingother
side to limit unnecessary movement from one
side of bed to the opposite side
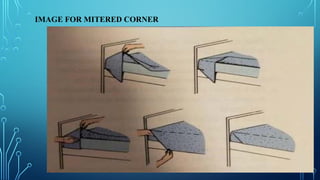
•ALERT Mittered corner-purposeis to
hold linen firmly in place on beds,
stretchers, and exam tables A mitered
corner is a special folding technique
that secures the linen under the
mattress.
31.
RULES FOR HANDLINGLINENS:
• Follow the rules of medical asepsis
• Wear gloves when handling soiled linen
• Wash hands before handling clean linen
• Because the uniform is considered to be dirty,
the cleanlinens should never touch the
uniform, but be held awayfrom the body.
32.
• Never shakelinens since this causes the spread
ofmicroorganisms.
• Clean linens are placed on clean surfaces.
• Dirty linens are never placed on the floor. Place soiled
linen in the proper receptacle. • Place linens on the bed
with the hem edges away from the patient.
33.
• Any linenbrought into a resident/patient’s room must
stay there because it is considered to be contaminated.
Other linens can be collected when collecting the bed
linens, i.e. towels, washcloths, gowns, bath blankets.
• When removing dirty linens roll them away from you.
The side of the linen that touched the resident is rolled
inside.
34.
GENERAL INSTRUCTIONS FORBED
MAKING:
• Wash your hand before & after the procedure. Don’t expose the client
unnecessarily.
•Protect the client from draught. Don’t cover the client’s face while placing
the linen. Don’t mix clean linen with soiled linen. Do not let the linen touch
your body or uniform Keep a reasonable distance from the face of the client
to prevent cross infection.
35.
•All equipment shouldbe collected before starting. Bed
should be made in such a way that patient can be put in
it without difficulty. The bed should be free from
crumbs and creases and should give a maximum
comfort to the patient. Pillows and other bed
accessories should be well arranged to give support
where necessary.
36.
•The patient's faceshould never be covered by
sheets or blankets. Extra assistance should be
available and, if necessary, one should be called
upon to help lift the patient. When pillows are
being shaken the nurse should turn away from
the patient. The open side of a pillow case
should be away from the main door of the ward.
37.
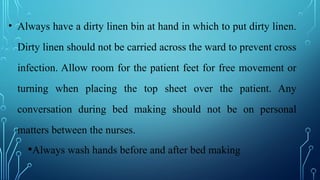
• Always havea dirty linen bin at hand in which to put dirty linen.
Dirty linen should not be carried across the ward to prevent cross
infection. Allow room for the patient feet for free movement or
turning when placing the top sheet over the patient. Any
conversation during bed making should not be on personal
matters between the nurses.
•Always wash hands before and after bed making
PRINCIPLES INVOLVED INBED MAKING:
✓Clean to unclean
✓Simple to complex
✓Principles of body mechanics
✓Principles of anatomy & physiology
✓Principles of microbiology
40.
OPENING A BEDFOR A CLIENT
• The open bed has the linens folded down, making it easier for the
client to get into bed. Open a bed for a new client or leave it open
when the client is out of bed for a short time. Follow these steps:
41.
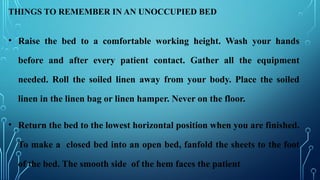
THINGS TO REMEMBERIN AN UNOCCUPIED BED
• Raise the bed to a comfortable working height. Wash your hands
before and after every patient contact. Gather all the equipment
needed. Roll the soiled linen away from your body. Place the soiled
linen in the linen bag or linen hamper. Never on the floor.
• Return the bed to the lowest horizontal position when you are finished.
To make a closed bed into an open bed, fanfold the sheets to the foot
of the bed. The smooth side of the hem faces the patient
42.
THINGS TO REMEMBERIN AN OCCUPIED BED
• Explain the procedure to the patient before beginning. Protect
the patient’s privacy.
•Cover the patient with a bath blanket
• Make sure the side rail is up on the side you are not working on
⎫ When finished make a toe pleat over the patient’s toes to
prevent the weight of the linen from pressing down on the toes
43.
PRELIMINARY ASSESSMENT
• Checkthe doctor’s order for specific precautions
regarding the movement and positioning of the client.
• Assess the client’s ability for self-care
• Check the furniture and linen available in the client’s
unit.
• Assess the number of clean linens needed.
44.
KEEY POINTS
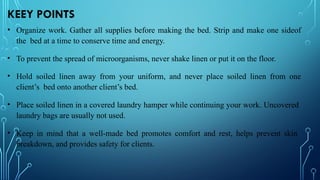
• Organizework. Gather all supplies before making the bed. Strip and make one sideof
the bed at a time to conserve time and energy.
• To prevent the spread of microorganisms, never shake linen or put it on the floor.
• Hold soiled linen away from your uniform, and never place soiled linen from one
client’s bed onto another client’s bed.
• Place soiled linen in a covered laundry hamper while continuing your work. Uncovered
laundry bags are usually not used.
• Keep in mind that a well-made bed promotes comfort and rest, helps prevent skin
breakdown, and provides safety for clients.
45.
COMMUNICATION TIP:
• Usean organized approach and reassuring tone of voice so the client feels safe
and comfortable during bedmaking.
• Encourage the client to report any discomfort or special requests while the bed is
being made. •
•When making an occupied bed, ask the client to assist as able and to report
any discomfort or the need to rest.
• Interact throughout the entire procedure, even if client is not responsive.
46.
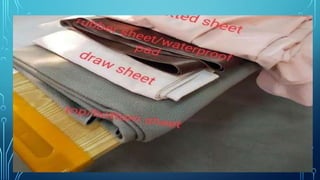
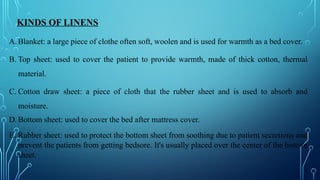
KINDS OF LINENS
A.Blanket: a large piece of clothe often soft, woolen and is used for warmth as a bed cover.
B. Top sheet: used to cover the patient to provide warmth, made of thick cotton, thermal
material.
C. Cotton draw sheet: a piece of cloth that the rubber sheet and is used to absorb and
moisture.
D. Bottom sheet: used to cover the bed after mattress cover.
E. Rubber sheet: used to protect the bottom sheet from soothing due to patient secretions and
prevent the patients from getting bedsore. It's usually placed over the center of the bottom
sheet.
47.
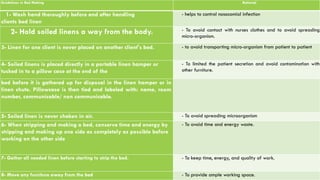
Guidelines in BedMaking Rational
1- Wash hand thoroughly before and after handling
clients bed linen
- helps to control nosocomial infection
2- Hold soiled linens a way from the body. - To avoid contact with nurses clothes and to avoid spreading
micro-organism.
3- Linen for one client is never placed on another client's bed. - to avoid transporting micro-organism from patient to patient
4- Soiled linens is placed directly in a portable linen hamper or
tucked in to a pillow case at the end of the
- To limited the patient secretion and avoid contamination with
other furniture.
bed before it is gathered up for disposal in the linen hamper or in
linen chute. Pillowcase is then tied and labeled with: name, room
number, communicable/ non communicable.
5- Soiled linen is never shaken in air. - To avoid spreading microorganism
6- When stripping and making a bed, conserve time and energy by
stripping and making up one side as completely as possible before
working on the other side
- To avoid time and energy waste.
7- Gather all needed linen before starting to strip the bed. - To keep time, energy, and quality of work.
8- Move any furniture away from the bed - To provide ample working space.
48.
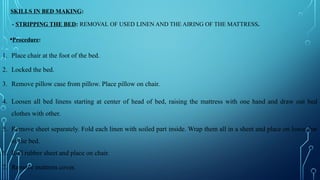
SKILLS IN BEDMAKING:
- STRIPPING THE BED: REMOVAL OF USED LINEN AND THE AIRING OF THE MATTRESS.
•Procedure:
1. Place chair at the foot of the bed.
2. Locked the bed.
3. Remove pillow case from pillow. Place pillow on chair.
4. Loosen all bed linens starting at center of head of bed, raising the mattress with one hand and draw out bed
clothes with other.
5. Remove sheet separately. Fold each linen with soiled part inside. Wrap them all in a sheet and place on lower bar
of the bed.
6. Roll rubber sheet and place on chair.
7. Remove mattress cover.
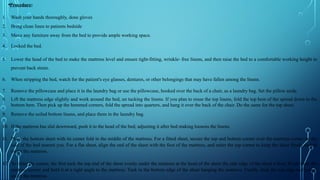
•Procedure:
1. Wash yourhands thoroughly, done gloves
2. Bring clean linen to patients bedside
3. Move any furniture away from the bed to provide ample working space.
4. Locked the bed.
5. Lower the head of the bed to make the mattress level and ensure tight-fitting, wrinkle- free linens, and then raise the bed to a comfortable working height to
prevent back strain.
6. When stripping the bed, watch for the patient's eye glasses, dentures, or other belongings that may have fallen among the linens.
7. Remove the pillowcase and place it in the laundry bag or use the pillowcase, hooked over the back of a chair, as a laundry bag. Set the pillow aside.
8. Lift the mattress edge slightly and work around the bed, un tucking the linens. If you plan to reuse the top linens, fold the top hem of the spread down to the
bottom hem. Then pick up the hemmed corners, fold the spread into quarters, and hang it over the back of the chair. Do the same for the top sheet.
9. Remove the soiled bottom linens, and place them in the laundry bag.
10. If the mattress has slid downward, push it to the head of the bed; adjusting it after bed making loosens the linens.
11. Place the bottom sheet with its center fold in the middle of the mattress. For a fitted sheet, secure the top and bottom corner over the mattress corner on the
side of the bed nearest you. For a flat sheet, align the end of the sheet with the foot of the mattress, and miter the top corner to keep the sheet firmly tucked
under the mattress.
12. To miter the corner, the first tuck the top end of the sheet evenly under the mattress at the head of the sheet the side edge of the sheet a bout 30 cm from the
mattress corner and hold it at a right angle to the mattress. Tuck in the bottom edge of the sheet hanging the mattress. Finally, drop the top edge and tuck it
under the mattress.
51.
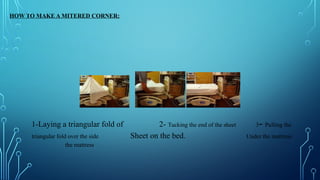
HOW TO MAKEA MITERED CORNER:
1-Laying a triangular fold of 2- Tucking the end of the sheet 3- Pulling the
triangular fold over the side Sheet on the bed. Under the mattress
the mattress
52.
•13-After tucking underone side of the bottom sheet, place the
rubber sheet and then draw sheet (if needed) about 38 cm from the
top of the bed, with its center fold in the middle of the bed. Then tuck
in the entire edge of the draw sheet on the side of the bed nearest
you.
•14-Place the top sheet with its corner fold in the middle of the bed
and its wide hem even with the top of the bed. Allow enough sheet at
the top of the bed to form a cuff over the spread
53.
15.Place the spreadover the top sheet, with its center fold in the middle of the bed.
16.Make a 7.6 cm to pleat, or vertical tuck, in the top linens to allow room for the
patient's feet and to prevent pressure that can cause discomfort, skin breakdown,
and foot drop.
17.Tuck the top sheet and spread under the foot of the mattress. Then miter the bottom
corners.
18.Move to the opposite side of the bed and repeat the procedure.
19.After fitting all corners of the bottom sheet or tucking them head the mattress, pull
the sheet at an angle from head toward the foot of the bed. This tightens the linens,
making the bottom sheet taut and wrinkle-free and promotion patient comfort.
54.
20. Fold thetop sheet over the spread at the head of the bed to form a
cuff and to give the bed a finished appearance, when making an open
bed, if a linen-saver pad is needed, place it on top of the bottom sheets.
21. Slip the pillow in to a clean case, tucking its corners well into the
case to ensure a smooth fit. Then place the pillow with its seam toward
the top of the bed to prevent it from rubbing against the patient's neck,
causing irritation, and its open edge facing away from the door to give
the bed a finished appearance.
55.
22. Lower thebed and lock its wheels to ensure patient safety.
23. Return furniture to its proper place, and place the call
button within the patients easy reach. Carry soiled linens from
the room is outstretched arms to avoid contaminating your
uniform.
24. After disposing of the linens, remove gloves if used and
wash your hands thoroughly to prevent the spread of
microorganisms.
56.
B- OPEN BED:PREPARING THE BED WITH NEW BED LINENS READY FOR
NEWLY ADMITTED PATIENTS
•Procedure
1. Refold each sheet according to its system of use.
2. Place clean linens on chair in order of use. See to it that the bed is flat.
3. Cover mattress.
4. Place bottom sheet with center fold in center in line with rim of matters at foot part,
spread across bed. Make mitered corner of head part, tuck extra sheet at side from
head of food.
5. Put rubber sheet 12-15 inches from the head of mattress. Cover with draw sheet.
Spread a cross bed. Tuck together extra length.
57.
6. Place topsheet in line with mattress at head
part and spread a cross bed. Tuck extra length of
sheet at foot part, mitered corner; allow hanging
free at sides.
7. Go to opposite side and repeat same procedure.
8. Grasp one corner of top sheet, fanfold at foot
part or diagonally to one side.
58.
C- POST OPERATIVEOR A SURGICAL BED
PREPARATION OF A SURGICAL BED PERMITS EASY PATIENT TRANSFER FROM SURGERY AND
PROMOTES CLEANLINESS AND COMFORT.
•Equipment:
•
• a- Linen for occupied bed
• b- Emesis basin
•d- Blanket
•f- Wash cloth
•g- Sphygmomanometer and stethoscope.
59.
TO MAKE SUCHA BED TAKES THE FOLLOWING STEPS:
1.Assemble linens as you would for making an unoccupied bed,
including two clean sheets (one fitted, if available), a draw sheet, a
bath blanket, a spread or sheet, a pillowcase, facial tissues, and
linen-saver pads.
2.Raise the bed to a comfortable working height to prevent back
strain.
3.Slip the pillow into a clean pillowcase and place it on a nearby
table or chair.
60.
4. Make thefoundation of the bed using the bottom sheet and
draw sheet.
5.Place an open bath blanket a bout (38 cm) from the head of
the bed with its center fold positioned in the middle of the
bed. The blanket warms the patient and counteracts the
decreased body temperature caused by anesthesia.
6.Place a top sheet or spread on the bath, and position it as you
did the blanket.
61.
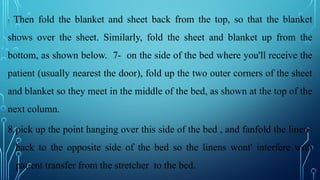
7. Then foldthe blanket and sheet back from the top, so that the blanket
shows over the sheet. Similarly, fold the sheet and blanket up from the
bottom, as shown below. 7- on the side of the bed where you'll receive the
patient (usually nearest the door), fold up the two outer corners of the sheet
and blanket so they meet in the middle of the bed, as shown at the top of the
next column.
8.pick up the point hanging over this side of the bed , and fanfold the linens
back to the opposite side of the bed so the linens wont' interfere with
patient transfer from the stretcher to the bed.
62.
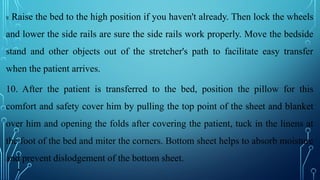
9. Raise thebed to the high position if you haven't already. Then lock the wheels
and lower the side rails are sure the side rails work properly. Move the bedside
stand and other objects out of the stretcher's path to facilitate easy transfer
when the patient arrives.
10. After the patient is transferred to the bed, position the pillow for this
comfort and safety cover him by pulling the top point of the sheet and blanket
over him and opening the folds after covering the patient, tuck in the linens at
the foot of the bed and miter the corners. Bottom sheet helps to absorb moisture
and prevent dislodgement of the bottom sheet.
•
63.
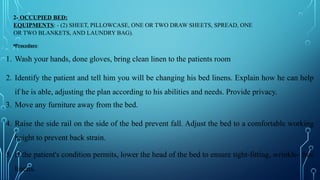
2- OCCUPIED BED:
EQUIPMENTS:- (2) SHEET, PILLOWCASE, ONE OR TWO DRAW SHEETS, SPREAD, ONE
OR TWO BLANKETS, AND LAUNDRY BAG).
•Procedure:
1. Wash your hands, done gloves, bring clean linen to the patients room
2. Identify the patient and tell him you will be changing his bed linens. Explain how he can help
if he is able, adjusting the plan according to his abilities and needs. Provide privacy.
3. Move any furniture away from the bed.
4. Raise the side rail on the side of the bed prevent fall. Adjust the bed to a comfortable working
height to prevent back strain.
5. If the patient's condition permits, lower the head of the bed to ensure tight-fitting, wrinkle- free
linens.
64.
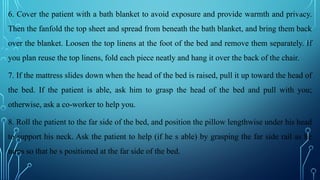
6. Cover thepatient with a bath blanket to avoid exposure and provide warmth and privacy.
Then the fanfold the top sheet and spread from beneath the bath blanket, and bring them back
over the blanket. Loosen the top linens at the foot of the bed and remove them separately. If
you plan reuse the top linens, fold each piece neatly and hang it over the back of the chair.
7. If the mattress slides down when the head of the bed is raised, pull it up toward the head of
the bed. If the patient is able, ask him to grasp the head of the bed and pull with you;
otherwise, ask a co-worker to help you.
8. Roll the patient to the far side of the bed, and position the pillow lengthwise under his head
to support his neck. Ask the patient to help (if he s able) by grasping the far side rail as he
turns so that he s positioned at the far side of the bed.
65.
9. Loosen thesoiled bottom linens on the side of the bed nearest you. Then
roll the linens toward the patient s back in the middle of the bed.
10. Place a clean bottom sheet on the bed, with its center fold in the middle of
the mattress.
11-Fanfold the remaining clean bottom sheet toward the patient, and place the
draw sheet, if needed, about 38 cm from the top of the bed, with its center
fold in the middle of the mattress. Tuck in the entire edge of the draw sheet
on the side nearest you. Fanfold the remaining draw sheet toward the patient.
66.
12. Raise theother side rail, and roll the patient over the soiled and fan folded
linen to the clean side of the bed. Ask the patient to help by grasping the rail.
13-Move to the unfinished side of the bed and lower the side rail nearest you.
The loosen and remove the soiled bottom linens separately and place them in
the laundry bag..
14-Pull the clean bottom sheet taut. Secure a fitted sheet over the mattress
corners or place the end of a flat sheet even with the foot of the bed, and miter
the top corner. Pull the draw sheet taut and tuck it tightly under the mattress.
Unfold and smooth the linen- saver pad, if used.
67.
15. Assist thepatient to the supine position if his condition permits.
16-Remove the soiled pillowcase, and place it in the laundry bag. Then slip the pillow
into a clean pillowcase, place the pillow beneath the patient s head.
17.Un fold the clean top sheet over the patient with the rough side of the hem facing a
way from the bed to avoid irritating the patients skin. Allow enough sheets at the top
of the bed to form a cuff over the spread.
18.Remove the bath blanket from beneath the sheet, and center the spread over the top
sheet.
19.Make 7.6 cm toe pleat, or vertical tuck, in the top linens to allow room for the patient
s feet and prevent pressure that can cause discomfort, skin breakdown, and foot drop.
68.
20. Tuck thetop sheet and spread under the foot of the bed, and miter the bottom
center. Fold the top sheet over the spread to give the bed a finished appearance.
21. Raise the head to the bed to a comfortable position for the patient, make
source both side rails are raised, and then lower the bed and lock its wheels to
ensure the patients safety. Assess the patient s body alignment and his mental and
emotional status.
22-Return furniture to its proper place, and place the call button within the
patient s easy reach. Remove the laundry bag from the room. Remove and
discard gloves.
69.
•Documentation
•Although linen changesaren’t usually documented, record their dates and times in your notes with incontinence, excessive
wound drainage, or diaphoresis.
70.
•References:
1. Arnow,D., Blauer,R.,Blue,B., et.al. : Nursing Procedures, second edition, Springhouse Corporation,
United State, 1993, PP:74-78.
2. Harkreader, H,: Fundamentals of Nursing- Caring and Clinical Judgment,8th
edition, W.B. Saunders
Company, 2000,PP:950-996.
3. Victor, B., Amor,C., Ai,J., et.al.: Bed Making, Health Center Journal, Vol:1, 2007, 20-30.
•