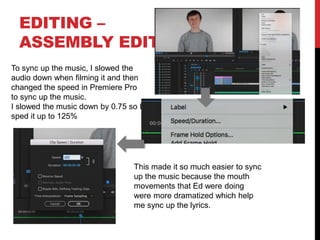
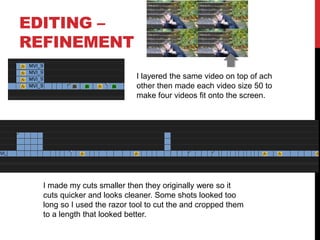
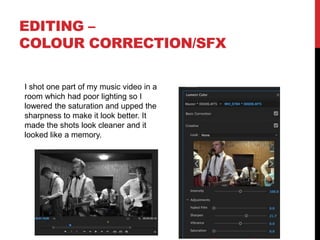
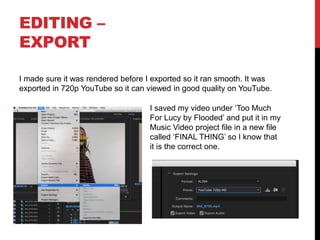
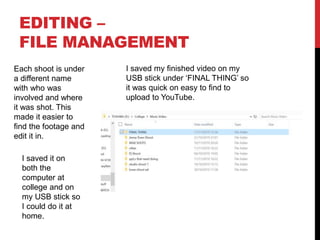
MUSIC VIDEO
PRODUCTION
PROCESS
LOGYOUR NAME
FILMING
Explain what worked and didn’t work about your filming and how you
managed this covering the following areas:
• Technical – using the cameras and any technical equipment; this could
be how you did your lip sync, used the green screen, dealt with problems
with batteries, etc
• Logistical – did your locations work? Did you have any access
problems? Did it rain?
• Personnel – how were your cast/crew? Did anyone let you down? How
did you manage this?
• Planning – did your planning help? Do you think it could have worked
better? How?
• Next steps – do you need to re-film? Film more? Have you changed your
video? How/why?
*If you make any drastic changes to your video you MUST
add this to your planning documentation and state how and
why this has happened
FILMING –
PRODUCTION STILLS
Where appropriate add stills from when you were filming,
annotate where necessary
Lights
reflecting the
background
to make it
look bright
Person stood
away from the
backdrop so there
is no shadow
Low ISO to
make the
background to
look brighter
Up the exposure
and whites in PP
to make it match
with the others
EDITING
• Record your edit progress, decisions, problems, etc. in
this section
• Include screenshots with annotations, statements, etc.
• Try to explain how you worked and justify why you chose
to work the way you did.
• Follow the structure and what to include on each slide as
this is necessary for evidence for assessment
EDITING –
FILE MANAGEMENT
I saved my finished video on my
USB stick under ‘FINAL THING’ so
it was quick on easy to find to
upload to YouTube.
Each shoot is under
a different name
with who was
involved and where
it was shot. This
made it easier to
find the footage and
edit it in.
I saved it on
both the
computer at
college and on
my USB stick so
I could do it at
home.
EDITING –
SETTING UP PREMIERE
Press on ‘File’ then go down to new project
EDITING –
IMPORTING FOOTAGE
Show how you imported your footage, your file set up in
Premiere and how you have organised your different docs
[video, audio, etc]
To import footage you
need to double tap on
the media section on PP
and chose the file to
import.
This can import
video files, pictures
and audio. This is
how I got the song
mp3 into PP.
EDITING –
WORKSPACE
EDITING –
ASSEMBLY EDIT
To sync up the music, I slowed the
audio down when filming it and then
changed the speed in Premiere Pro
to sync up the music.
I slowed the music down by 0.75 so I
sped it up to 125%
This made it so much easier to sync
up the music because the mouth
movements that Ed were doing
were more dramatized which help
me sync up the lyrics.
EDITING –
REFINEMENT
I made my cuts smaller then they originally were so it
cuts quicker and looks cleaner. Some shots looked too
long so I used the razor tool to cut the and cropped them
to a length that looked better.
I layered the same video on top of ach
other then made each video size 50 to
make four videos fit onto the screen.
EDITING –
COLOUR CORRECTION/SFX
I shot one part of my music video in a
room which had poor lighting so I
lowered the saturation and upped the
sharpness to make it look better. It
made the shots look cleaner and it
looked like a memory.
EDITING –
EXPORT
I saved my video under ‘Too Much
For Lucy by Flooded’ and put it in my
Music Video project file in a new file
called ‘FINAL THING’ so I know that
it is the correct one.
I made sure it was rendered before I exported so it ran smooth. It was
exported in 720p YouTube so it can viewed in good quality on YouTube.

Mv process log form 2019

  • 1.
  • 2.
    FILMING Explain what workedand didn’t work about your filming and how you managed this covering the following areas: • Technical – using the cameras and any technical equipment; this could be how you did your lip sync, used the green screen, dealt with problems with batteries, etc • Logistical – did your locations work? Did you have any access problems? Did it rain? • Personnel – how were your cast/crew? Did anyone let you down? How did you manage this? • Planning – did your planning help? Do you think it could have worked better? How? • Next steps – do you need to re-film? Film more? Have you changed your video? How/why? *If you make any drastic changes to your video you MUST add this to your planning documentation and state how and why this has happened
  • 3.
    FILMING – PRODUCTION STILLS Whereappropriate add stills from when you were filming, annotate where necessary Lights reflecting the background to make it look bright Person stood away from the backdrop so there is no shadow Low ISO to make the background to look brighter Up the exposure and whites in PP to make it match with the others
  • 4.
    EDITING • Record youredit progress, decisions, problems, etc. in this section • Include screenshots with annotations, statements, etc. • Try to explain how you worked and justify why you chose to work the way you did. • Follow the structure and what to include on each slide as this is necessary for evidence for assessment
  • 5.
    EDITING – FILE MANAGEMENT Isaved my finished video on my USB stick under ‘FINAL THING’ so it was quick on easy to find to upload to YouTube. Each shoot is under a different name with who was involved and where it was shot. This made it easier to find the footage and edit it in. I saved it on both the computer at college and on my USB stick so I could do it at home.
  • 6.
    EDITING – SETTING UPPREMIERE Press on ‘File’ then go down to new project
  • 7.
    EDITING – IMPORTING FOOTAGE Showhow you imported your footage, your file set up in Premiere and how you have organised your different docs [video, audio, etc] To import footage you need to double tap on the media section on PP and chose the file to import. This can import video files, pictures and audio. This is how I got the song mp3 into PP.
  • 8.
  • 9.
    EDITING – ASSEMBLY EDIT Tosync up the music, I slowed the audio down when filming it and then changed the speed in Premiere Pro to sync up the music. I slowed the music down by 0.75 so I sped it up to 125% This made it so much easier to sync up the music because the mouth movements that Ed were doing were more dramatized which help me sync up the lyrics.
  • 10.
    EDITING – REFINEMENT I mademy cuts smaller then they originally were so it cuts quicker and looks cleaner. Some shots looked too long so I used the razor tool to cut the and cropped them to a length that looked better. I layered the same video on top of ach other then made each video size 50 to make four videos fit onto the screen.
  • 11.
    EDITING – COLOUR CORRECTION/SFX Ishot one part of my music video in a room which had poor lighting so I lowered the saturation and upped the sharpness to make it look better. It made the shots look cleaner and it looked like a memory.
  • 12.
    EDITING – EXPORT I savedmy video under ‘Too Much For Lucy by Flooded’ and put it in my Music Video project file in a new file called ‘FINAL THING’ so I know that it is the correct one. I made sure it was rendered before I exported so it ran smooth. It was exported in 720p YouTube so it can viewed in good quality on YouTube.