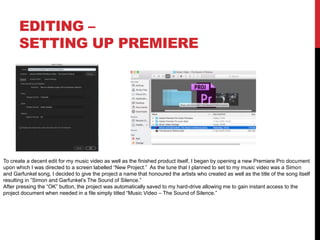
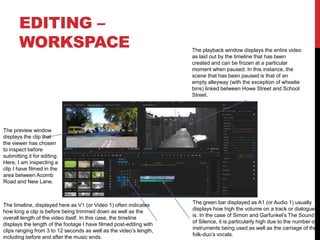
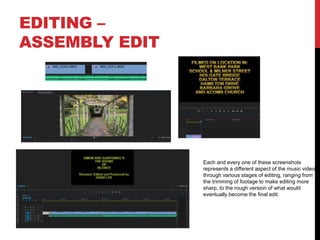
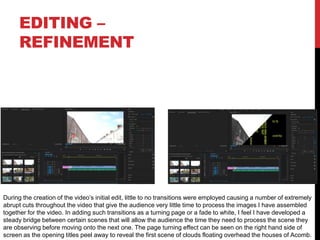
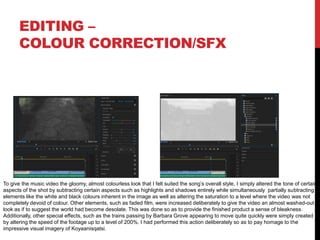
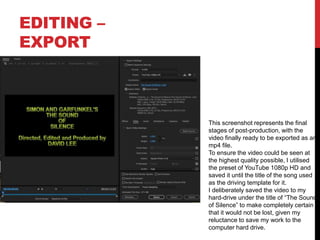
MUSIC VIDEO
PRODUCTION
PROCESS
LOGDAVID LEE
PRODUCTION LOG:
GUIDANCE
• This document is for you to track the progress of your
production – filming, editing and post-production.
• This is so you can track what you did and how you did it,
explaining and amendments and changes you made and
tracking the decisions that have shaped the practical
creation of your music video.
• The more detail you include about how you made your music
video, the better. The document is broken down in to two
sections, Filming and Editing, each of these is then made of
specific elements that occur in both.
• For each slide there is a prompt detailing what you should
include, delete the prompt after you have complete the slide.
• Remember, images often show what you’ve done more
effectively than words. Use text to explain an illustration.
FILMING
Explain what worked and didn’t work about your filming and how you
managed this covering the following areas:
• Technical – using the cameras and any technical equipment; this could
be how you did your lip sync, used the green screen, dealt with problems
with batteries, etc
• Logistical – did your locations work? Did you have any access
problems? Did it rain?
• Personnel – how were your cast/crew? Did anyone let you down? How
did you manage this?
• Planning – did your planning help? Do you think it could have worked
better? How?
• Next steps – do you need to re-film? Film more? Have you changed your
video? How/why?
*If you make any drastic changes to your video you MUST
add this to your planning documentation and state how and
why this has happened
FILMING – PRODUCTION STILLS
This particular sequence of the music video was filmed on Acomb Road
nearby the entrance of West Bank Park. Throughout all aspects of
production, I decided quite firmly that any footage I captured should feel
authentic and real, without the use of greenscreen to simulate the
environment, which eventually paid off when it came to editing the
video together, providing it with a grounded sense of reality that is very
rarely seen in music videos.
Because Acomb Church is likely to be privately owned, it would have
proved potentially difficult asking for permission to film inside. However,
as I had only intended from the start to film the exterior of the church, I
managed to circumvent the problem almost immediately, ultimately
resulting in a fantastic shot showcasing the entrance to the church as
well as the sign detailing what kind of church it is. Having been filmed
during a good spell of sunny weather, this alleviated any worry that
would have otherwise arisen had the weather been forecast to rain.
This sequence of the music video was filmed in West Bank Park
on a walkway leading directly down to the Bowling Green and
was taken on the same day as the Acomb Church sequence.
Having decided not to feature any cast whatsoever in the video
and work as a one-person crew, with the exception of two ghost
directors who shall remain anonymous, I did not have to worry
about timing schedules allowing me to film this scene (and its
alternate thereof) as a POV sequence seeing what the narrator
sees while remaining unseen.
Although I had covered a good portion of principal photography
on Tuesday, I decided to return to West Bank Park the day
following Wednesday to film an alternate take of this scene, in
which the POV moves from the bowling green and up to the
grassland area. This was done so a second option could be
incorporated into the edit in the event the first one was deemed
unusable.
Original take
(Tuesday filming)
Alternate take
(Thursday filming)
Entrance to
Acomb
Church.
EDITING
• Record your edit progress, decisions, problems, etc. in
this section
• Include screenshots with annotations, statements, etc.
• Try to explain how you worked and justify why you chose
to work the way you did.
• Follow the structure and what to include on each slide as
this is necessary for evidence for assessment
EDITING –
FILE MANAGEMENT
To ensure that the work on my music video would not
be lost, corrupted or otherwise tampered with in any
capacity whatsoever, I therefore came to the decision
to save it on to my hard-drive, believing it to be the
safest place in which it could be stored. In addition, this
would allow any software breakdowns that occurred to
automatically direct all autosaves there.
As a precaution, the Premiere Pro document
containing the edit of my music video through
various stages was saved on to my USB stick.
In order to keep my footage safe as well as make completely sure
that it wouldn’t spread across the entirety of my workspace screen,
I put together a file entitled “Music Video Footage” so that I would
be able to access what I had filmed instantly when it came to start
creating the rough edit of my video, ranging all the way from the
start of production from my first (dubious) attempt at filming a wide-
shot of Gladstone Street to the final shot of a group of CDs stacked
together.
EDITING –
SETTING UP PREMIERE
To create a decent edit for my music video as well as the finished product itself, I began by opening a new Premiere Pro document
upon which I was directed to a screen labelled “New Project.” As the tune that I planned to set to my music video was a Simon
and Garfunkel song, I decided to give the project a name that honoured the artists who created as well as the title of the song itself
resulting in ”Simon and Garfunkel’s The Sound of Silence.”
After pressing the “OK” button, the project was automatically saved to my hard-drive allowing me to gain instant access to the
project document when needed in a file simply titled “Music Video – The Sound of Silence.”
EDITING –
IMPORTING FOOTAGE
Each screenshot in this slide indicates a different stage of how I imported the filmed footage into Adobe Premier Pro. First, I started
by transferring the footage from the SD Card into a newly-created folder titled “Music Video Footage”. From there, I then dragged
the footage I had filmed into the assembly line contained in the project file and began editing what I wanted to display in the video
together. Finally, the finishing touches, which proved the most difficult to apply to the video, came in the form of the song itself,
featured as the fifth track on the compilation album “Simon and Garfunkel’s Greatest Hits.” To import the track itself into the video,
the CD had to first be inserted to a computer with a disc drive. After that, the track had to be burnt on to the computer and emailed
across to my York College email account so that I could then download it as an MP4 and begin editing the video around it.
EDITING –
WORKSPACE
The green bar displayed as A1 (or Audio 1) usually
displays how high the volume on a track or dialogue
is. In the case of Simon and Garfunkel’s The Sound
of Silence, it is particularly high due to the number of
instruments being used as well as the carriage of the
folk-duo’s vocals.
The timeline, displayed here as V1 (or Video 1) often indicates
how long a clip is before being trimmed down as well as the
overall length of the video itself. In this case, the timeline
displays the length of the footage I have filmed post-editing with
clips ranging from 3 to 12 seconds as well as the video’s length,
including before and after the music ends.
The preview window
displays the clip that
the viewer has chosen
to inspect before
submitting it for editing.
Here, I am inspecting a
clip I have filmed in the
area between Acomb
Road and New Lane.
The playback window displays the entire video
as laid out by the timeline that has been
created and can be frozen at a particular
moment when paused. In this instance, the
scene that has been paused is that of an
empty alleyway (with the exception of wheelie
bins) linked between Howe Street and School
Street.
EDITING –
ASSEMBLY EDIT
Each and every one of these screenshots
represents a different aspect of the music video
through various stages of editing, ranging from
the trimming of footage to make editing more
sharp, to the rough version of what would
eventually become the final edit.
EDITING –
REFINEMENT
During the creation of the video’s initial edit, little to no transitions were employed causing a number of extremely
abrupt cuts throughout the video that give the audience very little time to process the images I have assembled
together for the video. In adding such transitions as a turning page or a fade to white, I feel I have developed a
steady bridge between certain scenes that will allow the audience the time they need to process the scene they
are observing before moving onto the next one. The page turning effect can be seen on the right hand side of
screen as the opening titles peel away to reveal the first scene of clouds floating overhead the houses of Acomb.
EDITING –
COLOUR CORRECTION/SFX
To give the music video the gloomy, almost colourless look that I felt suited the song’s overall style, I simply altered the tone of certain
aspects of the shot by subtracting certain aspects such as highlights and shadows entirely while simultaneously partially subtracting
elements like the white and black colours inherent in the image as well as altering the saturation to a level where the video was not
completely devoid of colour. Other elements, such as faded film, were increased deliberately to give the video an almost washed-out
look as if to suggest the world had become desolate. This was done so as to provide the finished product a sense of bleakness.
Additionally, other special effects, such as the trains passing by Barbara Grove appearing to move quite quickly were simply created
by altering the speed of the footage up to a level of 200%. I had performed this action deliberately so as to pay homage to the
impressive visual imagery of Koyaanisqatsi.
EDITING –
EXPORT
This screenshot represents the final
stages of post-production, with the
video finally ready to be exported as an
mp4 file.
To ensure the video could be seen at
the highest quality possible, I utilised
the preset of YouTube 1080p HD and
saved it until the title of the song used
as the driving template for it.
I deliberately saved the video to my
hard-drive under the title of “The Sound
of Silence” to make completely certain
that it would not be lost, given my
reluctance to save my work to the
computer hard drive.

Music Video Process Log Form 2019

  • 1.
  • 2.
    PRODUCTION LOG: GUIDANCE • Thisdocument is for you to track the progress of your production – filming, editing and post-production. • This is so you can track what you did and how you did it, explaining and amendments and changes you made and tracking the decisions that have shaped the practical creation of your music video. • The more detail you include about how you made your music video, the better. The document is broken down in to two sections, Filming and Editing, each of these is then made of specific elements that occur in both. • For each slide there is a prompt detailing what you should include, delete the prompt after you have complete the slide. • Remember, images often show what you’ve done more effectively than words. Use text to explain an illustration.
  • 3.
    FILMING Explain what workedand didn’t work about your filming and how you managed this covering the following areas: • Technical – using the cameras and any technical equipment; this could be how you did your lip sync, used the green screen, dealt with problems with batteries, etc • Logistical – did your locations work? Did you have any access problems? Did it rain? • Personnel – how were your cast/crew? Did anyone let you down? How did you manage this? • Planning – did your planning help? Do you think it could have worked better? How? • Next steps – do you need to re-film? Film more? Have you changed your video? How/why? *If you make any drastic changes to your video you MUST add this to your planning documentation and state how and why this has happened
  • 4.
    FILMING – PRODUCTIONSTILLS This particular sequence of the music video was filmed on Acomb Road nearby the entrance of West Bank Park. Throughout all aspects of production, I decided quite firmly that any footage I captured should feel authentic and real, without the use of greenscreen to simulate the environment, which eventually paid off when it came to editing the video together, providing it with a grounded sense of reality that is very rarely seen in music videos. Because Acomb Church is likely to be privately owned, it would have proved potentially difficult asking for permission to film inside. However, as I had only intended from the start to film the exterior of the church, I managed to circumvent the problem almost immediately, ultimately resulting in a fantastic shot showcasing the entrance to the church as well as the sign detailing what kind of church it is. Having been filmed during a good spell of sunny weather, this alleviated any worry that would have otherwise arisen had the weather been forecast to rain. This sequence of the music video was filmed in West Bank Park on a walkway leading directly down to the Bowling Green and was taken on the same day as the Acomb Church sequence. Having decided not to feature any cast whatsoever in the video and work as a one-person crew, with the exception of two ghost directors who shall remain anonymous, I did not have to worry about timing schedules allowing me to film this scene (and its alternate thereof) as a POV sequence seeing what the narrator sees while remaining unseen. Although I had covered a good portion of principal photography on Tuesday, I decided to return to West Bank Park the day following Wednesday to film an alternate take of this scene, in which the POV moves from the bowling green and up to the grassland area. This was done so a second option could be incorporated into the edit in the event the first one was deemed unusable. Original take (Tuesday filming) Alternate take (Thursday filming) Entrance to Acomb Church.
  • 5.
    EDITING • Record youredit progress, decisions, problems, etc. in this section • Include screenshots with annotations, statements, etc. • Try to explain how you worked and justify why you chose to work the way you did. • Follow the structure and what to include on each slide as this is necessary for evidence for assessment
  • 6.
    EDITING – FILE MANAGEMENT Toensure that the work on my music video would not be lost, corrupted or otherwise tampered with in any capacity whatsoever, I therefore came to the decision to save it on to my hard-drive, believing it to be the safest place in which it could be stored. In addition, this would allow any software breakdowns that occurred to automatically direct all autosaves there. As a precaution, the Premiere Pro document containing the edit of my music video through various stages was saved on to my USB stick. In order to keep my footage safe as well as make completely sure that it wouldn’t spread across the entirety of my workspace screen, I put together a file entitled “Music Video Footage” so that I would be able to access what I had filmed instantly when it came to start creating the rough edit of my video, ranging all the way from the start of production from my first (dubious) attempt at filming a wide- shot of Gladstone Street to the final shot of a group of CDs stacked together.
  • 7.
    EDITING – SETTING UPPREMIERE To create a decent edit for my music video as well as the finished product itself, I began by opening a new Premiere Pro document upon which I was directed to a screen labelled “New Project.” As the tune that I planned to set to my music video was a Simon and Garfunkel song, I decided to give the project a name that honoured the artists who created as well as the title of the song itself resulting in ”Simon and Garfunkel’s The Sound of Silence.” After pressing the “OK” button, the project was automatically saved to my hard-drive allowing me to gain instant access to the project document when needed in a file simply titled “Music Video – The Sound of Silence.”
  • 8.
    EDITING – IMPORTING FOOTAGE Eachscreenshot in this slide indicates a different stage of how I imported the filmed footage into Adobe Premier Pro. First, I started by transferring the footage from the SD Card into a newly-created folder titled “Music Video Footage”. From there, I then dragged the footage I had filmed into the assembly line contained in the project file and began editing what I wanted to display in the video together. Finally, the finishing touches, which proved the most difficult to apply to the video, came in the form of the song itself, featured as the fifth track on the compilation album “Simon and Garfunkel’s Greatest Hits.” To import the track itself into the video, the CD had to first be inserted to a computer with a disc drive. After that, the track had to be burnt on to the computer and emailed across to my York College email account so that I could then download it as an MP4 and begin editing the video around it.
  • 9.
    EDITING – WORKSPACE The greenbar displayed as A1 (or Audio 1) usually displays how high the volume on a track or dialogue is. In the case of Simon and Garfunkel’s The Sound of Silence, it is particularly high due to the number of instruments being used as well as the carriage of the folk-duo’s vocals. The timeline, displayed here as V1 (or Video 1) often indicates how long a clip is before being trimmed down as well as the overall length of the video itself. In this case, the timeline displays the length of the footage I have filmed post-editing with clips ranging from 3 to 12 seconds as well as the video’s length, including before and after the music ends. The preview window displays the clip that the viewer has chosen to inspect before submitting it for editing. Here, I am inspecting a clip I have filmed in the area between Acomb Road and New Lane. The playback window displays the entire video as laid out by the timeline that has been created and can be frozen at a particular moment when paused. In this instance, the scene that has been paused is that of an empty alleyway (with the exception of wheelie bins) linked between Howe Street and School Street.
  • 10.
    EDITING – ASSEMBLY EDIT Eachand every one of these screenshots represents a different aspect of the music video through various stages of editing, ranging from the trimming of footage to make editing more sharp, to the rough version of what would eventually become the final edit.
  • 11.
    EDITING – REFINEMENT During thecreation of the video’s initial edit, little to no transitions were employed causing a number of extremely abrupt cuts throughout the video that give the audience very little time to process the images I have assembled together for the video. In adding such transitions as a turning page or a fade to white, I feel I have developed a steady bridge between certain scenes that will allow the audience the time they need to process the scene they are observing before moving onto the next one. The page turning effect can be seen on the right hand side of screen as the opening titles peel away to reveal the first scene of clouds floating overhead the houses of Acomb.
  • 12.
    EDITING – COLOUR CORRECTION/SFX Togive the music video the gloomy, almost colourless look that I felt suited the song’s overall style, I simply altered the tone of certain aspects of the shot by subtracting certain aspects such as highlights and shadows entirely while simultaneously partially subtracting elements like the white and black colours inherent in the image as well as altering the saturation to a level where the video was not completely devoid of colour. Other elements, such as faded film, were increased deliberately to give the video an almost washed-out look as if to suggest the world had become desolate. This was done so as to provide the finished product a sense of bleakness. Additionally, other special effects, such as the trains passing by Barbara Grove appearing to move quite quickly were simply created by altering the speed of the footage up to a level of 200%. I had performed this action deliberately so as to pay homage to the impressive visual imagery of Koyaanisqatsi.
  • 13.
    EDITING – EXPORT This screenshotrepresents the final stages of post-production, with the video finally ready to be exported as an mp4 file. To ensure the video could be seen at the highest quality possible, I utilised the preset of YouTube 1080p HD and saved it until the title of the song used as the driving template for it. I deliberately saved the video to my hard-drive under the title of “The Sound of Silence” to make completely certain that it would not be lost, given my reluctance to save my work to the computer hard drive.