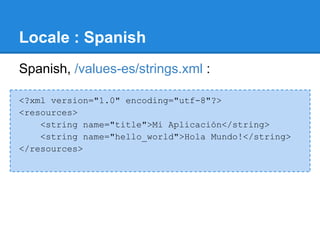
8
 Support
 Different Devices
 Anuchit Chalothorn
 anoochit@gmail.com

Licensed under a Creative Commons Attribution-NonCommercial-ShareAlike 3.0 Unported License.
Supporting Different Languages
Android will run on many devices in many
regions. To reach the most users, your
application should handle text, audio files,
numbers, currency, and graphics in ways
appropriate to the locales where your
application will be used.
Using Resources for Localization
The default resource set must also include any
default drawables and layouts, and can include
other types of resources such as animations.
● res/drawable/
● res/layout/
● res/anim/
● res/xml/
● res/raw/
Language String
Android makes this easy with a resources
directory in each Android project. Within the
res/ directory are subdirectories for various
resource types. There are also a few default
files such as res/values/strings.xml, which
holds your string values.
Locale Directories and String Files
To add support for more languages, create
additional values directories inside res/ that
include a hyphen and the ISO country code at
the end of the directory name. eg: values-es
for Spanish, values-th for Thai, values for
English etc.
Locale : English
English (default locale), /values/strings.xml :

<?xml version="1.0" encoding="utf-8"?>
<resources>
    <string name="title">My Application</string>
    <string name="hello_world">Hello World!</string>
</resources>
Locale : Spanish
Spanish, /values-es/strings.xml :

<?xml version="1.0" encoding="utf-8"?>
<resources>
    <string name="title">Mi Aplicación</string>
    <string name="hello_world">Hola Mundo!</string>
</resources>
Locale : French
French, /values-fr/strings.xml :

<?xml version="1.0" encoding="utf-8"?>
<resources>
    <string name="title">Mon Application</string>
    <string name="hello_world">Bonjour le monde !</string>
</resources>
Use the String Resources
You can refer to a string resource with the
syntax R.string.<string_name>. There are a
variety of methods that accept a string resource
this way.
Use the String Resources

// Get a string resource from your app's Resources
String hello = getResources().getString(R.string.
hello_world);

// Or supply a string resource to a method that requires a
string
TextView textView = new TextView(this);
textView.setText(R.string.hello_world);
Use the String in XML
In other XML files, you can refer to a string
resource with the syntax
@string/<string_name> whenever the XML
attribute accepts a string value.
Use the String in XML

<TextView
    android:layout_width="wrap_content"
    android:layout_height="wrap_content"
    android:text="@string/hello_world" />
Workshop: Locale
Create form UI like following and make locale
string for English, Vietnamese, Japanese and
Thai.
Locale your graphic
You can use qualifiers with any resources
include graphic in drawable directory, eg :
● /drawable for English (default locale)
● /drawable-th for Thai
● /drawable-vn for Vietnamese
● /drawable-ja for Japanese
Workshop: Locale your graphic
Create a UI like following and make locale
graphic for English, Vietnamese, Japanese and
Thai.
Supporting Different Screens
Android categorizes device screens using two
general properties: size and density. You
should expect that your app will be installed on
devices with screens that range in both size
and density.
Sizes and Densities
To declare different layouts and bitmaps you'd
like to use for different screens, you must place
these alternative resources in separate
directories, similar to how you do for different
language strings.
Create Different Layouts
To optimize your user experience on different
screen sizes, you should create a unique layout
XML file for each screen size you want to
support.
Create Different Layouts
The directory named with a -<screen_size>
suffix.
● /res/layout/main.xml <-- normal
● /res/layout-land/main.xml <-- landscape
● /res/layout-large/main.xml <-- for large
● /res/layout-large-land/main.xml <-- large landscape
Create Different Bitmaps
You should always provide bitmap resources
that are properly scaled to each of the
generalized density buckets: low, medium, high
and extra-high density. This helps you achieve
good graphical quality and performance on all
screen densities.
Create Different Bitmaps
To generate these images, you should start
with your raw resource in vector format and
generate the images for each density using the
following size scale:
● xhdpi: 2.0
● hdpi: 1.5
● mdpi: 1.0 (baseline)
● ldpi: 0.75


Ref: http://developer.android.com/design/style/iconography.html
Workshop: Drawable
Make graphic resources match each screen
size.
Supporting Different Platform Versions

While the latest versions of Android often
provide great APIs for your app, you should
continue to support older versions of Android
until more devices get updated.
Specify Minimum and Target API
The AndroidManifest.xml file describes details
about your app and identifies which versions of
Android it supports. Specifically, the
minSdkVersion and targetSdkVersion with
<use-sdk element.
Specify Minimum and Target API


<manifest xmlns:android="http://schemas.android.
com/apk/res/android" ... >
    <uses-sdk android:minSdkVersion="4"
              android:targetSdkVersion="15" />
    ...
</manifest>
Check System Version at Runtime
Android provides a unique code for each
platform version in the Build constants class.
Use these codes within your app to build
conditions that ensure the code that depends
on higher API levels is executed only when
those APIs are available on the system.
Check System Version at Runtime

private void setUpActionBar() {
// Make sure we're running on Honeycomb or higher to use
ActionBar APIs
  if (Build.VERSION.SDK_INT >= Build.VERSION_CODES.
HONEYCOMB)
   {
         ActionBar actionBar = getActionBar();
         actionBar.setDisplayHomeAsUpEnabled(true);
   }
}
Use Platform Styles and Themes
Android provides user experience themes that
give apps the look and feel of the underlying
operating system. These themes can be
applied to your app within the manifest file.
Platform Styles and Themes
To make your activity look like a dialog box:


<activity android:theme="@android:style/Theme.Dialog">
Platform Styles and Themes
To make your activity have a transparent
background:To make your activity have a
transparent background:

<activity
      android:theme="@android:style/Theme.Translucent">
Platform Styles and Themes
To apply your own custom theme defined in
/res/values/styles.xml:


<activity android:theme="@style/CustomTheme">
Platform Styles and Themes
To apply a theme to your entire app (all
activities), add the android:theme attribute to
the <application> element:

<application android:theme="@style/CustomTheme">
End

Android App Development 08 : Support Multiple Devices

  • 1.
    8 Support DifferentDevices Anuchit Chalothorn anoochit@gmail.com Licensed under a Creative Commons Attribution-NonCommercial-ShareAlike 3.0 Unported License.
  • 2.
    Supporting Different Languages Androidwill run on many devices in many regions. To reach the most users, your application should handle text, audio files, numbers, currency, and graphics in ways appropriate to the locales where your application will be used.
  • 3.
    Using Resources forLocalization The default resource set must also include any default drawables and layouts, and can include other types of resources such as animations. ● res/drawable/ ● res/layout/ ● res/anim/ ● res/xml/ ● res/raw/
  • 4.
    Language String Android makesthis easy with a resources directory in each Android project. Within the res/ directory are subdirectories for various resource types. There are also a few default files such as res/values/strings.xml, which holds your string values.
  • 5.
    Locale Directories andString Files To add support for more languages, create additional values directories inside res/ that include a hyphen and the ISO country code at the end of the directory name. eg: values-es for Spanish, values-th for Thai, values for English etc.
  • 6.
    Locale : English English(default locale), /values/strings.xml : <?xml version="1.0" encoding="utf-8"?> <resources> <string name="title">My Application</string> <string name="hello_world">Hello World!</string> </resources>
  • 7.
    Locale : Spanish Spanish,/values-es/strings.xml : <?xml version="1.0" encoding="utf-8"?> <resources> <string name="title">Mi Aplicación</string> <string name="hello_world">Hola Mundo!</string> </resources>
  • 8.
    Locale : French French,/values-fr/strings.xml : <?xml version="1.0" encoding="utf-8"?> <resources> <string name="title">Mon Application</string> <string name="hello_world">Bonjour le monde !</string> </resources>
  • 9.
    Use the StringResources You can refer to a string resource with the syntax R.string.<string_name>. There are a variety of methods that accept a string resource this way.
  • 10.
    Use the StringResources // Get a string resource from your app's Resources String hello = getResources().getString(R.string. hello_world); // Or supply a string resource to a method that requires a string TextView textView = new TextView(this); textView.setText(R.string.hello_world);
  • 11.
    Use the Stringin XML In other XML files, you can refer to a string resource with the syntax @string/<string_name> whenever the XML attribute accepts a string value.
  • 12.
    Use the Stringin XML <TextView android:layout_width="wrap_content" android:layout_height="wrap_content" android:text="@string/hello_world" />
  • 13.
    Workshop: Locale Create formUI like following and make locale string for English, Vietnamese, Japanese and Thai.
  • 15.
    Locale your graphic Youcan use qualifiers with any resources include graphic in drawable directory, eg : ● /drawable for English (default locale) ● /drawable-th for Thai ● /drawable-vn for Vietnamese ● /drawable-ja for Japanese
  • 16.
    Workshop: Locale yourgraphic Create a UI like following and make locale graphic for English, Vietnamese, Japanese and Thai.
  • 18.
    Supporting Different Screens Androidcategorizes device screens using two general properties: size and density. You should expect that your app will be installed on devices with screens that range in both size and density.
  • 19.
    Sizes and Densities Todeclare different layouts and bitmaps you'd like to use for different screens, you must place these alternative resources in separate directories, similar to how you do for different language strings.
  • 20.
    Create Different Layouts Tooptimize your user experience on different screen sizes, you should create a unique layout XML file for each screen size you want to support.
  • 21.
    Create Different Layouts Thedirectory named with a -<screen_size> suffix. ● /res/layout/main.xml <-- normal ● /res/layout-land/main.xml <-- landscape ● /res/layout-large/main.xml <-- for large ● /res/layout-large-land/main.xml <-- large landscape
  • 22.
    Create Different Bitmaps Youshould always provide bitmap resources that are properly scaled to each of the generalized density buckets: low, medium, high and extra-high density. This helps you achieve good graphical quality and performance on all screen densities.
  • 23.
    Create Different Bitmaps Togenerate these images, you should start with your raw resource in vector format and generate the images for each density using the following size scale: ● xhdpi: 2.0 ● hdpi: 1.5 ● mdpi: 1.0 (baseline) ● ldpi: 0.75 Ref: http://developer.android.com/design/style/iconography.html
  • 24.
    Workshop: Drawable Make graphicresources match each screen size.
  • 26.
    Supporting Different PlatformVersions While the latest versions of Android often provide great APIs for your app, you should continue to support older versions of Android until more devices get updated.
  • 27.
    Specify Minimum andTarget API The AndroidManifest.xml file describes details about your app and identifies which versions of Android it supports. Specifically, the minSdkVersion and targetSdkVersion with <use-sdk element.
  • 28.
    Specify Minimum andTarget API <manifest xmlns:android="http://schemas.android. com/apk/res/android" ... > <uses-sdk android:minSdkVersion="4" android:targetSdkVersion="15" /> ... </manifest>
  • 29.
    Check System Versionat Runtime Android provides a unique code for each platform version in the Build constants class. Use these codes within your app to build conditions that ensure the code that depends on higher API levels is executed only when those APIs are available on the system.
  • 30.
    Check System Versionat Runtime private void setUpActionBar() { // Make sure we're running on Honeycomb or higher to use ActionBar APIs if (Build.VERSION.SDK_INT >= Build.VERSION_CODES. HONEYCOMB) { ActionBar actionBar = getActionBar(); actionBar.setDisplayHomeAsUpEnabled(true); } }
  • 31.
    Use Platform Stylesand Themes Android provides user experience themes that give apps the look and feel of the underlying operating system. These themes can be applied to your app within the manifest file.
  • 32.
    Platform Styles andThemes To make your activity look like a dialog box: <activity android:theme="@android:style/Theme.Dialog">
  • 33.
    Platform Styles andThemes To make your activity have a transparent background:To make your activity have a transparent background: <activity android:theme="@android:style/Theme.Translucent">
  • 34.
    Platform Styles andThemes To apply your own custom theme defined in /res/values/styles.xml: <activity android:theme="@style/CustomTheme">
  • 35.
    Platform Styles andThemes To apply a theme to your entire app (all activities), add the android:theme attribute to the <application> element: <application android:theme="@style/CustomTheme">
  • 36.