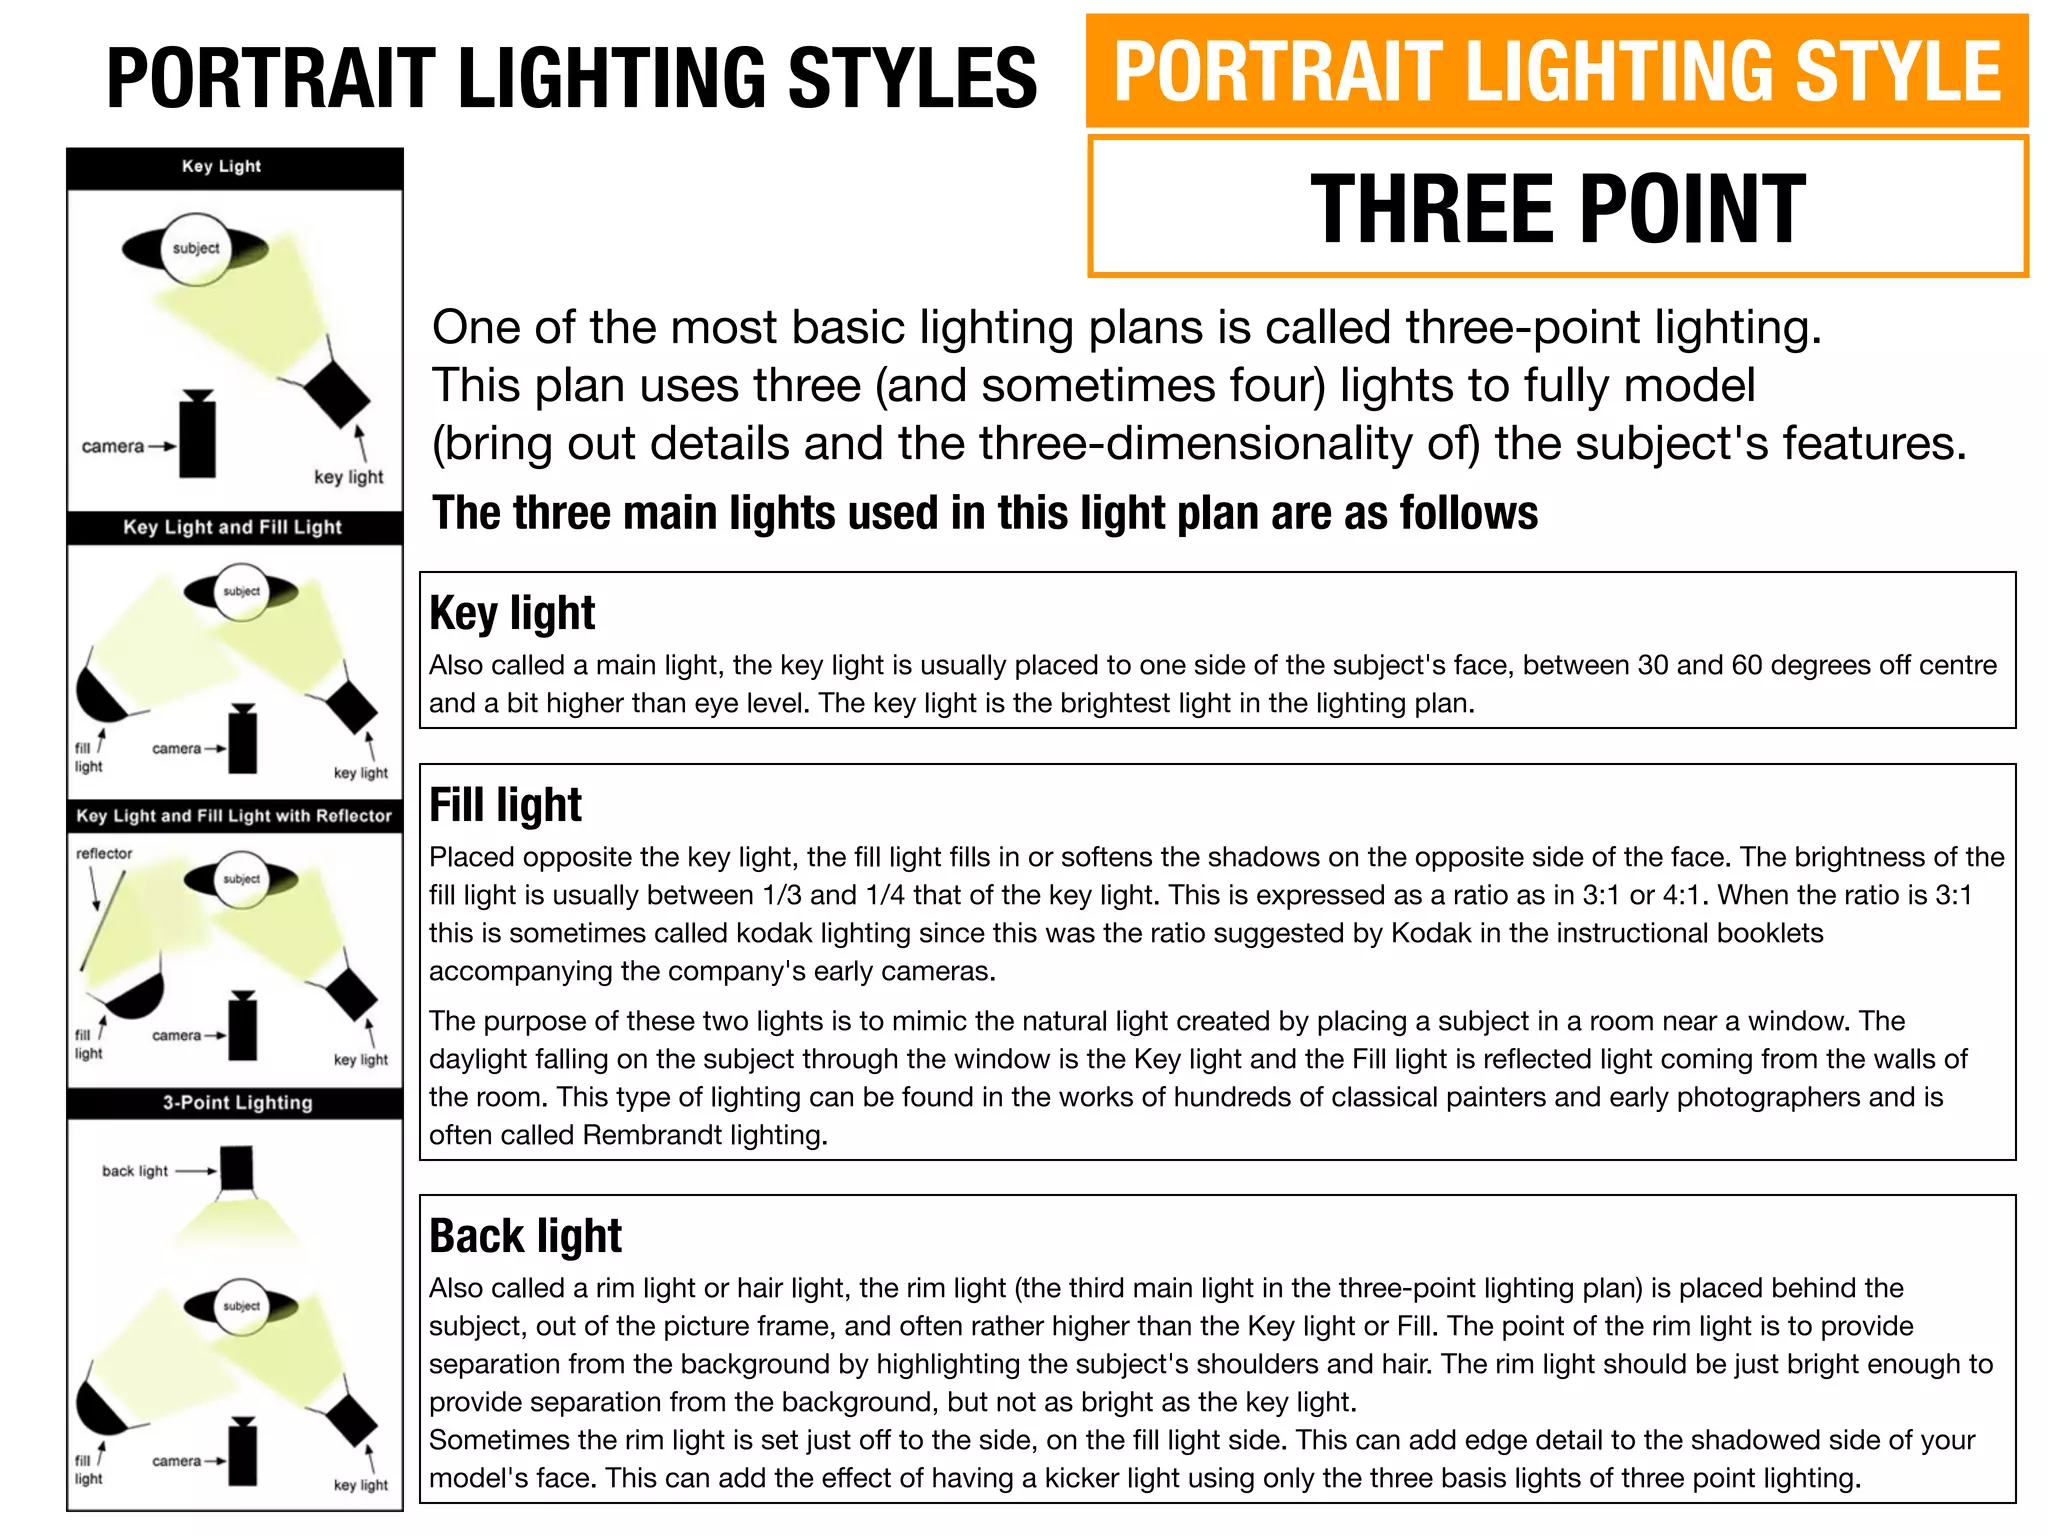
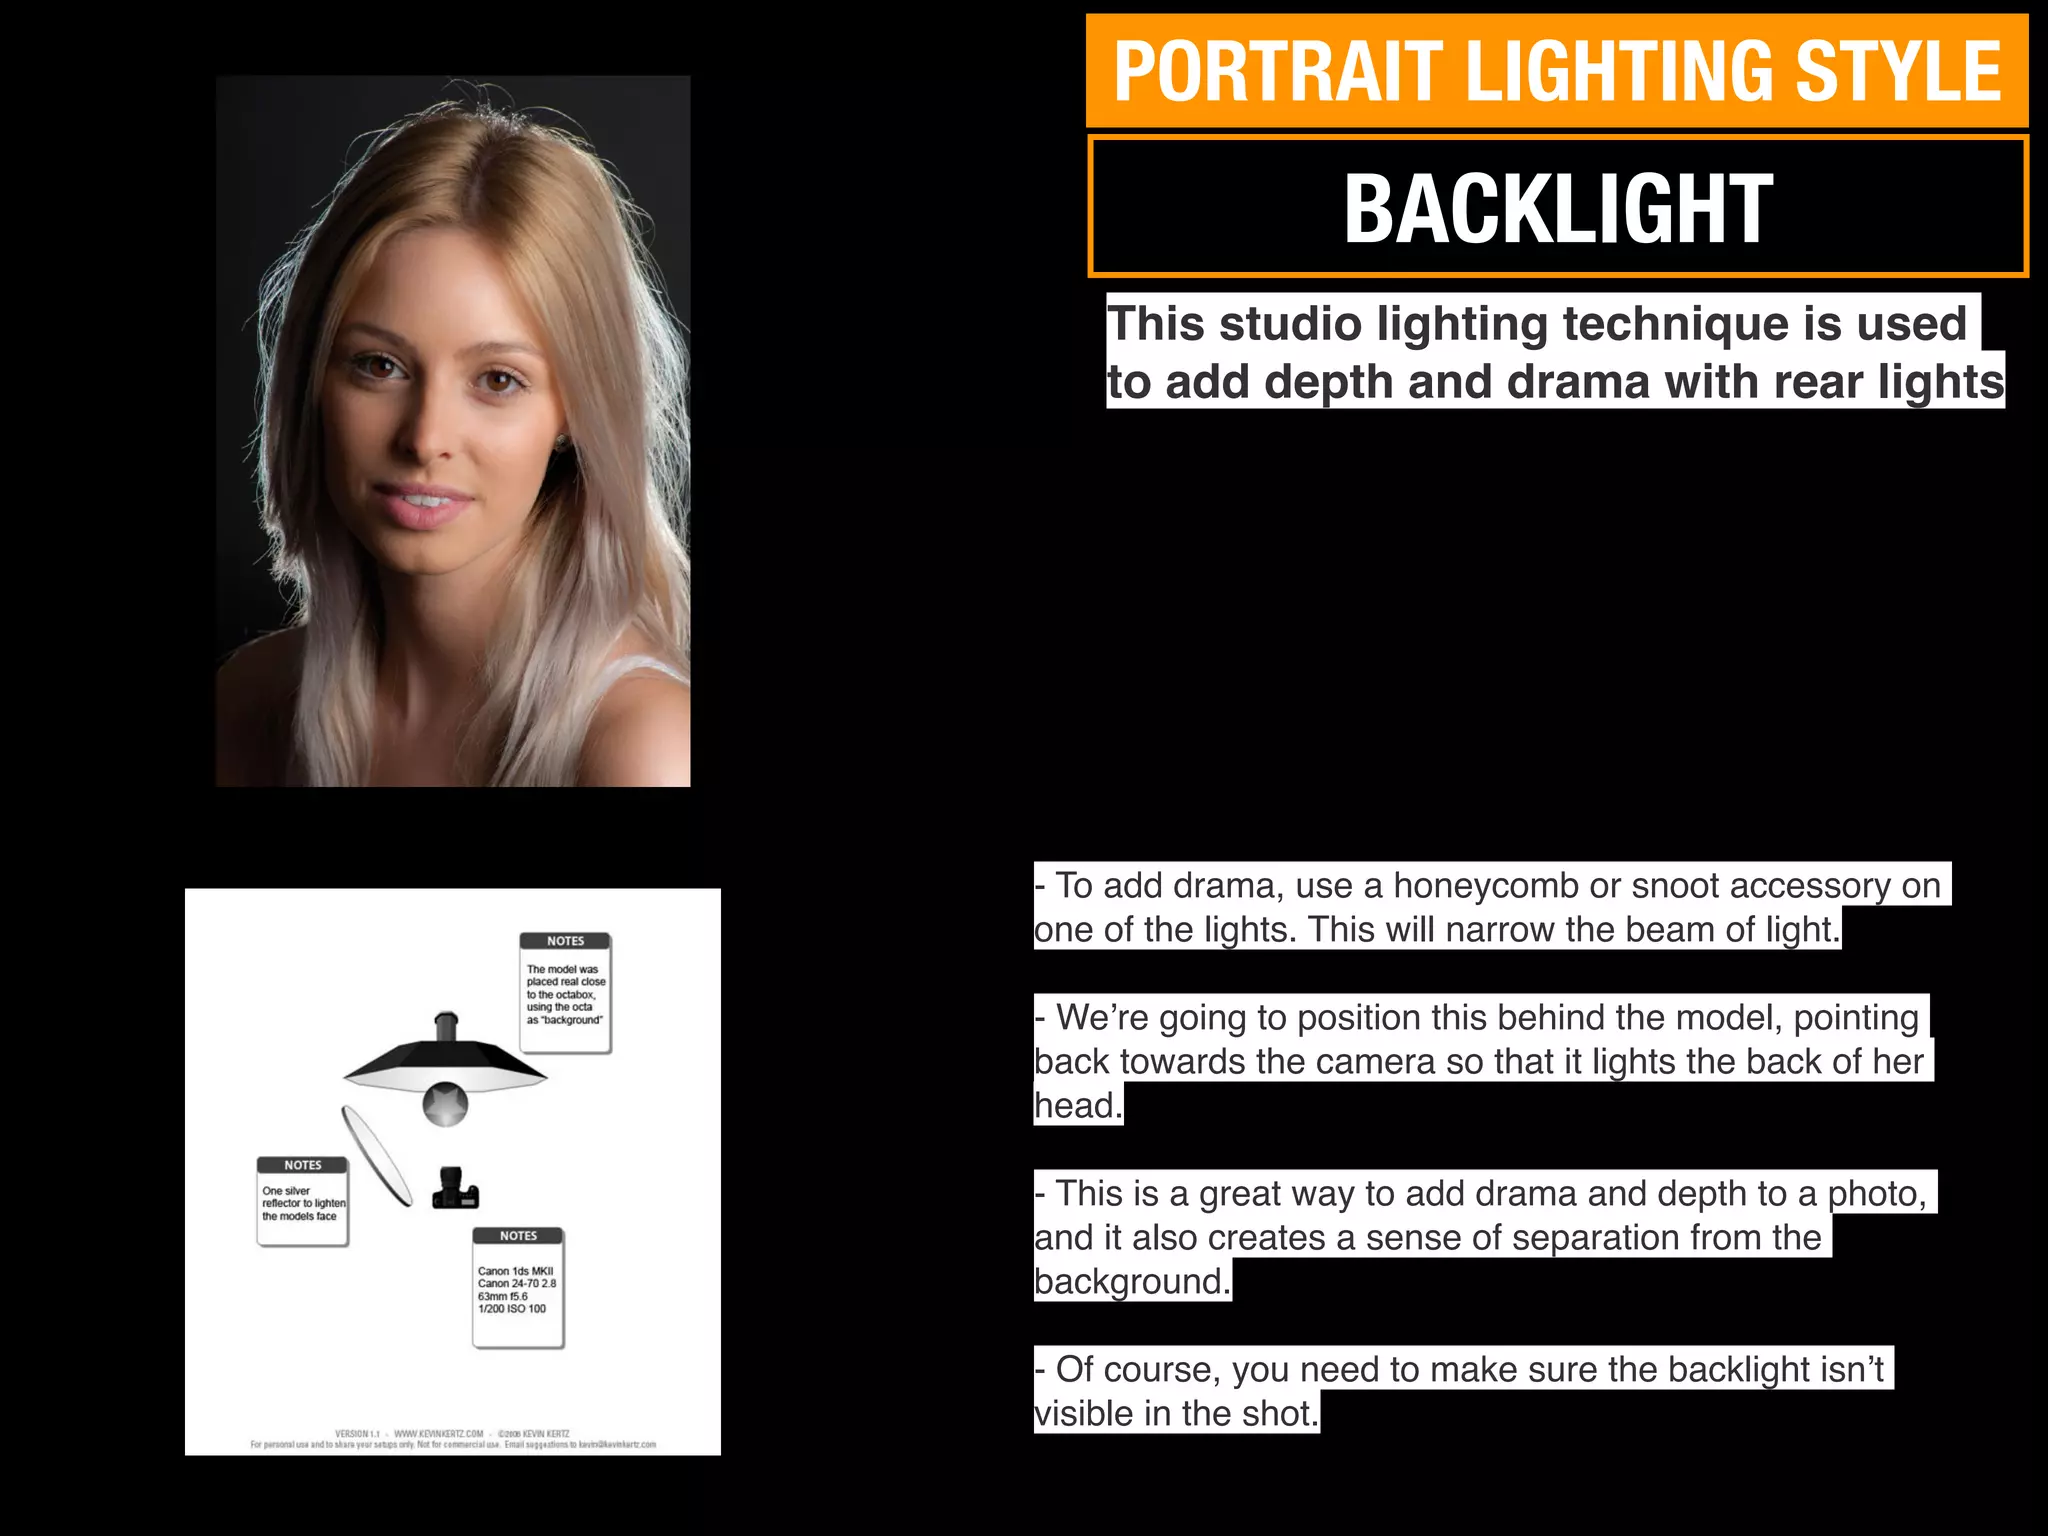
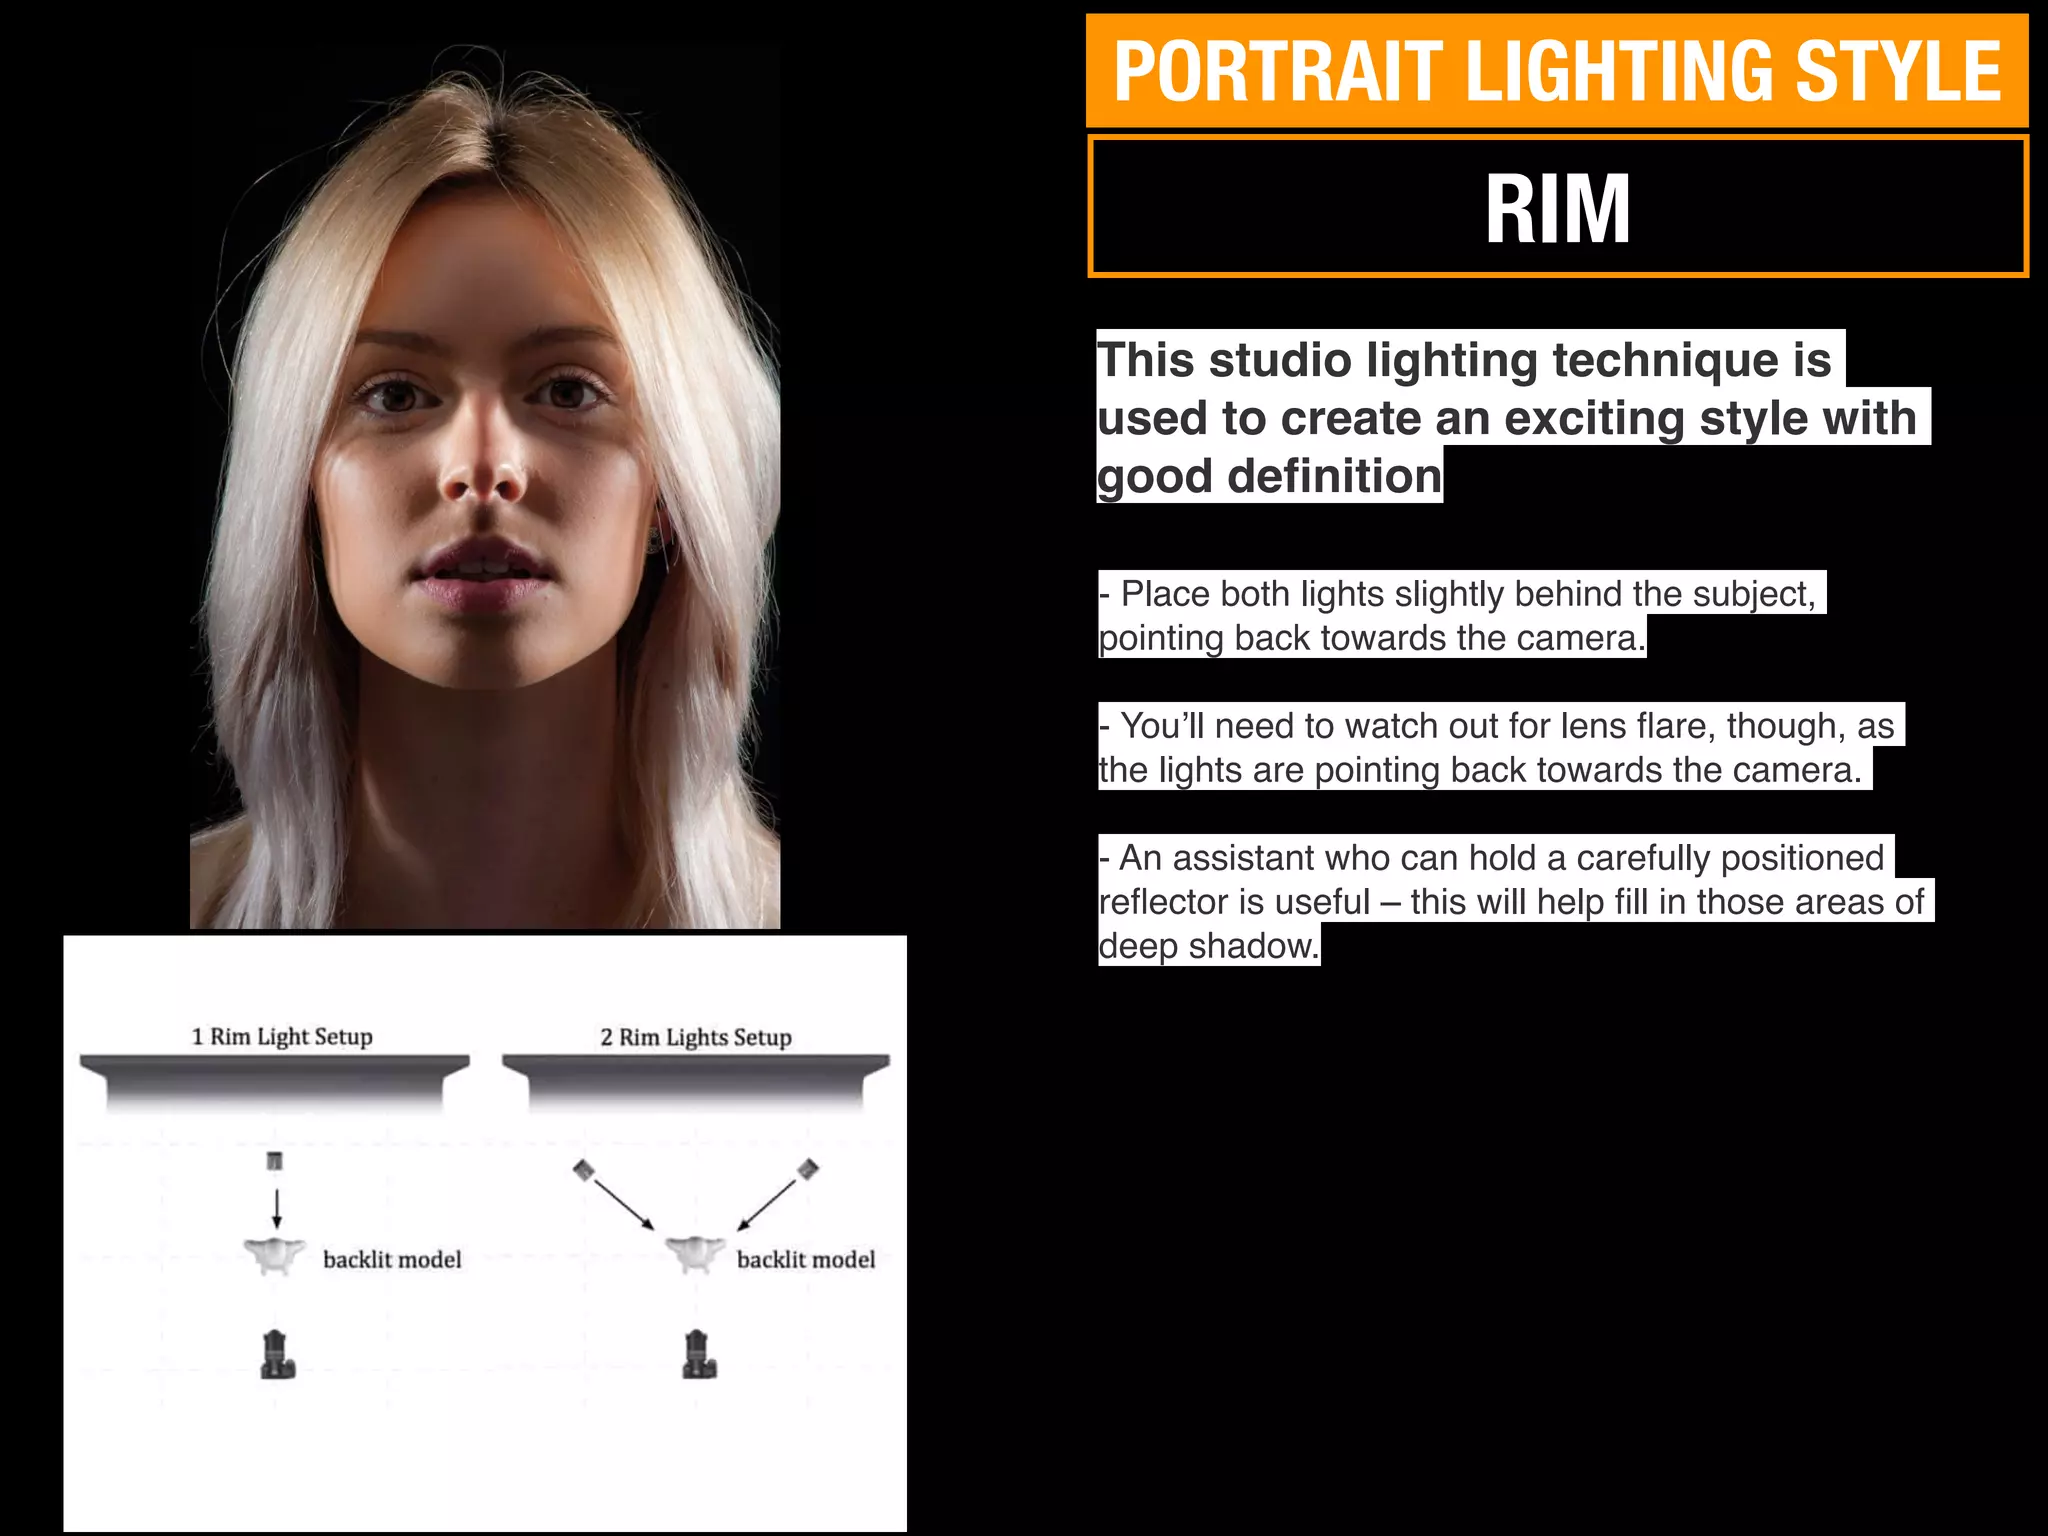
One of the most basic lighting plans is called three-point lighting.
This plan uses three (and sometimes four) lights to fully model
(bring out details and the three-dimensionality of) the subject's features.
The three main lights used in this light plan are as follows
Key light
Also called a main light, the key light is usually placed to one side of the subject's face, between 30 and 60 degrees o
ff
centre
and a bit higher than eye level. The key light is the brightest light in the lighting plan.
Fill light
Placed opposite the key light, the
fi
ll light
fi
lls in or softens the shadows on the opposite side of the face. The brightness of the
fi
ll light is usually between 1/3 and 1/4 that of the key light. This is expressed as a ratio as in 3:1 or 4:1. When the ratio is 3:1
this is sometimes called kodak lighting since this was the ratio suggested by Kodak in the instructional booklets
accompanying the company's early cameras.
The purpose of these two lights is to mimic the natural light created by placing a subject in a room near a window. The
daylight falling on the subject through the window is the Key light and the Fill light is re
fl
ected light coming from the walls of
the room. This type of lighting can be found in the works of hundreds of classical painters and early photographers and is
often called Rembrandt lighting.
Back light
Also called a rim light or hair light, the rim light (the third main light in the three-point lighting plan) is placed behind the
subject, out of the picture frame, and often rather higher than the Key light or Fill. The point of the rim light is to provide
separation from the background by highlighting the subject's shoulders and hair. The rim light should be just bright enough to
provide separation from the background, but not as bright as the key light.
Sometimes the rim light is set just o
ff
to the side, on the
fi
ll light side. This can add edge detail to the shadowed side of your
model's face. This can add the e
ff
ect of having a kicker light using only the three basis lights of three point lighting.
PORTRAIT LIGHTING STYLES
THREE POINT
PORTRAIT LIGHTING STYLE
PORTRAIT LIGHTING STYLES
Butter
fl
y lighting, also known as Paramount lighting, became a staple pattern for the Hollywood photographers of the
1930s. This lighting is characterised by the butter
fl
y-shaped shadow that it casts below the nose. The butter
fl
y
pattern can be quite useful for a variety of faces, but is at its best on lean subjects with high and pronounced
cheekbones. It is produced by placing the light source above the face (typically 25-70 degrees) and in line with the
direction in which the face is pointing.
BUTTERFLY
PORTRAIT LIGHTING STYLE
PORTRAIT LIGHTING STYLES
Lighting is said to be short when the light source illuminates the side of the head not visible to the camera. The short-
lighting position is probably the most commonly used position. It works well with a variety of faces and is often mentioned
as the choice for narrowing the face.
SHORT
PORTRAIT LIGHTING STYLE
PORTRAIT LIGHTING STYLES
BROAD
Lighting is said to be broad when the light source illuminates the side of the head visible to the camera. For this
example, the main light was placed to the right of the camera and illuminates the side of the head facing the camera; a
Rembrandt pattern is cast on the face. With appropriate positioning of the face, broad lighting can be used to either
broaden or narrow the apparent width of the face. Broad lighting is also useful for eliminating eyeglass glare, as the
direct re
fl
ections from the light source are directed away from the camera.
PORTRAIT LIGHTING STYLE
Rembrandt lighting is named after the
famous Dutch painter of that name. The
lighting is similar to loop lighting, but with the
light source moved higher and further left or
right of the face. It creates a strong pattern
characterised by a small triangle of light that
appears under the eye on the shadow side of
the face, along with a nose shadow that
nearly extends to the corner of the mouth.
This is not an all-purpose lighting and is
probably best reserved for character studies
and moody fashion work.
PORTRAIT LIGHTING STYLE
REMBRANDT
- This setup is great for beauty images as the lighting is
fl
at and even. It’s pretty easy to achieve this effect too
- All you need to do is place two lights on either side of
your subject at the same angle and at an equal distance.
- Try using a re
fl
ector under the face – your model should
easily be able to hold this. This will bounce light up and
onto the face.
This studio lighting technique is used
to capture every detail with even light
CLAMSHELL
PORTRAIT LIGHTING STYLE
- To add drama, use a honeycomb or snoot accessory on
one of the lights. This will narrow the beam of light.
- We’re going to position this behind the model, pointing
back towards the camera so that it lights the back of her
head.
- This is a great way to add drama and depth to a photo,
and it also creates a sense of separation from the
background.
- Of course, you need to make sure the backlight isn’t
visible in the shot.
This studio lighting technique is used
to add depth and drama with rear lights
BACKLIGHT
PORTRAIT LIGHTING STYLE
This studio lighting technique is
used to create an exciting style with
good de
fi
nition
- Place both lights slightly behind the subject,
pointing back towards the camera.
- You’ll need to watch out for lens
fl
are, though, as
the lights are pointing back towards the camera.
- An assistant who can hold a carefully positioned
re
fl
ector is useful – this will help
fi
ll in those areas of
deep shadow.
RIM
PORTRAIT LIGHTING STYLE

Portrait lighting setups.pdf

  • 1.
    One of themost basic lighting plans is called three-point lighting. This plan uses three (and sometimes four) lights to fully model (bring out details and the three-dimensionality of) the subject's features. The three main lights used in this light plan are as follows Key light Also called a main light, the key light is usually placed to one side of the subject's face, between 30 and 60 degrees o ff centre and a bit higher than eye level. The key light is the brightest light in the lighting plan. Fill light Placed opposite the key light, the fi ll light fi lls in or softens the shadows on the opposite side of the face. The brightness of the fi ll light is usually between 1/3 and 1/4 that of the key light. This is expressed as a ratio as in 3:1 or 4:1. When the ratio is 3:1 this is sometimes called kodak lighting since this was the ratio suggested by Kodak in the instructional booklets accompanying the company's early cameras. The purpose of these two lights is to mimic the natural light created by placing a subject in a room near a window. The daylight falling on the subject through the window is the Key light and the Fill light is re fl ected light coming from the walls of the room. This type of lighting can be found in the works of hundreds of classical painters and early photographers and is often called Rembrandt lighting. Back light Also called a rim light or hair light, the rim light (the third main light in the three-point lighting plan) is placed behind the subject, out of the picture frame, and often rather higher than the Key light or Fill. The point of the rim light is to provide separation from the background by highlighting the subject's shoulders and hair. The rim light should be just bright enough to provide separation from the background, but not as bright as the key light. Sometimes the rim light is set just o ff to the side, on the fi ll light side. This can add edge detail to the shadowed side of your model's face. This can add the e ff ect of having a kicker light using only the three basis lights of three point lighting. PORTRAIT LIGHTING STYLES THREE POINT PORTRAIT LIGHTING STYLE
  • 2.
    PORTRAIT LIGHTING STYLES Butter fl ylighting, also known as Paramount lighting, became a staple pattern for the Hollywood photographers of the 1930s. This lighting is characterised by the butter fl y-shaped shadow that it casts below the nose. The butter fl y pattern can be quite useful for a variety of faces, but is at its best on lean subjects with high and pronounced cheekbones. It is produced by placing the light source above the face (typically 25-70 degrees) and in line with the direction in which the face is pointing. BUTTERFLY PORTRAIT LIGHTING STYLE
  • 3.
    PORTRAIT LIGHTING STYLES Lightingis said to be short when the light source illuminates the side of the head not visible to the camera. The short- lighting position is probably the most commonly used position. It works well with a variety of faces and is often mentioned as the choice for narrowing the face. SHORT PORTRAIT LIGHTING STYLE
  • 4.
    PORTRAIT LIGHTING STYLES BROAD Lightingis said to be broad when the light source illuminates the side of the head visible to the camera. For this example, the main light was placed to the right of the camera and illuminates the side of the head facing the camera; a Rembrandt pattern is cast on the face. With appropriate positioning of the face, broad lighting can be used to either broaden or narrow the apparent width of the face. Broad lighting is also useful for eliminating eyeglass glare, as the direct re fl ections from the light source are directed away from the camera. PORTRAIT LIGHTING STYLE
  • 5.
    Rembrandt lighting isnamed after the famous Dutch painter of that name. The lighting is similar to loop lighting, but with the light source moved higher and further left or right of the face. It creates a strong pattern characterised by a small triangle of light that appears under the eye on the shadow side of the face, along with a nose shadow that nearly extends to the corner of the mouth. This is not an all-purpose lighting and is probably best reserved for character studies and moody fashion work. PORTRAIT LIGHTING STYLE REMBRANDT
  • 6.
    - This setupis great for beauty images as the lighting is fl at and even. It’s pretty easy to achieve this effect too - All you need to do is place two lights on either side of your subject at the same angle and at an equal distance. - Try using a re fl ector under the face – your model should easily be able to hold this. This will bounce light up and onto the face. This studio lighting technique is used to capture every detail with even light CLAMSHELL PORTRAIT LIGHTING STYLE
  • 7.
    - To adddrama, use a honeycomb or snoot accessory on one of the lights. This will narrow the beam of light. - We’re going to position this behind the model, pointing back towards the camera so that it lights the back of her head. - This is a great way to add drama and depth to a photo, and it also creates a sense of separation from the background. - Of course, you need to make sure the backlight isn’t visible in the shot. This studio lighting technique is used to add depth and drama with rear lights BACKLIGHT PORTRAIT LIGHTING STYLE
  • 8.
    This studio lightingtechnique is used to create an exciting style with good de fi nition - Place both lights slightly behind the subject, pointing back towards the camera. - You’ll need to watch out for lens fl are, though, as the lights are pointing back towards the camera. - An assistant who can hold a carefully positioned re fl ector is useful – this will help fi ll in those areas of deep shadow. RIM PORTRAIT LIGHTING STYLE