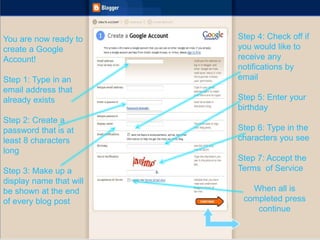
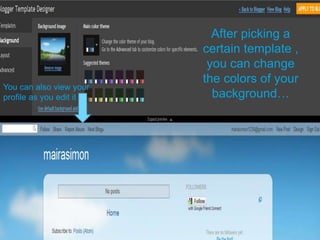
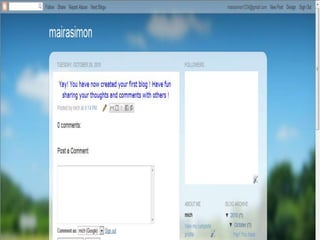
 First begin by going to ww.blogger.net
www.blogger.com
Next click on the orange logo that says:
Create a Blog
You are now ready to
create a Google
Account!
Step 1: Type in an
email address that
already exists
Step 2: Create a
password that is at
least 8 characters
long
Step 3: Make up a
display name that will
be shown at the end
of every blog post
Step 4: Check off if
you would like to
receive any
notifications by
email
Step 5: Enter your
birthday
Step 6: Type in the
characters you see
Step 7: Accept the
Terms of Service
When all is
completed press
continue
Now its time to name your
blog
Be fun and be Creative!
The name of your blog will
be seen on you profile,
blogs and dash board.
The URL you choose
will be used for those
who want to access your
blog.
At this time it is now time to start designing your blog. You
can choose up to any template that fits your style.
After picking a
certain template ,
you can change
the colors of your
background…
You can also view your
profile as you edit it
You can change
the lay out of the
gadgets to
arrange it to you
likings.
Gadgets
You can also
change the font,
font sizes, and
color of your blog
title, tabs, links
etc.
After you have finished designing your profile, you can
begin posting ! After you finish writing your post you can
edit the way you want it to appear. When you have
finished with that , you can preview what you have
written then you are ready to publish your post. Don’t
forget to title your post!
Michele guayara tutorial fit 1012

Michele guayara tutorial fit 1012

  • 2.
     First beginby going to ww.blogger.net www.blogger.com
  • 3.
    Next click onthe orange logo that says: Create a Blog
  • 4.
    You are nowready to create a Google Account! Step 1: Type in an email address that already exists Step 2: Create a password that is at least 8 characters long Step 3: Make up a display name that will be shown at the end of every blog post Step 4: Check off if you would like to receive any notifications by email Step 5: Enter your birthday Step 6: Type in the characters you see Step 7: Accept the Terms of Service When all is completed press continue
  • 5.
    Now its timeto name your blog Be fun and be Creative! The name of your blog will be seen on you profile, blogs and dash board. The URL you choose will be used for those who want to access your blog.
  • 6.
    At this timeit is now time to start designing your blog. You can choose up to any template that fits your style.
  • 7.
    After picking a certaintemplate , you can change the colors of your background… You can also view your profile as you edit it
  • 8.
    You can change thelay out of the gadgets to arrange it to you likings. Gadgets
  • 9.
    You can also changethe font, font sizes, and color of your blog title, tabs, links etc.
  • 10.
    After you havefinished designing your profile, you can begin posting ! After you finish writing your post you can edit the way you want it to appear. When you have finished with that , you can preview what you have written then you are ready to publish your post. Don’t forget to title your post!