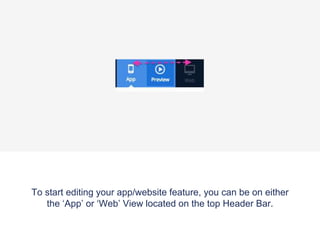
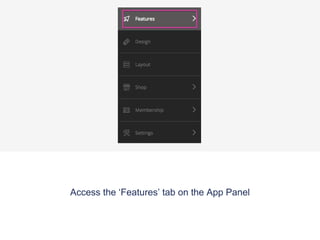
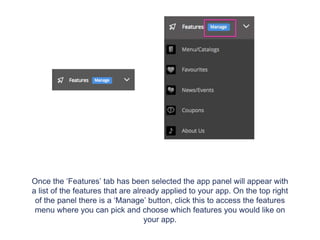
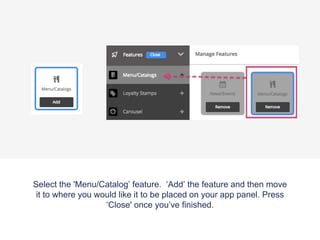
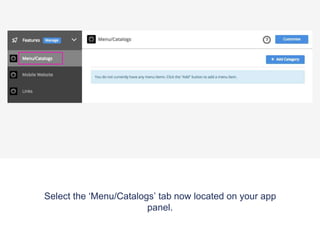
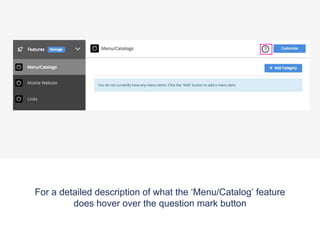
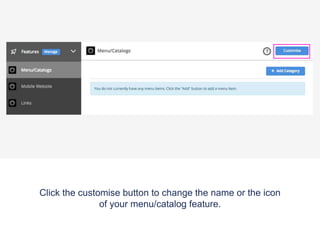
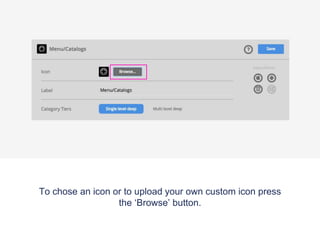
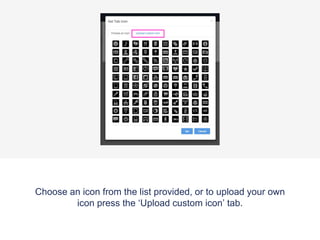
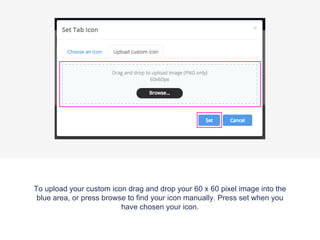
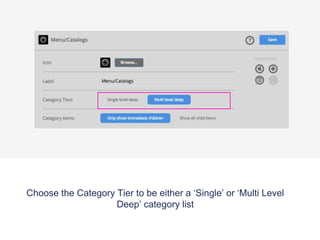
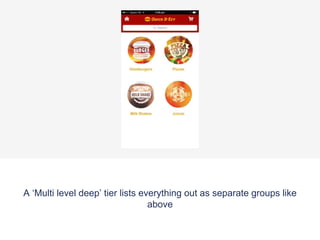
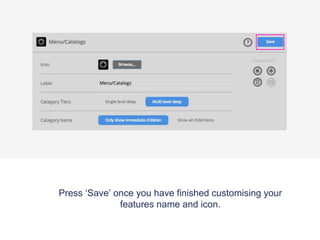
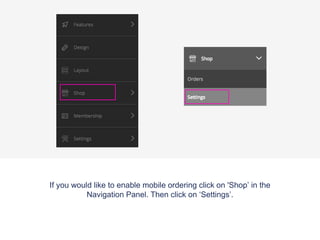
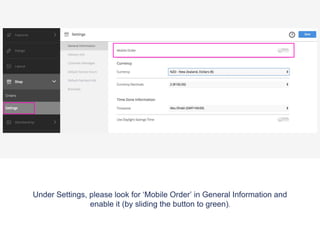
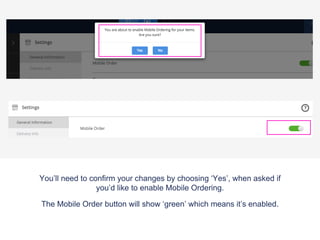
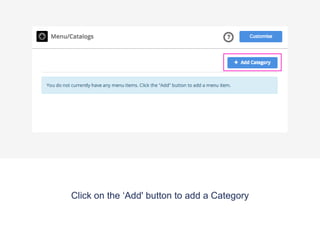
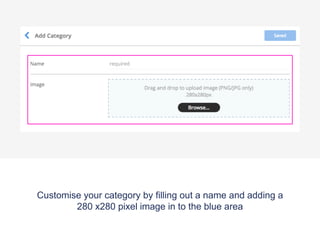
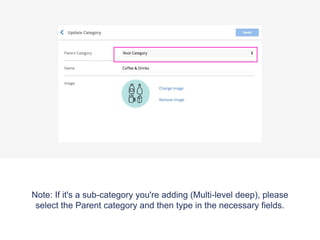
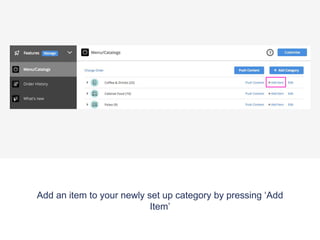
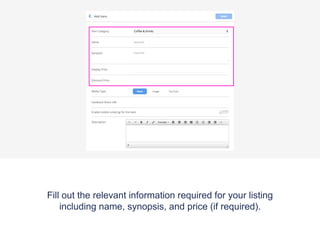
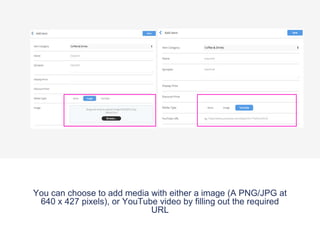
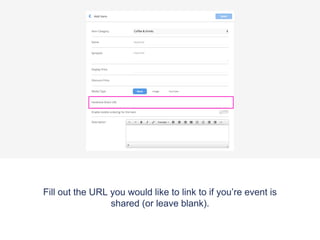
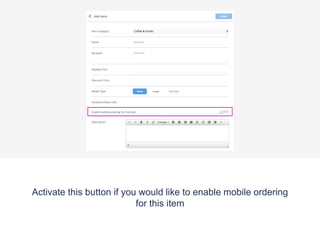
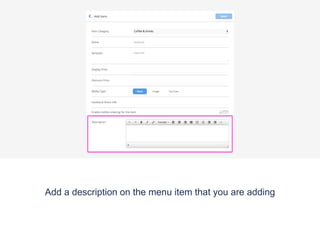
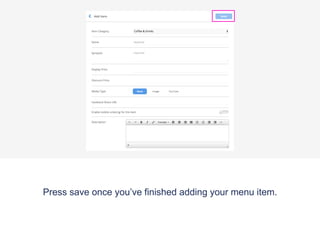
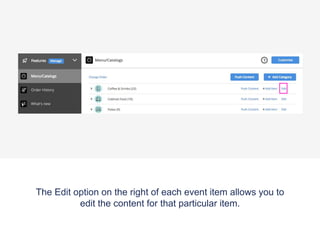
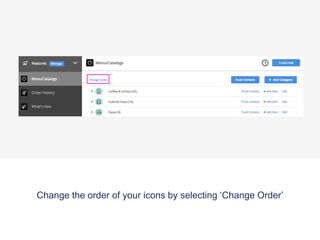
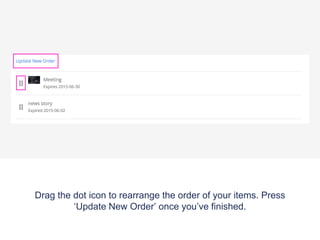
To start editing your app/website feature, you can be on either
the ā€˜App’ or ā€˜Web’ View located on the top Header Bar.
Access the ā€˜Features’ tab on the App Panel
Once the ā€˜Features’ tab has been selected the app panel will appear with
a list of the features that are already applied to your app. On the top right
of the panel there is a ā€˜Manage’ button, click this to access the features
menu where you can pick and choose which features you would like on
your app.
Select the 'Menu/Catalog’ feature. ā€˜Add’ the feature and then move
it to where you would like it to be placed on your app panel. Press
ā€˜Close' once you’ve finished.
Select the ā€˜Menu/Catalogs’ tab now located on your app
panel.
For a detailed description of what the ā€˜Menu/Catalog’ feature
does hover over the question mark button
Click the customise button to change the name or the icon
of your menu/catalog feature.
To chose an icon or to upload your own custom icon press
the ā€˜Browse’ button.
Choose an icon from the list provided, or to upload your own
icon press the ā€˜Upload custom icon’ tab.
To upload your custom icon drag and drop your 60 x 60 pixel image into the
blue area, or press browse to find your icon manually. Press set when you
have chosen your icon.
Choose the Category Tier to be either a ā€˜Single’ or ā€˜Multi Level
Deep’ category list
A ā€˜Single level deep’ tier lists everything out on the menu like
above
A ā€˜Multi level deep’ tier lists everything out as separate groups like
above
Press ā€˜Save’ once you have finished customising your
features name and icon.
If you would like to enable mobile ordering click on 'Shop’ in the
Navigation Panel. Then click on ā€˜Settings’.
Under Settings, please look for ā€˜Mobile Order’ in General Information and
enable it (by sliding the button to green).
You’ll need to confirm your changes by choosing ā€˜Yes’, when asked if
you’d like to enable Mobile Ordering.
The Mobile Order button will show ā€˜green’ which means it’s enabled.
Click on the ā€˜Add' button to add a Category
Customise your category by filling out a name and adding a
280 x280 pixel image in to the blue area
Note: If it's a sub-category you're adding (Multi-level deep), please
select the Parent category and then type in the necessary fields.
Add an item to your newly set up category by pressing ā€˜Add
Item’
Fill out the relevant information required for your listing
including name, synopsis, and price (if required).
You can choose to add media with either a image (A PNG/JPG at
640 x 427 pixels), or YouTube video by filling out the required
URL
Fill out the URL you would like to link to if you’re event is
shared (or leave blank).
Activate this button if you would like to enable mobile ordering
for this item
Add a description on the menu item that you are adding
Press save once you’ve finished adding your menu item.
The Edit option on the right of each event item allows you to
edit the content for that particular item.
Change the order of your icons by selecting ā€˜Change Order’
Drag the dot icon to rearrange the order of your items. Press
ā€˜Update New Order’ once you’ve finished.

Menu/Catalogue tutorial

  • 1.
    To start editingyour app/website feature, you can be on either the ā€˜App’ or ā€˜Web’ View located on the top Header Bar.
  • 2.
    Access the ā€˜Features’tab on the App Panel
  • 3.
    Once the ā€˜Features’tab has been selected the app panel will appear with a list of the features that are already applied to your app. On the top right of the panel there is a ā€˜Manage’ button, click this to access the features menu where you can pick and choose which features you would like on your app.
  • 4.
    Select the 'Menu/Catalog’feature. ā€˜Add’ the feature and then move it to where you would like it to be placed on your app panel. Press ā€˜Close' once you’ve finished.
  • 5.
    Select the ā€˜Menu/Catalogs’tab now located on your app panel.
  • 6.
    For a detaileddescription of what the ā€˜Menu/Catalog’ feature does hover over the question mark button
  • 7.
    Click the customisebutton to change the name or the icon of your menu/catalog feature.
  • 8.
    To chose anicon or to upload your own custom icon press the ā€˜Browse’ button.
  • 9.
    Choose an iconfrom the list provided, or to upload your own icon press the ā€˜Upload custom icon’ tab.
  • 10.
    To upload yourcustom icon drag and drop your 60 x 60 pixel image into the blue area, or press browse to find your icon manually. Press set when you have chosen your icon.
  • 11.
    Choose the CategoryTier to be either a ā€˜Single’ or ā€˜Multi Level Deep’ category list
  • 12.
    A ā€˜Single leveldeep’ tier lists everything out on the menu like above
  • 13.
    A ā€˜Multi leveldeep’ tier lists everything out as separate groups like above
  • 14.
    Press ā€˜Save’ onceyou have finished customising your features name and icon.
  • 15.
    If you wouldlike to enable mobile ordering click on 'Shop’ in the Navigation Panel. Then click on ā€˜Settings’.
  • 16.
    Under Settings, pleaselook for ā€˜Mobile Order’ in General Information and enable it (by sliding the button to green).
  • 17.
    You’ll need toconfirm your changes by choosing ā€˜Yes’, when asked if you’d like to enable Mobile Ordering. The Mobile Order button will show ā€˜green’ which means it’s enabled.
  • 18.
    Click on theā€˜Add' button to add a Category
  • 19.
    Customise your categoryby filling out a name and adding a 280 x280 pixel image in to the blue area
  • 20.
    Note: If it'sa sub-category you're adding (Multi-level deep), please select the Parent category and then type in the necessary fields.
  • 21.
    Add an itemto your newly set up category by pressing ā€˜Add Item’
  • 22.
    Fill out therelevant information required for your listing including name, synopsis, and price (if required).
  • 23.
    You can chooseto add media with either a image (A PNG/JPG at 640 x 427 pixels), or YouTube video by filling out the required URL
  • 24.
    Fill out theURL you would like to link to if you’re event is shared (or leave blank).
  • 25.
    Activate this buttonif you would like to enable mobile ordering for this item
  • 26.
    Add a descriptionon the menu item that you are adding
  • 27.
    Press save onceyou’ve finished adding your menu item.
  • 28.
    The Edit optionon the right of each event item allows you to edit the content for that particular item.
  • 29.
    Change the orderof your icons by selecting ā€˜Change Order’
  • 30.
    Drag the doticon to rearrange the order of your items. Press ā€˜Update New Order’ once you’ve finished.