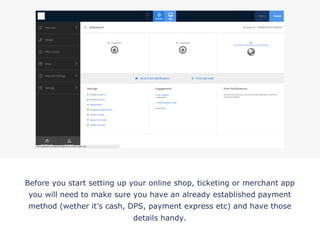
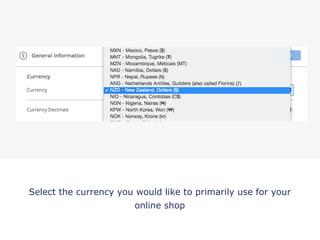
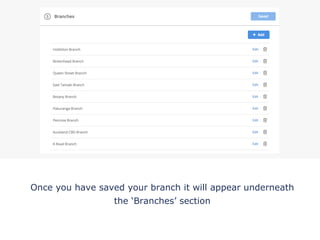
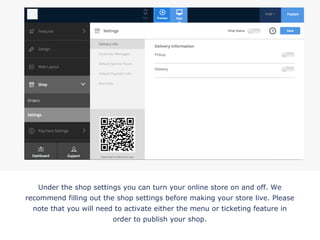
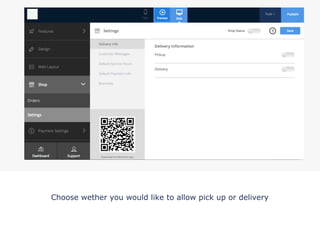
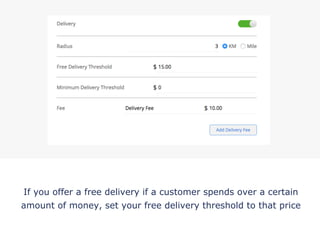
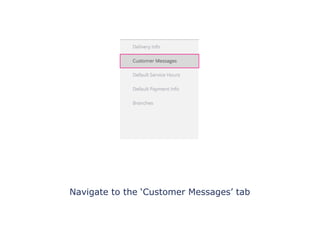
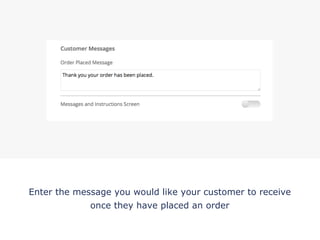
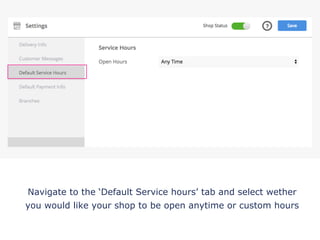
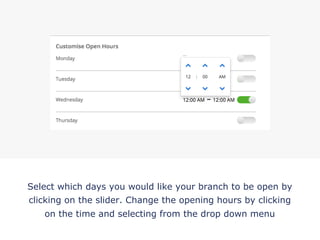
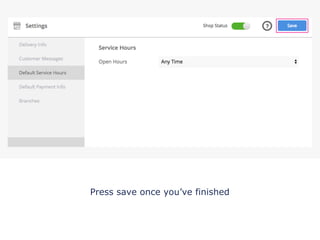
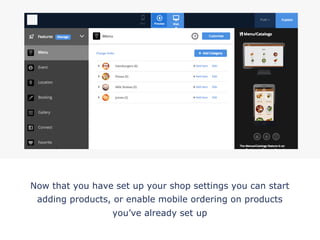
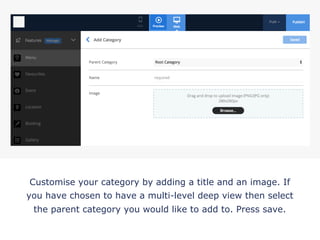
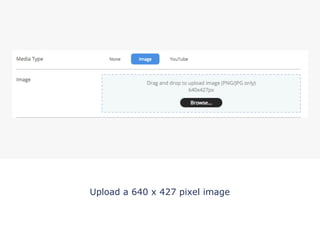
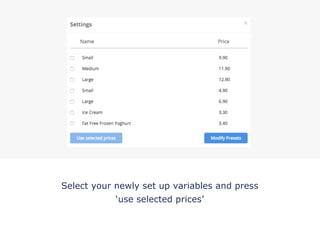
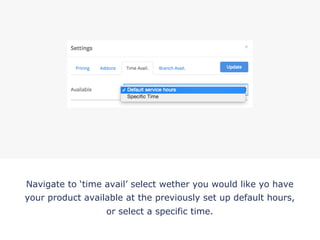
Before you start setting up your online shop, ticketing or merchant app
you will need to make sure you have an already established payment
method (wether it’s cash, DPS, payment express etc) and have those
details handy.
!
Log into your account and navigate to either the app or website view
(depending on which platform you would like to set up your shop on)
!
Click ‘Payment Settings’ on the side navigation panel and go
to the general information tab. This is where you will begin
to start filling out your payment details.
!
The General Information tab is where you will fill out all the
generic information of your shop including currency and
timezone information
!
Select the currency you would like to primarily use for your
online shop
!
Select how you would like your pricing decimals to be
displayed by selecting the currency decimal
!
Select your timezone. If your online ordering is only available for a
certain period of time throughout the day, it will follow the timzone you
have selected.
Select wether you would like to use daylight savings time
!
Press ‘Save’ once you have finished making changes to your General
Information settings.
!
Navigate to the ‘Default Payment’ tab underneath the
‘Payment Settings’ tab, on the side navigation panel.
!
Select the payment method you would like to use for your
online shop. If you select ‘Cash’ then you won’t need to fill
out any other details.
!
PayPal: If you have decided to use PayPal as your default payment method then
enter your PayPal account number and Client ID. You may need to log in to your
PayPal account to get this information (Hover over the question mark button for
instructions on where to find the information).
!
PaymentExpress: If you have decided to use PaymentExpress as your default
payment method then enter your account details. You may need to log in to your
PaymentExpress account to get this information (Hover over the question mark
button for instructions on where to find the information).
!
PayPal Express: If you have decided to use PayPal Express as your default payment
method then enter your account details. You may need to log in to your PayPal
Express account to get this information (Hover over the question mark button for
instructions on where to find the information).
!
Press ‘Save’ once you’ve finished making changes.
!
Navigate to the ‘Branches’ tab underneath the ‘Payment
Settings’ tab, on the side navigation panel.
!
The ‘Branches’ tab is where you set up your Branch
information. You need to have at least one branch set up for
your online shop to work. Press ‘Add’ to get started.
!
Under ‘Branch Details’ fill out the general information for
your branch. Your branch code and password is what is used
when you log in to the merchant app.
!
Navigate to the ‘Service Hours’ tab to set up the opening
hours for your branch. (Please note that you will set up
default service hours in further steps).
!
If you would like your branch to have it’s own custom
opening hours then select ‘custom’ on the drop down menu
!
Select which days you would like your branch to be open by
clicking on the slider. Change the opening hours by clicking
on the time and selecting from the drop down menu
!
Navigate to the ‘Payment Info’ tab. Select which payment
info you would like to use. If you have separate branches
you may like to use separate payment methods
!
Navigate to the ‘Notifications’ tab. Select wether you would
like to receive payment notifications via email, e-printer or
merchant app.
!
Once you have finished adding the information to your
branch, click save
!
Once you have saved your branch it will appear underneath
the ‘Branches’ section
!
You can edit or delete a branch at any point by pressing the
edit or trash icon adjacent to each branch
!
Now that you have filled out your payment settings you can continue
to set up your shop settings. Navigate to the ‘Shop’ section on your
side navigation panel and press the ‘Settings’ tab
!
Under the shop settings you can turn your online store on and off. We
recommend filling out the shop settings before making your store live. Please
note that you will need to activate either the menu or ticketing feature in
order to publish your shop.
!
Choose wether you would like to allow pick up or delivery
!
If you would like to allow pickup, activate the slider
!
If you would like to activate deliveries, then fill out the relevant
information, including the radius that you will deliver to
!
If you offer a free delivery if a customer spends over a certain
amount of money, set your free delivery threshold to that price
!
If you only allow delivery if a customer spends a certain amount of
money, then set your minimum delivery threshold to that price
!
If you would like to set up an additional delivery fee then fill out the
‘Fee’ information. You may like to have extra costs depending if your
customer is in a rural region.
!
Navigate to the ‘Customer Messages’ tab
Enter the message you would like your customer to receive
once they have placed an order
!
Activate the messages/instructions screen if you would like to have
a message or instructions on the payment screen (Where a
customer enters their payment details). E.g orders may take 2-3
weeks for delivery
!
Navigate to the ‘Default Service hours’ tab and select wether
you would like your shop to be open anytime or custom hours
!
Select which days you would like your branch to be open by
clicking on the slider. Change the opening hours by clicking
on the time and selecting from the drop down menu
!
Press save once you’ve finished
!
Now that you have set up your shop settings you can start
adding products, or enable mobile ordering on products
you’ve already set up
!
Click on the ‘Features’ tab on the side navigation panel
!
Select the ‘Manage’ button, located on the right of the
‘Features’ tab. Once clicked, you will access the features
menu
!
!
Select the ‘Menu/Catalog’ feature and press ‘Add’. This will
make the menu feature appear under your features tab.
Press close once you’ve finished.
Select the ‘Menu/Catalog’ tab now located on your app panel
!
Click the customise button to change the name or icon of
your menu/catalog feature
!
To chose an icon or to upload your own custom icon press
the ‘browse’ button.
!
Choose an icon from the list provided, or to upload your own
icon press the ‘upload custom icon’ tab
!
Choose the category tier to be either a ‘single’ (list view) or
‘multi level deep’ (grouped view) list.
Press save once you’ve finished
!
Click on the ‘add category’ button to start add a group for
your products e.g drinks
!
Customise your category by adding a title and an image. If
you have chosen to have a multi-level deep view then select
the parent category you would like to add to. Press save.
!
Add an item under your new category by pressing ‘add item’
adjacent to your group category
!
Enter your product information including name, synopsis,
display price and discount price (if necessary)
!
Choose wether you would like to add an image or youtube
link for your product
!
Upload a 640 x 427 pixel image
!
If you would like a video then copy and paste your YouTube
URL link into the text box
!
Add your Facebook URL if necessary
!
Select wether you would like to enable mobile ordering for
this product. Once activated press the settings button
!
Enter the price of your product, or, if you have multiple
prices for the same product click ‘multiple’
!
If you have multiple pricing for one product then caption it
(e,g sizes) and press the settings button to add categories
!
If you have previously set up variations then select the
variations you would like to use. If you would like to add new
choices then click ‘modify presets’
!
Press ‘add’ to create a new pricing variable. Name the option
and give it a price. Press ‘update presets’ once you’ve
finished
!
Select your newly set up variables and press
‘use selected prices’
!
Navigate to ‘time avail’ select wether you would like yo have
your product available at the previously set up default hours,
or select a specific time.
!
Navigate to ‘branch avail’ select wether you would like your
product to be available at all branches or only at specific
branches
!
If you only want your product to be available at specific
branches, then select the branches that you would like it to
be avaialable to. Press ‘update’ once you’ve finished
!
Continue editing your product by adding a product
description. Press ‘save’ once you’ve finished editing your
product
!
You will see that your new product will have been added to
the category you added it to. To keep adding products under
the same category then follow the previous steps
!
When you drop your category menu down, you will see that
you’ll be able to edit or delete each product
!
Change the order of your products by press ‘change order’
and drag the products you would like to move
!

Putti Shop

  • 1.
    Before you startsetting up your online shop, ticketing or merchant app you will need to make sure you have an already established payment method (wether it’s cash, DPS, payment express etc) and have those details handy. !
  • 2.
    Log into youraccount and navigate to either the app or website view (depending on which platform you would like to set up your shop on) !
  • 3.
    Click ‘Payment Settings’on the side navigation panel and go to the general information tab. This is where you will begin to start filling out your payment details. !
  • 4.
    The General Informationtab is where you will fill out all the generic information of your shop including currency and timezone information !
  • 5.
    Select the currencyyou would like to primarily use for your online shop !
  • 6.
    Select how youwould like your pricing decimals to be displayed by selecting the currency decimal !
  • 7.
    Select your timezone.If your online ordering is only available for a certain period of time throughout the day, it will follow the timzone you have selected. Select wether you would like to use daylight savings time !
  • 8.
    Press ‘Save’ onceyou have finished making changes to your General Information settings. !
  • 9.
    Navigate to the‘Default Payment’ tab underneath the ‘Payment Settings’ tab, on the side navigation panel. !
  • 10.
    Select the paymentmethod you would like to use for your online shop. If you select ‘Cash’ then you won’t need to fill out any other details. !
  • 11.
    PayPal: If youhave decided to use PayPal as your default payment method then enter your PayPal account number and Client ID. You may need to log in to your PayPal account to get this information (Hover over the question mark button for instructions on where to find the information). !
  • 12.
    PaymentExpress: If youhave decided to use PaymentExpress as your default payment method then enter your account details. You may need to log in to your PaymentExpress account to get this information (Hover over the question mark button for instructions on where to find the information). !
  • 13.
    PayPal Express: Ifyou have decided to use PayPal Express as your default payment method then enter your account details. You may need to log in to your PayPal Express account to get this information (Hover over the question mark button for instructions on where to find the information). !
  • 14.
    Press ‘Save’ onceyou’ve finished making changes. !
  • 15.
    Navigate to the‘Branches’ tab underneath the ‘Payment Settings’ tab, on the side navigation panel. !
  • 16.
    The ‘Branches’ tabis where you set up your Branch information. You need to have at least one branch set up for your online shop to work. Press ‘Add’ to get started. !
  • 17.
    Under ‘Branch Details’fill out the general information for your branch. Your branch code and password is what is used when you log in to the merchant app. !
  • 18.
    Navigate to the‘Service Hours’ tab to set up the opening hours for your branch. (Please note that you will set up default service hours in further steps). !
  • 19.
    If you wouldlike your branch to have it’s own custom opening hours then select ‘custom’ on the drop down menu !
  • 20.
    Select which daysyou would like your branch to be open by clicking on the slider. Change the opening hours by clicking on the time and selecting from the drop down menu !
  • 21.
    Navigate to the‘Payment Info’ tab. Select which payment info you would like to use. If you have separate branches you may like to use separate payment methods !
  • 22.
    Navigate to the‘Notifications’ tab. Select wether you would like to receive payment notifications via email, e-printer or merchant app. !
  • 23.
    Once you havefinished adding the information to your branch, click save !
  • 24.
    Once you havesaved your branch it will appear underneath the ‘Branches’ section !
  • 25.
    You can editor delete a branch at any point by pressing the edit or trash icon adjacent to each branch !
  • 26.
    Now that youhave filled out your payment settings you can continue to set up your shop settings. Navigate to the ‘Shop’ section on your side navigation panel and press the ‘Settings’ tab !
  • 27.
    Under the shopsettings you can turn your online store on and off. We recommend filling out the shop settings before making your store live. Please note that you will need to activate either the menu or ticketing feature in order to publish your shop. !
  • 28.
    Choose wether youwould like to allow pick up or delivery !
  • 29.
    If you wouldlike to allow pickup, activate the slider !
  • 30.
    If you wouldlike to activate deliveries, then fill out the relevant information, including the radius that you will deliver to !
  • 31.
    If you offera free delivery if a customer spends over a certain amount of money, set your free delivery threshold to that price !
  • 32.
    If you onlyallow delivery if a customer spends a certain amount of money, then set your minimum delivery threshold to that price !
  • 33.
    If you wouldlike to set up an additional delivery fee then fill out the ‘Fee’ information. You may like to have extra costs depending if your customer is in a rural region. !
  • 34.
    Navigate to the‘Customer Messages’ tab
  • 35.
    Enter the messageyou would like your customer to receive once they have placed an order !
  • 36.
    Activate the messages/instructionsscreen if you would like to have a message or instructions on the payment screen (Where a customer enters their payment details). E.g orders may take 2-3 weeks for delivery !
  • 37.
    Navigate to the‘Default Service hours’ tab and select wether you would like your shop to be open anytime or custom hours !
  • 38.
    Select which daysyou would like your branch to be open by clicking on the slider. Change the opening hours by clicking on the time and selecting from the drop down menu !
  • 39.
    Press save onceyou’ve finished !
  • 40.
    Now that youhave set up your shop settings you can start adding products, or enable mobile ordering on products you’ve already set up !
  • 41.
    Click on the‘Features’ tab on the side navigation panel !
  • 42.
    Select the ‘Manage’button, located on the right of the ‘Features’ tab. Once clicked, you will access the features menu !
  • 43.
    ! Select the ‘Menu/Catalog’feature and press ‘Add’. This will make the menu feature appear under your features tab. Press close once you’ve finished.
  • 44.
    Select the ‘Menu/Catalog’tab now located on your app panel !
  • 45.
    Click the customisebutton to change the name or icon of your menu/catalog feature !
  • 46.
    To chose anicon or to upload your own custom icon press the ‘browse’ button. !
  • 47.
    Choose an iconfrom the list provided, or to upload your own icon press the ‘upload custom icon’ tab !
  • 48.
    Choose the categorytier to be either a ‘single’ (list view) or ‘multi level deep’ (grouped view) list. Press save once you’ve finished !
  • 49.
    Click on the‘add category’ button to start add a group for your products e.g drinks !
  • 50.
    Customise your categoryby adding a title and an image. If you have chosen to have a multi-level deep view then select the parent category you would like to add to. Press save. !
  • 51.
    Add an itemunder your new category by pressing ‘add item’ adjacent to your group category !
  • 52.
    Enter your productinformation including name, synopsis, display price and discount price (if necessary) !
  • 53.
    Choose wether youwould like to add an image or youtube link for your product !
  • 54.
    Upload a 640x 427 pixel image !
  • 55.
    If you wouldlike a video then copy and paste your YouTube URL link into the text box !
  • 56.
    Add your FacebookURL if necessary !
  • 57.
    Select wether youwould like to enable mobile ordering for this product. Once activated press the settings button !
  • 58.
    Enter the priceof your product, or, if you have multiple prices for the same product click ‘multiple’ !
  • 59.
    If you havemultiple pricing for one product then caption it (e,g sizes) and press the settings button to add categories !
  • 60.
    If you havepreviously set up variations then select the variations you would like to use. If you would like to add new choices then click ‘modify presets’ !
  • 61.
    Press ‘add’ tocreate a new pricing variable. Name the option and give it a price. Press ‘update presets’ once you’ve finished !
  • 62.
    Select your newlyset up variables and press ‘use selected prices’ !
  • 63.
    Navigate to ‘timeavail’ select wether you would like yo have your product available at the previously set up default hours, or select a specific time. !
  • 64.
    Navigate to ‘branchavail’ select wether you would like your product to be available at all branches or only at specific branches !
  • 65.
    If you onlywant your product to be available at specific branches, then select the branches that you would like it to be avaialable to. Press ‘update’ once you’ve finished !
  • 66.
    Continue editing yourproduct by adding a product description. Press ‘save’ once you’ve finished editing your product !
  • 67.
    You will seethat your new product will have been added to the category you added it to. To keep adding products under the same category then follow the previous steps !
  • 68.
    When you dropyour category menu down, you will see that you’ll be able to edit or delete each product !
  • 69.
    Change the orderof your products by press ‘change order’ and drag the products you would like to move !