
Recommended
More Related Content
What's hot
What's hot (20)
Viewers also liked
Similar to App Design and Layout
Similar to App Design and Layout (17)
Recently uploaded
Recently uploaded (20)
App Design and Layout
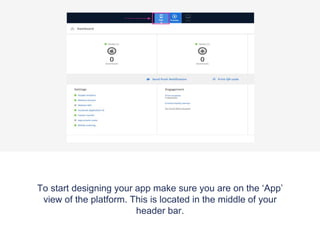
- 1. To start designing your app make sure you are on the ‘App’ view of the platform. This is located in the middle of your header bar.
- 2. Go to the ‘Design’ tab on the navigation panel to start customising out your content.
- 3. If you would like your colour set to be a default theme press ‘Browse Themes’ and choose the colours you would like to be used on your app, otherwise you can manually adjust them by going to the header bar settings and choosing a background and text colour.
- 4. Under the header bar click the browse button to add a logo, choose the background colour from the colour box on the right which will open a colour palette. Choose a colour and click on ‘okay’
- 5. Expand the category header section to customise it. Choose the title font from the drop down menu alongside, then you can choose a colour for the text and background.
- 6. You can then edit the content section by expanding it and once again choosing the background and title font from the drop down list, then add the colours for the title, body and background
- 7. If you’ve chosen to go with the ‘slider view’ for your app’s home screen, then here is where you can choose the sliding navigation colour for your app.
- 8. If you would like to see the changes while you are making them, press the ‘preview’ button on the top header bar where it will give you the QR code to scan, to be able to download the preview app from the app store and google play.
- 9. Press ‘save’ on the top right so that you don’t lose any changes.
- 10. To edit the layout of your app, go to the ‘Layout tab’ on the navigation panel.
- 11. Begin making it your own by choosing your app interface. (This is how it’s viewed on the Home Screen). There are 3 options to choose from : Slider, Grid or Tile.
- 12. If you choose the ‘Slider’, there will be no further changes for you to make.
- 13. Grid View
- 14. If you choose Grid View, you will need to upload a splash image. This is the image that will be viewed on the Home Screen of your app.
- 15. Press ‘Add Splash Image’.
- 16. ‘Drag and drop’ an image to upload or choose to browse to upload an image.
- 17. Choose whether you would like the splash screen to link to a feature, feature content or website. This means that if the splash screen is clicked, it will take you to the content that you have specified.
- 18. Press ‘update’ to save changes.
- 19. To add your own custom icon for your bottom tabs, press ‘Add Tab Icon’.
- 20. Either drag and drop an image in to the blue space or press ‘browse’ to upload one from your computer.
- 21. Choose whether you would like to link the tab to a particular feature, or content on your app or even an external website.
- 22. Choose a background colour for your app by pressing the drop down menu which will display a colour palette.
- 23. If you would like more than one row of tab icons then select either 2 or 3 rows.
- 24. The navigation icon is the icon used to open the slider menu. Use the preloaded icon or upload your own.
- 25. If you would like the tab icons to have a background image upload your own custom ‘Grid Background Image’.
- 26. Press ‘save’ to update your changes.
- 27. Tile View The Tile View is a good layout option if you would like to have multiple images and buttons on your App’s Home Screen.
- 28. Start uploading your image by clicking ‘Add Tile’.
- 29. Label the image that you are uploading
- 30. Select which size you would like to upload your tile as, by selecting the diagram of the layout you want to pick.
- 31. Once you have chosen the size you would like to go with, the image upload area will update the size that you will need to upload your pictures as, accordingly.
- 32. Select your image by dragging and dropping it on to the platform or browsing for one on your computer.
- 33. Choose whether you would like to link the tile to a particular feature or content on your app, or even an external website.
- 34. You will notice that the images you upload will puzzle together depending on the layout you have chosen for that image.
- 35. Rearrange the order of your images by hovering over the tile you would like to move and pressing the arrow button to move back and forth.
- 36. You can also delete and edit a tile by pressing the edit or trash can icon on the image.
- 37. The navigation icon is the icon used to open the slider menu. Use the preloaded icon or upload your own.
- 38. If you would like to have a border around each of the images, then select the border width. If you do not want the border set the border width to 0 px.
- 39. Press ‘save’ to update your changes.