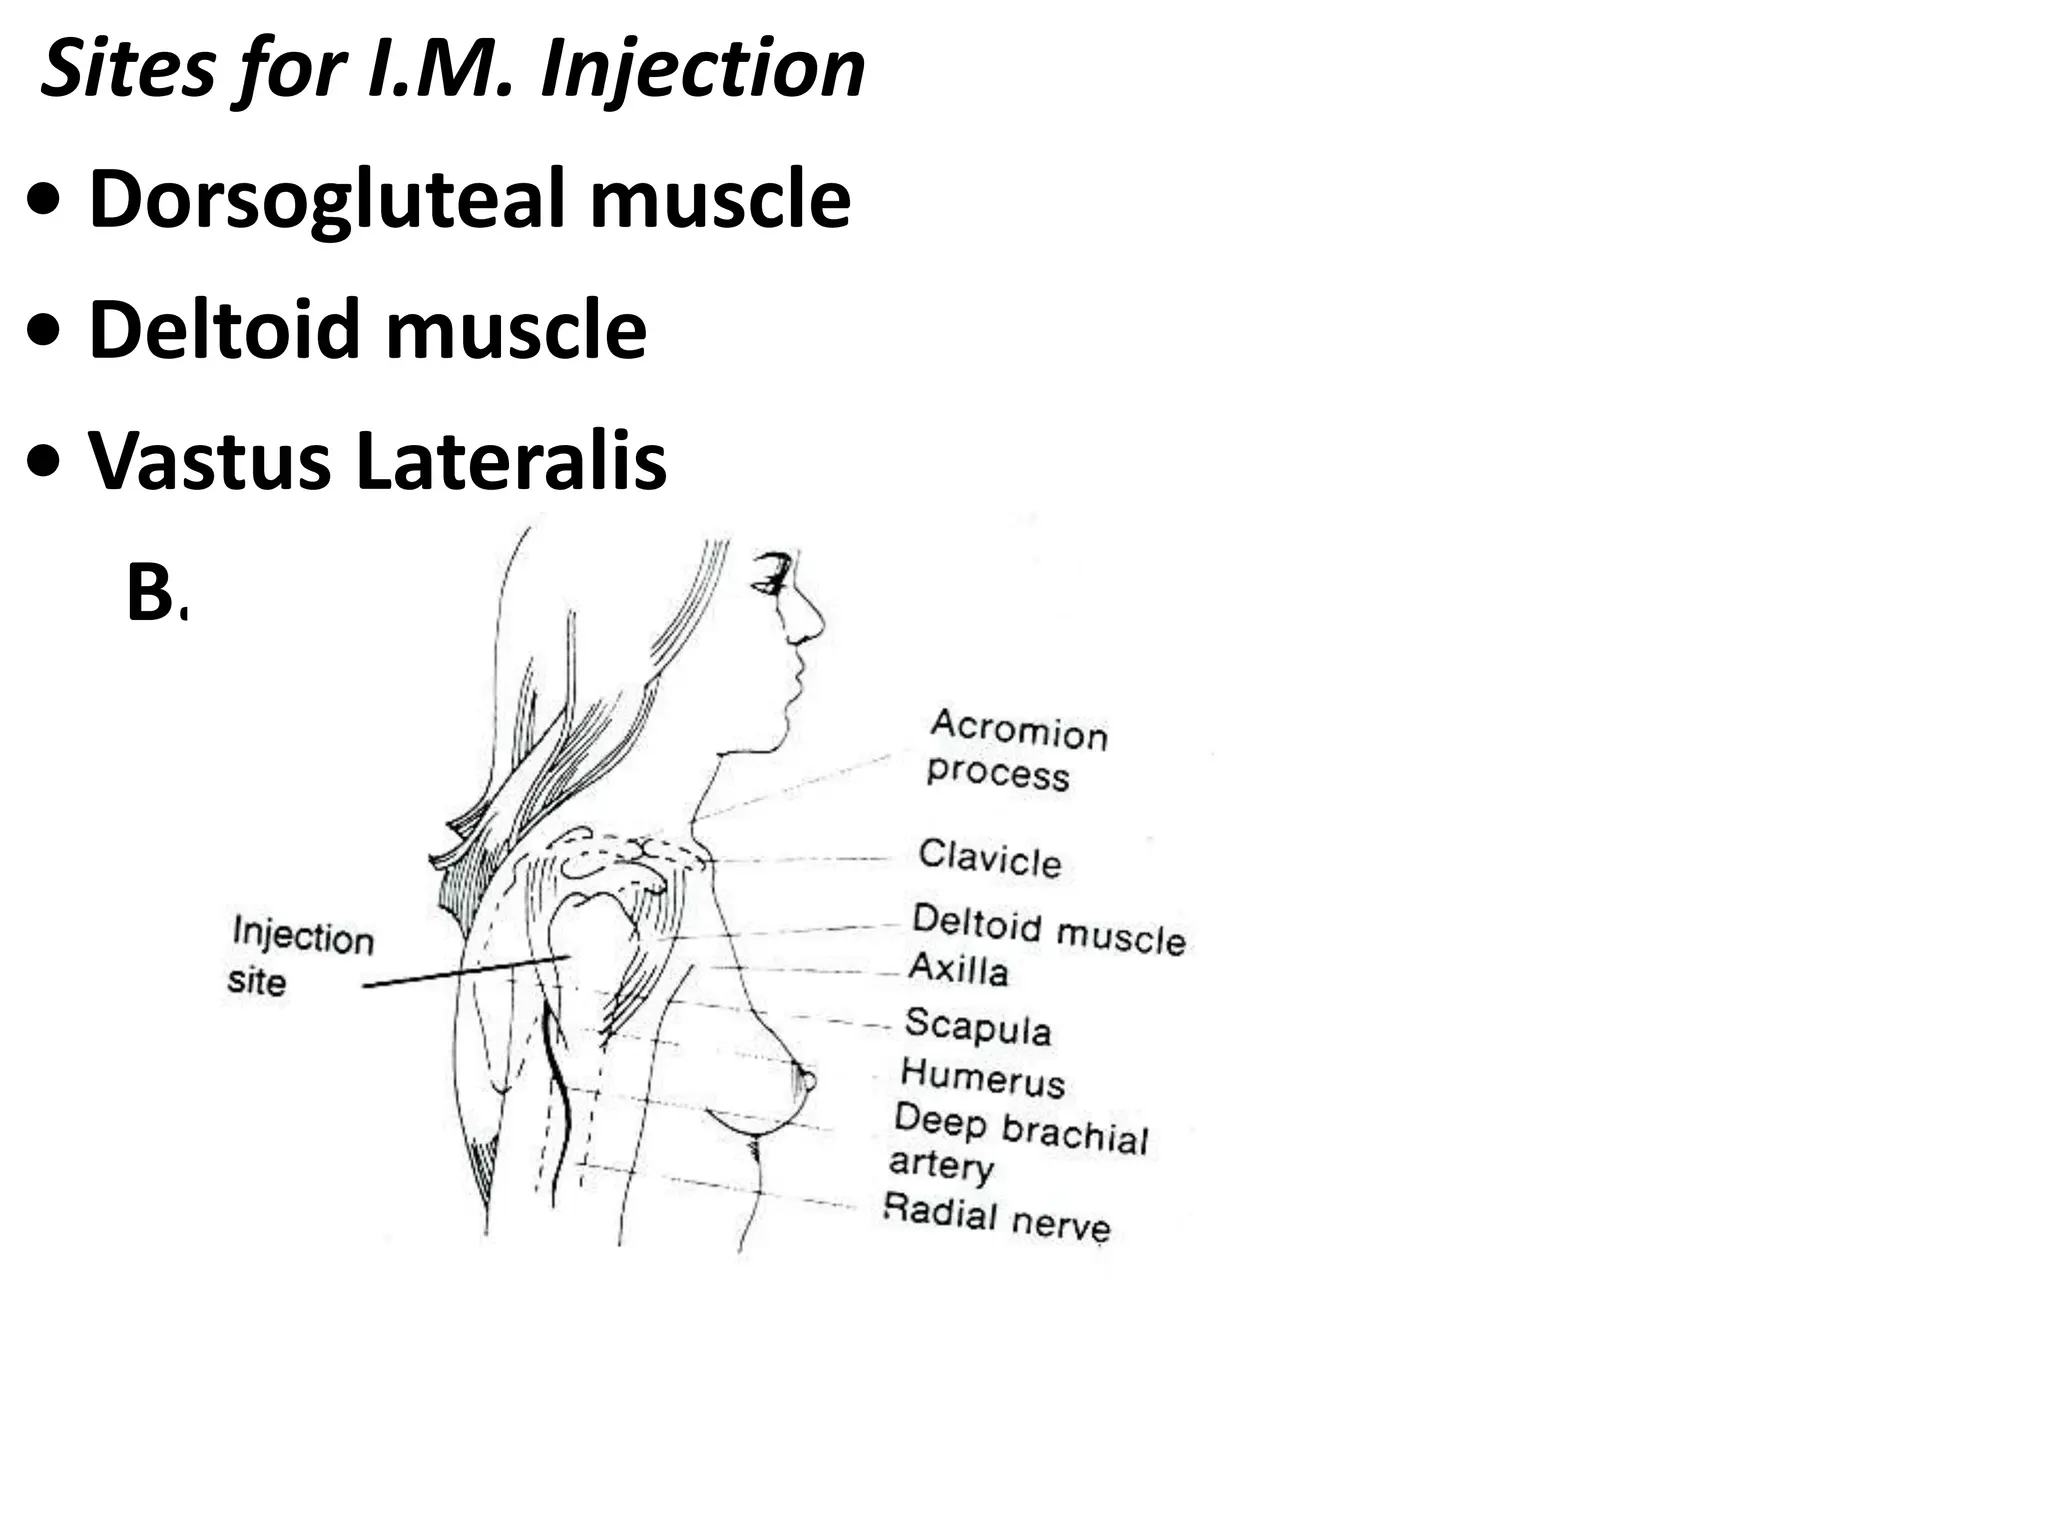
MEDICATION ADMINISTRATION
Learning Objectives
At the end of this unit/ session the students will be
able to:
Describe various rout of drug administration.
 Mention the general rules & care of administering
medications.
List the necessary equipments required for drug
administration.
 Mention the five rights before drug administration.
Cont……
Locate the different sites of parentral drug
administration.
 Demonstrate essential steps of medication
administration.
 List precautions for medication administration.
Drug Administration
The route of drug administration influences the
action of that drug on the body.
To obtain a systemic effect, a drug must be
absorbed and transported to the cells or tissues that
respond to them.
How a drug is administered ? Depends on the
chemical nature and quantity of the drug, as well as
on the desired speed of effect and the overall
condition of the client.
Cont….
Individual drugs are designed to be administered by
specific route be sure to check drug labels for the
appropriate route of administration.
Common routes of administration to obtain
systemic effects include the following: oral,
sublingual, rectal, trans dermal, and parentral.
 Parentral injections are commonly administered in
these sites: intradermal, subcutaneous, IM and IV.
Safety Procedures
When you administer drugs, you must follow
certain safety roles, which are also known as “the
Five Rights.”
These rules should be carried out each time when
you give a drug to a client.
The Five Rights
- Right medication.
-Compare drug card, medication sheet or drug
kardex (client’s medication record) three times,
With label on drug container.
 Know action, dosage and method of administration.
 Know side effects of the drug.
 Right client/Patient, check the client’s identification-
Name, Age, Bed number, and ward/door number.
- Right time
- Right method/route of administration
- Right amount/dosage- cheek all calculations of divided
dose with another nurse.
Expected out comes
- Medications are administered by correct route
- Medication action and side effects are identified
- Drug dosages are calculated accurately
Different Routes of Drug Administration:-
Oral - Topical
 Parentral - Intradermal
- Subcutaneous - Intramuscularly- Intravenous
 Rectal -Vaginal -Inhalation
1. Oral Administration
Oral medication is drug administered by mouth
Purpose
a. When local effects on GI tract are desired
b. When prolonged systemic action is desired
Contra- indications
1. For a patient with nausea & vomiting, unconscious
patients.
2. When digestive juices inactivate the effect of the
drug.
3. When there is inadequate absorption of the drug,
which leads to inaccurate determination of the drug
absorbed.
4. When the drug is irritating to the mucus membrane of
the alimentary canal.
Type of Oral Medication
1. Lozenges - sweet medicinal tablet containing sugar
that dissolve in the mouth so
that the medication is applied to the mouth and throat
2. Tablets - a small disc or flat round piece of dry drug
containing one or more drugs made by compressing a
powdered form of drug(s)
3. Capsules - small hollow digestible case usually made
of gelatin, filled with a drug to be swallowed by the
patient.
4. Syrups - sugar containing medicine dissolved in
water
5. Tinctures - medicinal substances dissolved in water
6. Suspensions - liquid medication with undissolved
solid particles in it.
7. Pills - a small ball of variable size, shape and color
some times coated with sugar that contains one or
more medicinal substances in solid form taken in
mouth.
8. Effervescence - drugs given of small bubbles of
gas.
9. Gargle - mildly antiseptic solution used to clean
the mouth or throat.
10. Powder - a medicinal preparation consisting of a
mixture of two or more drugs in the form of fine
particles.
Equipment
• Tray
• Towel
•A bowl of water for used mediation cup
• Measuring spoon
• A Jug of water/glass of water
• Chart and medication card
• Ordered medication
• Straw if necessary
Procedure
• Explain the procedure to the pt,
•Prepare your tray and take it to the patient's room
• Begin by checking the order
• Read the label 3 times
• Place solution and tablets in a separate container.
• If suspension, shake the bottle well before pouring
• Take it to the pt's bedside
• Keep the medication in site at all time
• Identify the patient carefully using all identification
variables.(Pt’s name, bed number…)
Cont…..
• Remain with the pt. until each medicine is
swallowed
•Offer additional fluid as necessary unless contra-
indicated
• Record the medication given, refused or omitted
immediately.
• Take care of the equipment & return them to their
proper places.
• Wash your hands.
Note
1. Remember the 5 R's
Right patient
 Right medication
 Right route
 Right dose
 Right time
Right documentation
2. Always keep the bottle tightly closed.
3. Clean and keep the label of the bottle clear.
4. Keep medication away from light.
5. Cheek their expiration date.
6. Keep the rim of the bottle clean
Cont……..
7. Give your undivided attention to your work while
preparing and giving medications.8. Make sure that a
graduate professional checks some potent drugs.
9. Never give medications from unlabeled container
10. Never return a dose once poured from the bottle.
11. Check your patient's vital sign may be necessary
before and after administrating some drugs e.g.
digitals, ergometrine.
12. Never give medicine that some one poured or drawn.
13. Never leave medicine at bed side of a patient and
within reach of the children.
2. Suppository
Purpose
• To produce a laxative effect. (bowel
movement),suppository is used frequently instead of
enema since it is inexpensive.
• To produce local sedative in the treatment of
hemorrhoids or rectal abscess.
• To produce general sedative effects when
medications cannot be taken by mouth
• To check rectal bleeding
Equipment
• Suppository (as ordered)
• Gauze square
• Rectal glove or finger cot
• Toilet paper
• Receiver for soiled swabs
• Bedpan, if the treatment is in order to produce
defection.
• Screen
• Mackintosh and towel
Procedure
1. Explain procedure to client
2. Wash hands
3. Check medication order.
4. Review client’s medical record for rectal surgery/ bleeding.
5. Prepare needed equipment and supplies.
6.Apply disposable gloves.
7. Identify client.
8. Arrange supplies at client’s bedside.
9. Provide privacy.
10. Position client in Sims’ position.
11. Keep client draped, except for anal area.
12. Examine external condition of client’s anus. Palpate rectal
walls.
13. Dispose of gloves, if soiled, and reapply new
gloves.
14. Remove suppository from wrapper and lubricate
rounded end.
15. Lubricate gloved finger of dominant hand.
16. Ask client to take slow, deep breaths through
mouth and to relax anal sphincter.
17. Retract client’s buttocks with non dominant
hand.
18. With index finger of dominant hand, gently insert
suppository through anus, pass the internal
sphincter, and place against rectal wall, 10 cm for
adults or 5 cm for children and infants.
19. Withdraw finger and wipe client’s anal area
clean.
20. Remove and dispose of gloves.
21. Wash hands.
22. If suppository contains a laxative or fecal
softener, be sure that client will receive help to reach
bedpan or toilet.
23. Keep client flat on back or on side for 5 minutes.
24. Return in 5 minutes to determine if suppository
has been expelled.
25. Observe client for effects of suppository 30
minutes after administration.
26. Record medication administration.
Kinds of Suppositories Used:
1. Bisacodyl (Dulcolax) is commonly ordered for its
laxative action. It stimulates the rectum and
lubricates its contents. Normally 15 minutes is
needed to produce bowel movement.
2. Glycerin or suppository for bringing about bowel
movement. If soap suppository is used cut a splinter
of soap 2-6 cm. and wash it in hot water to smooth
the rough edges before administration.
3. Bismuth - for checking diarrhea.
4. Opium, sodium barbital etc. for sedation
3. Parentral Drug Administration
A. Intradermal Injection
 It is an injection given into the dermal layer of the
skin (corneum)
Purpose
For diagnostic purpose
a. Fine test (mantoux test)
b. Allergic reaction
For therapeutic purpose
c. Intradermal injection may also be given like in
vaccination
Site of Injection
• The inner part of the forearm (midway between
the wrist and elbow.
• Upper arm, at deltoid area for BCG vaccination
Equipment
• Tray • Syringe & needle (sterile)
• Receiver • Drug (to be injected)
• File • Alcohol swab
• Marking pen • Water in the bowel to rinse
syringe and needle
Procedure
•• Explain procedure to patient -Wash hands
•Take equipment to the patient's side
• Get hold of the arm & locate the site of injection.
• Clean the skin with swab and inject the drug about
0.1. 0.2 inch in to the epidermis after the bevel of
the needle is no longer visible. Don't massage the
site after injection.
• Check for the immediate reaction of the skin (10-15
minutes later for tetanus, 20-30 minutes later for
penicillin)
• If it is for tine test, mark the area
Cont…….
• Chart the data and time of the
administration of the drug.
• Take care of the equipment &return to
their places.
• Do not forget to do the reading after 72
hours if it is for fine test (tuberculin test)
• Document about the procedure
B. Sub - Cutaneous Injection
 Injecting of drug under the skin in the sub-
-cutaneous tissue, (under the dermis)(0.05-2cc)
Purpose:
• To obtain quicker absorption than oral
administration
• When it is impossible to give medication orally
Equipment
• Tray(medication) • Sterile syringe & needle
(disposable) • Alcohol swabs • Medication
• File • Medication card and patient chart
• Receiver • Water in a bowel • Disposing box
Site of Injection
• Outer part of the upper arm
• The abdomen below the costal margin to the iliac
crest.
• The anterior aspect of the thigh
Procedure
• Explain the procedure to the patient
•Collect & take equipment to the pt's bed side or room
• Draw your medication
• Expel the air from the syringe
Cont…….
• Clean the site (usually it is in upper arms,
thighs or abdomen)
• Grasp the area between your thumb &
forefinger to tense it.
• Insert the needle elevate about 45 0 – 600 angle.
• Pierce the skin quickly & advance the needle
• Aspirate to determine that the needle has
not entered a blood vessel
• Inject the drug slowly.
Cont………….
• After injecting withdraw the needle and
massage the area with alcohol swab.
• Chart the amount and time of
administration immediately.
• Take care of the equipment- wash,
sterilize and return to its place
• Watch for undesired reaction (side
effect of the drug) etc.
Note.
If repeated injections are given , the
nurse should rotate the site of injection so
that each succeeding injection is about 5
cm away from the previous one.
C. Intra- Muscular Injection
 It is an introduction of a drug into a
body's system via the muscles.
Purpose
• To obtain quick action next to the intra-
venous route
• To avoid an irritation from the drug if
given through other route.
Equipment
• Tray
• Ordered drug (ampoule, vial)
• Sterile syringes and needle in a container
• Alcohol swab
• Receiver
• A bowl of water for used syringes and needle
• File
• Sterile jar with sterile forceps
• Chart
Sites for I.M. Injection
• Ventrogluteal muscle(A)
Sites for I.M. Injection
• Dorsogluteal muscle
• Deltoid muscle
• Vastus Lateralis
B.
C.
Figure 2. injection sites A : Vastus lateralis, B.Deltoid muscle, C. Gluteal Maxmusc
Procedure
• Do the ABC of the procedure.
• Prepare tray & take it to the patien’s room
• Prepare the medication
• Draw the medicine
• Expel the air from the syringe
• Choose the site of injection (the site for intra-
muscular)
• Using the iliac crest as the upper boundary divided
the buttock into four. Clean the upper outer
quadrant with alcohol swab:
• Stretch the skin and inject the medicine
Cont……….
• Draw back the piston (plunger) to check whether
or not you are in the blood vessel ( if blood returns,
withdraw and get a new needle & reinject in a
different spot)
• Push the drug slowly into the muscle
• When completed, withdraw the needle and
massage the area with swab gently to and
absorption.
• Place the patient comfortably
• Take care of the equipment you have used & return
to their places
Cont……..
• Chart the amount, time route and type of the
medicine
• Check the patient's reaction
NOTE:-
1. The needle for i.m. Injection should be long
2. Strict aseptic technique should be observed
throughout the procedure.
3. Injection should not be given in areas such as
inflamed, edematous, those containing moles and
pus.
D. I.V. INJECTIONS
It is the introduction of a drug in solution
form into a vein.
 The amount is not more than 10.ml. at a
time.
Sites for IV injection
1. Dorsal Venous network
2. Dorsal metacarpal Veins
3. Cephalic Veins 4. Radial vein
5. Ulnar vein 6. Median cubital vein
Purpose
• When the given drug is irritating to the
body tissue if given through other routes.
• When quick action is desired.
• When it is particularly desirable to
eliminate the variability of absorption.
• When blood drawing is needed
(exsanguinations)
Equipment
• Tray • Towel and rubber sheet
• Sterile needle and syringes in a sterile container
• Sterile forceps in a sterile container
• Alcohol swabs • File
• Medication • Tourniquet
• Receivers (2) • Treatment Chart
• Glove
Procedure
• Explain the procedure to the patient
• Wash hands
• Prepare your tray & the medication
• Position the patient properly
• Place rubber and towel under his arm(to protect
the bed linen)
• Expose the arm and apply tourniquet
• Ask pt. to open and close his fist.
• Palpate the vein and clean with alcohol swab the
site of the injection (Which is mainly the mid cubital
vein of the arm.)
Cont………….
• Clean with a circular motion; proceed from center
of the site outward.
• Hold the needle at about < 450 angles in line with
the veins.
• Puncture the vein and draw back to check whether
you are in the vein or not. (Blood return should be
seen if you are in the vein)
• Once you know that you are in the vein, release
the tourniquet and gently lower the angle of the
needle.
Cont…….
• When it is nearly paralleled to the vein and
instills the medications. Give very slowly
unless there is an order to give it fast
(Normally 40-60 drops is given in 1 minute).
• Check the pt's pulse in between. Any
complaint from the patient should not be ignored.
• Apply pressure over the site after removing
the needle to prevent bleeding. Tell patient
to flex his elbow.
Cont…..
• Watch the patient for few minutes
before leaving him.
• Remove your equipment
• Put the pt. In a comfortable position
• Wash, sterilize and place the equipment
in order.
• Chart the medication given the amount,
time & the reaction of the pt.
Note:
1. Have a bowl of water to rinse the
needle
2. Make yourself as well as the pt.
Comfortable before giving injection.
3. It is the fastest way of drug
administration
4. Never recup a used needle
E. Intravenous Therapy
 It is the administration of a large amount of
fluid into the system through a vein.
Purpose
• To maintain fluid & electrolyte balance
• To introduce medication particularly
antibiotics.
Equipment
• IV fluid as ordered • Sterile syringe & needle
• Rubber & towel • Receiver
• Alcohol swabs • Arm board
• Bandage & scissors • Tourniquet
• I.V pole • Adhesive tape
• Medication chart
• Vigo if needed/avilable
Preparation of the Patient
Since an infusion therapy takes several hours to
complete, the patient should first be made
comfortable.
Procedure
• Take equipment to the patient's bedside
• Explain the procedure to the patient. Be sure you
have right patient.
• Remove air from the tubing
• Place rubber & towel under the arm
• Apply tourniquet about 3 c. m. above the intended
site of entry.
Cont……..
• Observe & palpate for suitable vein
• Cleanse the skin with alcohol swabs thoroughly &
place the swab used thumb the retract down the
vein & soft tissue 4 c.m. below the intended site of
injection.
• Hold needle at 450 angle line with the vein
• Pierce the skin and puncture the vein
• Check if you are in the vein by drawing back with
the syringes. (blood returns if you are in the vein)
Cont…..
• Release the tourniquet gently
• Start the flow of solution by opening the clamp.
• Support needle with sterile gauze or sterile cotton
balls If necessary to keep it in proper position in the
vein
• Anchor the I.V. tubing with the adhesive tape to
prevent pull on the needle.
• Place arm board or splint under the arm and
bandage around.
• Adjust the rate of flow
Cont……
• Rate of flow is regulated by the following formula.
Number of ml. of sol's x number of drops in a ml. .
Number of hrs. over which sol. is to be administered x 60minutes
1ml = 15 drops
E.g. if 1000ml of 5% D/w is to run for 24 hrs, how
many drops per
minutes should it run?
1000 ml. x 15 gtt/ml. = 1000 x 15 gtt. = 10 gtt/min
24 x 60 min. 24 x 60 min.
Cont……
Note:
1. The arm board should be long enough to
extend beyond the wrist and elbow joint.
2. Board should be padded
3. Infusion bottle should be labeled with the
date, time infusion is started ,drops per minute, and
any added medications. If more than one
bottle as used in 24 hrs, it should be labeled as
bag 1,2,3, etc.
4. Extend the arm in the most comfortable position.
Cont……
5. Usual areas used for intravenous infusion are:
a) The median basilic vein on the inner surface of
the arm.
b) A vein on top of the foot
c) In an infant the jugular vein and the scalp vein
F. Blood Transfusion
 It is the giving of blood to a patient through a vein
Purpose
• To counter act severe hemorrhage and replace the
blood loss.
• To prevent circulatory failure in operation where
blood loss is considerable, such as in rectal
resection hysterectomy and arterial surgery.
Cont……..
• In severe burns to make up for blood lost by
burning but only after plasma and electrolytes have
been replaced.
• For treatment of severe anemia due to cancer,
marrow aplasia and similar conditions.
• To provide clotting factors normally present in
blood, which may be absent as a result of disease.
Equipment
• Bottle containing blood, with the patient
name, blood group and Rh. Factor and expiry
date.
• Blood giving set •Sterile syringes and needle
• Alcohol swabs • Sterile gauze
• Rubber sheet and towel • Tourniquet
• Arm splint • Bandages and scissors
• Adhesive tape • Receiver for dirty swabs
• I.V pole (stand) • Patient's chart.
Procedure
• Explain procedure to patient
• Before blood transfusion is administered, the
Nurse/HO has to check the blood group &
RH- factor if cross match of the donor's & the
recipient’s blood is done and is compatible. And also
check for HIV other blood born pathogens.
• Prepare the tray with necessary items
• Before taking it to the patient's room, check the
name, hospital number, bed number, blood group of
patient's ,
cont……..
• Rh. Factor and the expiry date with a 2nd health
professional or a doctor.
• Blood should be used within 21 days of its
withdrawal date, if enough sodium citrate is used, it
can be used until 36 days.
• Take it to the pt's room
• Hang the bottle & remove the air from the tubing
• Put pt. in a comfortable position.
• Place rubber & towel under the arm
• Check the vital signs before administering
• Choose the vein
Cont…….
• Apply tourniquet
• Clean the skin & feel for a distended vein & clean
again.
• Puncture the vein with the needle (the needle here should
be short and wide so that it does not cause occlusion easily)
• After you make sure that you are in the vein
release tourniquet & open the clamp.
• The drop/minute at the beginning should be very
slow
• Watch patient closely for any reaction
Cont………
• If there is no reaction from the patient regulate the
rate of flow according to the patient's conditions &
the order.
• Splint the arm & position it comfortably.
• Remove the equipment you have used, wash and
return to its proper place.
• Record the time you started the blood & any other
pertinent information.
• Check pt. frequently
Note:
1. Always remember to have anti- histamine
injection ready in case a patient has reaction
from the blood.
2. Be familiar with the most usual symptoms of
blood reactions which are:-
Immediate Reaction: a) Headache b) Backache
c) Chills d) Pyrexia e) Rash of the skin (urticaria )
Late Reaction ;-a) Dyspnea b) Renal shut
down in severe cases c) Heamaturia d) Chest pain
e) Rigor (rigidity)
Important care Interventions in Transfusion
Reaction;-
Reactions following blood transfusion may occur for
various reasons.
Patient must be informed that the supply of blood
is not completely, risk-free but that it has been
tested carefully.
 Nursing management is directed toward preventing
complications and promptly initiating measures to
control any complications that occur.
Cont……….
The following steps are taken so that a diagnosis
may be made regarding the type and severity of the
reaction:
The transfusion set is disconnected, but the
intravenous line is kept patent with a normal saline
solution (0.9%) in case intravenous medication
should be needed rapidly.
The blood container and tubing are saved, not
discarded.
Cont…..
•They are sent to blood bank for repeat
typing and culture.
•The identifying tags and numbers are
verified.
• The symptoms are treated as prescribed
and vital signs are monitored.
• The patient blood is drawn from plasma
hemoglobin, culture, and retype should
be checked.
Cont……
A urine sample is collected as soon as possible and
sent to laboratory and Subsequent voiding of urine
should be observed.
 For a hemoglobin determination take a sample and
send to the laboratory.
 The blood bank is notified that a suspected
transfusion reaction has occurred.
 The reaction is documented according to the
institution’s policy.
G. Cut Down
Dissection of a vein for inserting I.V cannula or
needle.
Purpose
 When vein puncture is difficult
 When pro longed, continuous infusion is needed
 When rapid infusion is important and emergency
situation combine these indications.
Equipment
Sterile
• Dressing forceps (1) • Cotton balls in a gallpot
• Solution for cleansing • Gloves
• Fenestrated towel • Syringe and needle
• Scalpel (surgical knife) • Mosquito forceps (3)
• Aneurysm needle (1) • Silk
• Intravenous cannula (2) • Small, straight scissors
(1) • Small, curved scissors (1) • Needle holder (1)
• Round needle (1)
Cont…….
• Cutting needle (2) • Tissue forceps (1)
• Gauze (slit at one end) • Probe
• Fine dissecting forceps (1) • Local anesthesia
Clean equipment:-
• Receiver of dirty swab • Stand light, if available
• Adhesive tape (plaster) • Dressing scissors
Procedure
• Explain procedure to the patient
•Wash hands& collect the materials
• Bring equipment to the bedside of the patient
• Shorten hair of the area, if needed
• Position the patient properly
• The nurse will then open the set and pour the
cleaning lotion in to the galipot for the doctor
• The doctor/ H/O then scrub his hands, put on
gloves, clean and drape the area, he/she will insert
the I.V
Cont…….
• The channel is securely tied with silk and skin is
closed
• The health personnel dresses the site and secure it
with adhesive plaster
• Remove all equipment, wash and send for
sterilization

Medication administration

  • 1.
    MEDICATION ADMINISTRATION Learning Objectives Atthe end of this unit/ session the students will be able to: Describe various rout of drug administration.  Mention the general rules & care of administering medications. List the necessary equipments required for drug administration.  Mention the five rights before drug administration.
  • 2.
    Cont…… Locate the differentsites of parentral drug administration.  Demonstrate essential steps of medication administration.  List precautions for medication administration.
  • 3.
    Drug Administration The routeof drug administration influences the action of that drug on the body. To obtain a systemic effect, a drug must be absorbed and transported to the cells or tissues that respond to them. How a drug is administered ? Depends on the chemical nature and quantity of the drug, as well as on the desired speed of effect and the overall condition of the client.
  • 4.
    Cont…. Individual drugs aredesigned to be administered by specific route be sure to check drug labels for the appropriate route of administration. Common routes of administration to obtain systemic effects include the following: oral, sublingual, rectal, trans dermal, and parentral.  Parentral injections are commonly administered in these sites: intradermal, subcutaneous, IM and IV.
  • 5.
    Safety Procedures When youadminister drugs, you must follow certain safety roles, which are also known as “the Five Rights.” These rules should be carried out each time when you give a drug to a client.
  • 6.
    The Five Rights -Right medication. -Compare drug card, medication sheet or drug kardex (client’s medication record) three times, With label on drug container.  Know action, dosage and method of administration.  Know side effects of the drug.  Right client/Patient, check the client’s identification- Name, Age, Bed number, and ward/door number. - Right time - Right method/route of administration - Right amount/dosage- cheek all calculations of divided dose with another nurse.
  • 7.
    Expected out comes -Medications are administered by correct route - Medication action and side effects are identified - Drug dosages are calculated accurately Different Routes of Drug Administration:- Oral - Topical  Parentral - Intradermal - Subcutaneous - Intramuscularly- Intravenous  Rectal -Vaginal -Inhalation
  • 8.
    1. Oral Administration Oralmedication is drug administered by mouth Purpose a. When local effects on GI tract are desired b. When prolonged systemic action is desired Contra- indications 1. For a patient with nausea & vomiting, unconscious patients. 2. When digestive juices inactivate the effect of the drug. 3. When there is inadequate absorption of the drug, which leads to inaccurate determination of the drug absorbed. 4. When the drug is irritating to the mucus membrane of the alimentary canal.
  • 9.
    Type of OralMedication 1. Lozenges - sweet medicinal tablet containing sugar that dissolve in the mouth so that the medication is applied to the mouth and throat 2. Tablets - a small disc or flat round piece of dry drug containing one or more drugs made by compressing a powdered form of drug(s) 3. Capsules - small hollow digestible case usually made of gelatin, filled with a drug to be swallowed by the patient. 4. Syrups - sugar containing medicine dissolved in water 5. Tinctures - medicinal substances dissolved in water 6. Suspensions - liquid medication with undissolved solid particles in it.
  • 10.
    7. Pills -a small ball of variable size, shape and color some times coated with sugar that contains one or more medicinal substances in solid form taken in mouth. 8. Effervescence - drugs given of small bubbles of gas. 9. Gargle - mildly antiseptic solution used to clean the mouth or throat. 10. Powder - a medicinal preparation consisting of a mixture of two or more drugs in the form of fine particles.
  • 11.
    Equipment • Tray • Towel •Abowl of water for used mediation cup • Measuring spoon • A Jug of water/glass of water • Chart and medication card • Ordered medication • Straw if necessary
  • 12.
    Procedure • Explain theprocedure to the pt, •Prepare your tray and take it to the patient's room • Begin by checking the order • Read the label 3 times • Place solution and tablets in a separate container. • If suspension, shake the bottle well before pouring • Take it to the pt's bedside • Keep the medication in site at all time • Identify the patient carefully using all identification variables.(Pt’s name, bed number…)
  • 13.
    Cont….. • Remain withthe pt. until each medicine is swallowed •Offer additional fluid as necessary unless contra- indicated • Record the medication given, refused or omitted immediately. • Take care of the equipment & return them to their proper places. • Wash your hands.
  • 14.
    Note 1. Remember the5 R's Right patient  Right medication  Right route  Right dose  Right time Right documentation 2. Always keep the bottle tightly closed. 3. Clean and keep the label of the bottle clear. 4. Keep medication away from light. 5. Cheek their expiration date. 6. Keep the rim of the bottle clean
  • 15.
    Cont…….. 7. Give yourundivided attention to your work while preparing and giving medications.8. Make sure that a graduate professional checks some potent drugs. 9. Never give medications from unlabeled container 10. Never return a dose once poured from the bottle. 11. Check your patient's vital sign may be necessary before and after administrating some drugs e.g. digitals, ergometrine. 12. Never give medicine that some one poured or drawn. 13. Never leave medicine at bed side of a patient and within reach of the children.
  • 16.
    2. Suppository Purpose • Toproduce a laxative effect. (bowel movement),suppository is used frequently instead of enema since it is inexpensive. • To produce local sedative in the treatment of hemorrhoids or rectal abscess. • To produce general sedative effects when medications cannot be taken by mouth • To check rectal bleeding
  • 17.
    Equipment • Suppository (asordered) • Gauze square • Rectal glove or finger cot • Toilet paper • Receiver for soiled swabs • Bedpan, if the treatment is in order to produce defection. • Screen • Mackintosh and towel
  • 18.
    Procedure 1. Explain procedureto client 2. Wash hands 3. Check medication order. 4. Review client’s medical record for rectal surgery/ bleeding. 5. Prepare needed equipment and supplies. 6.Apply disposable gloves. 7. Identify client. 8. Arrange supplies at client’s bedside. 9. Provide privacy. 10. Position client in Sims’ position. 11. Keep client draped, except for anal area. 12. Examine external condition of client’s anus. Palpate rectal walls.
  • 19.
    13. Dispose ofgloves, if soiled, and reapply new gloves. 14. Remove suppository from wrapper and lubricate rounded end. 15. Lubricate gloved finger of dominant hand. 16. Ask client to take slow, deep breaths through mouth and to relax anal sphincter. 17. Retract client’s buttocks with non dominant hand. 18. With index finger of dominant hand, gently insert suppository through anus, pass the internal sphincter, and place against rectal wall, 10 cm for adults or 5 cm for children and infants.
  • 20.
    19. Withdraw fingerand wipe client’s anal area clean. 20. Remove and dispose of gloves. 21. Wash hands. 22. If suppository contains a laxative or fecal softener, be sure that client will receive help to reach bedpan or toilet. 23. Keep client flat on back or on side for 5 minutes. 24. Return in 5 minutes to determine if suppository has been expelled. 25. Observe client for effects of suppository 30 minutes after administration. 26. Record medication administration.
  • 21.
    Kinds of SuppositoriesUsed: 1. Bisacodyl (Dulcolax) is commonly ordered for its laxative action. It stimulates the rectum and lubricates its contents. Normally 15 minutes is needed to produce bowel movement. 2. Glycerin or suppository for bringing about bowel movement. If soap suppository is used cut a splinter of soap 2-6 cm. and wash it in hot water to smooth the rough edges before administration. 3. Bismuth - for checking diarrhea. 4. Opium, sodium barbital etc. for sedation
  • 22.
    3. Parentral DrugAdministration A. Intradermal Injection  It is an injection given into the dermal layer of the skin (corneum) Purpose For diagnostic purpose a. Fine test (mantoux test) b. Allergic reaction For therapeutic purpose c. Intradermal injection may also be given like in vaccination
  • 23.
    Site of Injection •The inner part of the forearm (midway between the wrist and elbow. • Upper arm, at deltoid area for BCG vaccination Equipment • Tray • Syringe & needle (sterile) • Receiver • Drug (to be injected) • File • Alcohol swab • Marking pen • Water in the bowel to rinse syringe and needle
  • 24.
    Procedure •• Explain procedureto patient -Wash hands •Take equipment to the patient's side • Get hold of the arm & locate the site of injection. • Clean the skin with swab and inject the drug about 0.1. 0.2 inch in to the epidermis after the bevel of the needle is no longer visible. Don't massage the site after injection. • Check for the immediate reaction of the skin (10-15 minutes later for tetanus, 20-30 minutes later for penicillin) • If it is for tine test, mark the area
  • 25.
    Cont……. • Chart thedata and time of the administration of the drug. • Take care of the equipment &return to their places. • Do not forget to do the reading after 72 hours if it is for fine test (tuberculin test) • Document about the procedure
  • 26.
    B. Sub -Cutaneous Injection  Injecting of drug under the skin in the sub- -cutaneous tissue, (under the dermis)(0.05-2cc) Purpose: • To obtain quicker absorption than oral administration • When it is impossible to give medication orally Equipment • Tray(medication) • Sterile syringe & needle (disposable) • Alcohol swabs • Medication • File • Medication card and patient chart • Receiver • Water in a bowel • Disposing box
  • 27.
    Site of Injection •Outer part of the upper arm • The abdomen below the costal margin to the iliac crest. • The anterior aspect of the thigh Procedure • Explain the procedure to the patient •Collect & take equipment to the pt's bed side or room • Draw your medication • Expel the air from the syringe
  • 28.
    Cont……. • Clean thesite (usually it is in upper arms, thighs or abdomen) • Grasp the area between your thumb & forefinger to tense it. • Insert the needle elevate about 45 0 – 600 angle. • Pierce the skin quickly & advance the needle • Aspirate to determine that the needle has not entered a blood vessel • Inject the drug slowly.
  • 29.
    Cont…………. • After injectingwithdraw the needle and massage the area with alcohol swab. • Chart the amount and time of administration immediately. • Take care of the equipment- wash, sterilize and return to its place • Watch for undesired reaction (side effect of the drug) etc.
  • 30.
    Note. If repeated injectionsare given , the nurse should rotate the site of injection so that each succeeding injection is about 5 cm away from the previous one.
  • 31.
    C. Intra- MuscularInjection  It is an introduction of a drug into a body's system via the muscles. Purpose • To obtain quick action next to the intra- venous route • To avoid an irritation from the drug if given through other route.
  • 32.
    Equipment • Tray • Ordereddrug (ampoule, vial) • Sterile syringes and needle in a container • Alcohol swab • Receiver • A bowl of water for used syringes and needle • File • Sterile jar with sterile forceps • Chart
  • 33.
    Sites for I.M.Injection • Ventrogluteal muscle(A)
  • 34.
    Sites for I.M.Injection • Dorsogluteal muscle • Deltoid muscle • Vastus Lateralis B.
  • 35.
    C. Figure 2. injectionsites A : Vastus lateralis, B.Deltoid muscle, C. Gluteal Maxmusc
  • 36.
    Procedure • Do theABC of the procedure. • Prepare tray & take it to the patien’s room • Prepare the medication • Draw the medicine • Expel the air from the syringe • Choose the site of injection (the site for intra- muscular) • Using the iliac crest as the upper boundary divided the buttock into four. Clean the upper outer quadrant with alcohol swab: • Stretch the skin and inject the medicine
  • 37.
    Cont………. • Draw backthe piston (plunger) to check whether or not you are in the blood vessel ( if blood returns, withdraw and get a new needle & reinject in a different spot) • Push the drug slowly into the muscle • When completed, withdraw the needle and massage the area with swab gently to and absorption. • Place the patient comfortably • Take care of the equipment you have used & return to their places
  • 38.
    Cont…….. • Chart theamount, time route and type of the medicine • Check the patient's reaction NOTE:- 1. The needle for i.m. Injection should be long 2. Strict aseptic technique should be observed throughout the procedure. 3. Injection should not be given in areas such as inflamed, edematous, those containing moles and pus.
  • 39.
    D. I.V. INJECTIONS Itis the introduction of a drug in solution form into a vein.  The amount is not more than 10.ml. at a time. Sites for IV injection 1. Dorsal Venous network 2. Dorsal metacarpal Veins 3. Cephalic Veins 4. Radial vein 5. Ulnar vein 6. Median cubital vein
  • 40.
    Purpose • When thegiven drug is irritating to the body tissue if given through other routes. • When quick action is desired. • When it is particularly desirable to eliminate the variability of absorption. • When blood drawing is needed (exsanguinations)
  • 41.
    Equipment • Tray •Towel and rubber sheet • Sterile needle and syringes in a sterile container • Sterile forceps in a sterile container • Alcohol swabs • File • Medication • Tourniquet • Receivers (2) • Treatment Chart • Glove
  • 42.
    Procedure • Explain theprocedure to the patient • Wash hands • Prepare your tray & the medication • Position the patient properly • Place rubber and towel under his arm(to protect the bed linen) • Expose the arm and apply tourniquet • Ask pt. to open and close his fist. • Palpate the vein and clean with alcohol swab the site of the injection (Which is mainly the mid cubital vein of the arm.)
  • 43.
    Cont…………. • Clean witha circular motion; proceed from center of the site outward. • Hold the needle at about < 450 angles in line with the veins. • Puncture the vein and draw back to check whether you are in the vein or not. (Blood return should be seen if you are in the vein) • Once you know that you are in the vein, release the tourniquet and gently lower the angle of the needle.
  • 44.
    Cont……. • When itis nearly paralleled to the vein and instills the medications. Give very slowly unless there is an order to give it fast (Normally 40-60 drops is given in 1 minute). • Check the pt's pulse in between. Any complaint from the patient should not be ignored. • Apply pressure over the site after removing the needle to prevent bleeding. Tell patient to flex his elbow.
  • 45.
    Cont….. • Watch thepatient for few minutes before leaving him. • Remove your equipment • Put the pt. In a comfortable position • Wash, sterilize and place the equipment in order. • Chart the medication given the amount, time & the reaction of the pt.
  • 46.
    Note: 1. Have abowl of water to rinse the needle 2. Make yourself as well as the pt. Comfortable before giving injection. 3. It is the fastest way of drug administration 4. Never recup a used needle
  • 47.
    E. Intravenous Therapy It is the administration of a large amount of fluid into the system through a vein. Purpose • To maintain fluid & electrolyte balance • To introduce medication particularly antibiotics.
  • 48.
    Equipment • IV fluidas ordered • Sterile syringe & needle • Rubber & towel • Receiver • Alcohol swabs • Arm board • Bandage & scissors • Tourniquet • I.V pole • Adhesive tape • Medication chart • Vigo if needed/avilable
  • 49.
    Preparation of thePatient Since an infusion therapy takes several hours to complete, the patient should first be made comfortable. Procedure • Take equipment to the patient's bedside • Explain the procedure to the patient. Be sure you have right patient. • Remove air from the tubing • Place rubber & towel under the arm • Apply tourniquet about 3 c. m. above the intended site of entry.
  • 50.
    Cont…….. • Observe &palpate for suitable vein • Cleanse the skin with alcohol swabs thoroughly & place the swab used thumb the retract down the vein & soft tissue 4 c.m. below the intended site of injection. • Hold needle at 450 angle line with the vein • Pierce the skin and puncture the vein • Check if you are in the vein by drawing back with the syringes. (blood returns if you are in the vein)
  • 51.
    Cont….. • Release thetourniquet gently • Start the flow of solution by opening the clamp. • Support needle with sterile gauze or sterile cotton balls If necessary to keep it in proper position in the vein • Anchor the I.V. tubing with the adhesive tape to prevent pull on the needle. • Place arm board or splint under the arm and bandage around. • Adjust the rate of flow
  • 52.
    Cont…… • Rate offlow is regulated by the following formula. Number of ml. of sol's x number of drops in a ml. . Number of hrs. over which sol. is to be administered x 60minutes 1ml = 15 drops E.g. if 1000ml of 5% D/w is to run for 24 hrs, how many drops per minutes should it run? 1000 ml. x 15 gtt/ml. = 1000 x 15 gtt. = 10 gtt/min 24 x 60 min. 24 x 60 min.
  • 53.
    Cont…… Note: 1. The armboard should be long enough to extend beyond the wrist and elbow joint. 2. Board should be padded 3. Infusion bottle should be labeled with the date, time infusion is started ,drops per minute, and any added medications. If more than one bottle as used in 24 hrs, it should be labeled as bag 1,2,3, etc. 4. Extend the arm in the most comfortable position.
  • 54.
    Cont…… 5. Usual areasused for intravenous infusion are: a) The median basilic vein on the inner surface of the arm. b) A vein on top of the foot c) In an infant the jugular vein and the scalp vein
  • 55.
    F. Blood Transfusion It is the giving of blood to a patient through a vein Purpose • To counter act severe hemorrhage and replace the blood loss. • To prevent circulatory failure in operation where blood loss is considerable, such as in rectal resection hysterectomy and arterial surgery.
  • 56.
    Cont…….. • In severeburns to make up for blood lost by burning but only after plasma and electrolytes have been replaced. • For treatment of severe anemia due to cancer, marrow aplasia and similar conditions. • To provide clotting factors normally present in blood, which may be absent as a result of disease.
  • 57.
    Equipment • Bottle containingblood, with the patient name, blood group and Rh. Factor and expiry date. • Blood giving set •Sterile syringes and needle • Alcohol swabs • Sterile gauze • Rubber sheet and towel • Tourniquet • Arm splint • Bandages and scissors • Adhesive tape • Receiver for dirty swabs • I.V pole (stand) • Patient's chart.
  • 58.
    Procedure • Explain procedureto patient • Before blood transfusion is administered, the Nurse/HO has to check the blood group & RH- factor if cross match of the donor's & the recipient’s blood is done and is compatible. And also check for HIV other blood born pathogens. • Prepare the tray with necessary items • Before taking it to the patient's room, check the name, hospital number, bed number, blood group of patient's ,
  • 59.
    cont…….. • Rh. Factorand the expiry date with a 2nd health professional or a doctor. • Blood should be used within 21 days of its withdrawal date, if enough sodium citrate is used, it can be used until 36 days. • Take it to the pt's room • Hang the bottle & remove the air from the tubing • Put pt. in a comfortable position. • Place rubber & towel under the arm • Check the vital signs before administering • Choose the vein
  • 60.
    Cont……. • Apply tourniquet •Clean the skin & feel for a distended vein & clean again. • Puncture the vein with the needle (the needle here should be short and wide so that it does not cause occlusion easily) • After you make sure that you are in the vein release tourniquet & open the clamp. • The drop/minute at the beginning should be very slow • Watch patient closely for any reaction
  • 61.
    Cont……… • If thereis no reaction from the patient regulate the rate of flow according to the patient's conditions & the order. • Splint the arm & position it comfortably. • Remove the equipment you have used, wash and return to its proper place. • Record the time you started the blood & any other pertinent information. • Check pt. frequently
  • 62.
    Note: 1. Always rememberto have anti- histamine injection ready in case a patient has reaction from the blood. 2. Be familiar with the most usual symptoms of blood reactions which are:- Immediate Reaction: a) Headache b) Backache c) Chills d) Pyrexia e) Rash of the skin (urticaria ) Late Reaction ;-a) Dyspnea b) Renal shut down in severe cases c) Heamaturia d) Chest pain e) Rigor (rigidity)
  • 63.
    Important care Interventionsin Transfusion Reaction;- Reactions following blood transfusion may occur for various reasons. Patient must be informed that the supply of blood is not completely, risk-free but that it has been tested carefully.  Nursing management is directed toward preventing complications and promptly initiating measures to control any complications that occur.
  • 64.
    Cont………. The following stepsare taken so that a diagnosis may be made regarding the type and severity of the reaction: The transfusion set is disconnected, but the intravenous line is kept patent with a normal saline solution (0.9%) in case intravenous medication should be needed rapidly. The blood container and tubing are saved, not discarded.
  • 65.
    Cont….. •They are sentto blood bank for repeat typing and culture. •The identifying tags and numbers are verified. • The symptoms are treated as prescribed and vital signs are monitored. • The patient blood is drawn from plasma hemoglobin, culture, and retype should be checked.
  • 66.
    Cont…… A urine sampleis collected as soon as possible and sent to laboratory and Subsequent voiding of urine should be observed.  For a hemoglobin determination take a sample and send to the laboratory.  The blood bank is notified that a suspected transfusion reaction has occurred.  The reaction is documented according to the institution’s policy.
  • 67.
    G. Cut Down Dissectionof a vein for inserting I.V cannula or needle. Purpose  When vein puncture is difficult  When pro longed, continuous infusion is needed  When rapid infusion is important and emergency situation combine these indications.
  • 68.
    Equipment Sterile • Dressing forceps(1) • Cotton balls in a gallpot • Solution for cleansing • Gloves • Fenestrated towel • Syringe and needle • Scalpel (surgical knife) • Mosquito forceps (3) • Aneurysm needle (1) • Silk • Intravenous cannula (2) • Small, straight scissors (1) • Small, curved scissors (1) • Needle holder (1) • Round needle (1)
  • 69.
    Cont……. • Cutting needle(2) • Tissue forceps (1) • Gauze (slit at one end) • Probe • Fine dissecting forceps (1) • Local anesthesia Clean equipment:- • Receiver of dirty swab • Stand light, if available • Adhesive tape (plaster) • Dressing scissors
  • 70.
    Procedure • Explain procedureto the patient •Wash hands& collect the materials • Bring equipment to the bedside of the patient • Shorten hair of the area, if needed • Position the patient properly • The nurse will then open the set and pour the cleaning lotion in to the galipot for the doctor • The doctor/ H/O then scrub his hands, put on gloves, clean and drape the area, he/she will insert the I.V
  • 71.
    Cont……. • The channelis securely tied with silk and skin is closed • The health personnel dresses the site and secure it with adhesive plaster • Remove all equipment, wash and send for sterilization