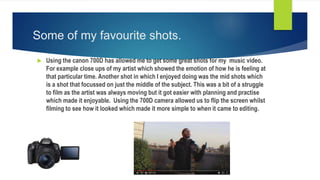
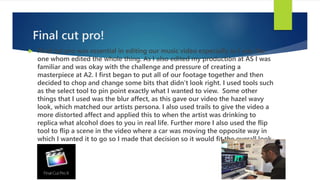
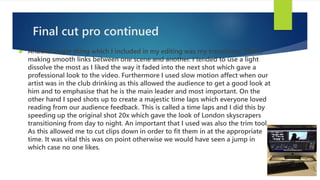
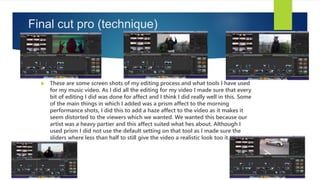
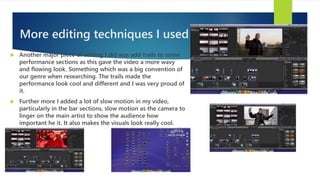
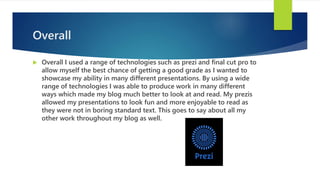
Media evaluation Q4
HOW DID YOU USE MEDIA TECHNOLOGIES IN THE CONSTRUCTION AND
RESEARCH, PLANNING AND EVALUATION STAGES? – BY DILRAJ SINGH
Where it all started?
 The website I chose to house all of my A2 Media coursework was Weebly.com,
which is a great website used for creating new blogs and business websites. As I
have used this website to complete my AS Media coursework I was very familiar
and confident in choosing it to hold all of my work again as it is reliable and
easy to use. To get the best out of Weebly I created many different tabs to
break out different sections of my work, where my different course content
would go, as this would make it easy not only for me but for anyone else who is
viewing my blog to navigate around to get the best experience. Further more
Weebly allows my to embed and add presentations straight onto my blog from
other websites such as Author stream and Prezi which other blog creator
websites would not allow. Overall Weebly was a great tool to use to build my
coursework blog and I recommended it to anyone to try out.
My deep research
 My research page of my blog was one of the most important pages for
me to construct well as this is where all my analysis is. I wanted to
make this page clear as it was important for me to know where all my
work is in case I need to refer back to it at any time. For example this is
the page where all my media music video analysis and facts about
history of music videos are. Some digital technologies I used to do my
analysis was YouTube and Wiki. I used YouTube to watch videos so I
could pick out things to analyse.
 I also used things such as Prezi and SlideShare to present things like
my research of Andrew Goodwin whom is theorist which talks about
mise-en-scene whom I referred too in my evaluation. It was important
for me to use a wide range of media technology so that my blog wasn't
just plain and boring.
Conducting surveys for audience
research
 I used google docs questionnaire to create my survey as I found out
that it was very easy and simple to create and send out. I made a total
of 8 questions using this applications which were very marked out how
and where you should answer them because of googles layout. I sent it
out to my whole school sixth form so I could get reliable and
constructive feedback from all my peers. Docs also gave me an overall
page on the answers which allowed me to talk about each answer more
structured and in detailed. If I was to this again I would send my
questionnaire out to a wider audience as some of my responses may
have been biased as they were all from peers.
Planning the whole thing
 The planning page was very important for me as this is where all of my
materials for making the music video would be housed. Once again I
had to use YouTube to look up many different music videos in which I
could get inspiration of and which would help me in my production. I
also used YouTube to upload a group pitch of mine in which my group
and I would explain the breakdown and overall concept of our video. I
also used prezis and scribd to create things like shot lists and location
scouting and embedded it onto my planning page.
Vlogs
 I used YouTube to create many progression update vlogs so that our
teacher can see how much we had progressed over the construction
stages. These vlogs were vital as it allowed us to look back on how we
did and what we could have improved. Further we arranged filming
days so that everyone in the group would know when and where we
are going to film.
Photoshop
 Photoshop was vital for us as this is where we would create our fabulous
digipak for our artist. Photoshop allowed us to add an image which we
shot with the Canon and edit it in Photoshop so that it looked like a
professional album cover. We made sure that we made the original
image some what lighter as many digipaks from our genre had a light
colour balance to them. Further more we used the airbrush tool to get
rid of any out of place spots on the artist so that he looked like he had
no flaws. Lastly we also used Photoshop to add text to our album cover
as we decided to have half of it sit behind the artist and have that cool
affect.
Construction/production
 For the actual filming of the our music video my group used a Canon
700d DSLR camera which is a top of the range point and shoot camera.
This gave us the ability to film our video in full 1080p HD which meant
visuals and bright lights looked stunning. As well as the great
definition this camera allowed us to use many more great features, for
example focus and auto focus and zoom. The camera was easy to use
as we had experience using a similar camera in the previous year for
AS. As well as the camera we used a tri-pod which allowed us to film
still shots brilliantly as it gave us the stability the shot craved.
Some of my favourite shots.
 Using the canon 700D has allowed me to get some great shots for my music video.
For example close ups of my artist which showed the emotion of how he is feeling at
that particular time. Another shot in which I enjoyed doing was the mid shots which
is a shot that focussed on just the middle of the subject. This was a bit of a struggle
to film as the artist was always moving but it got easier with planning and practise
which made it enjoyable. Using the 700D camera allowed us to flip the screen whilst
filming to see how it looked which made it more simple to when it came to editing.
Final cut pro!
 Final cut pro was essential in editing our music video especially as I was the
one whom edited the whole thing. As I also edited my production at AS I was
familiar and was okay with the challenge and pressure of creating a
masterpiece at A2. I first began to put all of our footage together and then
decided to chop and change some bits that didn’t look right. I used tools such
as the select tool to pin point exactly what I wanted to view. Some other
things that I used was the blur affect, as this gave our video the hazel wavy
look, which matched our artists persona. I also used trails to give the video a
more distorted affect and applied this to when the artist was drinking to
replica what alcohol does to you in real life. Further more I also used the flip
tool to flip a scene in the video where a car was moving the opposite way in
which I wanted it to go so I made that decision so it would fit the overall look
better.
Final cut pro continued
 Another major thing which I included in my editing was my transitions. This is
making smooth links between one scene and another. I tended to use a light
dissolve the most as I liked the way it faded into the next shot which gave a
professional look to the video. Furthermore I used slow motion affect when our
artist was in the club drinking as this allowed the audience to get a good look at
him and to emphasise that he is the main leader and most important. On the
other hand I sped shots up to create a majestic time laps which everyone loved
reading from our audience feedback. This is called a time laps and I did this by
speeding up the original shot 20x which gave the look of London skyscrapers
transitioning from day to night. An important that I used was also the trim tool.
As this allowed me to cut clips down in order to fit them in at the appropriate
time. It was vital this was on point otherwise we would have seen a jump in
which case no one likes.
Final cut pro (technique)
 These are some screen shots of my editing process and what tools I have used
for my music video. As I did all the editing for my video I made sure that every
bit of editing I did was done for affect and I think I did really well in this. Some
of the main things in which I added was a prism affect to the morning
performance shots, I did this to add a haze affect to the video as it makes it
seem distorted to the viewers which we wanted. We wanted this because our
artist was a heavy partier and this affect suited what hes about. Although I
used prism I did not use the default setting on that tool as I made sure the
sliders where less than half to still give the video a realistic look too it.
More editing techniques I used
 Another major piece of editing I did was add trails to some
performance sections as this gave the video a more wavy
and flowing look. Something which was a big convention of
our genre when researching. The trails made the
performance look cool and different and I was very proud of
it.
 Further more I added a lot of slow motion in my video,
particularly in the bar sections, slow motion as the camera to
linger on the main artist to show the audience how
important he it. It also makes the visuals look really cool.
Overall
 Overall I used a range of technologies such as prezi and final cut pro to
allow myself the best chance of getting a good grade as I wanted to
showcase my ability in many different presentations. By using a wide
range of technologies I was able to produce work in many different
ways which made my blog much better to look at and read. My prezis
allowed my presentations to look fun and more enjoyable to read as
they were not in boring standard text. This goes to say about all my
other work throughout my blog as well.

Media evaluation Q4 - Dilraj Singh

  • 1.
    Media evaluation Q4 HOWDID YOU USE MEDIA TECHNOLOGIES IN THE CONSTRUCTION AND RESEARCH, PLANNING AND EVALUATION STAGES? – BY DILRAJ SINGH
  • 2.
    Where it allstarted?  The website I chose to house all of my A2 Media coursework was Weebly.com, which is a great website used for creating new blogs and business websites. As I have used this website to complete my AS Media coursework I was very familiar and confident in choosing it to hold all of my work again as it is reliable and easy to use. To get the best out of Weebly I created many different tabs to break out different sections of my work, where my different course content would go, as this would make it easy not only for me but for anyone else who is viewing my blog to navigate around to get the best experience. Further more Weebly allows my to embed and add presentations straight onto my blog from other websites such as Author stream and Prezi which other blog creator websites would not allow. Overall Weebly was a great tool to use to build my coursework blog and I recommended it to anyone to try out.
  • 3.
    My deep research My research page of my blog was one of the most important pages for me to construct well as this is where all my analysis is. I wanted to make this page clear as it was important for me to know where all my work is in case I need to refer back to it at any time. For example this is the page where all my media music video analysis and facts about history of music videos are. Some digital technologies I used to do my analysis was YouTube and Wiki. I used YouTube to watch videos so I could pick out things to analyse.  I also used things such as Prezi and SlideShare to present things like my research of Andrew Goodwin whom is theorist which talks about mise-en-scene whom I referred too in my evaluation. It was important for me to use a wide range of media technology so that my blog wasn't just plain and boring.
  • 4.
    Conducting surveys foraudience research  I used google docs questionnaire to create my survey as I found out that it was very easy and simple to create and send out. I made a total of 8 questions using this applications which were very marked out how and where you should answer them because of googles layout. I sent it out to my whole school sixth form so I could get reliable and constructive feedback from all my peers. Docs also gave me an overall page on the answers which allowed me to talk about each answer more structured and in detailed. If I was to this again I would send my questionnaire out to a wider audience as some of my responses may have been biased as they were all from peers.
  • 5.
    Planning the wholething  The planning page was very important for me as this is where all of my materials for making the music video would be housed. Once again I had to use YouTube to look up many different music videos in which I could get inspiration of and which would help me in my production. I also used YouTube to upload a group pitch of mine in which my group and I would explain the breakdown and overall concept of our video. I also used prezis and scribd to create things like shot lists and location scouting and embedded it onto my planning page.
  • 6.
    Vlogs  I usedYouTube to create many progression update vlogs so that our teacher can see how much we had progressed over the construction stages. These vlogs were vital as it allowed us to look back on how we did and what we could have improved. Further we arranged filming days so that everyone in the group would know when and where we are going to film.
  • 7.
    Photoshop  Photoshop wasvital for us as this is where we would create our fabulous digipak for our artist. Photoshop allowed us to add an image which we shot with the Canon and edit it in Photoshop so that it looked like a professional album cover. We made sure that we made the original image some what lighter as many digipaks from our genre had a light colour balance to them. Further more we used the airbrush tool to get rid of any out of place spots on the artist so that he looked like he had no flaws. Lastly we also used Photoshop to add text to our album cover as we decided to have half of it sit behind the artist and have that cool affect.
  • 8.
    Construction/production  For theactual filming of the our music video my group used a Canon 700d DSLR camera which is a top of the range point and shoot camera. This gave us the ability to film our video in full 1080p HD which meant visuals and bright lights looked stunning. As well as the great definition this camera allowed us to use many more great features, for example focus and auto focus and zoom. The camera was easy to use as we had experience using a similar camera in the previous year for AS. As well as the camera we used a tri-pod which allowed us to film still shots brilliantly as it gave us the stability the shot craved.
  • 9.
    Some of myfavourite shots.  Using the canon 700D has allowed me to get some great shots for my music video. For example close ups of my artist which showed the emotion of how he is feeling at that particular time. Another shot in which I enjoyed doing was the mid shots which is a shot that focussed on just the middle of the subject. This was a bit of a struggle to film as the artist was always moving but it got easier with planning and practise which made it enjoyable. Using the 700D camera allowed us to flip the screen whilst filming to see how it looked which made it more simple to when it came to editing.
  • 10.
    Final cut pro! Final cut pro was essential in editing our music video especially as I was the one whom edited the whole thing. As I also edited my production at AS I was familiar and was okay with the challenge and pressure of creating a masterpiece at A2. I first began to put all of our footage together and then decided to chop and change some bits that didn’t look right. I used tools such as the select tool to pin point exactly what I wanted to view. Some other things that I used was the blur affect, as this gave our video the hazel wavy look, which matched our artists persona. I also used trails to give the video a more distorted affect and applied this to when the artist was drinking to replica what alcohol does to you in real life. Further more I also used the flip tool to flip a scene in the video where a car was moving the opposite way in which I wanted it to go so I made that decision so it would fit the overall look better.
  • 11.
    Final cut procontinued  Another major thing which I included in my editing was my transitions. This is making smooth links between one scene and another. I tended to use a light dissolve the most as I liked the way it faded into the next shot which gave a professional look to the video. Furthermore I used slow motion affect when our artist was in the club drinking as this allowed the audience to get a good look at him and to emphasise that he is the main leader and most important. On the other hand I sped shots up to create a majestic time laps which everyone loved reading from our audience feedback. This is called a time laps and I did this by speeding up the original shot 20x which gave the look of London skyscrapers transitioning from day to night. An important that I used was also the trim tool. As this allowed me to cut clips down in order to fit them in at the appropriate time. It was vital this was on point otherwise we would have seen a jump in which case no one likes.
  • 12.
    Final cut pro(technique)  These are some screen shots of my editing process and what tools I have used for my music video. As I did all the editing for my video I made sure that every bit of editing I did was done for affect and I think I did really well in this. Some of the main things in which I added was a prism affect to the morning performance shots, I did this to add a haze affect to the video as it makes it seem distorted to the viewers which we wanted. We wanted this because our artist was a heavy partier and this affect suited what hes about. Although I used prism I did not use the default setting on that tool as I made sure the sliders where less than half to still give the video a realistic look too it.
  • 13.
    More editing techniquesI used  Another major piece of editing I did was add trails to some performance sections as this gave the video a more wavy and flowing look. Something which was a big convention of our genre when researching. The trails made the performance look cool and different and I was very proud of it.  Further more I added a lot of slow motion in my video, particularly in the bar sections, slow motion as the camera to linger on the main artist to show the audience how important he it. It also makes the visuals look really cool.
  • 14.
    Overall  Overall Iused a range of technologies such as prezi and final cut pro to allow myself the best chance of getting a good grade as I wanted to showcase my ability in many different presentations. By using a wide range of technologies I was able to produce work in many different ways which made my blog much better to look at and read. My prezis allowed my presentations to look fun and more enjoyable to read as they were not in boring standard text. This goes to say about all my other work throughout my blog as well.