SlideShare a Scribd company logo
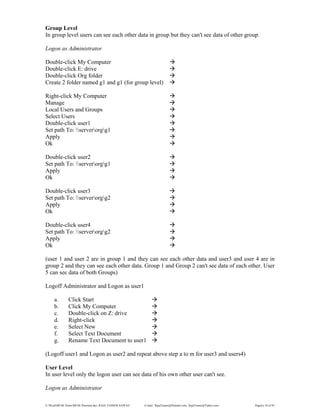
1 of 93
Download to read offline
E:WordMCSE NotesMCSE Practical.doc; RAJA YASSER NAWAZ E-mail: RajaYasser@Hotmail.com, RajaYasser@Yahoo.com Page(s) 1 of 93
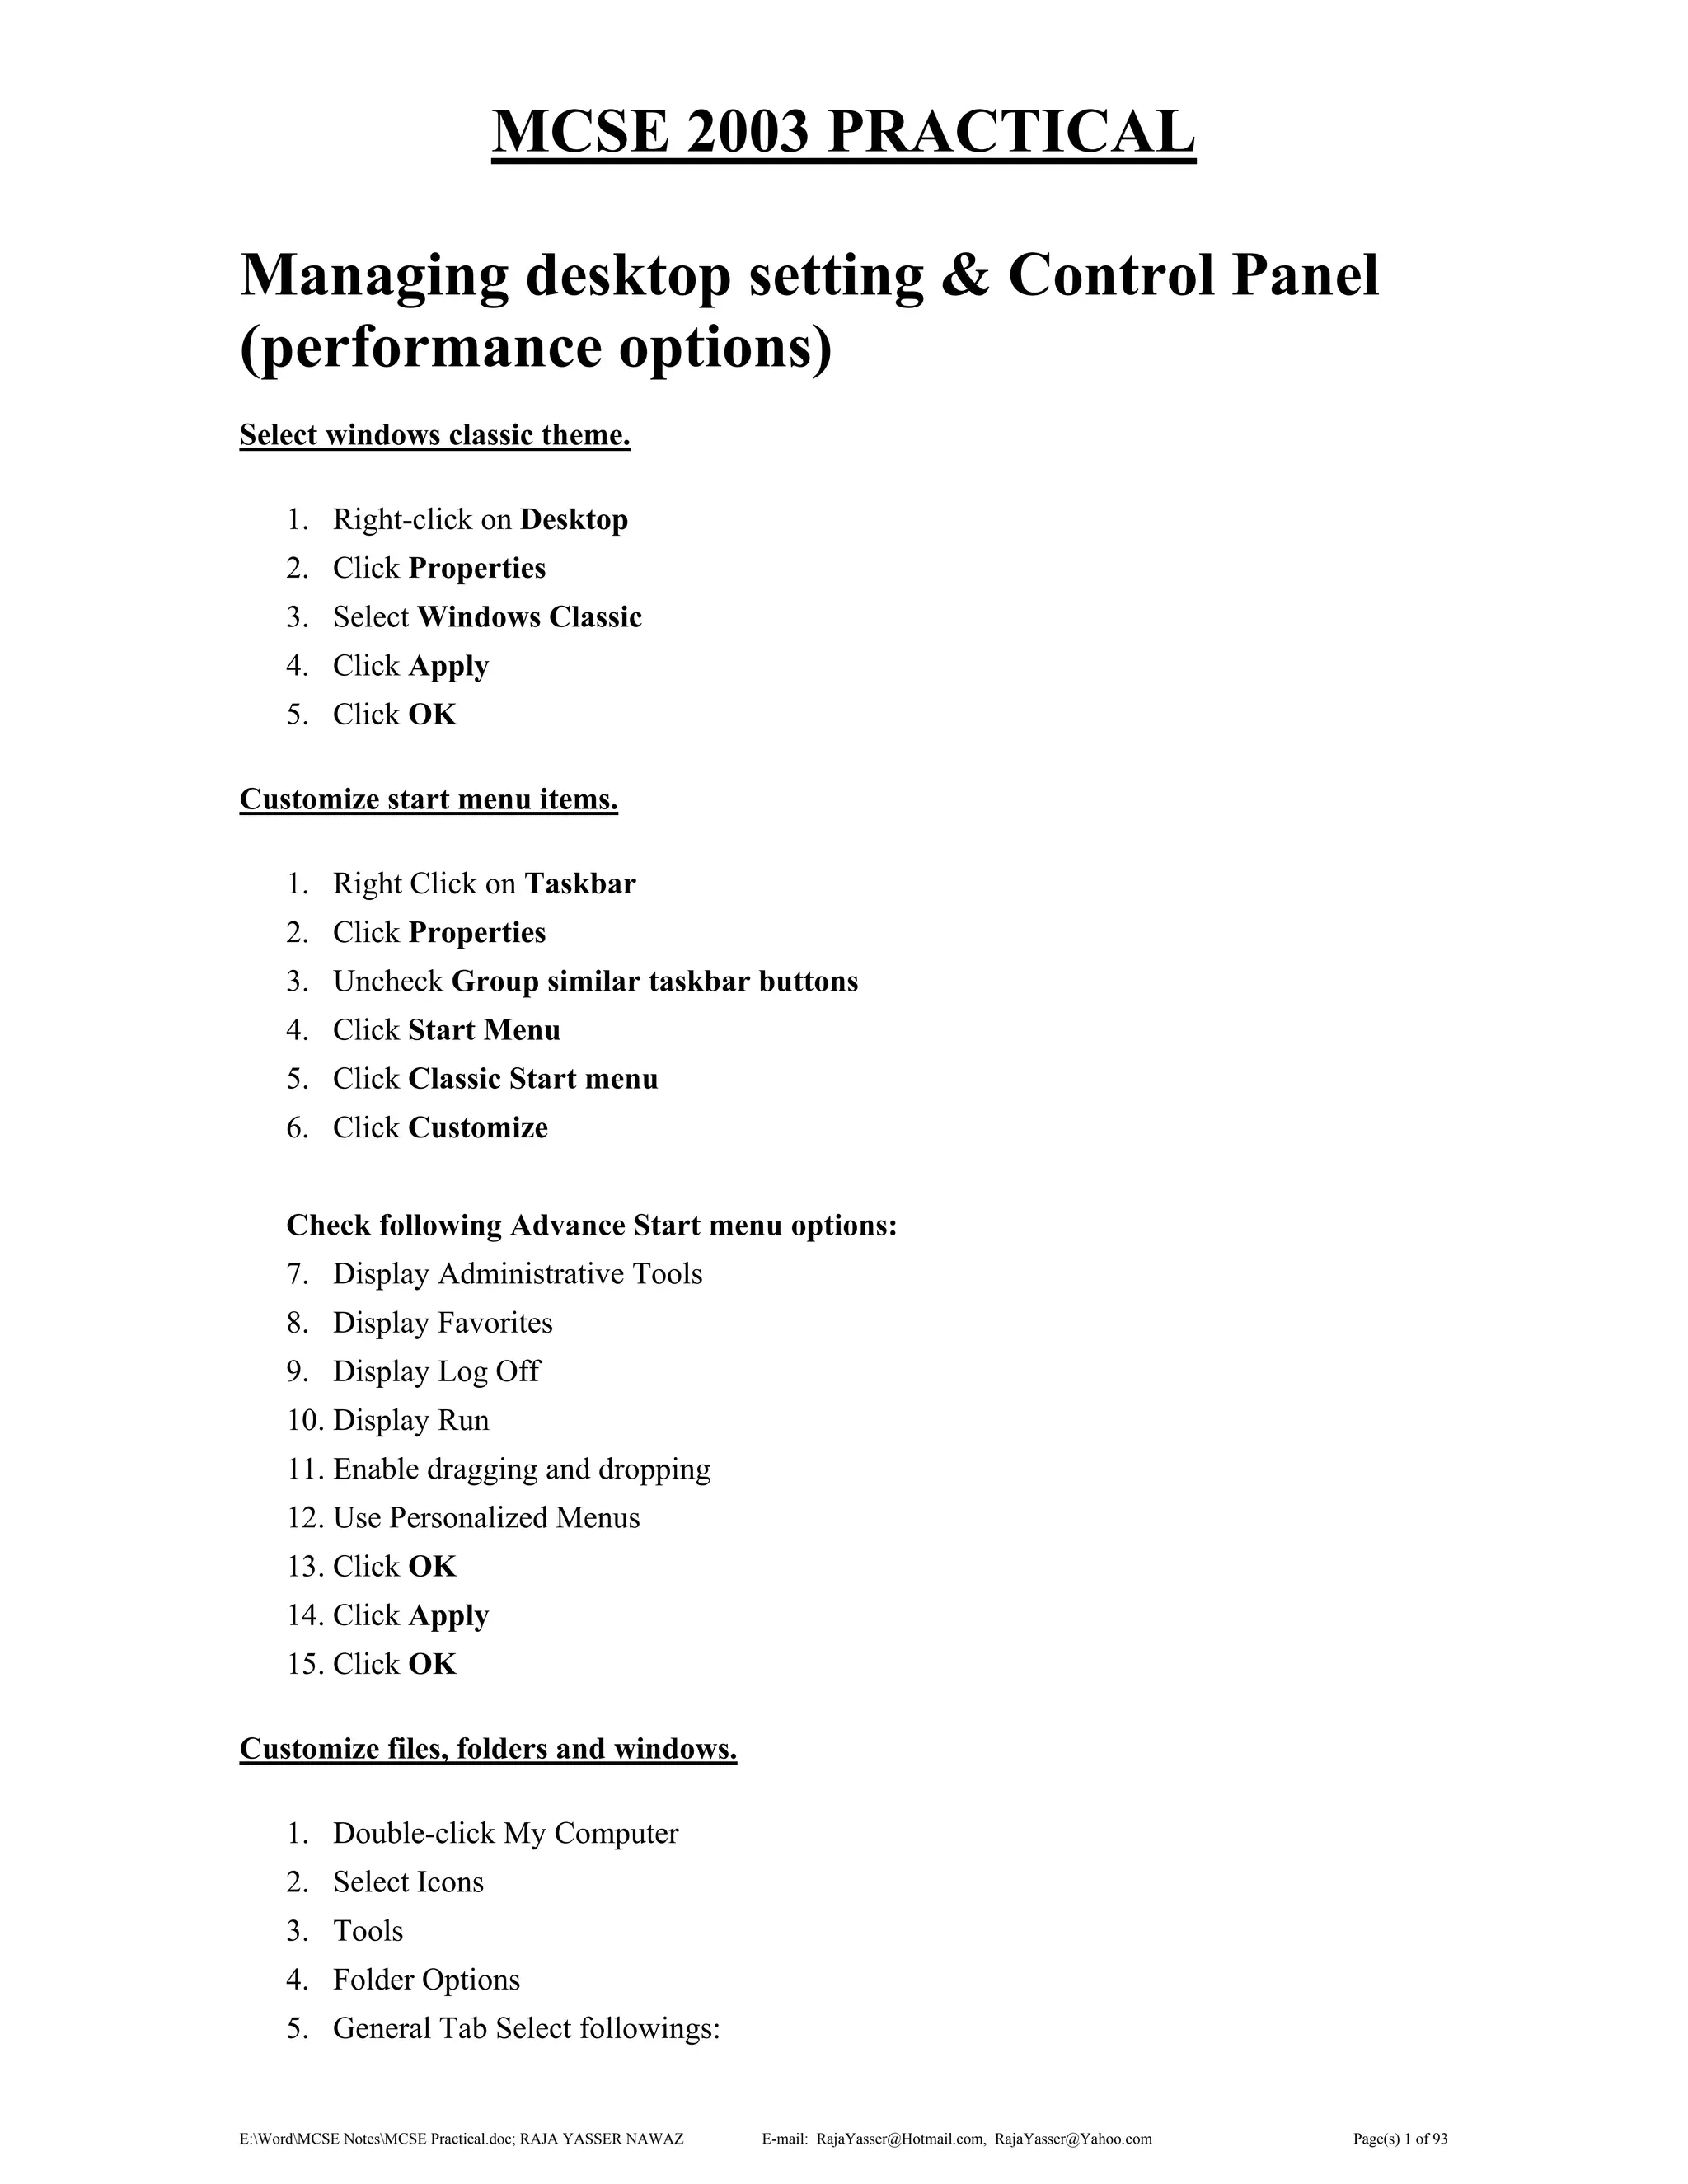
MCSE 2003 PRACTICAL
Managing desktop setting & Control Panel
(performance options)
Select windows classic theme.
1. Right-click on Desktop
2. Click Properties
3. Select Windows Classic
4. Click Apply
5. Click OK
Customize start menu items.
1. Right Click on Taskbar
2. Click Properties
3. Uncheck Group similar taskbar buttons
4. Click Start Menu
5. Click Classic Start menu
6. Click Customize
Check following Advance Start menu options:
7. Display Administrative Tools
8. Display Favorites
9. Display Log Off
10. Display Run
11. Enable dragging and dropping
12. Use Personalized Menus
13. Click OK
14. Click Apply
15. Click OK
Customize files, folders and windows.
1. Double-click My Computer
2. Select Icons
3. Tools
4. Folder Options
5. General Tab Select followings:
E:WordMCSE NotesMCSE Practical.doc; RAJA YASSER NAWAZ E-mail: RajaYasser@Hotmail.com, RajaYasser@Yahoo.com Page(s) 2 of 93
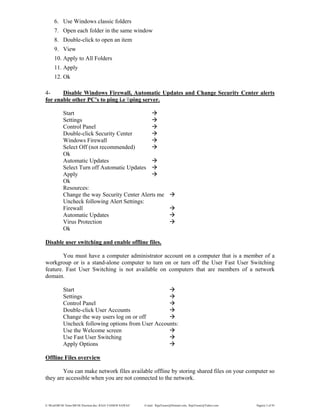
6. Use Windows classic folders
7. Open each folder in the same window
8. Double-click to open an item
9. View
10. Apply to All Folders
11. Apply
12. Ok
4- Disable Windows Firewall, Automatic Updates and Change Security Center alerts
for enable other PC's to ping i.e ping server.
Start
Settings
Control Panel
Double-click Security Center
Windows Firewall
Select Off (not recommended)
Ok
Automatic Updates
Select Turn off Automatic Updates
Apply
Ok
Resources:
Change the way Security Center Alerts me
Uncheck following Alert Settings:
Firewall
Automatic Updates
Virus Protection
Ok
Disable user switching and enable offline files.
You must have a computer administrator account on a computer that is a member of a
workgroup or is a stand-alone computer to turn on or turn off the User Fast User Switching
feature. Fast User Switching is not available on computers that are members of a network
domain.
Start
Settings
Control Panel
Double-click User Accounts
Change the way users log on or off
Uncheck following options from User Accounts:
Use the Welcome screen
Use Fast User Switching
Apply Options
Offline Files overview
You can make network files available offline by storing shared files on your computer so
they are accessible when you are not connected to the network.
E:WordMCSE NotesMCSE Practical.doc; RAJA YASSER NAWAZ E-mail: RajaYasser@Hotmail.com, RajaYasser@Yahoo.com Page(s) 3 of 93
This can be helpful when you use a portable computer to accomplish most of your work,
or if your stand-alone computer is frequently disconnected from the network. You can work with
offline files the same way you work with files when you’re connected to the network.
When you reconnect to the network, any changes that you made to files while working
offline are updated to the network. This process is called synchronization. If you and someone
else on the network made changes to the same file, you can save your version of the file to the
network, keep the other version, or save both.
If you share folders on your computer with others on the network, they can work offline
with those folders. To protect files in your shared folders, you can specify whether other users
can change your documents or just view them. You can also control which shared files users can
access offline.
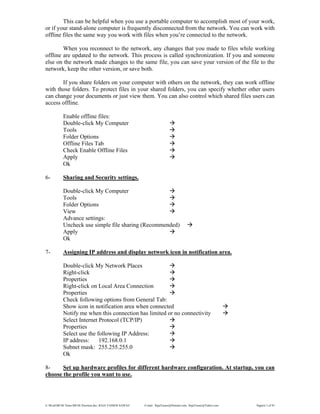
Enable offline files:
Double-click My Computer
Tools
Folder Options
Offline Files Tab
Check Enable Offline Files
Apply
Ok
6- Sharing and Security settings.
Double-click My Computer
Tools
Folder Options
View
Advance settings:
Uncheck use simple file sharing (Recommended)
Apply
Ok
7- Assigning IP address and display network icon in notification area.
Double-click My Network Places
Right-click
Properties
Right-click on Local Area Connection
Properties
Check following options from General Tab:
Show icon in notification area when connected
Notify me when this connection has limited or no connectivity
Select Internet Protocol (TCP/IP)
Properties
Select use the following IP Address:
IP address: 192.168.0.1
Subnet mask: 255.255.255.0
Ok
8- Set up hardware profiles for different hardware configuration. At startup, you can
choose the profile you want to use.
E:WordMCSE NotesMCSE Practical.doc; RAJA YASSER NAWAZ E-mail: RajaYasser@Hotmail.com, RajaYasser@Yahoo.com Page(s) 4 of 93
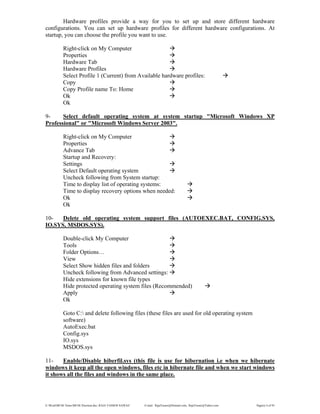
Hardware profiles provide a way for you to set up and store different hardware
configurations. You can set up hardware profiles for different hardware configurations. At
startup, you can choose the profile you want to use.
Right-click on My Computer
Properties
Hardware Tab
Hardware Profiles
Select Profile 1 (Current) from Available hardware profiles:
Copy
Copy Profile name To: Home
Ok
Ok
9- Select default operating system at system startup "Microsoft Windows XP
Professional" or "Microsoft Windows Server 2003".
Right-click on My Computer
Properties
Advance Tab
Startup and Recovery:
Settings
Select Default operating system
Uncheck following from System startup:
Time to display list of operating systems:
Time to display recovery options when needed:
Ok
Ok
10- Delete old operating system support files (AUTOEXEC.BAT, CONFIG.SYS,
IO.SYS, MSDOS.SYS).
Double-click My Computer
Tools
Folder Options…
View
Select Show hidden files and folders
Uncheck following from Advanced settings:
Hide extensions for known file types
Hide protected operating system files (Recommended)
Apply
Ok
Goto C: and delete following files (these files are used for old operating system
software)
AutoExec.bat
Config.sys
IO.sys
MSDOS.sys
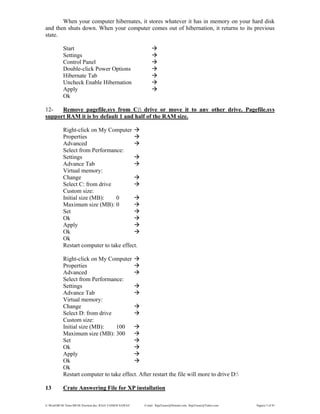
11- Enable/Disable hiberfil.sys (this file is use for hibernation i.e when we hibernate
windows it keep all the open windows, files etc in hibernate file and when we start windows
it shows all the files and windows in the same place.
E:WordMCSE NotesMCSE Practical.doc; RAJA YASSER NAWAZ E-mail: RajaYasser@Hotmail.com, RajaYasser@Yahoo.com Page(s) 5 of 93
When your computer hibernates, it stores whatever it has in memory on your hard disk
and then shuts down. When your computer comes out of hibernation, it returns to its previous
state.
Start
Settings
Control Panel
Double-click Power Options
Hibernate Tab
Uncheck Enable Hibernation
Apply
Ok
12- Remove pagefile.sys from C: drive or move it to any other drive. Pagefile.sys
support RAM it is by default 1 and half of the RAM size.
Right-click on My Computer
Properties
Advanced
Select from Performance:
Settings
Advance Tab
Virtual memory:
Change
Select C: from drive
Custom size:
Initial size (MB): 0
Maximum size (MB): 0
Set
Ok
Apply
Ok
Ok
Restart computer to take effect.
Right-click on My Computer
Properties
Advanced
Select from Performance:
Settings
Advance Tab
Virtual memory:
Change
Select D: from drive
Custom size:
Initial size (MB): 100
Maximum size (MB): 300
Set
Ok
Apply
Ok
Ok
Restart computer to take effect. After restart the file will more to drive D:
13 Crate Answering File for XP installation
E:WordMCSE NotesMCSE Practical.doc; RAJA YASSER NAWAZ E-mail: RajaYasser@Hotmail.com, RajaYasser@Yahoo.com Page(s) 6 of 93
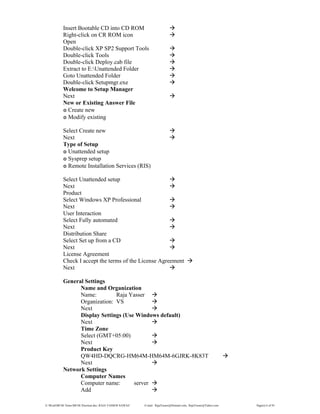
Insert Bootable CD into CD ROM
Right-click on CR ROM icon
Open
Double-click XP SP2 Support Tools
Double-click Tools
Double-click Deploy.cab file
Extract to E:Unattended Folder
Goto Unattended Folder
Double-click Setupmgr.exe
Welcome to Setup Manager
Next
New or Existing Answer File
๏ Create new
๏ Modify existing
Select Create new
Next
Type of Setup
๏ Unattended setup
๏ Sysprep setup
๏ Remote Installation Services (RIS)
Select Unattended setup
Next
Product
Select Windows XP Professional
Next
User Interaction
Select Fully automated
Next
Distribution Share
Select Set up from a CD
Next
License Agreement
Check I accept the terms of the License Agreement
Next
General Settings
Name and Organization
Name: Raja Yasser
Organization: VS
Next
Display Settings (Use Windows default)
Next
Time Zone
Select (GMT+05:00)
Next
Product Key
QW4HD-DQCRG-HM64M-HM64M-6GJRK-8K83T
Next
Network Settings
Computer Names
Computer name: server
Add
E:WordMCSE NotesMCSE Practical.doc; RAJA YASSER NAWAZ E-mail: RajaYasser@Hotmail.com, RajaYasser@Yahoo.com Page(s) 7 of 93
Next
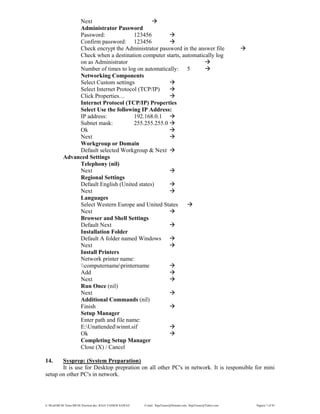
Administrator Password
Password: 123456
Confirm password: 123456
Check encrypt the Administrator password in the answer file
Check when a destination computer starts, automatically log
on as Administrator
Number of times to log on automatically: 5
Networking Components
Select Custom settings
Select Internet Protocol (TCP/IP)
Click Properties…
Internet Protocol (TCP/IP) Properties
Select Use the following IP Address:
IP address: 192.168.0.1
Subnet mask: 255.255.255.0
Ok
Next
Workgroup or Domain
Default selected Workgroup & Next
Advanced Settings
Telephony (nil)
Next
Regional Settings
Default English (United states)
Next
Languages
Select Western Europe and United States
Next
Browser and Shell Settings
Default Next
Installation Folder
Default A folder named Windows
Next
Install Printers
Network printer name:
computernameprintername
Add
Next
Run Once (nil)
Next
Additional Commands (nil)
Finish
Setup Manager
Enter path and file name:
E:Unattendedwinnt.sif
Ok
Completing Setup Manager
Close (X) / Cancel
14. Sysprep: (System Preparation)
It is use for Desktop prepration on all other PC's in network. It is responsible for mini
setup on other PC's in network.
E:WordMCSE NotesMCSE Practical.doc; RAJA YASSER NAWAZ E-mail: RajaYasser@Hotmail.com, RajaYasser@Yahoo.com Page(s) 8 of 93
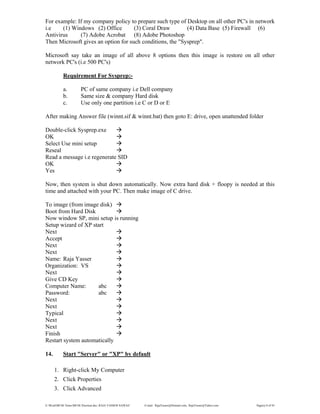
For example: If my company policy to prepare such type of Desktop on all other PC's in network
i.e (1) Windows (2) Office (3) Coral Draw (4) Data Base (5) Firewall (6)
Antivirus (7) Adobe Acrobat (8) Adobe Photoshop
Then Microsoft gives an option for such conditions, the "Sysprep".
Microsoft say take an image of all above 8 options then this image is restore on all other
network PC's (i.e 500 PC's)
Requirement For Sysprep:-
a. PC of same company i.e Dell company
b. Same size & company Hard disk
c. Use only one partition i.e C or D or E
After making Answer file (winnt.sif & winnt.bat) then goto E: drive, open unattended folder
Double-click Sysprep.exe
OK
Select Use mini setup
Reseal
Read a message i.e regenerate SID
OK
Yes
Now, then system is shut down automatically. Now extra hard disk + floopy is needed at this
time and attached with your PC. Then make image of C drive.
To image (from image disk)
Boot from Hard Disk
Now window SP, mini setup is running
Setup wizard of XP start
Next
Accept
Next
Next
Name: Raja Yasser
Organization: VS
Next
Give CD Key
Computer Name: abc
Password: abc
Next
Next
Typical
Next
Next
Finish
Restart system automatically
14. Start "Server" or "XP" by default
1. Right-click My Computer
2. Click Properties
3. Click Advanced
E:WordMCSE NotesMCSE Practical.doc; RAJA YASSER NAWAZ E-mail: RajaYasser@Hotmail.com, RajaYasser@Yahoo.com Page(s) 9 of 93
4. Click Settings (Startup an Recovery)
5. Select "Windows Server 2003, Enterprise" Or "Microsoft Windows XP Professional"
6. Uncheck Time to display list of operating systems
7. Uncheck Time to display recovery options when needed
8. Click OK
9. Click OK
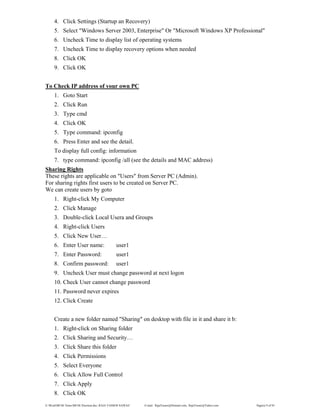
To Check IP address of your own PC
1. Goto Start
2. Click Run
3. Type cmd
4. Click OK
5. Type command: ipconfig
6. Press Enter and see the detail.
To display full config: information
7. type command: ipconfig /all (see the details and MAC address)
Sharing Rights
These rights are applicable on "Users" from Server PC (Admin).
For sharing rights first users to be created on Server PC.
We can create users by goto
1. Right-click My Computer
2. Click Manage
3. Double-click Local Usera and Groups
4. Right-click Users
5. Click New User…
6. Enter User name: user1
7. Enter Password: user1
8. Confirm password: user1
9. Uncheck User must change password at next logon
10. Check User cannot change password
11. Password never expires
12. Click Create
Create a new folder named "Sharing" on desktop with file in it and share it b:
1. Right-click on Sharing folder
2. Click Sharing and Security…
3. Click Share this folder
4. Click Permissions
5. Select Everyone
6. Click Allow Full Control
7. Click Apply
8. Click OK
E:WordMCSE NotesMCSE Practical.doc; RAJA YASSER NAWAZ E-mail: RajaYasser@Hotmail.com, RajaYasser@Yahoo.com Page(s) 10 of 93
9. Click Apply
10. Click OK
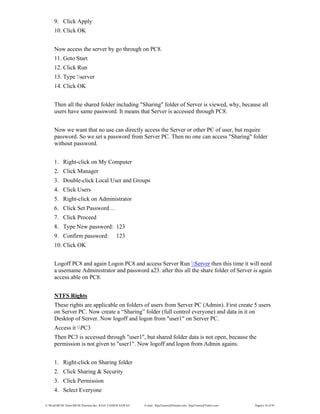
Now access the server by go through on PC8.
11. Goto Start
12. Click Run
13. Type server
14. Click OK
Then all the shared folder including "Sharing" folder of Server is viewed, why, because all
users have same password. It means that Server is accessed through PC8.
Now we want that no use can directly access the Server or other PC of user, but require
password. So we set a password from Server PC. Then no one can access "Sharing" folder
without password.
1. Right-click on My Computer
2. Click Manager
3. Double-click Local User and Groups
4. Click Users
5. Right-click on Administrator
6. Click Set Password…
7. Click Proceed
8. Type New password: 123
9. Confirm password: 123
10. Click OK
Logoff PC8 and again Logon PC8 and access Server Run Server then this time it will need
a username Administrator and password a23. after this all the share folder of Server is again
access able on PC8.
NTFS Rights
These rights are applicable on folders of users from Server PC (Admin). First create 5 users
on Server PC. Now create a “Sharing” folder (full control everyone) and data in it on
Desktop of Server. Now logoff and logon from "user1" on Server PC.
Access it PC3
Then PC3 is accessed through "user1", but shared folder data is not open, because the
permission is not given to "user1". Now logoff and logon from Admin agains.
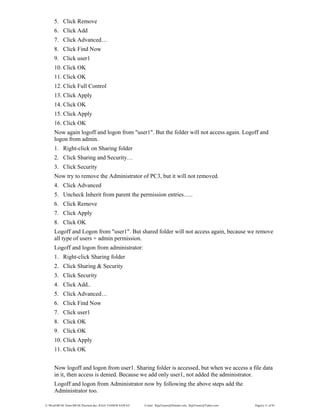
1. Right-click on Sharing folder
2. Click Sharing & Security
3. Click Permission
4. Select Everyone
E:WordMCSE NotesMCSE Practical.doc; RAJA YASSER NAWAZ E-mail: RajaYasser@Hotmail.com, RajaYasser@Yahoo.com Page(s) 11 of 93
5. Click Remove
6. Click Add
7. Click Advanced…
8. Click Find Now
9. Click user1
10. Click OK
11. Click OK
12. Click Full Control
13. Click Apply
14. Click OK
15. Click Apply
16. Click OK
Now again logoff and logon from "user1". But the folder will not access again. Logoff and
logon from admin.
1. Right-click on Sharing folder
2. Click Sharing and Security…
3. Click Security
Now try to remove the Administrator of PC3, but it will not removed.
4. Click Advanced
5. Uncheck Inherit from parent the permission entries…..
6. Click Remove
7. Click Apply
8. Click OK
Logoff and Logon from "user1". But shared folder will not access again, because we remove
all type of users + admin permission.
Logoff and logon from administrator:
1. Right-click Sharing folder
2. Click Sharing & Security
3. Click Security
4. Click Add..
5. Click Advanced…
6. Click Find Now
7. Click user1
8. Click OK
9. Click OK
10. Click Apply
11. Click OK
Now logoff and logon from user1. Sharing folder is accessed, but when we access a file data
in it, then access is denied. Because we add only user1, not added the administrator.
Logoff and logon from Administrator now by following the above steps add the
Administrator too.
E:WordMCSE NotesMCSE Practical.doc; RAJA YASSER NAWAZ E-mail: RajaYasser@Hotmail.com, RajaYasser@Yahoo.com Page(s) 12 of 93
Logoff and logon from user1 now shared folder + file in it both are accessed.
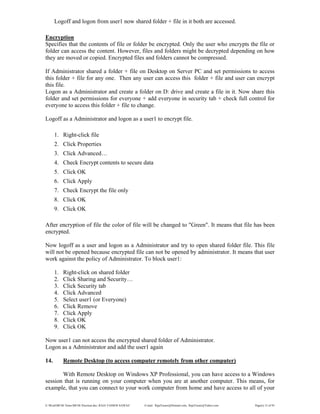
Encryption
Specifies that the contents of file or folder be encrypted. Only the user who encrypts the file or
folder can access the content. However, files and folders might be decrypted depending on how
they are moved or copied. Encrypted files and folders cannot be compressed.
If Administrator shared a folder + file on Desktop on Server PC and set permissions to access
this folder + file for any one. Then any user can access this folder + file and user can encrypt
this file.
Logon as a Administrator and create a folder on D: drive and create a file in it. Now share this
folder and set permissions for everyone + add everyone in security tab + check full control for
everyone to access this folder + file to change.
Logoff as a Administrator and logon as a user1 to encrypt file.
1. Right-click file
2. Click Properties
3. Click Advanced…
4. Check Encrypt contents to secure data
5. Click OK
6. Click Apply
7. Check Encrypt the file only
8. Click OK
9. Click OK
After encryption of file the color of file will be changed to "Green". It means that file has been
encrypted.
Now logoff as a user and logon as a Administrator and try to open shared folder file. This file
will not be opened because encrypted file can not be opened by administrator. It means that user
work against the policy of Administrator. To block user1:
1. Right-click on shared folder
2. Click Sharing and Security…
3. Click Security tab
4. Click Advanced
5. Select user1 (or Everyone)
6. Click Remove
7. Click Apply
8. Click OK
9. Click OK
Now user1 can not access the encrypted shared folder of Administrator.
Logon as a Administrator and add the user1 again
14. Remote Desktop (to access computer remotely from other computer)
With Remote Desktop on Windows XP Professional, you can have access to a Windows
session that is running on your computer when you are at another computer. This means, for
example, that you can connect to your work computer from home and have access to all of your
E:WordMCSE NotesMCSE Practical.doc; RAJA YASSER NAWAZ E-mail: RajaYasser@Hotmail.com, RajaYasser@Yahoo.com Page(s) 13 of 93
applications, files, and network resources as though you were in front of your computer at work.
You can leave programs running at work and when you get home, you can see your desktop at
work displayed on your home computer, with the same programs running.
When you connect to your computer at work, Remote Desktop automatically locks that
computer so no one else can access your applications and files while you are gone.
Remote Desktop also allows more than one user to have active sessions on a single computer.
This means that multiple users can leave their applications running and preserve the state of their
Windows session even while others are logged on.
To use Remote Desktop, you need the following:
- A computer running Windows XP Professional ("remote" computer) with a
connection to a Local Area Network or the Internet.
- A second computer ("home" computer) with access to the Local Area Network via
network connection, modem, or Virtual Private Network (VPN) connection. This
computer must have Remote Desktop Connection, formerly called the Terminal
Services client, installed.
- Appropriate user accounts and permissions.
Right-click on My Computer
Select Properties
Remote
Remote Desktop
Check Allow users to connect remotely to this computer
(Check this above option on both computers)
Apply
Ok
Goto Start
Programs
Accessories
Communications
Remote Desktop Connections
Computer (name, vs1)
Options>>
User name: Administrator
Password 123
Check Save my password
Optional Local Resources
Check Disk Drives
Check Printers
Serial ports
Connect
Or
Save As….
Save on Desktop
File name PC2.rdp
Save
Close (X) / Cancel
Double-click on PC2.rdp file on Desktop
15. Remote Assistance (remote assistance access systems remotely through live IP on
the internet or computers on LAN
E:WordMCSE NotesMCSE Practical.doc; RAJA YASSER NAWAZ E-mail: RajaYasser@Hotmail.com, RajaYasser@Yahoo.com Page(s) 14 of 93
Remote Assistance is a convenient way for a friend in another location to connect to your
computer from another computer running a compatible operating system, such as Microsoft
Windows XP.
After your friend is connected, he will be able to view your computer screen and chat online
with you in real time about what you both see. With your permission, your friend can even use
his or her mouse and keyboard to work with you on your computer.
Notes
- Both you and your assistant must be using either Windows Messenger or a MAPI-
compliant e-mail account such as Microsoft Outlook or Outlook Express.
- You and your assistant need to be connected to the Internet while using Remote
Assistance.
- If Windows Firewall is turned on, Remote Assistance will temporarily open firewall
ports.
- If you are working on a corporate or local area network, firewalls might stop you
from using Remote Assistance. In this case, check with your network administrator
before using Remote Assistance.
Right-click on My Computer
Select Properties
Remote
Remote Assistance
Apply
Ok
Goto Start
Programs
Remote Assistance
Click Invite someone to help you
Click Save invitation as a file (Advanced)
Set the invitation to expire
Select 30 from combo box
Select Days from combo box
Continue >
Type password: 123
Confirm password: 123
Click Save Invitation
Select Desktop
File name: PC2.msrcincident
Save
Close Remote Assistance
(Now you can send this file to your remote user or friend through e-mail or any other
way) or
Right-click on Desktop
Select New
Select New Folder
Type folder name PC2
Drag and Drop PC2.msrcincident file into folder named PC2
Right-click on PC2 folder
Sharing and Security…
Sharing Tab
Share this folder
E:WordMCSE NotesMCSE Practical.doc; RAJA YASSER NAWAZ E-mail: RajaYasser@Hotmail.com, RajaYasser@Yahoo.com Page(s) 15 of 93
Check Full Control
Security Tab
Add…
Advanced…
Find Now
Select Everyone
Ok
Ok
Check Full Control
Apply
Ok
Goto other PC (Server)
Goto Start
Run
Open : VS1
Ok
Double-click shared folder PC2
Copy PC2.msrcincident
Goto Desktop
Paste PC2.msrcincident file
Double-click PC2.msrcinciden file on Desktop
Type password: 123
Yes
If the other user accepts your invitation by Clicking Yes then you can access his PC or
send messages or files etc to each other.
16. Files and Settings Transfer Wizard (FastWiz)
The Files and Settings Transfer Wizard helps you move your data files and personal
settings from your old computer to your new one, without having to go through much of the
same configuration you did with your old computer. For example, you can take your personal
display properties, folder and taskbar options, and Internet browser and e-mail settings from
your old computer and place them on the new one. The wizard will also move specific files or
entire folders, such as My Documents, My Pictures, and Favorites. Passwords are not moved
with program settings when you use the Files and Settings Transfer Wizard. This is a feature of
the Files and Settings Transfer Wizard that helps to keep your passwords confidential.
We recommend that you install a virus detection program on the new computer before
transferring files over from the old computer. This can help protect your new computer from
viruses that may be contained in the files transferred over from your old computer.
Goto Start
Programs
Accessories
System Tools
Files and Settings Transfer Wizard
Next
Click Old computer
Next
Click Other
Click Browse…
Select Desktop
E:WordMCSE NotesMCSE Practical.doc; RAJA YASSER NAWAZ E-mail: RajaYasser@Hotmail.com, RajaYasser@Yahoo.com Page(s) 16 of 93
Ok
Next
Click Both files and settings
Next
Finish
It will create USMT2.UNC folder on Desktop copy this folder to other PC that you want to
deploy settings and follow the following steps:
Goto Start
Programs
Accessories
System Tools
Files and Settings Transfer Wizard
Next
Click New computer
Next
Click I don't need the Wizard Disk. I have already collected my files and settings from my old
computer.
Click Other
Click Browse and give the path of copied folder USMT2.UNC
Next
17. Quota (the amount of disk space available to a user.)
a. Organization Level
b. Group Level
c. User Level
Organization Level
In organization level all users can see data i.e. folders and files of each other.
Logon as Administrator
Create a folder name org in E: drive
Right-Click Org folder
Select Sharing and Security
Click Share this folder
Click Permissions
Check Full Control (for Everyone)
Ok
Click Security Tab
Add…
Advanced…
Find Now
Select Everyone
Ok
Ok
Check Full Control (for Everyone)
Apply
Ok
Right-click on E: drive
Properties
Click on Quota Tab
Check Enable quota management
E:WordMCSE NotesMCSE Practical.doc; RAJA YASSER NAWAZ E-mail: RajaYasser@Hotmail.com, RajaYasser@Yahoo.com Page(s) 17 of 93
Check Deny disk space to users exceeding quota limit
Click Limit disk space to 100 MB
Set warning level to 99 MB
Check Log event when a user exceeds their quota limit
Check Log event when a user exceeds their warning level
Apply
Ok
Disk Quota Message Ok
Wait for the green light and Ok
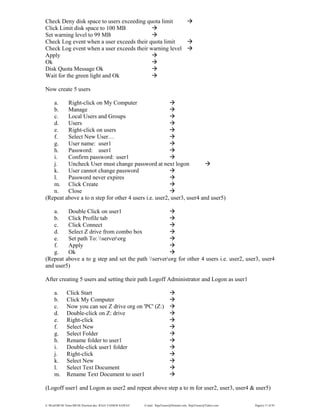
Now create 5 users
a. Right-click on My Computer
b. Manage
c. Local Users and Groups
d. Users
e. Right-click on users
f. Select New User…
g. User name: user1
h. Password: user1
i. Confirm password: user1
j. Uncheck User must change password at next logon
k. User cannot change password
l. Password never expires
m. Click Create
n. Close
(Repeat above a to n step for other 4 users i.e. user2, user3, user4 and user5)
a. Double Click on user1
b. Click Profile tab
c. Click Connect
d. Select Z drive from combo box
e. Set path To: serverorg
f. Apply
g. Ok
(Repeat above a to g step and set the path serverorg for other 4 users i.e. user2, user3, user4
and user5)
After creating 5 users and setting their path Logoff Administrator and Logon as user1
a. Click Start
b. Click My Computer
c. Now you can see Z drive org on 'PC' (Z:)
d. Double-click on Z: drive
e. Right-click
f. Select New
g. Select Folder
h. Rename folder to user1
i. Double-click user1 folder
j. Right-click
k. Select New
l. Select Text Document
m. Rename Text Document to user1
(Logoff user1 and Logon as user2 and repeat above step a to m for user2, user3, user4 & user5)
E:WordMCSE NotesMCSE Practical.doc; RAJA YASSER NAWAZ E-mail: RajaYasser@Hotmail.com, RajaYasser@Yahoo.com Page(s) 18 of 93
Group Level
In group level users can see each other data in group but they can't see data of other group.
Logon as Administrator
Double-click My Computer
Double-click E: drive
Double-click Org folder
Create 2 folder named g1 and g1 (for group level)
Right-click My Computer
Manage
Local Users and Groups
Select Users
Double-click user1
Set path To: serverorgg1
Apply
Ok
Double-click user2
Set path To: serverorgg1
Apply
Ok
Double-click user3
Set path To: serverorgg2
Apply
Ok
Double-click user4
Set path To: serverorgg2
Apply
Ok
(user 1 and user 2 are in group 1 and they can see each other data and user3 and user 4 are in
group 2 and they can see each other data. Group 1 and Group 2 can't see data of each other. User
5 can see data of both Groups)
Logoff Administrator and Logon as user1
a. Click Start
b. Click My Computer
c. Double-click on Z: drive
d. Right-click
e. Select New
f. Select Text Document
g. Rename Text Document to user1
(Logoff user1 and Logon as user2 and repeat above step a to m for user3 and users4)
User Level
In user level only the logon user can see data of his own other user can't see.
Logon as Administrator
E:WordMCSE NotesMCSE Practical.doc; RAJA YASSER NAWAZ E-mail: RajaYasser@Hotmail.com, RajaYasser@Yahoo.com Page(s) 19 of 93
Double-click My Computer
Double-click E: drive
Double-click Org folder
Create 3 folder named mark, sales & acc
(Marketing, Sales and Account department)
Right-click My Computer
Manager
Local Users and Groups
Users
Double-click user1
Profile
Set path To: serverorgmark%username%
"%username%" name of user. It will create folder named user1 in mark folder.
Apply
Ok
Double-click user2
Profile
Set path To: serverorgsales%username%
Apply
Ok
Double-click user3
Profile
Set path To: serverorgacc%username%
Apply
Ok
Double-click user4
Profile
Set path To: serverorgacc%username%
Apply
Ok
(user1 is working in Marketing department, user2 is working in Sales department, user3 and user
4 are working in Account department)
Logoff Administrator and Logon as user1
a. Click Start
b. Click My Computer
c. Double-click on Z: drive
d. Right-click
e. Select New
f. Select Text Document
g. Rename Text Document to user1
(Logoff user1 and Logon as user2 and repeat above step a to g for user2, user3 and users4)
Resolvers
E:WordMCSE NotesMCSE Practical.doc; RAJA YASSER NAWAZ E-mail: RajaYasser@Hotmail.com, RajaYasser@Yahoo.com Page(s) 20 of 93
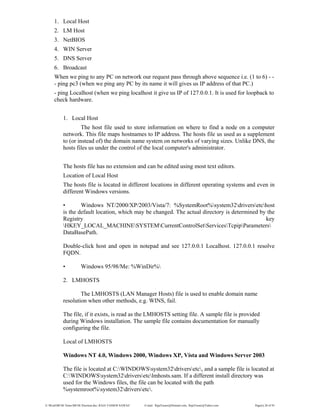
1. Local Host
2. LM Host
3. NetBIOS
4. WIN Server
5. DNS Server
6. Broadcast
When we ping to any PC on network our request pass through above sequence i.e. (1 to 6) - -
- ping pc3 (when we ping any PC by its name it will gives us IP address of that PC.)
- ping Localhost (when we ping localhost it give us IP of 127.0.0.1. It is used for loopback to
check hardware.
1. Local Host
The host file used to store information on where to find a node on a computer
network. This file maps hostnames to IP address. The hosts file us used as a supplement
to (or instead of) the domain name system on networks of varying sizes. Unlike DNS, the
hosts files us under the control of the local computer's administrator.
The hosts file has no extension and can be edited using most text editors.
Location of Local Host
The hosts file is located in different locations in different operating systems and even in
different Windows versions.
• Windows NT/2000/XP/2003/Vista/7: %SystemRoot%system32driversetchost
is the default location, which may be changed. The actual directory is determined by the
Registry key
HKEY_LOCAL_MACHINESYSTEMCurrentControlSetServicesTcpipParameters
DataBasePath.
Double-click host and open in notepad and see 127.0.0.1 Localhost. 127.0.0.1 resolve
FQDN.
• Windows 95/98/Me: %WinDir%
2. LMHOSTS
The LMHOSTS (LAN Manager Hosts) file is used to enable domain name
resolution when other methods, e.g. WINS, fail.
The file, if it exists, is read as the LMHOSTS setting file. A sample file is provided
during Windows installation. The sample file contains documentation for manually
configuring the file.
Local of LMHOSTS
Windows NT 4.0, Windows 2000, Windows XP, Vista and Windows Server 2003
The file is located at C:WINDOWSsystem32driversetc, and a sample file is located at
C:WINDOWSsystem32driversetclmhosts.sam. If a different install directory was
used for the Windows files, the file can be located with the path
%systemroot%system32driversetc.
E:WordMCSE NotesMCSE Practical.doc; RAJA YASSER NAWAZ E-mail: RajaYasser@Hotmail.com, RajaYasser@Yahoo.com Page(s) 21 of 93
Open Lmhosts.sam in notepad
Goto last and write your won PC IP address.i.e
192.168.0.2 press tab abc
Close the file, save and rename it as
Lmhosts.sam to lmhost only
Now ping PC2 then its ping and also ping by abc
Ping abc (abc is at LM host)
3. NetBIOS name cache
The NetBIOS name cache contains every NetBIOS name that was recently associated
with an IP address. This local cache helps reduce network traffic by eliminating the need
for broadcasting or WINS queries, it can sampling start communicating with the lost.
1. Right-click on My Network Places
2. Click Properties
3. Right-click Local Area Connection
4. Click Properties
5. Click Internet Protocol (TCP/IP)
6. Click Properties
7. Click obtain an IP address automatically
8. Click OK
9. Click Close
Now "Yellow bar" is running near time bar due to removing IP address of its own PC.
Then ping server or other PC then its again ping, because Microsoft give IP address by
self default i.e. 169.254.29.30
Note: no work can be done without IP address on network.
It means, that if NetBIOS work is done on user own PC or in network then IP address are
given by Microsoft by default.
In network if all PC's are connected through "Cables" only and no IP addresses are given
manually, then Microsoft give IP addresses by self and also give facilities to ping any pc
in network.
The local NetBIOS cache can be viewed with the nbtstat.exe command.
C:>nbtstat –C
Syntax:
Nbtstat [-a RemoteName] [-A IP address] [-c] [-n] [-r] [-R] [-s] [-S] [interval]]
-a (adapter status) Lists the remote machine's name table given its name
-A (Adapter status) Lists the remote machine's name table given its IP address
-C (cache) Lists the remote name cache including the IP
addresses
-n (names) Lists local NetBIOS names.
-r (resolved) Lists names resolved by broadcast and via WINS
-R (Reload) Purges and reloads the remote cache name table
-S (Sessions) Lists sessions table with the destination IP addresses
-s (sessions) Lists sessions table converting destination IP
E:WordMCSE NotesMCSE Practical.doc; RAJA YASSER NAWAZ E-mail: RajaYasser@Hotmail.com, RajaYasser@Yahoo.com Page(s) 22 of 93
addresses to host names via the hosts file.
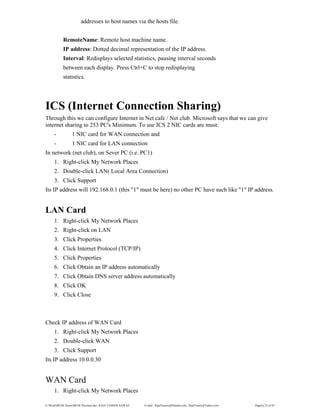
RemoteName: Remote host machine name.
IP address: Dotted decimal representation of the IP address.
Interval: Redisplays selected statistics, pausing interval seconds
between each display. Press Ctrl+C to stop redisplaying
statistics.
ICS (Internet Connection Sharing)
Through this we can configure Internet in Net cafe / Net club. Microsoft says that we can give
internet sharing to 253 PC's Minimum. To use ICS 2 NIC cards are must:
- 1 NIC card for WAN connection and
- 1 NIC card for LAN connection
In network (net club), on Sever PC (i.e. PC1)
1. Right-click My Network Places
2. Double-click LAN( Local Area Connection)
3. Click Support
Its IP address will 192.168.0.1 (this "1" must be here) no other PC have such like "1" IP address.
LAN Card
1. Right-click My Network Places
2. Right-click on LAN
3. Click Properties
4. Click Internet Protocol (TCP/IP)
5. Click Properties
6. Click Obtain an IP address automatically
7. Click Obtain DNS server address automatically
8. Click OK
9. Click Close
Check IP address of WAN Card
1. Right-click My Network Places
2. Double-click WAN
3. Click Support
Its IP address 10.0.0.30
WAN Card
1. Right-click My Network Places
E:WordMCSE NotesMCSE Practical.doc; RAJA YASSER NAWAZ E-mail: RajaYasser@Hotmail.com, RajaYasser@Yahoo.com Page(s) 23 of 93
2. Right-click on WAN
3. Click Properties
4. Click Internet Protocol (TCP/IP)
5. Click Properties
6. Click Obtain an IP address automatically
7. Click Obtain DNS server address automatically
8. Click OK
9. Click Close
To share "WAN":
1. Right-click My Network Places
2. Right-click on WAN
3. Click Properties
4. Click Advanced tab
5. Check Allow other network users to connect through this computer's Internet connection
6. Check Allow other network users to control or disable the shared Internet connection
7. Click OK
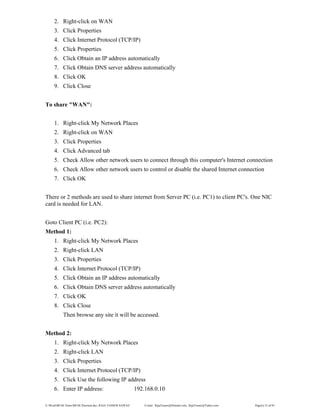
There or 2 methods are used to share internet from Server PC (i.e. PC1) to client PC's. One NIC
card is needed for LAN.
Goto Client PC (i.e. PC2):
Method 1:
1. Right-click My Network Places
2. Right-click LAN
3. Click Properties
4. Click Internet Protocol (TCP/IP)
5. Click Obtain an IP address automatically
6. Click Obtain DNS server address automatically
7. Click OK
8. Click Close
Then browse any site it will be accessed.
Method 2:
1. Right-click My Network Places
2. Right-click LAN
3. Click Properties
4. Click Internet Protocol (TCP/IP)
5. Click Use the following IP address
6. Enter IP address: 192.168.0.10
E:WordMCSE NotesMCSE Practical.doc; RAJA YASSER NAWAZ E-mail: RajaYasser@Hotmail.com, RajaYasser@Yahoo.com Page(s) 24 of 93
7. Enter Subnet mask: 255.255.255.0
8. Enter Default gateway 192.168.0.1
9. Click Use the following DNS server addresses
10. Enter Preferred DNS server: 192.168.0.1
11. Click Obtain DNS server address automatically
12. Click OK
13. Click Close
Then browse any site it will be accessed.
To create a new forest  Domain
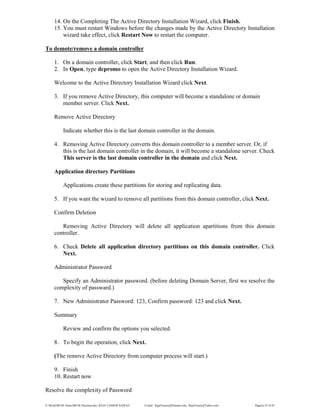
1. Click Start, click Run, and then type dcpromo to start the Active Directory Installation
Wizard.
2. Welcome to the Active Directory Installation Wizard page click Next.
3. On the Operating System Compatibility page, read the information and then click
Next.
4. On the Domain Controller Type page, click Domain controller for a new domain,
and then click Next.
5. On the Create New Domain page, click Domain in a new forest, and then click Next.
6. On the New Domain Name page, type the full DNS name for the new domain, and then
click Next. i.e corvit.com.
Note: On 1 Server only 1 Domain can be created.
7. On the NetBIOS Domain Name page, verify the NetBIOS name, and then click Next.
8. On the Database and Log Folders page, type the location in which you want to install
the database and log folders, or click Browse to choose a location, and then click Next.
Note: Change the Database Folder path i.e E:NTDS, because if server
crashdamage then other path is workable.
9. On the Shared System Volume page, type the location in which you want to install the
Sysvol folder, or click Browse to choose a location, and then click Next.
Note: Change the Log Folder path i.e E:SYSVOL, to save policies on other
location incase server crash  damage then other path is workable.
10. Optional: on the DNS Registration Diagnostics page, verify if an existing DNS server
will be authoritative for this forest or, if necessary, choose to install and configure DNS
on this server by clicking Install and configure the DNS server on this computer, and
set this computer to use this DNS server as its preferred DNS server, and then click
Next.
11. On the Permissions page, select one of the following:
o Permissions compatible with pre-Windows 2000 server operating systems
o Permissions compatible only with Windows 2000 or Windows Server 2003
operating systems, click Next
12. On the Directory Services Restore Mode Administrator Password page, click Next.
Note: Restore password is not necessary. It is used only when we make a backup.
This password will be different from other passwords.
13. Review the Summary page, and then click Next to begin the installation.
E:WordMCSE NotesMCSE Practical.doc; RAJA YASSER NAWAZ E-mail: RajaYasser@Hotmail.com, RajaYasser@Yahoo.com Page(s) 25 of 93
14. On the Completing The Active Directory Installation Wizard, click Finish.
15. You must restart Windows before the changes made by the Active Directory Installation
wizard take effect, click Restart Now to restart the computer.
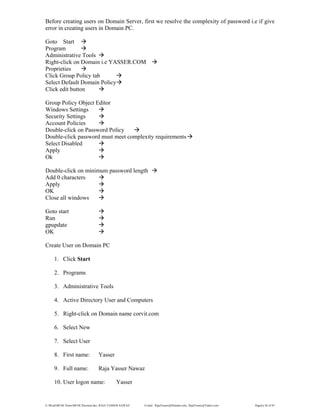
To demote/remove a domain controller
1. On a domain controller, click Start, and then click Run.
2. In Open, type dcpromo to open the Active Directory Installation Wizard.
Welcome to the Active Directory Installation Wizard click Next.
3. If you remove Active Directory, this computer will become a standalone or domain
member server. Click Next.
Remove Active Directory
Indicate whether this is the last domain controller in the domain.
4. Removing Active Directory converts this domain controller to a member server. Or, if
this is the last domain controller in the domain, it will become a standalone server. Check
This server is the last domain controller in the domain and click Next.
Application directory Partitions
Applications create these partitions for storing and replicating data.
5. If you want the wizard to remove all partitions from this domain controller, click Next.
Confirm Deletion
Removing Active Directory will delete all application apartitions from this domain
controller.
6. Check Delete all application directory partitions on this domain controller. Click
Next.
Administrator Password
Specify an Administrator password. (before deleting Domain Server, first we resolve the
complexity of passward.)
7. New Administrator Password: 123, Confirm password: 123 and click Next.
Summary
Review and confirm the options you selected.
8. To begin the operation, click Next.
(The remove Active Directory from computer process will start.)
9. Finish
10. Restart now
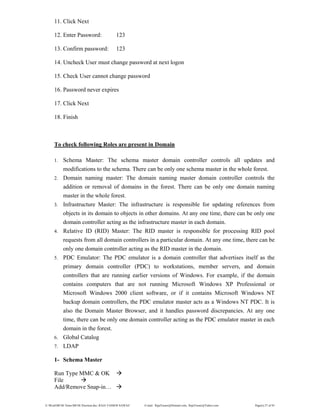
Resolve the complexity of Password
E:WordMCSE NotesMCSE Practical.doc; RAJA YASSER NAWAZ E-mail: RajaYasser@Hotmail.com, RajaYasser@Yahoo.com Page(s) 26 of 93
Before creating users on Domain Server, first we resolve the complexity of password i.e if give
error in creating users in Domain PC.
Goto Start
Program
Administrative Tools
Right-click on Domain i.e YASSER.COM
Proprieties
Click Group Policy tab
Select Default Domain Policy
Click edit button
Group Policy Object Editor
Windows Settings
Security Settings
Account Policies
Double-click on Password Policy
Double-click password must meet complexity requirements
Select Disabled
Apply
Ok
Double-click on minimum password length
Add 0 characters
Apply
OK
Close all windows
Goto start
Run
gpupdate
OK
Create User on Domain PC
1. Click Start
2. Programs
3. Administrative Tools
4. Active Directory User and Computers
5. Right-click on Domain name corvit.com
6. Select New
7. Select User
8. First name: Yasser
9. Full name: Raja Yasser Nawaz
10. User logon name: Yasser
E:WordMCSE NotesMCSE Practical.doc; RAJA YASSER NAWAZ E-mail: RajaYasser@Hotmail.com, RajaYasser@Yahoo.com Page(s) 27 of 93
11. Click Next
12. Enter Password: 123
13. Confirm password: 123
14. Uncheck User must change password at next logon
15. Check User cannot change password
16. Password never expires
17. Click Next
18. Finish
To check following Roles are present in Domain
1. Schema Master: The schema master domain controller controls all updates and
modifications to the schema. There can be only one schema master in the whole forest.
2. Domain naming master: The domain naming master domain controller controls the
addition or removal of domains in the forest. There can be only one domain naming
master in the whole forest.
3. Infrastructure Master: The infrastructure is responsible for updating references from
objects in its domain to objects in other domains. At any one time, there can be only one
domain controller acting as the infrastructure master in each domain.
4. Relative ID (RID) Master: The RID master is responsible for processing RID pool
requests from all domain controllers in a particular domain. At any one time, there can be
only one domain controller acting as the RID master in the domain.
5. PDC Emulator: The PDC emulator is a domain controller that advertises itself as the
primary domain controller (PDC) to workstations, member servers, and domain
controllers that are running earlier versions of Windows. For example, if the domain
contains computers that are not running Microsoft Windows XP Professional or
Microsoft Windows 2000 client software, or if it contains Microsoft Windows NT
backup domain controllers, the PDC emulator master acts as a Windows NT PDC. It is
also the Domain Master Browser, and it handles password discrepancies. At any one
time, there can be only one domain controller acting as the PDC emulator master in each
domain in the forest.
6. Global Catalog
7. LDAP
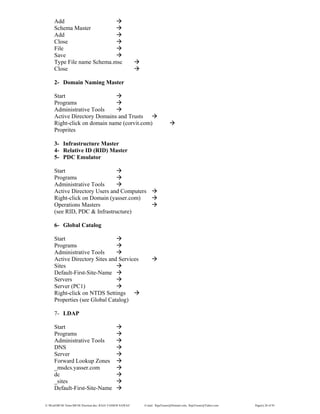
1- Schema Master
Run Type MMC & OK
File
Add/Remove Snap-in…
E:WordMCSE NotesMCSE Practical.doc; RAJA YASSER NAWAZ E-mail: RajaYasser@Hotmail.com, RajaYasser@Yahoo.com Page(s) 28 of 93
Add
Schema Master
Add
Close
File
Save
Type File name Schema.msc
Close
2- Domain Naming Master
Start
Programs
Administrative Tools
Active Directory Domains and Trusts
Right-click on domain name (corvit.com)
Proprites
3- Infrastructure Master
4- Relative ID (RID) Master
5- PDC Emulator
Start
Programs
Administrative Tools
Active Directory Users and Computers
Right-click on Domain (yasser.com)
Operations Masters
(see RID, PDC & Infrastructure)
6- Global Catalog
Start
Programs
Administrative Tools
Active Directory Sites and Services
Sites
Default-First-Site-Name
Servers
Server (PC1)
Right-click on NTDS Settings
Properties (see Global Catalog)
7- LDAP
Start
Programs
Administrative Tools
DNS
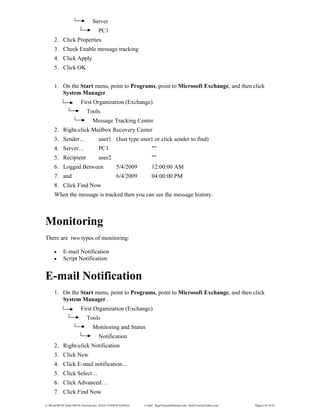
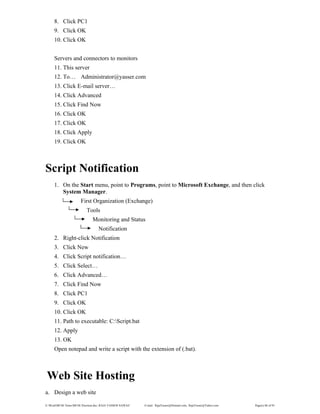
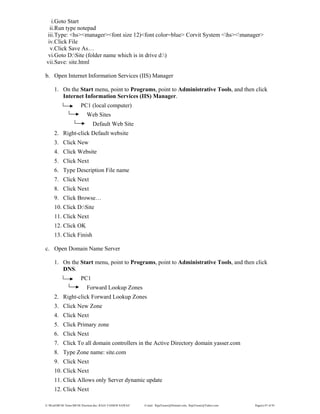
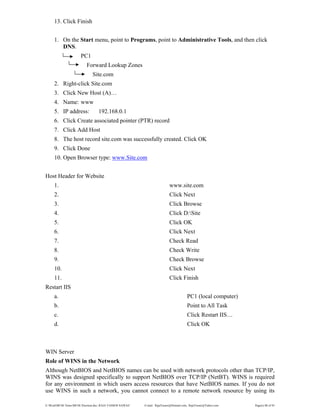
Server
Forward Lookup Zones
_msdcs.yasser.com
dc
_sites
Default-First-Site-Name
E:WordMCSE NotesMCSE Practical.doc; RAJA YASSER NAWAZ E-mail: RajaYasser@Hotmail.com, RajaYasser@Yahoo.com Page(s) 29 of 93
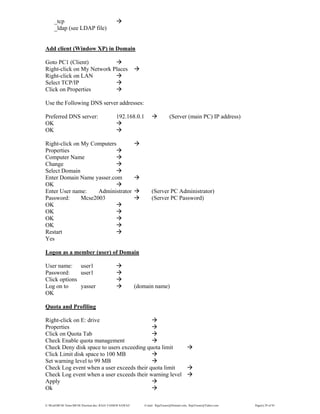
_tcp
_ldap (see LDAP file)
Add client (Window XP) in Domain
Goto PC1 (Client)
Right-click on My Network Places
Right-click on LAN
Select TCP/IP
Click on Properties
Use the Following DNS server addresses:
Preferred DNS server: 192.168.0.1 (Server (main PC) IP address)
OK
OK
Right-click on My Computers
Properties
Computer Name
Change
Select Domain
Enter Domain Name yasser.com
OK
Enter User name: Administrator (Server PC Administrator)
Password: Mcse2003 (Server PC Password)
OK
OK
OK
OK
Restart
Yes
Logon as a member (user) of Domain
User name: user1
Password: user1
Click options
Log on to yasser (domain name)
OK
Quota and Profiling
Right-click on E: drive
Properties
Click on Quota Tab
Check Enable quota management
Check Deny disk space to users exceeding quota limit
Click Limit disk space to 100 MB
Set warning level to 99 MB
Check Log event when a user exceeds their quota limit
Check Log event when a user exceeds their warning level
Apply
Ok
E:WordMCSE NotesMCSE Practical.doc; RAJA YASSER NAWAZ E-mail: RajaYasser@Hotmail.com, RajaYasser@Yahoo.com Page(s) 30 of 93
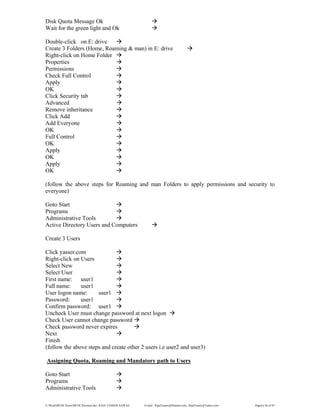
Disk Quota Message Ok
Wait for the green light and Ok
Double-click on E: drive
Create 3 Folders (Home, Roaming & man) in E: drive
Right-click on Home Folder
Properties
Permissions
Check Full Control
Apply
OK
Click Security tab
Advanced
Remove inheritance
Click Add
Add Everyone
OK
Full Control
OK
Apply
OK
Apply
OK
(follow the above steps for Roaming and man Folders to apply permissions and security to
everyone)
Goto Start
Programs
Administrative Tools
Active Directory Users and Computers
Create 3 Users
Click yasser.com
Right-click on Users
Select New
Select User
First name: user1
Full name: user1
User logon name: user1
Password: user1
Confirm password: user1
Uncheck User must change password at next logon
Check User cannot change password
Check password never expires
Next
Finish
(follow the above steps and create other 2 users i.e user2 and user3)
Assigning Quota, Roaming and Mandatory path to Users
Goto Start
Programs
Administrative Tools
E:WordMCSE NotesMCSE Practical.doc; RAJA YASSER NAWAZ E-mail: RajaYasser@Hotmail.com, RajaYasser@Yahoo.com Page(s) 31 of 93
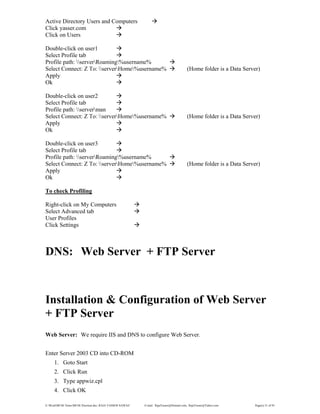
Active Directory Users and Computers
Click yasser.com
Click on Users
Double-click on user1
Select Profile tab
Profile path: serverRoaming%username%
Select Connect: Z To: serverHome%username% (Home folder is a Data Server)
Apply
Ok
Double-click on user2
Select Profile tab
Profile path: serverman
Select Connect: Z To: serverHome%username% (Home folder is a Data Server)
Apply
Ok
Double-click on user3
Select Profile tab
Profile path: serverRoaming%username%
Select Connect: Z To: serverHome%username% (Home folder is a Data Server)
Apply
Ok
To check Profiling
Right-click on My Computers
Select Advanced tab
User Profiles
Click Settings
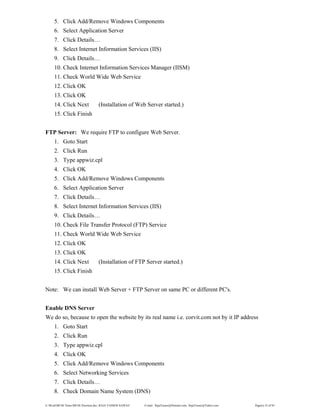
DNS: Web Server + FTP Server
Installation & Configuration of Web Server
+ FTP Server
Web Server: We require IIS and DNS to configure Web Server.
Enter Server 2003 CD into CD-ROM
1. Goto Start
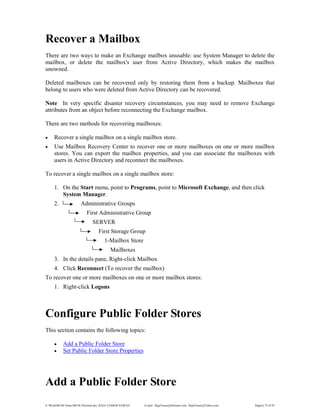
2. Click Run
3. Type appwiz.cpl
4. Click OK
E:WordMCSE NotesMCSE Practical.doc; RAJA YASSER NAWAZ E-mail: RajaYasser@Hotmail.com, RajaYasser@Yahoo.com Page(s) 32 of 93
5. Click Add/Remove Windows Components
6. Select Application Server
7. Click Details…
8. Select Internet Information Services (IIS)
9. Click Details…
10. Check Internet Information Services Manager (IISM)
11. Check World Wide Web Service
12. Click OK
13. Click OK
14. Click Next (Installation of Web Server started.)
15. Click Finish
FTP Server: We require FTP to configure Web Server.
1. Goto Start
2. Click Run
3. Type appwiz.cpl
4. Click OK
5. Click Add/Remove Windows Components
6. Select Application Server
7. Click Details…
8. Select Internet Information Services (IIS)
9. Click Details…
10. Check File Transfer Protocol (FTP) Service
11. Check World Wide Web Service
12. Click OK
13. Click OK
14. Click Next (Installation of FTP Server started.)
15. Click Finish
Note: We can install Web Server + FTP Server on same PC or different PC's.
Enable DNS Server
We do so, because to open the website by its real name i.e. corvit.com not by it IP address
1. Goto Start
2. Click Run
3. Type appwiz.cpl
4. Click OK
5. Click Add/Remove Windows Components
6. Select Networking Services
7. Click Details…
8. Check Domain Name System (DNS)
E:WordMCSE NotesMCSE Practical.doc; RAJA YASSER NAWAZ E-mail: RajaYasser@Hotmail.com, RajaYasser@Yahoo.com Page(s) 33 of 93
9. Click OK
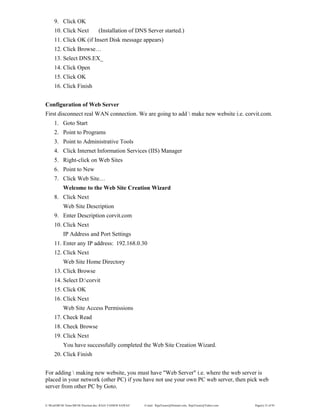
10. Click Next (Installation of DNS Server started.)
11. Click OK (if Insert Disk message appears)
12. Click Browse…
13. Select DNS.EX_
14. Click Open
15. Click OK
16. Click Finish
Configuration of Web Server
First disconnect real WAN connection. We are going to add  make new website i.e. corvit.com.
1. Goto Start
2. Point to Programs
3. Point to Administrative Tools
4. Click Internet Information Services (IIS) Manager
5. Right-click on Web Sites
6. Point to New
7. Click Web Site…
Welcome to the Web Site Creation Wizard
8. Click Next
Web Site Description
9. Enter Description corvit.com
10. Click Next
IP Address and Port Settings
11. Enter any IP address: 192.168.0.30
12. Click Next
Web Site Home Directory
13. Click Browse
14. Select D:corvit
15. Click OK
16. Click Next
Web Site Access Permissions
17. Check Read
18. Check Browse
19. Click Next
You have successfully completed the Web Site Creation Wizard.
20. Click Finish
For adding  making new website, you must have "Web Server" i.e. where the web server is
placed in your network (other PC) if you have not use your own PC web server, then pick web
server from other PC by Goto.
E:WordMCSE NotesMCSE Practical.doc; RAJA YASSER NAWAZ E-mail: RajaYasser@Hotmail.com, RajaYasser@Yahoo.com Page(s) 34 of 93
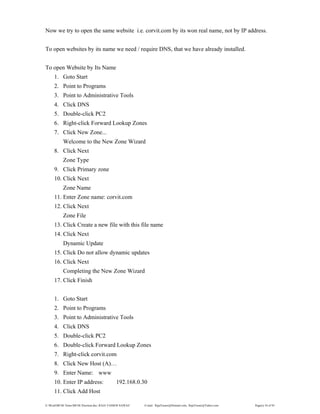
Now we try to open the same website i.e. corvit.com by its won real name, not by IP address.
To open websites by its name we need / require DNS, that we have already installed.
To open Website by Its Name
1. Goto Start
2. Point to Programs
3. Point to Administrative Tools
4. Click DNS
5. Double-click PC2
6. Right-click Forward Lookup Zones
7. Click New Zone...
Welcome to the New Zone Wizard
8. Click Next
Zone Type
9. Click Primary zone
10. Click Next
Zone Name
11. Enter Zone name: corvit.com
12. Click Next
Zone File
13. Click Create a new file with this file name
14. Click Next
Dynamic Update
15. Click Do not allow dynamic updates
16. Click Next
Completing the New Zone Wizard
17. Click Finish
1. Goto Start
2. Point to Programs
3. Point to Administrative Tools
4. Click DNS
5. Double-click PC2
6. Double-click Forward Lookup Zones
7. Right-click corvit.com
8. Click New Host (A)…
9. Enter Name: www
10. Enter IP address: 192.168.0.30
11. Click Add Host
E:WordMCSE NotesMCSE Practical.doc; RAJA YASSER NAWAZ E-mail: RajaYasser@Hotmail.com, RajaYasser@Yahoo.com Page(s) 35 of 93
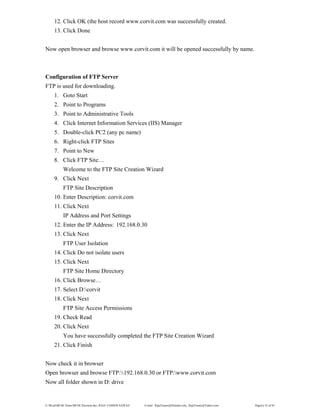
12. Click OK (the host record www.corvit.com was successfully created.
13. Click Done
Now open browser and browse www.corvit.com it will be opened successfully by name.
Configuration of FTP Server
FTP is used for downloading.
1. Goto Start
2. Point to Programs
3. Point to Administrative Tools
4. Click Internet Information Services (IIS) Manager
5. Double-click PC2 (any pc name)
6. Right-click FTP Sites
7. Point to New
8. Click FTP Site…
Welcome to the FTP Site Creation Wizard
9. Click Next
FTP Site Description
10. Enter Description: corvit.com
11. Click Next
IP Address and Port Settings
12. Enter the IP Address: 192.168.0.30
13. Click Next
FTP User Isolation
14. Click Do not isolate users
15. Click Next
FTP Site Home Directory
16. Click Browse…
17. Select D:corvit
18. Click Next
FTP Site Access Permissions
19. Check Read
20. Click Next
You have successfully completed the FTP Site Creation Wizard
21. Click Finish
Now check it in browser
Open browser and browse FTP:192.168.0.30 or FTP:www.corvit.com
Now all folder shown in D: drive
E:WordMCSE NotesMCSE Practical.doc; RAJA YASSER NAWAZ E-mail: RajaYasser@Hotmail.com, RajaYasser@Yahoo.com Page(s) 36 of 93
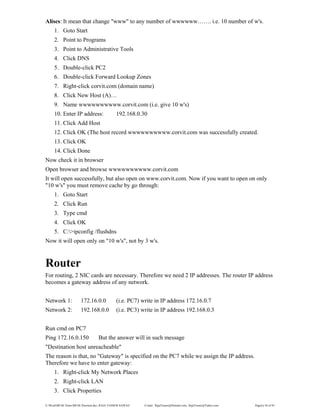
Alises: It mean that change "www" to any number of wwwwww……. i.e. 10 number of w's.
1. Goto Start
2. Point to Programs
3. Point to Administrative Tools
4. Click DNS
5. Double-click PC2
6. Double-click Forward Lookup Zones
7. Right-click corvit.com (domain name)
8. Click New Host (A)…
9. Name wwwwwwwwww.corvit.com (i.e. give 10 w's)
10. Enter IP address: 192.168.0.30
11. Click Add Host
12. Click OK (The host record wwwwwwwwww.corvit.com was successfully created.
13. Click OK
14. Click Done
Now check it in browser
Open browser and browse wwwwwwwwww.corvit.com
It will open successfully, but also open on www.corvit.com. Now if you want to open on only
"10 w's" you must remove cache by go through:
1. Goto Start
2. Click Run
3. Type cmd
4. Click OK
5. C:>ipconfig /flushdns
Now it will open only on "10 w's", not by 3 w's.
Router
For routing, 2 NIC cards are necessary. Therefore we need 2 IP addresses. The router IP address
becomes a gateway address of any network.
Network 1: 172.16.0.0 (i.e. PC7) write in IP address 172.16.0.7
Network 2: 192.168.0.0 (i.e. PC3) write in IP address 192.168.0.3
Run cmd on PC7
Ping 172.16.0.150 But the answer will in such message
"Destination host unreacheable"
The reason is that, no "Gateway" is specified on the PC7 while we assign the IP address.
Therefore we have to enter gateway:
1. Right-click My Network Places
2. Right-click LAN
3. Click Properties
E:WordMCSE NotesMCSE Practical.doc; RAJA YASSER NAWAZ E-mail: RajaYasser@Hotmail.com, RajaYasser@Yahoo.com Page(s) 37 of 93
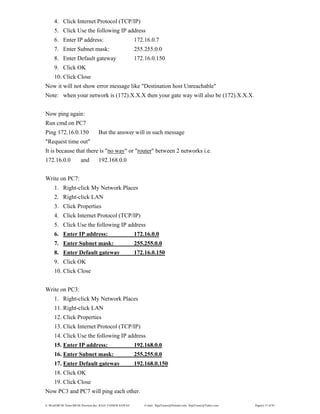
4. Click Internet Protocol (TCP/IP)
5. Click Use the following IP address
6. Enter IP address: 172.16.0.7
7. Enter Subnet mask: 255.255.0.0
8. Enter Default gateway 172.16.0.150
9. Click OK
10. Click Close
Now it will not show error message like "Destination host Unreachable"
Note: when your network is (172).X.X.X then your gate way will also be (172).X.X.X.
Now ping again:
Run cmd on PC7
Ping 172.16.0.150 But the answer will in such message
"Request time out"
It is because that there is "no way" or "router" between 2 networks i.e.
172.16.0.0 and 192.168.0.0
Write on PC7:
1. Right-click My Network Places
2. Right-click LAN
3. Click Properties
4. Click Internet Protocol (TCP/IP)
5. Click Use the following IP address
6. Enter IP address: 172.16.0.0
7. Enter Subnet mask: 255.255.0.0
8. Enter Default gateway 172.16.0.150
9. Click OK
10. Click Close
Write on PC3:
1. Right-click My Network Places
11. Right-click LAN
12. Click Properties
13. Click Internet Protocol (TCP/IP)
14. Click Use the following IP address
15. Enter IP address: 192.168.0.0
16. Enter Subnet mask: 255.255.0.0
17. Enter Default gateway 192.168.0.150
18. Click OK
19. Click Close
Now PC3 and PC7 will ping each other.
E:WordMCSE NotesMCSE Practical.doc; RAJA YASSER NAWAZ E-mail: RajaYasser@Hotmail.com, RajaYasser@Yahoo.com Page(s) 38 of 93
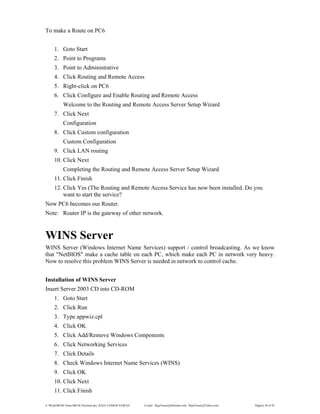
To make a Route on PC6
1. Goto Start
2. Point to Programs
3. Point to Administrative
4. Click Routing and Remote Access
5. Right-click on PC6
6. Click Configure and Enable Routing and Remote Access
Welcome to the Routing and Remote Access Server Setup Wizard
7. Click Next
Configuration
8. Click Custom configuration
Custom Configuration
9. Click LAN routing
10. Click Next
Completing the Routing and Remote Access Server Setup Wizard
11. Click Finish
12. Click Yes (The Routing and Remote Access Service has now been installed. Do you
want to start the service?
Now PC6 becomes our Router.
Note: Router IP is the gateway of other network.
WINS Server
WINS Server (Windows Internet Name Services) support / control broadcasting. As we know
that "NetBIOS" make a cache table on each PC, which make each PC in network very heavy.
Now to resolve this problem WINS Server is needed in network to control cache.
Installation of WINS Server
Insert Server 2003 CD into CD-ROM
1. Goto Start
2. Click Run
3. Type appwiz.cpl
4. Click OK
5. Click Add/Remove Windows Components
6. Click Networking Services
7. Click Details
8. Check Windows Internet Name Services (WINS)
9. Click OK
10. Click Next
11. Click Finish
E:WordMCSE NotesMCSE Practical.doc; RAJA YASSER NAWAZ E-mail: RajaYasser@Hotmail.com, RajaYasser@Yahoo.com Page(s) 39 of 93
Logon as a Administrator
Configuration of WINS Server
To configure WINS Server on PC3, first give IP address of PC 3 (WINS Server PC) on another
PC4.
1. Right-click on My Network Places (PC4)
2. Click Properties
3. Right-click on LAN
4. Click Properties
5. Select Internet Protocol (TCP/IP)
6. Click Properties
7. Click Advanced…
8. Click WINS tab
9. Click Add…
10. Enter WINS server: 192.168.0.3
11. Click Add
12. Click OK
13. Click OK
14. Click Close
This process will add PC4 into WINS server PC3
Now ping by name i.e. ping pc4 or ping pc3 not by IP address. Goto PC3 and ping PC4 it will
work.
Check that PC4 is added into PC3 (WINS server PC)
Goto PC3
1. Goto Start
2. Point to Programs
3. Point to Administrative Tools
4. Click WINS
5. Double-click PC3[192.168.0.3]
6. Right-click Active Registration
7. Click Display Records…
8. Click Find Now
Now it will show / give the PC4 IP address and also cache of PC4 IP address and also cache of
PC4. as we added like PC4 into WINS server PC3, we can add also other network PC's into
WINS server PC3 and also cache of all. Therefore cache of each PC's will be shown on PC3
(WINS server) but not on his won PC. In other words WINDS server keep record of all PC's
What is DHCP?
E:WordMCSE NotesMCSE Practical.doc; RAJA YASSER NAWAZ E-mail: RajaYasser@Hotmail.com, RajaYasser@Yahoo.com Page(s) 40 of 93
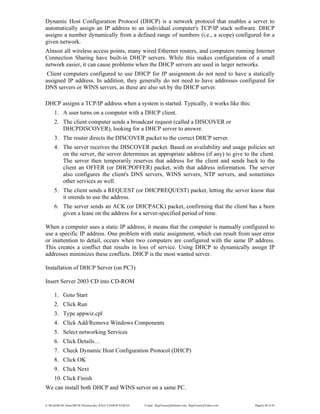
Dynamic Host Configuration Protocol (DHCP) is a network protocol that enables a server to
automatically assign an IP address to an individual computer's TCP/IP stack software. DHCP
assigns a number dynamically from a defined range of numbers (i.e., a scope) configured for a
given network.
Almost all wireless access points, many wired Ethernet routers, and computers running Internet
Connection Sharing have built-in DHCP servers. While this makes configuration of a small
network easier, it can cause problems when the DHCP servers are used in larger networks.
Client computers configured to use DHCP for IP assignment do not need to have a statically
assigned IP address. In addition, they generally do not need to have addresses configured for
DNS servers or WINS servers, as these are also set by the DHCP server.
DHCP assigns a TCP/IP address when a system is started. Typically, it works like this:
1. A user turns on a computer with a DHCP client.
2. The client computer sends a broadcast request (called a DISCOVER or
DHCPDISCOVER), looking for a DHCP server to answer.
3. The router directs the DISCOVER packet to the correct DHCP server.
4. The server receives the DISCOVER packet. Based on availability and usage policies set
on the server, the server determines an appropriate address (if any) to give to the client.
The server then temporarily reserves that address for the client and sends back to the
client an OFFER (or DHCPOFFER) packet, with that address information. The server
also configures the client's DNS servers, WINS servers, NTP servers, and sometimes
other services as well.
5. The client sends a REQUEST (or DHCPREQUEST) packet, letting the server know that
it intends to use the address.
6. The server sends an ACK (or DHCPACK) packet, confirming that the client has a been
given a lease on the address for a server-specified period of time.
When a computer uses a static IP address, it means that the computer is manually configured to
use a specific IP address. One problem with static assignment, which can result from user error
or inattention to detail, occurs when two computers are configured with the same IP address.
This creates a conflict that results in loss of service. Using DHCP to dynamically assign IP
addresses minimizes these conflicts. DHCP is the most wanted server.
Installation of DHCP Server (on PC3)
Insert Server 2003 CD into CD-ROM
1. Goto Start
2. Click Run
3. Type appwiz.cpl
4. Click Add/Remove Windows Components
5. Select networking Services
6. Click Details…
7. Check Dynamic Host Configuration Protocol (DHCP)
8. Click OK
9. Click Next
10. Click Finish
We can install both DHCP and WINS server on a same PC.
E:WordMCSE NotesMCSE Practical.doc; RAJA YASSER NAWAZ E-mail: RajaYasser@Hotmail.com, RajaYasser@Yahoo.com Page(s) 41 of 93
Configuration of DHCP Server
1. Goto Start
2. Point to Programs
3. Point to Administrative Tools
4. Click DHCP
5. Right-click on PC3[192.168.0.3]
6. Click New Scope…
Welcome to the New Scope Wizard
7. Click Next
Scope Name (You have to provide an identifying scope name)
8. Type Name: corvit (any name)
9. Click Next
IP Address Range (You define the scope address range by identifying a set of
consecutive IP address, any rage can be specified)
10. Start IP address: 192.168.0.150
11. End IP address: 192.168.0.200
12. Click Next
Add Exclusions (Exclusions are addresses or a range of addresses that are not distributed
by the server.)
13. Start IP address: 192.168.0.150 (150 to 155 Reserve IP's for Server)
14. End IP address: 192.168.0.155
15. Click Next
Lease Duration (The lease duration specifies how long a client can use an IP address
from this scope.
16. Enter Days: 30
17. Click Next
Configure DHCP Options (You have to configure the most common DHCP options
before clients can use the scope.)
18. Click Yes, I want to configure these options now
19. Click Next
Router (Default Gateway) (you can specify the routers, or default gateways, to be
distributed by this scope. From Exclude / Reserved IP's or from above IP's range.)
20. Enter Gateway IP address: 192.168.0.156
21. Click Next
Domain Name and DNS Servers(The DNS maps & translates domain anmes used by
clients on your network.)
22. Enter Parent domain: PC4 (any name)
23. Enter IP address: 192.168.0.157
24. Click Add
25. Click Next
WINS Servers (Computers running Windows can use WINS servers to convert NetBIOS
computer names to IP addresses.)
E:WordMCSE NotesMCSE Practical.doc; RAJA YASSER NAWAZ E-mail: RajaYasser@Hotmail.com, RajaYasser@Yahoo.com Page(s) 42 of 93
26. Enter WINS Server name: PC5 (any name)
27. Enter WINS Server IP address: 192.168.0.160
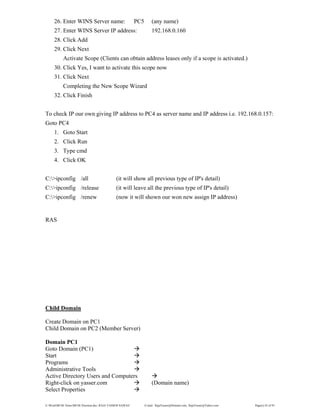
28. Click Add
29. Click Next
Activate Scope (Clients can obtain address leases only if a scope is activated.)
30. Click Yes, I want to activate this scope now
31. Click Next
Completing the New Scope Wizard
32. Click Finish
To check IP our own giving IP address to PC4 as server name and IP address i.e. 192.168.0.157:
Goto PC4
1. Goto Start
2. Click Run
3. Type cmd
4. Click OK
C:>ipconfig /all (it will show all previous type of IP's detail)
C:>ipconfig /release (it will leave all the previous type of IP's detail)
C:>ipconfig /renew (now it will shown our won new assign IP address)
RAS
Child Domain
Create Domain on PC1
Child Domain on PC2 (Member Server)
Domain PC1
Goto Domain (PC1)
Start
Programs
Administrative Tools
Active Directory Users and Computers
Right-click on yasser.com (Domain name)
Select Properties
E:WordMCSE NotesMCSE Practical.doc; RAJA YASSER NAWAZ E-mail: RajaYasser@Hotmail.com, RajaYasser@Yahoo.com Page(s) 43 of 93
Click Group Policy tab
Click Edit button
Group Policy Object Editor
Default Domain Policy [Computer name.yasser.com] Policy
Computer Configuration
Double-click Windows Settings
Double-click Security Settings
Double-click Account Policies
Double-click Password Policies
Double-click Password must meet complexity requirements
Click Disabled
Apply
OK
Double-click Minimum password length
Enter 0 characters
Apply
OK
OK
Close Group Policy Object Editor
Close Active Directory Users and Computers
Goto Start
Run
Enter gpupdate
OK
Child Domain on PC2 (Member Server)
Right-click on My Network Places
Select properties
Right-click on Local Area Connection
Select Properties
Select internet Protocol (TCP/IP)
Click Properties button
Use the following IP address:
IP address: 192.168.0.2
Subnet mask: 255.255.255.0
Use the following DNS server addresses:
Preferred DNS server: 192.168.0.2 (PC2 i.e Child Domain IP address)
Alternate DNS server: 192.168.0.1 (PC1 i.e Domain IP address)
OK
Close
Close
Right-click on My Computer (PC2)
Select Computer Name tab
Click Change button
Select Domain
Enter domain name: yasser.com (Domain name PC1)
OK
Enter the name and password of an account with permission to join the domain.
E:WordMCSE NotesMCSE Practical.doc; RAJA YASSER NAWAZ E-mail: RajaYasser@Hotmail.com, RajaYasser@Yahoo.com Page(s) 44 of 93
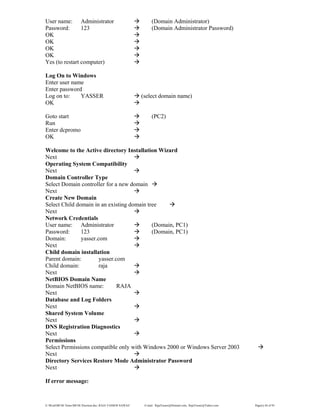
User name: Administrator (Domain Administrator)
Password: 123 (Domain Administrator Password)
OK
OK
OK
OK
Yes (to restart computer)
Log On to Windows
Enter user name
Enter password
Log on to: YASSER (select domain name)
OK
Goto start (PC2)
Run
Enter dcpromo
OK
Welcome to the Active directory Installation Wizard
Next
Operating System Compatibility
Next
Domain Controller Type
Select Domain controller for a new domain
Next
Create New Domain
Select Child domain in an existing domain tree
Next
Network Credentials
User name: Administrator (Domain, PC1)
Password: 123 (Domain, PC1)
Domain: yasser.com
Next
Child domain installation
Parent domain: yasser.com
Child domain: raja
Next
NetBIOS Domain Name
Domain NetBIOS name: RAJA
Next
Database and Log Folders
Next
Shared System Volume
Next
DNS Registration Diagnostics
Next
Permissions
Select Permissions compatible only with Windows 2000 or Windows Server 2003
Next
Directory Services Restore Mode Administrator Password
Next
If error message:
E:WordMCSE NotesMCSE Practical.doc; RAJA YASSER NAWAZ E-mail: RajaYasser@Hotmail.com, RajaYasser@Yahoo.com Page(s) 45 of 93
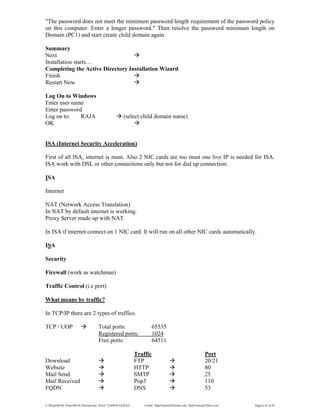
"The password does not meet the minimum password length requirement of the password policy
on this computer. Enter a longer password." Then resolve the password minimum length on
Domain (PC1) and start create child domain again.
Summary
Next
Installation starts…
Completing the Active Directory Installation Wizard
Finish
Restart Now
Log On to Windows
Enter user name
Enter password
Log on to: RAJA (select child domain name)
OK
ISA (Internet Security Acceleration)
First of all ISA, internet is must. Also 2 NIC cards are too must one live IP is needed for ISA.
ISA work with DSL or other connections only but not for dial up connection.
ISA
Internet
NAT (Network Access Translation)
In NAT by default internet is working.
Proxy Server made up with NAT.
In ISA if internet connect on 1 NIC card. It will run on all other NIC cards automatically.
ISA
Security
Firewall (work as watchman)
Traffic Control (i.e port)
What means by traffic?
In TCP/IP there are 2 types of traffics.
TCP / UOP Total ports: 65535
Registered ports: 1024
Free ports: 64511
Traffic Port
Download FTP 20/21
Website HTTP 80
Mail Send SMTP 25
Mail Received Pop3 110
FQDN DNS 53
E:WordMCSE NotesMCSE Practical.doc; RAJA YASSER NAWAZ E-mail: RajaYasser@Hotmail.com, RajaYasser@Yahoo.com Page(s) 46 of 93
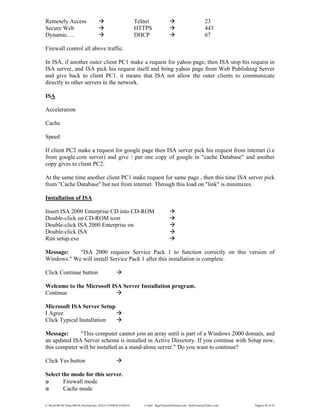
Remotely Access Telnet 23
Secure Web HTTPS 443
Dynamic…. DHCP 67
Firewall control all above traffic.
In ISA, if another outer client PC1 make a request for yahoo page, then ISA stop his request in
ISA server, and ISA pick his request itself and bring yahoo page from Web Publishing Server
and give back to client PC1. it means that ISA not allow the outer clients to communicate
directly to other servers in the network.
ISA
Acceleration
Cache
Speed
If client PC2 make a request for google page then ISA server pick his request from internet (i.e
from google.com server) and give / put one copy of google in "cache Database" and another
copy gives to client PC2.
At the same time another client PC1 make request for same page , then this time ISA server pick
from "Cache Database" but not from internet. Through this load on "link" is minimizes.
Installation of ISA
Insert ISA 2000 Enterprise CD into CD-ROM
Double-click on CD-ROM icon
Double-click ISA 2000 Enterprise on
Double-click ISA
Run setup.exe
Message: "ISA 2000 requires Service Pack 1 to function correctly on this version of
Windows." We will install Service Pack 1 after this installation is complete.
Click Continue button
Welcome to the Microsoft ISA Server Installation program.
Continue
Microsoft ISA Server Setup
I Agree
Click Typical Installation
Message: "This computer cannot join an array until is part of a Windows 2000 domain, and
an updated ISA Server schema is installed in Active Directory. If you continue with Setup now,
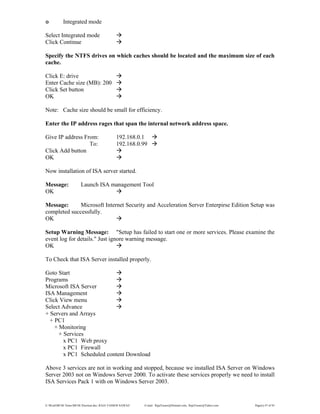
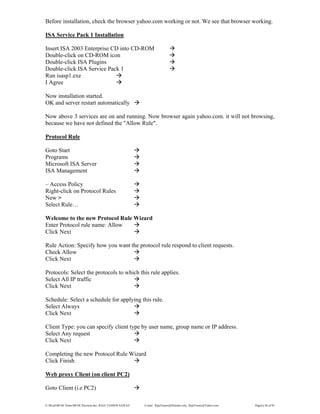
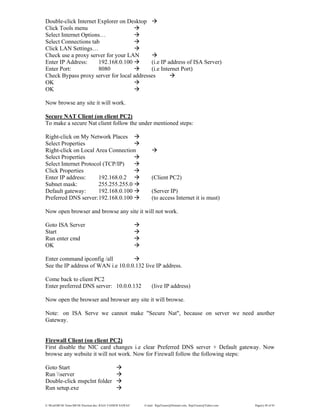
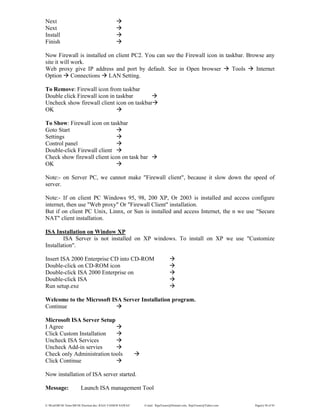
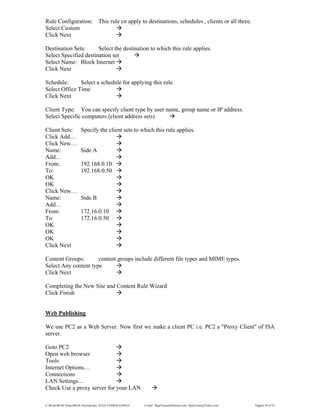
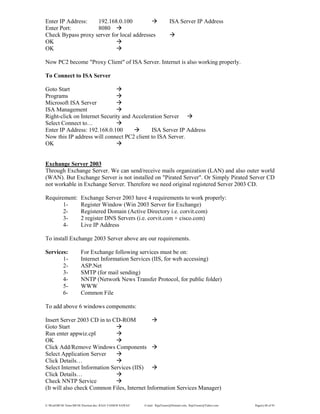
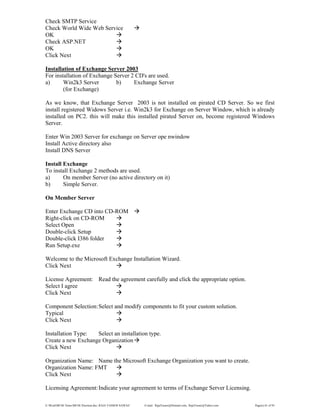
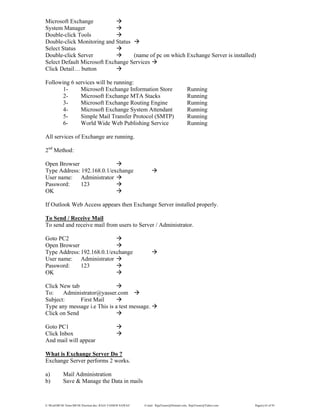
this computer will be installed as a stand-alone server." Do you want to continue?
Click Yes button
Select the mode for this server.
๏ Firewall mode
๏ Cache mode
E:WordMCSE NotesMCSE Practical.doc; RAJA YASSER NAWAZ E-mail: RajaYasser@Hotmail.com, RajaYasser@Yahoo.com Page(s) 47 of 93
๏ Integrated mode
Select Integrated mode
Click Continue
Specify the NTFS drives on which caches should be located and the maximum size of each
cache.
Click E: drive
Enter Cache size (MB): 200
Click Set button
OK
Note: Cache size should be small for efficiency.
Enter the IP address rages that span the internal network address space.
Give IP address From: 192.168.0.1
To: 192.168.0.99
Click Add button
OK
Now installation of ISA server started.
Message: Launch ISA management Tool
OK
Message: Microsoft Internet Security and Acceleration Server Enterpirse Edition Setup was
completed successfully.
OK
Setup Warning Message: "Setup has failed to start one or more services. Please examine the
event log for details." Just ignore warning message.
OK
To Check that ISA Server installed properly.
Goto Start
Programs
Microsoft ISA Server
ISA Management
Click View menu
Select Advance
+ Servers and Arrays
+ PC1
+ Monitoring
+ Services
x PC1 Web proxy
x PC1 Firewall
x PC1 Scheduled content Download
Above 3 services are not in working and stopped, because we installed ISA Server on Windows
Server 2003 not on Windows Server 2000. To activate these services properly we need to install
ISA Services Pack 1 with on Windows Server 2003.
E:WordMCSE NotesMCSE Practical.doc; RAJA YASSER NAWAZ E-mail: RajaYasser@Hotmail.com, RajaYasser@Yahoo.com Page(s) 48 of 93
Before installation, check the browser yahoo.com working or not. We see that browser working.
ISA Service Pack 1 Installation
Insert ISA 2003 Enterprise CD into CD-ROM
Double-click on CD-ROM icon
Double-click ISA Plugins
Double-click ISA Service Pack 1
Run isasp1.exe
I Agree
Now installation started.
OK and server restart automatically
Now above 3 services are on and running. Now browser again yahoo.com. it will not browsing,
because we have not defined the "Allow Rule".
Protocol Rule
Goto Start
Programs
Microsoft ISA Server
ISA Management
– Access Policy
Right-click on Protocol Rules
New >
Select Rule…
Welcome to the new Protocol Rule Wizard
Enter Protocol rule name: Allow
Click Next
Rule Action: Specify how you want the protocol rule respond to client requests.
Check Allow
Click Next
Protocols: Select the protocols to which this rule applies.
Select All IP traffic
Click Next
Schedule: Select a schedule for applying this rule.
Select Always
Click Next
Client Type: you can specify client type by user name, group name or IP address.
Select Any request
Click Next
Completing the new Protocol Rule Wizard
Click Finish
Web proxy Client (on client PC2)
Goto Client (i.e PC2)
E:WordMCSE NotesMCSE Practical.doc; RAJA YASSER NAWAZ E-mail: RajaYasser@Hotmail.com, RajaYasser@Yahoo.com Page(s) 49 of 93
Double-click Internet Explorer on Desktop
Click Tools menu
Select Internet Options…
Select Connections tab
Click LAN Settings…
Check use a proxy server for your LAN
Enter IP Address: 192.168.0.100 (i.e IP address of ISA Server)
Enter Port: 8080 (i.e Internet Port)
Check Bypass proxy server for local addresses
OK
OK
Now browse any site it will work.
Secure NAT Client (on client PC2)
To make a secure Nat client follow the under mentioned steps:
Right-click on My Network Places
Select Properties
Right-click on Local Area Connection
Select Properties
Select Internet Protocol (TCP/IP)
Click Properties
Enter IP address: 192.168.0.2 (Client PC2)
Subnet mask: 255.255.255.0
Default gateway: 192.168.0.100 (Server IP)
Preferred DNS server:192.168.0.100 (to access Internet it is must)
Now open browser and browse any site it will not work.
Goto ISA Server
Start
Run enter cmd
OK
Enter command ipconfig /all
See the IP address of WAN i.e 10.0.0.132 live IP address.
Come back to client PC2
Enter preferred DNS server: 10.0.0.132 (live IP address)
Now open the browser and browser any site it will browse.
Note: on ISA Serve we cannot make "Secure Nat", because on server we need another
Gateway.
Firewall Client (on client PC2)
First disable the NIC card changes i.e clear Preferred DNS server + Default gateway. Now
browse any website it will not work. Now for Firewall follow the following steps:
Goto Start
Run server
Double-click mspclnt folder
Run setup.exe
E:WordMCSE NotesMCSE Practical.doc; RAJA YASSER NAWAZ E-mail: RajaYasser@Hotmail.com, RajaYasser@Yahoo.com Page(s) 50 of 93
Next
Next
Install
Finish
Now Firewall is installed on client PC2. You can see the Firewall icon in taskbar. Browse any
site it will work.
Web proxy give IP address and port by default. See in Open browser Tools Internet
Option Connections LAN Setting.
To Remove: Firewall icon from taskbar
Double click Firewall icon in taskbar
Uncheck show firewall client icon on taskbar
OK
To Show: Firewall icon on taskbar
Goto Start
Settings
Control panel
Double-click Firewall client
Check show firewall client icon on task bar
OK
Note:- on Server PC, we cannot make "Firewall client", because it slow down the speed of
server.
Note:- If on client PC Windows 95, 98, 200 XP, Or 2003 is installed and access configure
internet, then use "Web proxy" Or "Firewall Client" installation.
But if on client PC Unix, Linnx, or Sun is installed and access Internet, the n we use "Secure
NAT" client installation.
ISA Installation on Window XP
ISA Server is not installed on XP windows. To install on XP we use "Customize
Installation".
Insert ISA 2000 Enterprise CD into CD-ROM
Double-click on CD-ROM icon
Double-click ISA 2000 Enterprise on
Double-click ISA
Run setup.exe
Welcome to the Microsoft ISA Server Installation program.
Continue
Microsoft ISA Server Setup
I Agree
Click Custom Installation
Uncheck ISA Services
Uncheck Add-in servies
Check only Administration tools
Click Continue
Now installation of ISA server started.
Message: Launch ISA management Tool
E:WordMCSE NotesMCSE Practical.doc; RAJA YASSER NAWAZ E-mail: RajaYasser@Hotmail.com, RajaYasser@Yahoo.com Page(s) 51 of 93
OK
Message: Microsoft Internet Security and Acceleration Server Enterpirse Edition Setup was
completed successfully.
OK
To Check that ISA Server installed properly.
Goto Start
Programs
Microsoft ISA Server
ISA Management
Click View menu
Select Advance
Right-click Internet Security and Acceleration Server
Connect to…
Connect to this stand-alone server:
Enter IP address 192.168.0.100 (give ISA Server IP address)
OK
To Check that ISA Server installed properly on Windows XP.
Goto Start
Programs
Microsoft ISA Server
ISA Management
Click View menu
Select Advance
+ Servers and Arrays
+ PC1
+ Monitoring
+ Services
PC1 Web proxy
PC1 Firewall
PC1 Scheduled content Download
All the 3 services are enabled and working.
To Block Some Sites
To block some sites, there are 2 works to be done on ISA Server.
Policy Element
Access Policy
First we mention those sites to which we want to block in "Policy Element". Or First we set a
destination.
Goto Start
Programs
Microsoft ISA Server
ISA Management
Double-click Policy Element
Right-Click on Destination Sets
Select New
E:WordMCSE NotesMCSE Practical.doc; RAJA YASSER NAWAZ E-mail: RajaYasser@Hotmail.com, RajaYasser@Yahoo.com Page(s) 52 of 93
Select Set…
Enter Name: Block Sites
Click Add
Enter Destination: *.yahoo.com
*.yahoo.*
*.google.com
*.msn.com
*.hotmail.com
*.geo.tv
OK
OK
We have created a list of sites to block. Now we will apply rule on these sites.
Double-click on Access Policy
Right-click on Site and Content Rule
Select New
Select Rule
Welcome to the New Site and content Rule Wizard
Enter name: Block Sites
Click Next
Rule Action: Select the type of action this rule performs.
Select Deny
Click Next
Rule Configuration: This rule cn apply to destinations, schedules , clients or all three.
Select Custom
Click Next
Destination Sets: Select the destination to which this rule applies.
Select Specified destination set
Select Name: Block Sites
Click Next
Schedule: Select a schedule for applying this rule.
Select Always
Click Next
Client Type: You can specify client type by user name, group name or IP address.
Select Any request
Click Next
Content Groups: content groups include different file types and MIME types.
Select Any content type
Click Next
Completing the New Site and Content Rule Wizard
Click Finish
On Client PC2
Browse any site from above sites i.e google.com. It will not be opened and give error message.
To Block Internet Access on all PC's
E:WordMCSE NotesMCSE Practical.doc; RAJA YASSER NAWAZ E-mail: RajaYasser@Hotmail.com, RajaYasser@Yahoo.com Page(s) 53 of 93
Goto Start
Programs
Microsoft ISA Server
ISA Management
Double-click Policy Element
Right-Click on Destination Sets
Select New
Select Set…
Enter Name: Block Internet
Click Add
Enter Destination: * (* means to block a whole internet)
OK
OK
Now we apply a Rule to Block the Internet.
Double-click on Access Policy
Right-click on Site and Content Rule
Select New
Select Rule
Welcome to the New Site and content Rule Wizard
Enter name: Block Internet
Click Next
Rule Action: Select the type of action this rule performs.
Select Deny
Click Next
Rule Configuration: This rule cn apply to destinations, schedules , clients or all three.
Select Custom
Click Next
Destination Sets: Select the destination to which this rule applies.
Select Specified destination set
Select Name: Block Internet
Click Next
Schedule: Select a schedule for applying this rule.
Select Always
Click Next
Client Type: You can specify client type by user name, group name or IP address.
Select Any request
Click Next
Content Groups: content groups include different file types and MIME types.
Select Any content type
Click Next
Completing the New Site and Content Rule Wizard
Click Finish
On any PC
E:WordMCSE NotesMCSE Practical.doc; RAJA YASSER NAWAZ E-mail: RajaYasser@Hotmail.com, RajaYasser@Yahoo.com Page(s) 54 of 93
Browse any site it will not be opened and give error message.
To Block Internet on some specific PC (PC2)
Goto Start
Programs
Microsoft ISA Server
ISA Management
Double-click Policy Element
Right-Click on Destination Sets
Select New
Select Set…
Enter Name: Block Net
Click Add
Enter Destination: * (* means to block a whole internet)
OK
OK
Refresh
Now we apply a Rule to Block the Internet.
Double-click on Access Policy
Right-click on Site and Content Rule
Select New
Select Rule
Welcome to the New Site and content Rule Wizard
Enter name: Block Internet
Click Next
Rule Action: Select the type of action this rule performs.
Select Deny
Click Next
Rule Configuration: This rule cn apply to destinations, schedules , clients or all three.
Select Custom
Click Next
Destination Sets: Select the destination to which this rule applies.
Select Specified destination set
Select Name: Block Internet
Click Next
Schedule: Select a schedule for applying this rule.
Select Always
Click Next
Client Type: You can specify client type by user name, group name or IP address.
Select Specific computers (client address sets)
Click Next
Client Sets: Specify the client sets to which this rule applies.
Click Add…
Click New…
Enter Name: Block Net
E:WordMCSE NotesMCSE Practical.doc; RAJA YASSER NAWAZ E-mail: RajaYasser@Hotmail.com, RajaYasser@Yahoo.com Page(s) 55 of 93
Click Add…
Enter IP address range that you want to block.
From: 192.168.0.20
To: 192.168.0.30
OK
OK
OK
Click Next
Content Groups: content groups include different file types and MIME types.
Select Any content type
Click Next
Completing the New Site and Content Rule Wizard
Click Finish
To Block Pictures / Images
Goto Start
Programs
Microsoft ISA Server
ISA Management
Double-click Policy Element
Right-Click on Destination Sets
Select New
Select Set…
Enter Name: Block Images
Click Add
Enter Destination: geo.tv (block images of geo.tv)
OK
OK
Now we will apply rule to block images.
Double-click on Access Policy
Right-click on Site and Content Rule
Select New
Select Rule
Welcome to the New Site and content Rule Wizard
Enter name: Block Sites
Click Next
Rule Action: Select the type of action this rule performs.
Select Deny
Click Next
Rule Configuration: This rule cn apply to destinations, schedules , clients or all three.
Select Custom
Click Next
Destination Sets: Select the destination to which this rule applies.
Select Specified destination set
Select Name: Block Sites
Click Next
E:WordMCSE NotesMCSE Practical.doc; RAJA YASSER NAWAZ E-mail: RajaYasser@Hotmail.com, RajaYasser@Yahoo.com Page(s) 56 of 93
Schedule: Select a schedule for applying this rule.
Select Always
Click Next
Client Type: You can specify client type by user name, group name or IP address.
Select Any request
Click Next
Content Groups: content groups include different file types and MIME types.
Select Only the following content types:
Check images
Click Next
Completing the New Site and Content Rule Wizard
Click Finish
To Block Audio and Video on All Sites
Goto Start
Programs
Microsoft ISA Server
ISA Management
Double-click Policy Element
Right-Click on Destination Sets
Select New
Select Set…
Enter Name: Block Audio & Video
Click Add
Enter Destination: *
OK
OK
Now we will apply rule to block Audio & Video.
Double-click on Access Policy
Right-click on Site and Content Rule
Select New
Select Rule
Welcome to the New Site and content Rule Wizard
Enter name: Block Sites
Click Next
Rule Action: Select the type of action this rule performs.
Select Deny
Click Next
Rule Configuration: This rule cn apply to destinations, schedules , clients or all three.
Select Custom
Click Next
Destination Sets: Select the destination to which this rule applies.
Select Specified destination set
Select Name: Block Sites
E:WordMCSE NotesMCSE Practical.doc; RAJA YASSER NAWAZ E-mail: RajaYasser@Hotmail.com, RajaYasser@Yahoo.com Page(s) 57 of 93
Click Next
Schedule: Select a schedule for applying this rule.
Select Always
Click Next
Client Type: You can specify client type by user name, group name or IP address.
Select Any request
Click Next
Content Groups: content groups include different file types and MIME types.
Select Only the following content types:
Check Audio
Check Video
Click Next
Completing the New Site and Content Rule Wizard
Click Finish
Re-direct to Specific website
When client enter URL of any site. He will redirect to a specific website.
Goto Start
Run cmd
OK
Enter comment: ping www.urdupoint.com i.e IP address 66.116.125.170
Goto Start
Programs
Microsoft ISA Server
ISA Management
Double-click Policy Element
Right-Click on Destination Sets
Select New
Select Set…
Enter Name: Route
Click Add
Enter Destination: *
OK
OK
Routing
You can create touting rules, which determine whether a Web Proxy client Request is:
- Retrieved directly from the specified destination
- Sent to an upstream server
- Redirected to an alternate site
Routing rules apply to both incoming Web request and outgoing Web Requests.
Double-click on Network Configuration
Right-click on Routing
Select New…
Select Rule…
Welcome to the New Routing Rule Wizard
E:WordMCSE NotesMCSE Practical.doc; RAJA YASSER NAWAZ E-mail: RajaYasser@Hotmail.com, RajaYasser@Yahoo.com Page(s) 58 of 93
Enter name: Route Internet
Click Next
Destination Sets: Select the destinations to which this rule applies.
Select Specified destination set
Select Route
Click Next
Request Action: How should the rule process requests from clients?
Select Redirect to
Hosted site: 66.116.125.170 (IP address of www.urdupoint.com)
Port: 80
SSL Port: 443 (Internet port or STTP Port)
Click Next
Cache Retrieval Configuration: Specify how the rule searches the cache for requested
objects and how requests will be routed if no valid object exists.
Select Any version of the requested object. Never route the request
Click Next
Completing the New Routing Rule Wizard
Click Finish
To Allow Internet in Office Time Only
Goto Start
Programs
Microsoft ISA Server
ISA Management
Double-click Policy Element
Right-Click on Schedules
Select New
Select Schedule…
Enter Name: Office Time
Select time in AM/PM
Select Monday to Saturday
Select 8 AM to 4 PM
Select Active
OK
Now we will apply rule to use internet in office time.
Double-click on Access Policy
Right-click on Site and Content Rule
Select New
Select Rule
Welcome to the New Site and content Rule Wizard
Enter name: Office Time
Click Next
Rule Action: Select the type of action this rule performs.
Select Deny
Click Next
E:WordMCSE NotesMCSE Practical.doc; RAJA YASSER NAWAZ E-mail: RajaYasser@Hotmail.com, RajaYasser@Yahoo.com Page(s) 59 of 93
Rule Configuration: This rule cn apply to destinations, schedules , clients or all three.
Select Custom
Click Next
Destination Sets: Select the destination to which this rule applies.
Select Specified destination set
Select Name: Block Internet
Click Next
Schedule: Select a schedule for applying this rule.
Select Office Time
Click Next
Client Type: You can specify client type by user name, group name or IP address.
Select Specific computers (client address sets)
Client Sets: Specify the client sets to which this rule applies.
Click Add…
Click New…
Name: Side A
Add…
From: 192.168.0.10
To: 192.168.0.50
OK
OK
Click New…
Name: Side B
Add…
From: 172.16.0.10
To: 172.16.0.50
OK
OK
OK
Click Next
Content Groups: content groups include different file types and MIME types.
Select Any content type
Click Next
Completing the New Site and Content Rule Wizard
Click Finish
Web Publishing
We use PC2 as a Web Server. Now first we make a client PC i.e. PC2 a "Proxy Client" of ISA
server.
Goto PC2
Open web browser
Tools
Internet Options…
Connections
LAN Settings…
Check Use a proxy server for your LAN
E:WordMCSE NotesMCSE Practical.doc; RAJA YASSER NAWAZ E-mail: RajaYasser@Hotmail.com, RajaYasser@Yahoo.com Page(s) 60 of 93
Enter IP Address: 192.168.0.100 ISA Server IP Address
Enter Port: 8080
Check Bypass proxy server for local addresses
OK
OK
Now PC2 become "Proxy Client" of ISA Server. Internet is also working properly.
To Connect to ISA Server
Goto Start
Programs
Microsoft ISA Server
ISA Management
Right-click on Internet Security and Acceleration Server
Select Connect to…
Enter IP Address: 192.168.0.100 ISA Server IP Address
Now this IP address will connect PC2 client to ISA Server.
OK
Exchange Server 2003
Through Exchange Server. We can send/receive mails organization (LAN) and also outer world
(WAN). But Exchange Server is not installed on "Pirated Server". Or Simply Pirated Server CD
not workable in Exchange Server. Therefore we need original registered Server 2003 CD.
Requirement: Exchange Server 2003 have 4 requirements to work properly:
1- Register Window (Win 2003 Server for Exchange)
2- Registered Domain (Active Directory i.e. corvit.com)
3- 2 register DNS Servers (i.e. corvit.com + cisco.com)
4- Live IP Address
To install Exchange 2003 Server above are our requirements.
Services: For Exchange following services must be on:
1- Internet Information Services (IIS, for web accessing)
2- ASP.Net
3- SMTP (for mail sending)
4- NNTP (Network News Transfer Protocol, for public folder)
5- WWW
6- Common File
To add above 6 windows components:
Insert Server 2003 CD in to CD-ROM
Goto Start
Run enter appwiz.cpl
OK
Click Add/Remove Windows Components
Select Application Server
Click Details…
Select Internet Information Services (IIS)
Click Details…
Check NNTP Service
(It will also check Common Files, Internet Information Services Manager)
E:WordMCSE NotesMCSE Practical.doc; RAJA YASSER NAWAZ E-mail: RajaYasser@Hotmail.com, RajaYasser@Yahoo.com Page(s) 61 of 93
Check SMTP Service
Check World Wide Web Service
OK
Check ASP.NET
OK
Click Next
Installation of Exchange Server 2003
For installation of Exchange Server 2 CD's are used.
a) Win2k3 Server b) Exchange Server
(for Exchange)
As we know, that Exchange Server 2003 is not installed on pirated CD Server. So we first
install registered Widows Server i.e. Win2k3 for Exchange on Server Window, which is already
installed on PC2. this will make this installed pirated Server on, become registered Windows
Server.
Enter Win 2003 Server for exchange on Server ope nwindow
Install Active directory also
Install DNS Server
Install Exchange
To install Exchange 2 methods are used.
a) On member Server (no active directory on it)
b) Simple Server.
On Member Server
Enter Exchange CD into CD-ROM
Right-click on CD-ROM
Select Open
Double-click Setup
Double-click I386 folder
Run Setup.exe
Welcome to the Microsoft Exchange Installation Wizard.
Click Next
License Agreement: Read the agreement carefully and click the appropriate option.
Select I agree
Click Next
Component Selection:Select and modify components to fit your custom solution.
Typical
Click Next
Installation Type: Select an installation type.
Create a new Exchange Organization
Click Next
Organization Name: Name the Microsoft Exchange Organization you want to create.
Organization Name: FMT
Click Next
Licensing Agreement:Indicate your agreement to terms of Exchange Server Licensing.
E:WordMCSE NotesMCSE Practical.doc; RAJA YASSER NAWAZ E-mail: RajaYasser@Hotmail.com, RajaYasser@Yahoo.com Page(s) 62 of 93
Select I agree that I have read and will be bound by the license agreements for this product
Click Next
Installation Summary
Click Next
(if any message appear click OK)
Completing the Microsoft Exchange Wizard
Click Finish
To Check status of Exchange Server
To check that Exchange Server is installed properly or not. There are two methods are used:
1st
Method:
Goto Start
Run cmd
OK
Type 192.168.0.1 25
Note: 192.168.0.1 is IP address of PC on which Exchange is installed and 25 for mail sending.
If following message appears it means Exchange installed successfully:
"220 server.yasser.com Microsoft ESMTP MAIL Service, Version: 6.0.3790.0 ready at
date and time + time zone (i.e Thu, 30 Apr 2009 21:27:47 +0500)"
Type: ehlo
after ehlo command following message will appear:
250-server.yasser.com Hello [192.168.0.1]
250-TURN
250-SIZE
250-ETRN
250-PIPELINING
250-DSN
250-ENHANCEDSTATUSCODES
250-8bitmime
250-BINARYMIME
250-CHUNKING
250-VRFY
250-X-EXPS GSSAPI NTLM LOGIN
250-X-EXPS=LOGIN
250-AUTH GSSAPI NTLM LOGIN
250-AUTH=LOGIN
250-X-LINK2STATE
250-XEXCH50
250 OK
Note: If 4 X’s appear then Exchange Server installed properly.
To Verify all Service are Running
After installation of Exchange Server check the status of Exchange Server.
Goto Start
Programs
E:WordMCSE NotesMCSE Practical.doc; RAJA YASSER NAWAZ E-mail: RajaYasser@Hotmail.com, RajaYasser@Yahoo.com Page(s) 63 of 93
Microsoft Exchange
System Manager
Double-click Tools
Double-click Monitoring and Status
Select Status
Double-click Server (name of pc on which Exchange Server is installed)
Select Default Microsoft Exchange Services
Click Detail… button
Following 6 services will be running:
1- Microsoft Exchange Information Store Running
2- Microsoft Exchange MTA Stacks Running
3- Microsoft Exchange Routing Engine Running
4- Microsoft Exchange System Attendant Running
5- Simple Mail Transfer Protocol (SMTP) Running
6- World Wide Web Publishing Service Running
All services of Exchange are running.
2nd
Method:
Open Browser
Type Address: 192.168.0.1/exchange
User name: Administrator
Password: 123
OK
If Outlook Web Access appears then Exchange Server installed properly.
To Send / Receive Mail
To send and receive mail from users to Server / Administrator.
Goto PC2
Open Browser
Type Address:192.168.0.1/exchange
User name: Administrator
Password: 123
OK
Click New tab
To: Administrator@yasser.com
Subject: First Mail
Type any message i.e This is a test message.
Click on Send
Goto PC1
Click Inbox
And mail will appear
What is Exchange Server Do ?
Exchange Server performs 2 works.
a) Mail Administration
b) Save & Manage the Data in mails
E:WordMCSE NotesMCSE Practical.doc; RAJA YASSER NAWAZ E-mail: RajaYasser@Hotmail.com, RajaYasser@Yahoo.com Page(s) 64 of 93
There are 2 things in Exchange Server.
(i) Storage Group (4 storage groups in members)
(ii) Mail Box Store (5 mail box store in members)
1- Storage Group
———
———
——— 5 mail box store
———
———
2- Storage Group
———
———
———
———
———
3- Storage Group
———
———
———
———
———
4- Storage Group
———
———
———
———
———
4 storage groups 5 mail box store = 20 mail box store and it have unlimited capacity.
To Check Exchange Server File in PC drive
Double-click My Computer
Double-click C: drive
Double-click Program Files
Double-click Exchsrvr
Double-click MDBDATA
Mail box store: It consist of 2 files
Priv1.edb (for text date, by default size 4mb)
Priv1.stm (for attachments, by default size 4mb)
Public Folder: it consist of 2 files
Pub1.edb (by default size 3mb)
Pub1.stm (by default size 2mb)
Change View of Exchange
Goto Start
Programs
Microsoft Exchange
System Manager
Right-click FMT(Exchange) (FMT organization name)
E:WordMCSE NotesMCSE Practical.doc; RAJA YASSER NAWAZ E-mail: RajaYasser@Hotmail.com, RajaYasser@Yahoo.com Page(s) 65 of 93
Select Properties
Check Display administrative groups
Apply
OK
OK
Enable Security Tab
Right-click on FMT (Exchange) and select properties. If security tab does not appear then
perform the following steps:
Goto Start
Run regedit
OK
Double-click HKEY_CUURNT_USER
Double-click Software
Double-click Microsoft
Double-click Exchange
Right-click EXAdmin
New
Select DWORD Value
Enter name: showsecuritypage
Double-click showsecuritypage
Enter Value data: 1
OK
Storage Groups & Stores (Mailbox or Public Stores)
Each Exchange Server contain only 4 storage groups.
Each storage groups contain only 5 mailbox stores or public stores.
By default first storage group is physically store on c:Program FilesExchsrvrmdbdata.
However we can change the location.
Configuring the Exchange Store
The Microsoft Exchange Information Store service manages the Exchange store, where you can
store mailboxes, public folders, documents, files, and applications. The Exchange store uses two
types of databases:
- Mailbox stores
The part of the Exchange store that maintains information in user mailboxes. A mailbox
store consists of a rich-text .edb file, plus a streaming native Internet content .stm file.
- Public folder stores
The part of the Exchange store that maintains information in public folders, a public
folder store consists of a rich-text .edb file, plus a streaming native Internet content .stm file.
Add a Storage Groups
Exchange supports multiple databases contained within a storage group. A storage group
includes one to five databases and one set of transaction log files for all databases in the storage
group.
To add a storage group:
1. Goto Start
E:WordMCSE NotesMCSE Practical.doc; RAJA YASSER NAWAZ E-mail: RajaYasser@Hotmail.com, RajaYasser@Yahoo.com Page(s) 66 of 93
2. Programs
3. Microsoft Exchange
4. System Manager
5. Right-click FMT(Exchange) (FMT organization name)
6. Select Properties
7. Check Display administrative groups
8. Apply
9. OK
10. OK
11. Double-click Administrative Groups
12. Double-click First Administrative Group
13. Double-click Servers
14. Right-click PC1 (PC1 PC name on which Exchange
installed)
15. Select New
16. Select Storage Group...
17. Type Name: 1st Storage Group
18. Apply
19. OK
By following the above steps you can create 4 storage groups.
Optional: On the General tab, set the following properties:
- To change the name and location of the transaction logs, use Transaction log
location. To move the logs, use System Manager on the server on which the logs
reside.
- To change the name and location of the system path, use System path location. This
is where temporary (tmp.edb) and recovered (edb.chk) files are stored.
- To clear each 4 KB page of data from the drive at deletion, click Zero out deleted
database pages. This is a security precaution.
! WARNING Enabling this option can slow server performance.
- To reuse the same log file instead of creating a new one when the 5 MB limit is
reached, click Enable circular logging.
! WARNING Enabling this option prevents you from creating a set of log files
and you can restore only from your last backup. Reserve this option for storage
groups that support Network News Transfer Protocol (NNTP) folders (in public
folder stores), which do not require log files.
- To add additional information, on the Details tab, use Administrative note.
Configure Mailbox Stores
Mailboxes are the delivery location for all incoming mail messages for a designated owner.
Information in a user's mailbox is stored in a mailbox store on an Exchange server. A mailbox
can contain received messages, message attachments, folders, documents, and other files.
E:WordMCSE NotesMCSE Practical.doc; RAJA YASSER NAWAZ E-mail: RajaYasser@Hotmail.com, RajaYasser@Yahoo.com Page(s) 67 of 93
This section contains the following topics:
• Add a Mailbox Store
• Set Mailbox Store Properties
• Administer a Mailbox Store
• Recover a Mailbox
• Delete a Mailbox
Add a Mailbox Store
The mailbox store is a storage device for a server's mailboxes. Exchange supports multiple
mailbox stores for each server. Each mailbox store is contained in a storage group.
The only properties required to add a mailbox store are a name and a default public folder store.
To add a mailbox store:
1. On the Start menu, point to Programs, point to Microsoft Exchange, and then click
System Manager.
2. Double-click Administrative Groups
3. Double-click First Administrative Group
4 Double-click Servers
5. Double-click PC1
6. Right-click First Storage Group (storage group container to which you want to add
the mailbox store)
7. Select New
8. Select Mailbox Store…
9. Enter name: 1-Mailbox Store
10. Apply
11. OK
12. Yes
13. The Store was successfully mounted. Click OK
Set Mailbox Store Properties
You can change the properties of mailbox stores (and the mailboxes they contain) with System
Manager.
Note The Limits tab displays the default limits of the mailboxes in the mailbox store. Once you
create a mailbox, you can change its limits with Active Directory Users and Computers.
To set mailbox properties:
11. On the Start menu, point to Programs, point to Microsoft Exchange, and then click
System Manager.
12. Administrative Groups
Mcse notes
Mcse notes
Mcse notes
Mcse notes
Mcse notes
Mcse notes
Mcse notes
Mcse notes
Mcse notes
Mcse notes
Mcse notes
Mcse notes
Mcse notes
Mcse notes
Mcse notes
Mcse notes
Mcse notes
Mcse notes
Mcse notes
Mcse notes
Mcse notes
Mcse notes
Mcse notes
Mcse notes
Mcse notes
Mcse notes

More Related Content

What's hot

Computer maintenance
Computer maintenanceComputer maintenance
Computer maintenanceramsashu15
 
Oracle database 12c client quick installation guide 5
Oracle database 12c client quick installation guide 5Oracle database 12c client quick installation guide 5
Oracle database 12c client quick installation guide 5bupbechanhgmail
 
Siri softwaretroubleshooting.doc
Siri softwaretroubleshooting.docSiri softwaretroubleshooting.doc
Siri softwaretroubleshooting.docsirikeshava
 
CSS LO6 - PREPARING AND INSTALLING OPERATING SYSTEM
CSS LO6 - PREPARING AND INSTALLING OPERATING SYSTEMCSS LO6 - PREPARING AND INSTALLING OPERATING SYSTEM
CSS LO6 - PREPARING AND INSTALLING OPERATING SYSTEMMarvin Bronoso
 
Lesson 3 - Understanding Native Applications, Tools, Mobility, and Remote Man...
Lesson 3 - Understanding Native Applications, Tools, Mobility, and Remote Man...Lesson 3 - Understanding Native Applications, Tools, Mobility, and Remote Man...
Lesson 3 - Understanding Native Applications, Tools, Mobility, and Remote Man...Gene Carboni
 
Chapter08 Implementing And Managing Printers
Chapter08      Implementing And  Managing  PrintersChapter08      Implementing And  Managing  Printers
Chapter08 Implementing And Managing PrintersRaja Waseem Akhtar
 
Lesson 6 - Understanding File and Print Sharing
Lesson 6 - Understanding File and Print SharingLesson 6 - Understanding File and Print Sharing
Lesson 6 - Understanding File and Print SharingGene Carboni
 
General PC Maintenance and Troubleshooting
General PC Maintenance and TroubleshootingGeneral PC Maintenance and Troubleshooting
General PC Maintenance and TroubleshootingRaj Alam
 
Understanding the Windows Server Administration Fundamentals (Part-2)
Understanding the Windows Server Administration Fundamentals (Part-2)Understanding the Windows Server Administration Fundamentals (Part-2)
Understanding the Windows Server Administration Fundamentals (Part-2)Tuan Yang
 
Lesson 5 - Managing Devices
Lesson 5 - Managing DevicesLesson 5 - Managing Devices
Lesson 5 - Managing DevicesGene Carboni
 
Fix network connection issues in windows windows help
Fix network connection issues in windows   windows helpFix network connection issues in windows   windows help
Fix network connection issues in windows windows helpGiveme3
 
Unit 5 Project - Babeli
Unit 5 Project - BabeliUnit 5 Project - Babeli
Unit 5 Project - BabeliLianna Babeli
 
FOSS_GNU/Linux
FOSS_GNU/LinuxFOSS_GNU/Linux
FOSS_GNU/LinuxYogesh Ks
 
Netresview
NetresviewNetresview
Netresviewpiramal
 

What's hot (18)

Users guide
Users guideUsers guide
Users guide
 
Siri bootcamp
Siri bootcampSiri bootcamp
Siri bootcamp
 
Computer maintenance
Computer maintenanceComputer maintenance
Computer maintenance
 
Oracle database 12c client quick installation guide 5
Oracle database 12c client quick installation guide 5Oracle database 12c client quick installation guide 5
Oracle database 12c client quick installation guide 5
 
Siri softwaretroubleshooting.doc
Siri softwaretroubleshooting.docSiri softwaretroubleshooting.doc
Siri softwaretroubleshooting.doc
 
CSS LO6 - PREPARING AND INSTALLING OPERATING SYSTEM
CSS LO6 - PREPARING AND INSTALLING OPERATING SYSTEMCSS LO6 - PREPARING AND INSTALLING OPERATING SYSTEM
CSS LO6 - PREPARING AND INSTALLING OPERATING SYSTEM
 
Lesson 3 - Understanding Native Applications, Tools, Mobility, and Remote Man...
Lesson 3 - Understanding Native Applications, Tools, Mobility, and Remote Man...Lesson 3 - Understanding Native Applications, Tools, Mobility, and Remote Man...
Lesson 3 - Understanding Native Applications, Tools, Mobility, and Remote Man...
 
Chapter08 Implementing And Managing Printers
Chapter08      Implementing And  Managing  PrintersChapter08      Implementing And  Managing  Printers
Chapter08 Implementing And Managing Printers
 
SP1_Battlecard
SP1_BattlecardSP1_Battlecard
SP1_Battlecard
 
Lesson 6 - Understanding File and Print Sharing
Lesson 6 - Understanding File and Print SharingLesson 6 - Understanding File and Print Sharing
Lesson 6 - Understanding File and Print Sharing
 
General PC Maintenance and Troubleshooting
General PC Maintenance and TroubleshootingGeneral PC Maintenance and Troubleshooting
General PC Maintenance and Troubleshooting
 
Understanding the Windows Server Administration Fundamentals (Part-2)
Understanding the Windows Server Administration Fundamentals (Part-2)Understanding the Windows Server Administration Fundamentals (Part-2)
Understanding the Windows Server Administration Fundamentals (Part-2)
 
Lesson 5 - Managing Devices
Lesson 5 - Managing DevicesLesson 5 - Managing Devices
Lesson 5 - Managing Devices
 
Fix network connection issues in windows windows help
Fix network connection issues in windows   windows helpFix network connection issues in windows   windows help
Fix network connection issues in windows windows help
 
Unit 5 Project - Babeli
Unit 5 Project - BabeliUnit 5 Project - Babeli
Unit 5 Project - Babeli
 
0x80042308
0x800423080x80042308
0x80042308
 
FOSS_GNU/Linux
FOSS_GNU/LinuxFOSS_GNU/Linux
FOSS_GNU/Linux
 
Netresview
NetresviewNetresview
Netresview
 

Similar to Mcse notes

How To Make System Work Faster
How To Make System Work FasterHow To Make System Work Faster
How To Make System Work FasterGaurav bhatnagar
 
Windows tuning guide_for_vspace
Windows tuning guide_for_vspaceWindows tuning guide_for_vspace
Windows tuning guide_for_vspacekaduger
 
Linux tips
Linux tipsLinux tips
Linux tipsH. Kheir
 
Installing 12c R1 database on oracle linux
Installing 12c R1 database on oracle linuxInstalling 12c R1 database on oracle linux
Installing 12c R1 database on oracle linuxAnar Godjaev
 
Installation of oracle 12c RAC on linux vm
Installation of oracle 12c RAC  on linux vmInstallation of oracle 12c RAC  on linux vm
Installation of oracle 12c RAC on linux vmRon Morgan
 
Computer_Troubleshooting.ppt
Computer_Troubleshooting.pptComputer_Troubleshooting.ppt
Computer_Troubleshooting.pptneil448324
 
Windows Server 2008 Active Directory
Windows Server 2008 Active DirectoryWindows Server 2008 Active Directory
Windows Server 2008 Active Directoryanilinvns
 
Linux conf-admin
Linux conf-adminLinux conf-admin
Linux conf-adminbadamisri
 
Linux conf-admin
Linux conf-adminLinux conf-admin
Linux conf-adminbadamisri
 
Deploying office 2010 via group policy
Deploying office 2010 via group policyDeploying office 2010 via group policy
Deploying office 2010 via group policyNaresh Gotad
 
Prokonmanual 140505223324-phpapp01
Prokonmanual 140505223324-phpapp01Prokonmanual 140505223324-phpapp01
Prokonmanual 140505223324-phpapp01tuanpham234
 
SOP - 2013 Server Build
SOP - 2013 Server BuildSOP - 2013 Server Build
SOP - 2013 Server BuildRobert Jones
 

Similar to Mcse notes (20)

How To Make System Work Faster
How To Make System Work FasterHow To Make System Work Faster
How To Make System Work Faster
 
Windows tuning guide_for_vspace
Windows tuning guide_for_vspaceWindows tuning guide_for_vspace
Windows tuning guide_for_vspace
 
Linux tips
Linux tipsLinux tips
Linux tips
 
John
JohnJohn
John
 
Linux
Linux Linux
Linux
 
Windows 2003 Server
Windows 2003 ServerWindows 2003 Server
Windows 2003 Server
 
Installing 12c R1 database on oracle linux
Installing 12c R1 database on oracle linuxInstalling 12c R1 database on oracle linux
Installing 12c R1 database on oracle linux
 
Installation of oracle 12c RAC on linux vm
Installation of oracle 12c RAC  on linux vmInstallation of oracle 12c RAC  on linux vm
Installation of oracle 12c RAC on linux vm
 
Computer_Troubleshooting.ppt
Computer_Troubleshooting.pptComputer_Troubleshooting.ppt
Computer_Troubleshooting.ppt
 
Windows Server 2008 Active Directory
Windows Server 2008 Active DirectoryWindows Server 2008 Active Directory
Windows Server 2008 Active Directory
 
Linux conf-admin
Linux conf-adminLinux conf-admin
Linux conf-admin
 
Linux conf-admin
Linux conf-adminLinux conf-admin
Linux conf-admin
 
Linux Conf Admin
Linux Conf AdminLinux Conf Admin
Linux Conf Admin
 
Bsd routers
Bsd routersBsd routers
Bsd routers
 
Control panel 07
Control panel 07Control panel 07
Control panel 07
 
Deploying office 2010 via group policy
Deploying office 2010 via group policyDeploying office 2010 via group policy
Deploying office 2010 via group policy
 
Prokonmanual 140505223324-phpapp01
Prokonmanual 140505223324-phpapp01Prokonmanual 140505223324-phpapp01
Prokonmanual 140505223324-phpapp01
 
SOP - 2013 Server Build
SOP - 2013 Server BuildSOP - 2013 Server Build
SOP - 2013 Server Build
 
Max dna installation
Max dna installationMax dna installation
Max dna installation
 
1
11
1
 

More from Danish Mahmood

CCFDS - Thesis II PPT.pptx
CCFDS - Thesis II PPT.pptxCCFDS - Thesis II PPT.pptx
CCFDS - Thesis II PPT.pptxDanish Mahmood
 
PROJECT POSTER TEM.pptx
PROJECT POSTER TEM.pptxPROJECT POSTER TEM.pptx
PROJECT POSTER TEM.pptxDanish Mahmood
 
SG Data analytics.pptx
SG Data analytics.pptxSG Data analytics.pptx
SG Data analytics.pptxDanish Mahmood
 
One way functions and trapdoor functions.pptx
One way functions and trapdoor functions.pptxOne way functions and trapdoor functions.pptx
One way functions and trapdoor functions.pptxDanish Mahmood
 
network security lec2 ccns
network security lec2 ccnsnetwork security lec2 ccns
network security lec2 ccnsDanish Mahmood
 

More from Danish Mahmood (7)

CCFDS - Thesis II PPT.pptx
CCFDS - Thesis II PPT.pptxCCFDS - Thesis II PPT.pptx
CCFDS - Thesis II PPT.pptx
 
PROJECT POSTER TEM.pptx
PROJECT POSTER TEM.pptxPROJECT POSTER TEM.pptx
PROJECT POSTER TEM.pptx
 
GSM Architecture.ppt
 GSM Architecture.ppt GSM Architecture.ppt
GSM Architecture.ppt
 
SG Data analytics.pptx
SG Data analytics.pptxSG Data analytics.pptx
SG Data analytics.pptx
 
block chain.pptx
block chain.pptxblock chain.pptx
block chain.pptx
 
One way functions and trapdoor functions.pptx
One way functions and trapdoor functions.pptxOne way functions and trapdoor functions.pptx
One way functions and trapdoor functions.pptx
 
network security lec2 ccns
network security lec2 ccnsnetwork security lec2 ccns
network security lec2 ccns
 

Recently uploaded

AIM of Education-Teachers Training-2024.ppt
AIM of Education-Teachers Training-2024.pptAIM of Education-Teachers Training-2024.ppt
AIM of Education-Teachers Training-2024.pptNishitharanjan Rout
 
How to Manage Call for Tendor in Odoo 17
How to Manage Call for Tendor in Odoo 17How to Manage Call for Tendor in Odoo 17
How to Manage Call for Tendor in Odoo 17Celine George
 
Details on CBSE Compartment Exam.pptx1111
Details on CBSE Compartment Exam.pptx1111Details on CBSE Compartment Exam.pptx1111
Details on CBSE Compartment Exam.pptx1111GangaMaiya1
 
Single or Multiple melodic lines structure
Single or Multiple melodic lines structureSingle or Multiple melodic lines structure
Single or Multiple melodic lines structuredhanjurrannsibayan2
 
General Principles of Intellectual Property: Concepts of Intellectual Proper...
General Principles of Intellectual Property: Concepts of Intellectual  Proper...General Principles of Intellectual Property: Concepts of Intellectual  Proper...
General Principles of Intellectual Property: Concepts of Intellectual Proper...Poonam Aher Patil
 
Towards a code of practice for AI in AT.pptx
Towards a code of practice for AI in AT.pptxTowards a code of practice for AI in AT.pptx
Towards a code of practice for AI in AT.pptxJisc
 
dusjagr & nano talk on open tools for agriculture research and learning
dusjagr & nano talk on open tools for agriculture research and learningdusjagr & nano talk on open tools for agriculture research and learning
dusjagr & nano talk on open tools for agriculture research and learningMarc Dusseiller Dusjagr
 
Beyond_Borders_Understanding_Anime_and_Manga_Fandom_A_Comprehensive_Audience_...
Beyond_Borders_Understanding_Anime_and_Manga_Fandom_A_Comprehensive_Audience_...Beyond_Borders_Understanding_Anime_and_Manga_Fandom_A_Comprehensive_Audience_...
Beyond_Borders_Understanding_Anime_and_Manga_Fandom_A_Comprehensive_Audience_...Pooja Bhuva
 
COMMUNICATING NEGATIVE NEWS - APPROACHES .pptx
COMMUNICATING NEGATIVE NEWS - APPROACHES .pptxCOMMUNICATING NEGATIVE NEWS - APPROACHES .pptx
COMMUNICATING NEGATIVE NEWS - APPROACHES .pptxannathomasp01
 
Tatlong Kwento ni Lola basyang-1.pdf arts
Tatlong Kwento ni Lola basyang-1.pdf artsTatlong Kwento ni Lola basyang-1.pdf arts
Tatlong Kwento ni Lola basyang-1.pdf artsNbelano25
 
Interdisciplinary_Insights_Data_Collection_Methods.pptx
Interdisciplinary_Insights_Data_Collection_Methods.pptxInterdisciplinary_Insights_Data_Collection_Methods.pptx
Interdisciplinary_Insights_Data_Collection_Methods.pptxPooja Bhuva
 
Understanding Accommodations and Modifications
Understanding  Accommodations and ModificationsUnderstanding  Accommodations and Modifications
Understanding Accommodations and ModificationsMJDuyan
 
REMIFENTANIL: An Ultra short acting opioid.pptx
REMIFENTANIL: An Ultra short acting opioid.pptxREMIFENTANIL: An Ultra short acting opioid.pptx
REMIFENTANIL: An Ultra short acting opioid.pptxDr. Ravikiran H M Gowda
 
On National Teacher Day, meet the 2024-25 Kenan Fellows
On National Teacher Day, meet the 2024-25 Kenan FellowsOn National Teacher Day, meet the 2024-25 Kenan Fellows
On National Teacher Day, meet the 2024-25 Kenan FellowsMebane Rash
 
latest AZ-104 Exam Questions and Answers
latest AZ-104 Exam Questions and Answerslatest AZ-104 Exam Questions and Answers
latest AZ-104 Exam Questions and Answersdalebeck957
 
80 ĐỀ THI THỬ TUYỂN SINH TIẾNG ANH VÀO 10 SỞ GD – ĐT THÀNH PHỐ HỒ CHÍ MINH NĂ...
80 ĐỀ THI THỬ TUYỂN SINH TIẾNG ANH VÀO 10 SỞ GD – ĐT THÀNH PHỐ HỒ CHÍ MINH NĂ...80 ĐỀ THI THỬ TUYỂN SINH TIẾNG ANH VÀO 10 SỞ GD – ĐT THÀNH PHỐ HỒ CHÍ MINH NĂ...
80 ĐỀ THI THỬ TUYỂN SINH TIẾNG ANH VÀO 10 SỞ GD – ĐT THÀNH PHỐ HỒ CHÍ MINH NĂ...Nguyen Thanh Tu Collection
 
SOC 101 Demonstration of Learning Presentation
SOC 101 Demonstration of Learning PresentationSOC 101 Demonstration of Learning Presentation
SOC 101 Demonstration of Learning Presentationcamerronhm
 
Google Gemini An AI Revolution in Education.pptx
Google Gemini An AI Revolution in Education.pptxGoogle Gemini An AI Revolution in Education.pptx
Google Gemini An AI Revolution in Education.pptxDr. Sarita Anand
 

Recently uploaded (20)

AIM of Education-Teachers Training-2024.ppt
AIM of Education-Teachers Training-2024.pptAIM of Education-Teachers Training-2024.ppt
AIM of Education-Teachers Training-2024.ppt
 
How to Manage Call for Tendor in Odoo 17
How to Manage Call for Tendor in Odoo 17How to Manage Call for Tendor in Odoo 17
How to Manage Call for Tendor in Odoo 17
 
Details on CBSE Compartment Exam.pptx1111
Details on CBSE Compartment Exam.pptx1111Details on CBSE Compartment Exam.pptx1111
Details on CBSE Compartment Exam.pptx1111
 
Single or Multiple melodic lines structure
Single or Multiple melodic lines structureSingle or Multiple melodic lines structure
Single or Multiple melodic lines structure
 
Call Girls in Uttam Nagar (delhi) call me [🔝9953056974🔝] escort service 24X7
Call Girls in  Uttam Nagar (delhi) call me [🔝9953056974🔝] escort service 24X7Call Girls in  Uttam Nagar (delhi) call me [🔝9953056974🔝] escort service 24X7
Call Girls in Uttam Nagar (delhi) call me [🔝9953056974🔝] escort service 24X7
 
General Principles of Intellectual Property: Concepts of Intellectual Proper...
General Principles of Intellectual Property: Concepts of Intellectual  Proper...General Principles of Intellectual Property: Concepts of Intellectual  Proper...
General Principles of Intellectual Property: Concepts of Intellectual Proper...
 
Towards a code of practice for AI in AT.pptx
Towards a code of practice for AI in AT.pptxTowards a code of practice for AI in AT.pptx
Towards a code of practice for AI in AT.pptx
 
dusjagr & nano talk on open tools for agriculture research and learning
dusjagr & nano talk on open tools for agriculture research and learningdusjagr & nano talk on open tools for agriculture research and learning
dusjagr & nano talk on open tools for agriculture research and learning
 
Beyond_Borders_Understanding_Anime_and_Manga_Fandom_A_Comprehensive_Audience_...
Beyond_Borders_Understanding_Anime_and_Manga_Fandom_A_Comprehensive_Audience_...Beyond_Borders_Understanding_Anime_and_Manga_Fandom_A_Comprehensive_Audience_...
Beyond_Borders_Understanding_Anime_and_Manga_Fandom_A_Comprehensive_Audience_...
 
COMMUNICATING NEGATIVE NEWS - APPROACHES .pptx
COMMUNICATING NEGATIVE NEWS - APPROACHES .pptxCOMMUNICATING NEGATIVE NEWS - APPROACHES .pptx
COMMUNICATING NEGATIVE NEWS - APPROACHES .pptx
 
Tatlong Kwento ni Lola basyang-1.pdf arts
Tatlong Kwento ni Lola basyang-1.pdf artsTatlong Kwento ni Lola basyang-1.pdf arts
Tatlong Kwento ni Lola basyang-1.pdf arts
 
Interdisciplinary_Insights_Data_Collection_Methods.pptx
Interdisciplinary_Insights_Data_Collection_Methods.pptxInterdisciplinary_Insights_Data_Collection_Methods.pptx
Interdisciplinary_Insights_Data_Collection_Methods.pptx
 
Understanding Accommodations and Modifications
Understanding  Accommodations and ModificationsUnderstanding  Accommodations and Modifications
Understanding Accommodations and Modifications
 
REMIFENTANIL: An Ultra short acting opioid.pptx
REMIFENTANIL: An Ultra short acting opioid.pptxREMIFENTANIL: An Ultra short acting opioid.pptx
REMIFENTANIL: An Ultra short acting opioid.pptx
 
On National Teacher Day, meet the 2024-25 Kenan Fellows
On National Teacher Day, meet the 2024-25 Kenan FellowsOn National Teacher Day, meet the 2024-25 Kenan Fellows
On National Teacher Day, meet the 2024-25 Kenan Fellows
 
latest AZ-104 Exam Questions and Answers
latest AZ-104 Exam Questions and Answerslatest AZ-104 Exam Questions and Answers
latest AZ-104 Exam Questions and Answers
 
80 ĐỀ THI THỬ TUYỂN SINH TIẾNG ANH VÀO 10 SỞ GD – ĐT THÀNH PHỐ HỒ CHÍ MINH NĂ...
80 ĐỀ THI THỬ TUYỂN SINH TIẾNG ANH VÀO 10 SỞ GD – ĐT THÀNH PHỐ HỒ CHÍ MINH NĂ...80 ĐỀ THI THỬ TUYỂN SINH TIẾNG ANH VÀO 10 SỞ GD – ĐT THÀNH PHỐ HỒ CHÍ MINH NĂ...
80 ĐỀ THI THỬ TUYỂN SINH TIẾNG ANH VÀO 10 SỞ GD – ĐT THÀNH PHỐ HỒ CHÍ MINH NĂ...
 
SOC 101 Demonstration of Learning Presentation
SOC 101 Demonstration of Learning PresentationSOC 101 Demonstration of Learning Presentation
SOC 101 Demonstration of Learning Presentation
 
Google Gemini An AI Revolution in Education.pptx
Google Gemini An AI Revolution in Education.pptxGoogle Gemini An AI Revolution in Education.pptx
Google Gemini An AI Revolution in Education.pptx
 
Mehran University Newsletter Vol-X, Issue-I, 2024
Mehran University Newsletter Vol-X, Issue-I, 2024Mehran University Newsletter Vol-X, Issue-I, 2024
Mehran University Newsletter Vol-X, Issue-I, 2024
 

Mcse notes

  • 1. E:WordMCSE NotesMCSE Practical.doc; RAJA YASSER NAWAZ E-mail: RajaYasser@Hotmail.com, RajaYasser@Yahoo.com Page(s) 1 of 93 MCSE 2003 PRACTICAL Managing desktop setting & Control Panel (performance options) Select windows classic theme. 1. Right-click on Desktop 2. Click Properties 3. Select Windows Classic 4. Click Apply 5. Click OK Customize start menu items. 1. Right Click on Taskbar 2. Click Properties 3. Uncheck Group similar taskbar buttons 4. Click Start Menu 5. Click Classic Start menu 6. Click Customize Check following Advance Start menu options: 7. Display Administrative Tools 8. Display Favorites 9. Display Log Off 10. Display Run 11. Enable dragging and dropping 12. Use Personalized Menus 13. Click OK 14. Click Apply 15. Click OK Customize files, folders and windows. 1. Double-click My Computer 2. Select Icons 3. Tools 4. Folder Options 5. General Tab Select followings:
  • 2. E:WordMCSE NotesMCSE Practical.doc; RAJA YASSER NAWAZ E-mail: RajaYasser@Hotmail.com, RajaYasser@Yahoo.com Page(s) 2 of 93 6. Use Windows classic folders 7. Open each folder in the same window 8. Double-click to open an item 9. View 10. Apply to All Folders 11. Apply 12. Ok 4- Disable Windows Firewall, Automatic Updates and Change Security Center alerts for enable other PC's to ping i.e ping server. Start Settings Control Panel Double-click Security Center Windows Firewall Select Off (not recommended) Ok Automatic Updates Select Turn off Automatic Updates Apply Ok Resources: Change the way Security Center Alerts me Uncheck following Alert Settings: Firewall Automatic Updates Virus Protection Ok Disable user switching and enable offline files. You must have a computer administrator account on a computer that is a member of a workgroup or is a stand-alone computer to turn on or turn off the User Fast User Switching feature. Fast User Switching is not available on computers that are members of a network domain. Start Settings Control Panel Double-click User Accounts Change the way users log on or off Uncheck following options from User Accounts: Use the Welcome screen Use Fast User Switching Apply Options Offline Files overview You can make network files available offline by storing shared files on your computer so they are accessible when you are not connected to the network.
  • 3. E:WordMCSE NotesMCSE Practical.doc; RAJA YASSER NAWAZ E-mail: RajaYasser@Hotmail.com, RajaYasser@Yahoo.com Page(s) 3 of 93 This can be helpful when you use a portable computer to accomplish most of your work, or if your stand-alone computer is frequently disconnected from the network. You can work with offline files the same way you work with files when you’re connected to the network. When you reconnect to the network, any changes that you made to files while working offline are updated to the network. This process is called synchronization. If you and someone else on the network made changes to the same file, you can save your version of the file to the network, keep the other version, or save both. If you share folders on your computer with others on the network, they can work offline with those folders. To protect files in your shared folders, you can specify whether other users can change your documents or just view them. You can also control which shared files users can access offline. Enable offline files: Double-click My Computer Tools Folder Options Offline Files Tab Check Enable Offline Files Apply Ok 6- Sharing and Security settings. Double-click My Computer Tools Folder Options View Advance settings: Uncheck use simple file sharing (Recommended) Apply Ok 7- Assigning IP address and display network icon in notification area. Double-click My Network Places Right-click Properties Right-click on Local Area Connection Properties Check following options from General Tab: Show icon in notification area when connected Notify me when this connection has limited or no connectivity Select Internet Protocol (TCP/IP) Properties Select use the following IP Address: IP address: 192.168.0.1 Subnet mask: 255.255.255.0 Ok 8- Set up hardware profiles for different hardware configuration. At startup, you can choose the profile you want to use.
  • 4. E:WordMCSE NotesMCSE Practical.doc; RAJA YASSER NAWAZ E-mail: RajaYasser@Hotmail.com, RajaYasser@Yahoo.com Page(s) 4 of 93 Hardware profiles provide a way for you to set up and store different hardware configurations. You can set up hardware profiles for different hardware configurations. At startup, you can choose the profile you want to use. Right-click on My Computer Properties Hardware Tab Hardware Profiles Select Profile 1 (Current) from Available hardware profiles: Copy Copy Profile name To: Home Ok Ok 9- Select default operating system at system startup "Microsoft Windows XP Professional" or "Microsoft Windows Server 2003". Right-click on My Computer Properties Advance Tab Startup and Recovery: Settings Select Default operating system Uncheck following from System startup: Time to display list of operating systems: Time to display recovery options when needed: Ok Ok 10- Delete old operating system support files (AUTOEXEC.BAT, CONFIG.SYS, IO.SYS, MSDOS.SYS). Double-click My Computer Tools Folder Options… View Select Show hidden files and folders Uncheck following from Advanced settings: Hide extensions for known file types Hide protected operating system files (Recommended) Apply Ok Goto C: and delete following files (these files are used for old operating system software) AutoExec.bat Config.sys IO.sys MSDOS.sys 11- Enable/Disable hiberfil.sys (this file is use for hibernation i.e when we hibernate windows it keep all the open windows, files etc in hibernate file and when we start windows it shows all the files and windows in the same place.
  • 5. E:WordMCSE NotesMCSE Practical.doc; RAJA YASSER NAWAZ E-mail: RajaYasser@Hotmail.com, RajaYasser@Yahoo.com Page(s) 5 of 93 When your computer hibernates, it stores whatever it has in memory on your hard disk and then shuts down. When your computer comes out of hibernation, it returns to its previous state. Start Settings Control Panel Double-click Power Options Hibernate Tab Uncheck Enable Hibernation Apply Ok 12- Remove pagefile.sys from C: drive or move it to any other drive. Pagefile.sys support RAM it is by default 1 and half of the RAM size. Right-click on My Computer Properties Advanced Select from Performance: Settings Advance Tab Virtual memory: Change Select C: from drive Custom size: Initial size (MB): 0 Maximum size (MB): 0 Set Ok Apply Ok Ok Restart computer to take effect. Right-click on My Computer Properties Advanced Select from Performance: Settings Advance Tab Virtual memory: Change Select D: from drive Custom size: Initial size (MB): 100 Maximum size (MB): 300 Set Ok Apply Ok Ok Restart computer to take effect. After restart the file will more to drive D: 13 Crate Answering File for XP installation
  • 6. E:WordMCSE NotesMCSE Practical.doc; RAJA YASSER NAWAZ E-mail: RajaYasser@Hotmail.com, RajaYasser@Yahoo.com Page(s) 6 of 93 Insert Bootable CD into CD ROM Right-click on CR ROM icon Open Double-click XP SP2 Support Tools Double-click Tools Double-click Deploy.cab file Extract to E:Unattended Folder Goto Unattended Folder Double-click Setupmgr.exe Welcome to Setup Manager Next New or Existing Answer File ๏ Create new ๏ Modify existing Select Create new Next Type of Setup ๏ Unattended setup ๏ Sysprep setup ๏ Remote Installation Services (RIS) Select Unattended setup Next Product Select Windows XP Professional Next User Interaction Select Fully automated Next Distribution Share Select Set up from a CD Next License Agreement Check I accept the terms of the License Agreement Next General Settings Name and Organization Name: Raja Yasser Organization: VS Next Display Settings (Use Windows default) Next Time Zone Select (GMT+05:00) Next Product Key QW4HD-DQCRG-HM64M-HM64M-6GJRK-8K83T Next Network Settings Computer Names Computer name: server Add
  • 7. E:WordMCSE NotesMCSE Practical.doc; RAJA YASSER NAWAZ E-mail: RajaYasser@Hotmail.com, RajaYasser@Yahoo.com Page(s) 7 of 93 Next Administrator Password Password: 123456 Confirm password: 123456 Check encrypt the Administrator password in the answer file Check when a destination computer starts, automatically log on as Administrator Number of times to log on automatically: 5 Networking Components Select Custom settings Select Internet Protocol (TCP/IP) Click Properties… Internet Protocol (TCP/IP) Properties Select Use the following IP Address: IP address: 192.168.0.1 Subnet mask: 255.255.255.0 Ok Next Workgroup or Domain Default selected Workgroup & Next Advanced Settings Telephony (nil) Next Regional Settings Default English (United states) Next Languages Select Western Europe and United States Next Browser and Shell Settings Default Next Installation Folder Default A folder named Windows Next Install Printers Network printer name: computernameprintername Add Next Run Once (nil) Next Additional Commands (nil) Finish Setup Manager Enter path and file name: E:Unattendedwinnt.sif Ok Completing Setup Manager Close (X) / Cancel 14. Sysprep: (System Preparation) It is use for Desktop prepration on all other PC's in network. It is responsible for mini setup on other PC's in network.
  • 8. E:WordMCSE NotesMCSE Practical.doc; RAJA YASSER NAWAZ E-mail: RajaYasser@Hotmail.com, RajaYasser@Yahoo.com Page(s) 8 of 93 For example: If my company policy to prepare such type of Desktop on all other PC's in network i.e (1) Windows (2) Office (3) Coral Draw (4) Data Base (5) Firewall (6) Antivirus (7) Adobe Acrobat (8) Adobe Photoshop Then Microsoft gives an option for such conditions, the "Sysprep". Microsoft say take an image of all above 8 options then this image is restore on all other network PC's (i.e 500 PC's) Requirement For Sysprep:- a. PC of same company i.e Dell company b. Same size & company Hard disk c. Use only one partition i.e C or D or E After making Answer file (winnt.sif & winnt.bat) then goto E: drive, open unattended folder Double-click Sysprep.exe OK Select Use mini setup Reseal Read a message i.e regenerate SID OK Yes Now, then system is shut down automatically. Now extra hard disk + floopy is needed at this time and attached with your PC. Then make image of C drive. To image (from image disk) Boot from Hard Disk Now window SP, mini setup is running Setup wizard of XP start Next Accept Next Next Name: Raja Yasser Organization: VS Next Give CD Key Computer Name: abc Password: abc Next Next Typical Next Next Finish Restart system automatically 14. Start "Server" or "XP" by default 1. Right-click My Computer 2. Click Properties 3. Click Advanced
  • 9. E:WordMCSE NotesMCSE Practical.doc; RAJA YASSER NAWAZ E-mail: RajaYasser@Hotmail.com, RajaYasser@Yahoo.com Page(s) 9 of 93 4. Click Settings (Startup an Recovery) 5. Select "Windows Server 2003, Enterprise" Or "Microsoft Windows XP Professional" 6. Uncheck Time to display list of operating systems 7. Uncheck Time to display recovery options when needed 8. Click OK 9. Click OK To Check IP address of your own PC 1. Goto Start 2. Click Run 3. Type cmd 4. Click OK 5. Type command: ipconfig 6. Press Enter and see the detail. To display full config: information 7. type command: ipconfig /all (see the details and MAC address) Sharing Rights These rights are applicable on "Users" from Server PC (Admin). For sharing rights first users to be created on Server PC. We can create users by goto 1. Right-click My Computer 2. Click Manage 3. Double-click Local Usera and Groups 4. Right-click Users 5. Click New User… 6. Enter User name: user1 7. Enter Password: user1 8. Confirm password: user1 9. Uncheck User must change password at next logon 10. Check User cannot change password 11. Password never expires 12. Click Create Create a new folder named "Sharing" on desktop with file in it and share it b: 1. Right-click on Sharing folder 2. Click Sharing and Security… 3. Click Share this folder 4. Click Permissions 5. Select Everyone 6. Click Allow Full Control 7. Click Apply 8. Click OK
  • 10. E:WordMCSE NotesMCSE Practical.doc; RAJA YASSER NAWAZ E-mail: RajaYasser@Hotmail.com, RajaYasser@Yahoo.com Page(s) 10 of 93 9. Click Apply 10. Click OK Now access the server by go through on PC8. 11. Goto Start 12. Click Run 13. Type server 14. Click OK Then all the shared folder including "Sharing" folder of Server is viewed, why, because all users have same password. It means that Server is accessed through PC8. Now we want that no use can directly access the Server or other PC of user, but require password. So we set a password from Server PC. Then no one can access "Sharing" folder without password. 1. Right-click on My Computer 2. Click Manager 3. Double-click Local User and Groups 4. Click Users 5. Right-click on Administrator 6. Click Set Password… 7. Click Proceed 8. Type New password: 123 9. Confirm password: 123 10. Click OK Logoff PC8 and again Logon PC8 and access Server Run Server then this time it will need a username Administrator and password a23. after this all the share folder of Server is again access able on PC8. NTFS Rights These rights are applicable on folders of users from Server PC (Admin). First create 5 users on Server PC. Now create a “Sharing” folder (full control everyone) and data in it on Desktop of Server. Now logoff and logon from "user1" on Server PC. Access it PC3 Then PC3 is accessed through "user1", but shared folder data is not open, because the permission is not given to "user1". Now logoff and logon from Admin agains. 1. Right-click on Sharing folder 2. Click Sharing & Security 3. Click Permission 4. Select Everyone
  • 11. E:WordMCSE NotesMCSE Practical.doc; RAJA YASSER NAWAZ E-mail: RajaYasser@Hotmail.com, RajaYasser@Yahoo.com Page(s) 11 of 93 5. Click Remove 6. Click Add 7. Click Advanced… 8. Click Find Now 9. Click user1 10. Click OK 11. Click OK 12. Click Full Control 13. Click Apply 14. Click OK 15. Click Apply 16. Click OK Now again logoff and logon from "user1". But the folder will not access again. Logoff and logon from admin. 1. Right-click on Sharing folder 2. Click Sharing and Security… 3. Click Security Now try to remove the Administrator of PC3, but it will not removed. 4. Click Advanced 5. Uncheck Inherit from parent the permission entries….. 6. Click Remove 7. Click Apply 8. Click OK Logoff and Logon from "user1". But shared folder will not access again, because we remove all type of users + admin permission. Logoff and logon from administrator: 1. Right-click Sharing folder 2. Click Sharing & Security 3. Click Security 4. Click Add.. 5. Click Advanced… 6. Click Find Now 7. Click user1 8. Click OK 9. Click OK 10. Click Apply 11. Click OK Now logoff and logon from user1. Sharing folder is accessed, but when we access a file data in it, then access is denied. Because we add only user1, not added the administrator. Logoff and logon from Administrator now by following the above steps add the Administrator too.
  • 12. E:WordMCSE NotesMCSE Practical.doc; RAJA YASSER NAWAZ E-mail: RajaYasser@Hotmail.com, RajaYasser@Yahoo.com Page(s) 12 of 93 Logoff and logon from user1 now shared folder + file in it both are accessed. Encryption Specifies that the contents of file or folder be encrypted. Only the user who encrypts the file or folder can access the content. However, files and folders might be decrypted depending on how they are moved or copied. Encrypted files and folders cannot be compressed. If Administrator shared a folder + file on Desktop on Server PC and set permissions to access this folder + file for any one. Then any user can access this folder + file and user can encrypt this file. Logon as a Administrator and create a folder on D: drive and create a file in it. Now share this folder and set permissions for everyone + add everyone in security tab + check full control for everyone to access this folder + file to change. Logoff as a Administrator and logon as a user1 to encrypt file. 1. Right-click file 2. Click Properties 3. Click Advanced… 4. Check Encrypt contents to secure data 5. Click OK 6. Click Apply 7. Check Encrypt the file only 8. Click OK 9. Click OK After encryption of file the color of file will be changed to "Green". It means that file has been encrypted. Now logoff as a user and logon as a Administrator and try to open shared folder file. This file will not be opened because encrypted file can not be opened by administrator. It means that user work against the policy of Administrator. To block user1: 1. Right-click on shared folder 2. Click Sharing and Security… 3. Click Security tab 4. Click Advanced 5. Select user1 (or Everyone) 6. Click Remove 7. Click Apply 8. Click OK 9. Click OK Now user1 can not access the encrypted shared folder of Administrator. Logon as a Administrator and add the user1 again 14. Remote Desktop (to access computer remotely from other computer) With Remote Desktop on Windows XP Professional, you can have access to a Windows session that is running on your computer when you are at another computer. This means, for example, that you can connect to your work computer from home and have access to all of your
  • 13. E:WordMCSE NotesMCSE Practical.doc; RAJA YASSER NAWAZ E-mail: RajaYasser@Hotmail.com, RajaYasser@Yahoo.com Page(s) 13 of 93 applications, files, and network resources as though you were in front of your computer at work. You can leave programs running at work and when you get home, you can see your desktop at work displayed on your home computer, with the same programs running. When you connect to your computer at work, Remote Desktop automatically locks that computer so no one else can access your applications and files while you are gone. Remote Desktop also allows more than one user to have active sessions on a single computer. This means that multiple users can leave their applications running and preserve the state of their Windows session even while others are logged on. To use Remote Desktop, you need the following: - A computer running Windows XP Professional ("remote" computer) with a connection to a Local Area Network or the Internet. - A second computer ("home" computer) with access to the Local Area Network via network connection, modem, or Virtual Private Network (VPN) connection. This computer must have Remote Desktop Connection, formerly called the Terminal Services client, installed. - Appropriate user accounts and permissions. Right-click on My Computer Select Properties Remote Remote Desktop Check Allow users to connect remotely to this computer (Check this above option on both computers) Apply Ok Goto Start Programs Accessories Communications Remote Desktop Connections Computer (name, vs1) Options>> User name: Administrator Password 123 Check Save my password Optional Local Resources Check Disk Drives Check Printers Serial ports Connect Or Save As…. Save on Desktop File name PC2.rdp Save Close (X) / Cancel Double-click on PC2.rdp file on Desktop 15. Remote Assistance (remote assistance access systems remotely through live IP on the internet or computers on LAN
  • 14. E:WordMCSE NotesMCSE Practical.doc; RAJA YASSER NAWAZ E-mail: RajaYasser@Hotmail.com, RajaYasser@Yahoo.com Page(s) 14 of 93 Remote Assistance is a convenient way for a friend in another location to connect to your computer from another computer running a compatible operating system, such as Microsoft Windows XP. After your friend is connected, he will be able to view your computer screen and chat online with you in real time about what you both see. With your permission, your friend can even use his or her mouse and keyboard to work with you on your computer. Notes - Both you and your assistant must be using either Windows Messenger or a MAPI- compliant e-mail account such as Microsoft Outlook or Outlook Express. - You and your assistant need to be connected to the Internet while using Remote Assistance. - If Windows Firewall is turned on, Remote Assistance will temporarily open firewall ports. - If you are working on a corporate or local area network, firewalls might stop you from using Remote Assistance. In this case, check with your network administrator before using Remote Assistance. Right-click on My Computer Select Properties Remote Remote Assistance Apply Ok Goto Start Programs Remote Assistance Click Invite someone to help you Click Save invitation as a file (Advanced) Set the invitation to expire Select 30 from combo box Select Days from combo box Continue > Type password: 123 Confirm password: 123 Click Save Invitation Select Desktop File name: PC2.msrcincident Save Close Remote Assistance (Now you can send this file to your remote user or friend through e-mail or any other way) or Right-click on Desktop Select New Select New Folder Type folder name PC2 Drag and Drop PC2.msrcincident file into folder named PC2 Right-click on PC2 folder Sharing and Security… Sharing Tab Share this folder
  • 15. E:WordMCSE NotesMCSE Practical.doc; RAJA YASSER NAWAZ E-mail: RajaYasser@Hotmail.com, RajaYasser@Yahoo.com Page(s) 15 of 93 Check Full Control Security Tab Add… Advanced… Find Now Select Everyone Ok Ok Check Full Control Apply Ok Goto other PC (Server) Goto Start Run Open : VS1 Ok Double-click shared folder PC2 Copy PC2.msrcincident Goto Desktop Paste PC2.msrcincident file Double-click PC2.msrcinciden file on Desktop Type password: 123 Yes If the other user accepts your invitation by Clicking Yes then you can access his PC or send messages or files etc to each other. 16. Files and Settings Transfer Wizard (FastWiz) The Files and Settings Transfer Wizard helps you move your data files and personal settings from your old computer to your new one, without having to go through much of the same configuration you did with your old computer. For example, you can take your personal display properties, folder and taskbar options, and Internet browser and e-mail settings from your old computer and place them on the new one. The wizard will also move specific files or entire folders, such as My Documents, My Pictures, and Favorites. Passwords are not moved with program settings when you use the Files and Settings Transfer Wizard. This is a feature of the Files and Settings Transfer Wizard that helps to keep your passwords confidential. We recommend that you install a virus detection program on the new computer before transferring files over from the old computer. This can help protect your new computer from viruses that may be contained in the files transferred over from your old computer. Goto Start Programs Accessories System Tools Files and Settings Transfer Wizard Next Click Old computer Next Click Other Click Browse… Select Desktop
  • 16. E:WordMCSE NotesMCSE Practical.doc; RAJA YASSER NAWAZ E-mail: RajaYasser@Hotmail.com, RajaYasser@Yahoo.com Page(s) 16 of 93 Ok Next Click Both files and settings Next Finish It will create USMT2.UNC folder on Desktop copy this folder to other PC that you want to deploy settings and follow the following steps: Goto Start Programs Accessories System Tools Files and Settings Transfer Wizard Next Click New computer Next Click I don't need the Wizard Disk. I have already collected my files and settings from my old computer. Click Other Click Browse and give the path of copied folder USMT2.UNC Next 17. Quota (the amount of disk space available to a user.) a. Organization Level b. Group Level c. User Level Organization Level In organization level all users can see data i.e. folders and files of each other. Logon as Administrator Create a folder name org in E: drive Right-Click Org folder Select Sharing and Security Click Share this folder Click Permissions Check Full Control (for Everyone) Ok Click Security Tab Add… Advanced… Find Now Select Everyone Ok Ok Check Full Control (for Everyone) Apply Ok Right-click on E: drive Properties Click on Quota Tab Check Enable quota management
  • 17. E:WordMCSE NotesMCSE Practical.doc; RAJA YASSER NAWAZ E-mail: RajaYasser@Hotmail.com, RajaYasser@Yahoo.com Page(s) 17 of 93 Check Deny disk space to users exceeding quota limit Click Limit disk space to 100 MB Set warning level to 99 MB Check Log event when a user exceeds their quota limit Check Log event when a user exceeds their warning level Apply Ok Disk Quota Message Ok Wait for the green light and Ok Now create 5 users a. Right-click on My Computer b. Manage c. Local Users and Groups d. Users e. Right-click on users f. Select New User… g. User name: user1 h. Password: user1 i. Confirm password: user1 j. Uncheck User must change password at next logon k. User cannot change password l. Password never expires m. Click Create n. Close (Repeat above a to n step for other 4 users i.e. user2, user3, user4 and user5) a. Double Click on user1 b. Click Profile tab c. Click Connect d. Select Z drive from combo box e. Set path To: serverorg f. Apply g. Ok (Repeat above a to g step and set the path serverorg for other 4 users i.e. user2, user3, user4 and user5) After creating 5 users and setting their path Logoff Administrator and Logon as user1 a. Click Start b. Click My Computer c. Now you can see Z drive org on 'PC' (Z:) d. Double-click on Z: drive e. Right-click f. Select New g. Select Folder h. Rename folder to user1 i. Double-click user1 folder j. Right-click k. Select New l. Select Text Document m. Rename Text Document to user1 (Logoff user1 and Logon as user2 and repeat above step a to m for user2, user3, user4 & user5)
  • 18. E:WordMCSE NotesMCSE Practical.doc; RAJA YASSER NAWAZ E-mail: RajaYasser@Hotmail.com, RajaYasser@Yahoo.com Page(s) 18 of 93 Group Level In group level users can see each other data in group but they can't see data of other group. Logon as Administrator Double-click My Computer Double-click E: drive Double-click Org folder Create 2 folder named g1 and g1 (for group level) Right-click My Computer Manage Local Users and Groups Select Users Double-click user1 Set path To: serverorgg1 Apply Ok Double-click user2 Set path To: serverorgg1 Apply Ok Double-click user3 Set path To: serverorgg2 Apply Ok Double-click user4 Set path To: serverorgg2 Apply Ok (user 1 and user 2 are in group 1 and they can see each other data and user3 and user 4 are in group 2 and they can see each other data. Group 1 and Group 2 can't see data of each other. User 5 can see data of both Groups) Logoff Administrator and Logon as user1 a. Click Start b. Click My Computer c. Double-click on Z: drive d. Right-click e. Select New f. Select Text Document g. Rename Text Document to user1 (Logoff user1 and Logon as user2 and repeat above step a to m for user3 and users4) User Level In user level only the logon user can see data of his own other user can't see. Logon as Administrator
  • 19. E:WordMCSE NotesMCSE Practical.doc; RAJA YASSER NAWAZ E-mail: RajaYasser@Hotmail.com, RajaYasser@Yahoo.com Page(s) 19 of 93 Double-click My Computer Double-click E: drive Double-click Org folder Create 3 folder named mark, sales & acc (Marketing, Sales and Account department) Right-click My Computer Manager Local Users and Groups Users Double-click user1 Profile Set path To: serverorgmark%username% "%username%" name of user. It will create folder named user1 in mark folder. Apply Ok Double-click user2 Profile Set path To: serverorgsales%username% Apply Ok Double-click user3 Profile Set path To: serverorgacc%username% Apply Ok Double-click user4 Profile Set path To: serverorgacc%username% Apply Ok (user1 is working in Marketing department, user2 is working in Sales department, user3 and user 4 are working in Account department) Logoff Administrator and Logon as user1 a. Click Start b. Click My Computer c. Double-click on Z: drive d. Right-click e. Select New f. Select Text Document g. Rename Text Document to user1 (Logoff user1 and Logon as user2 and repeat above step a to g for user2, user3 and users4) Resolvers
  • 20. E:WordMCSE NotesMCSE Practical.doc; RAJA YASSER NAWAZ E-mail: RajaYasser@Hotmail.com, RajaYasser@Yahoo.com Page(s) 20 of 93 1. Local Host 2. LM Host 3. NetBIOS 4. WIN Server 5. DNS Server 6. Broadcast When we ping to any PC on network our request pass through above sequence i.e. (1 to 6) - - - ping pc3 (when we ping any PC by its name it will gives us IP address of that PC.) - ping Localhost (when we ping localhost it give us IP of 127.0.0.1. It is used for loopback to check hardware. 1. Local Host The host file used to store information on where to find a node on a computer network. This file maps hostnames to IP address. The hosts file us used as a supplement to (or instead of) the domain name system on networks of varying sizes. Unlike DNS, the hosts files us under the control of the local computer's administrator. The hosts file has no extension and can be edited using most text editors. Location of Local Host The hosts file is located in different locations in different operating systems and even in different Windows versions. • Windows NT/2000/XP/2003/Vista/7: %SystemRoot%system32driversetchost is the default location, which may be changed. The actual directory is determined by the Registry key HKEY_LOCAL_MACHINESYSTEMCurrentControlSetServicesTcpipParameters DataBasePath. Double-click host and open in notepad and see 127.0.0.1 Localhost. 127.0.0.1 resolve FQDN. • Windows 95/98/Me: %WinDir% 2. LMHOSTS The LMHOSTS (LAN Manager Hosts) file is used to enable domain name resolution when other methods, e.g. WINS, fail. The file, if it exists, is read as the LMHOSTS setting file. A sample file is provided during Windows installation. The sample file contains documentation for manually configuring the file. Local of LMHOSTS Windows NT 4.0, Windows 2000, Windows XP, Vista and Windows Server 2003 The file is located at C:WINDOWSsystem32driversetc, and a sample file is located at C:WINDOWSsystem32driversetclmhosts.sam. If a different install directory was used for the Windows files, the file can be located with the path %systemroot%system32driversetc.
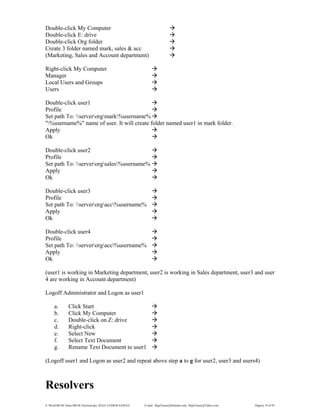
  • 21. E:WordMCSE NotesMCSE Practical.doc; RAJA YASSER NAWAZ E-mail: RajaYasser@Hotmail.com, RajaYasser@Yahoo.com Page(s) 21 of 93 Open Lmhosts.sam in notepad Goto last and write your won PC IP address.i.e 192.168.0.2 press tab abc Close the file, save and rename it as Lmhosts.sam to lmhost only Now ping PC2 then its ping and also ping by abc Ping abc (abc is at LM host) 3. NetBIOS name cache The NetBIOS name cache contains every NetBIOS name that was recently associated with an IP address. This local cache helps reduce network traffic by eliminating the need for broadcasting or WINS queries, it can sampling start communicating with the lost. 1. Right-click on My Network Places 2. Click Properties 3. Right-click Local Area Connection 4. Click Properties 5. Click Internet Protocol (TCP/IP) 6. Click Properties 7. Click obtain an IP address automatically 8. Click OK 9. Click Close Now "Yellow bar" is running near time bar due to removing IP address of its own PC. Then ping server or other PC then its again ping, because Microsoft give IP address by self default i.e. 169.254.29.30 Note: no work can be done without IP address on network. It means, that if NetBIOS work is done on user own PC or in network then IP address are given by Microsoft by default. In network if all PC's are connected through "Cables" only and no IP addresses are given manually, then Microsoft give IP addresses by self and also give facilities to ping any pc in network. The local NetBIOS cache can be viewed with the nbtstat.exe command. C:>nbtstat –C Syntax: Nbtstat [-a RemoteName] [-A IP address] [-c] [-n] [-r] [-R] [-s] [-S] [interval]] -a (adapter status) Lists the remote machine's name table given its name -A (Adapter status) Lists the remote machine's name table given its IP address -C (cache) Lists the remote name cache including the IP addresses -n (names) Lists local NetBIOS names. -r (resolved) Lists names resolved by broadcast and via WINS -R (Reload) Purges and reloads the remote cache name table -S (Sessions) Lists sessions table with the destination IP addresses -s (sessions) Lists sessions table converting destination IP
  • 22. E:WordMCSE NotesMCSE Practical.doc; RAJA YASSER NAWAZ E-mail: RajaYasser@Hotmail.com, RajaYasser@Yahoo.com Page(s) 22 of 93 addresses to host names via the hosts file. RemoteName: Remote host machine name. IP address: Dotted decimal representation of the IP address. Interval: Redisplays selected statistics, pausing interval seconds between each display. Press Ctrl+C to stop redisplaying statistics. ICS (Internet Connection Sharing) Through this we can configure Internet in Net cafe / Net club. Microsoft says that we can give internet sharing to 253 PC's Minimum. To use ICS 2 NIC cards are must: - 1 NIC card for WAN connection and - 1 NIC card for LAN connection In network (net club), on Sever PC (i.e. PC1) 1. Right-click My Network Places 2. Double-click LAN( Local Area Connection) 3. Click Support Its IP address will 192.168.0.1 (this "1" must be here) no other PC have such like "1" IP address. LAN Card 1. Right-click My Network Places 2. Right-click on LAN 3. Click Properties 4. Click Internet Protocol (TCP/IP) 5. Click Properties 6. Click Obtain an IP address automatically 7. Click Obtain DNS server address automatically 8. Click OK 9. Click Close Check IP address of WAN Card 1. Right-click My Network Places 2. Double-click WAN 3. Click Support Its IP address 10.0.0.30 WAN Card 1. Right-click My Network Places
  • 23. E:WordMCSE NotesMCSE Practical.doc; RAJA YASSER NAWAZ E-mail: RajaYasser@Hotmail.com, RajaYasser@Yahoo.com Page(s) 23 of 93 2. Right-click on WAN 3. Click Properties 4. Click Internet Protocol (TCP/IP) 5. Click Properties 6. Click Obtain an IP address automatically 7. Click Obtain DNS server address automatically 8. Click OK 9. Click Close To share "WAN": 1. Right-click My Network Places 2. Right-click on WAN 3. Click Properties 4. Click Advanced tab 5. Check Allow other network users to connect through this computer's Internet connection 6. Check Allow other network users to control or disable the shared Internet connection 7. Click OK There or 2 methods are used to share internet from Server PC (i.e. PC1) to client PC's. One NIC card is needed for LAN. Goto Client PC (i.e. PC2): Method 1: 1. Right-click My Network Places 2. Right-click LAN 3. Click Properties 4. Click Internet Protocol (TCP/IP) 5. Click Obtain an IP address automatically 6. Click Obtain DNS server address automatically 7. Click OK 8. Click Close Then browse any site it will be accessed. Method 2: 1. Right-click My Network Places 2. Right-click LAN 3. Click Properties 4. Click Internet Protocol (TCP/IP) 5. Click Use the following IP address 6. Enter IP address: 192.168.0.10
  • 24. E:WordMCSE NotesMCSE Practical.doc; RAJA YASSER NAWAZ E-mail: RajaYasser@Hotmail.com, RajaYasser@Yahoo.com Page(s) 24 of 93 7. Enter Subnet mask: 255.255.255.0 8. Enter Default gateway 192.168.0.1 9. Click Use the following DNS server addresses 10. Enter Preferred DNS server: 192.168.0.1 11. Click Obtain DNS server address automatically 12. Click OK 13. Click Close Then browse any site it will be accessed. To create a new forest Domain 1. Click Start, click Run, and then type dcpromo to start the Active Directory Installation Wizard. 2. Welcome to the Active Directory Installation Wizard page click Next. 3. On the Operating System Compatibility page, read the information and then click Next. 4. On the Domain Controller Type page, click Domain controller for a new domain, and then click Next. 5. On the Create New Domain page, click Domain in a new forest, and then click Next. 6. On the New Domain Name page, type the full DNS name for the new domain, and then click Next. i.e corvit.com. Note: On 1 Server only 1 Domain can be created. 7. On the NetBIOS Domain Name page, verify the NetBIOS name, and then click Next. 8. On the Database and Log Folders page, type the location in which you want to install the database and log folders, or click Browse to choose a location, and then click Next. Note: Change the Database Folder path i.e E:NTDS, because if server crashdamage then other path is workable. 9. On the Shared System Volume page, type the location in which you want to install the Sysvol folder, or click Browse to choose a location, and then click Next. Note: Change the Log Folder path i.e E:SYSVOL, to save policies on other location incase server crash damage then other path is workable. 10. Optional: on the DNS Registration Diagnostics page, verify if an existing DNS server will be authoritative for this forest or, if necessary, choose to install and configure DNS on this server by clicking Install and configure the DNS server on this computer, and set this computer to use this DNS server as its preferred DNS server, and then click Next. 11. On the Permissions page, select one of the following: o Permissions compatible with pre-Windows 2000 server operating systems o Permissions compatible only with Windows 2000 or Windows Server 2003 operating systems, click Next 12. On the Directory Services Restore Mode Administrator Password page, click Next. Note: Restore password is not necessary. It is used only when we make a backup. This password will be different from other passwords. 13. Review the Summary page, and then click Next to begin the installation.
  • 25. E:WordMCSE NotesMCSE Practical.doc; RAJA YASSER NAWAZ E-mail: RajaYasser@Hotmail.com, RajaYasser@Yahoo.com Page(s) 25 of 93 14. On the Completing The Active Directory Installation Wizard, click Finish. 15. You must restart Windows before the changes made by the Active Directory Installation wizard take effect, click Restart Now to restart the computer. To demote/remove a domain controller 1. On a domain controller, click Start, and then click Run. 2. In Open, type dcpromo to open the Active Directory Installation Wizard. Welcome to the Active Directory Installation Wizard click Next. 3. If you remove Active Directory, this computer will become a standalone or domain member server. Click Next. Remove Active Directory Indicate whether this is the last domain controller in the domain. 4. Removing Active Directory converts this domain controller to a member server. Or, if this is the last domain controller in the domain, it will become a standalone server. Check This server is the last domain controller in the domain and click Next. Application directory Partitions Applications create these partitions for storing and replicating data. 5. If you want the wizard to remove all partitions from this domain controller, click Next. Confirm Deletion Removing Active Directory will delete all application apartitions from this domain controller. 6. Check Delete all application directory partitions on this domain controller. Click Next. Administrator Password Specify an Administrator password. (before deleting Domain Server, first we resolve the complexity of passward.) 7. New Administrator Password: 123, Confirm password: 123 and click Next. Summary Review and confirm the options you selected. 8. To begin the operation, click Next. (The remove Active Directory from computer process will start.) 9. Finish 10. Restart now Resolve the complexity of Password
  • 26. E:WordMCSE NotesMCSE Practical.doc; RAJA YASSER NAWAZ E-mail: RajaYasser@Hotmail.com, RajaYasser@Yahoo.com Page(s) 26 of 93 Before creating users on Domain Server, first we resolve the complexity of password i.e if give error in creating users in Domain PC. Goto Start Program Administrative Tools Right-click on Domain i.e YASSER.COM Proprieties Click Group Policy tab Select Default Domain Policy Click edit button Group Policy Object Editor Windows Settings Security Settings Account Policies Double-click on Password Policy Double-click password must meet complexity requirements Select Disabled Apply Ok Double-click on minimum password length Add 0 characters Apply OK Close all windows Goto start Run gpupdate OK Create User on Domain PC 1. Click Start 2. Programs 3. Administrative Tools 4. Active Directory User and Computers 5. Right-click on Domain name corvit.com 6. Select New 7. Select User 8. First name: Yasser 9. Full name: Raja Yasser Nawaz 10. User logon name: Yasser
  • 27. E:WordMCSE NotesMCSE Practical.doc; RAJA YASSER NAWAZ E-mail: RajaYasser@Hotmail.com, RajaYasser@Yahoo.com Page(s) 27 of 93 11. Click Next 12. Enter Password: 123 13. Confirm password: 123 14. Uncheck User must change password at next logon 15. Check User cannot change password 16. Password never expires 17. Click Next 18. Finish To check following Roles are present in Domain 1. Schema Master: The schema master domain controller controls all updates and modifications to the schema. There can be only one schema master in the whole forest. 2. Domain naming master: The domain naming master domain controller controls the addition or removal of domains in the forest. There can be only one domain naming master in the whole forest. 3. Infrastructure Master: The infrastructure is responsible for updating references from objects in its domain to objects in other domains. At any one time, there can be only one domain controller acting as the infrastructure master in each domain. 4. Relative ID (RID) Master: The RID master is responsible for processing RID pool requests from all domain controllers in a particular domain. At any one time, there can be only one domain controller acting as the RID master in the domain. 5. PDC Emulator: The PDC emulator is a domain controller that advertises itself as the primary domain controller (PDC) to workstations, member servers, and domain controllers that are running earlier versions of Windows. For example, if the domain contains computers that are not running Microsoft Windows XP Professional or Microsoft Windows 2000 client software, or if it contains Microsoft Windows NT backup domain controllers, the PDC emulator master acts as a Windows NT PDC. It is also the Domain Master Browser, and it handles password discrepancies. At any one time, there can be only one domain controller acting as the PDC emulator master in each domain in the forest. 6. Global Catalog 7. LDAP 1- Schema Master Run Type MMC & OK File Add/Remove Snap-in…
  • 28. E:WordMCSE NotesMCSE Practical.doc; RAJA YASSER NAWAZ E-mail: RajaYasser@Hotmail.com, RajaYasser@Yahoo.com Page(s) 28 of 93 Add Schema Master Add Close File Save Type File name Schema.msc Close 2- Domain Naming Master Start Programs Administrative Tools Active Directory Domains and Trusts Right-click on domain name (corvit.com) Proprites 3- Infrastructure Master 4- Relative ID (RID) Master 5- PDC Emulator Start Programs Administrative Tools Active Directory Users and Computers Right-click on Domain (yasser.com) Operations Masters (see RID, PDC & Infrastructure) 6- Global Catalog Start Programs Administrative Tools Active Directory Sites and Services Sites Default-First-Site-Name Servers Server (PC1) Right-click on NTDS Settings Properties (see Global Catalog) 7- LDAP Start Programs Administrative Tools DNS Server Forward Lookup Zones _msdcs.yasser.com dc _sites Default-First-Site-Name
  • 29. E:WordMCSE NotesMCSE Practical.doc; RAJA YASSER NAWAZ E-mail: RajaYasser@Hotmail.com, RajaYasser@Yahoo.com Page(s) 29 of 93 _tcp _ldap (see LDAP file) Add client (Window XP) in Domain Goto PC1 (Client) Right-click on My Network Places Right-click on LAN Select TCP/IP Click on Properties Use the Following DNS server addresses: Preferred DNS server: 192.168.0.1 (Server (main PC) IP address) OK OK Right-click on My Computers Properties Computer Name Change Select Domain Enter Domain Name yasser.com OK Enter User name: Administrator (Server PC Administrator) Password: Mcse2003 (Server PC Password) OK OK OK OK Restart Yes Logon as a member (user) of Domain User name: user1 Password: user1 Click options Log on to yasser (domain name) OK Quota and Profiling Right-click on E: drive Properties Click on Quota Tab Check Enable quota management Check Deny disk space to users exceeding quota limit Click Limit disk space to 100 MB Set warning level to 99 MB Check Log event when a user exceeds their quota limit Check Log event when a user exceeds their warning level Apply Ok
  • 30. E:WordMCSE NotesMCSE Practical.doc; RAJA YASSER NAWAZ E-mail: RajaYasser@Hotmail.com, RajaYasser@Yahoo.com Page(s) 30 of 93 Disk Quota Message Ok Wait for the green light and Ok Double-click on E: drive Create 3 Folders (Home, Roaming & man) in E: drive Right-click on Home Folder Properties Permissions Check Full Control Apply OK Click Security tab Advanced Remove inheritance Click Add Add Everyone OK Full Control OK Apply OK Apply OK (follow the above steps for Roaming and man Folders to apply permissions and security to everyone) Goto Start Programs Administrative Tools Active Directory Users and Computers Create 3 Users Click yasser.com Right-click on Users Select New Select User First name: user1 Full name: user1 User logon name: user1 Password: user1 Confirm password: user1 Uncheck User must change password at next logon Check User cannot change password Check password never expires Next Finish (follow the above steps and create other 2 users i.e user2 and user3) Assigning Quota, Roaming and Mandatory path to Users Goto Start Programs Administrative Tools
  • 31. E:WordMCSE NotesMCSE Practical.doc; RAJA YASSER NAWAZ E-mail: RajaYasser@Hotmail.com, RajaYasser@Yahoo.com Page(s) 31 of 93 Active Directory Users and Computers Click yasser.com Click on Users Double-click on user1 Select Profile tab Profile path: serverRoaming%username% Select Connect: Z To: serverHome%username% (Home folder is a Data Server) Apply Ok Double-click on user2 Select Profile tab Profile path: serverman Select Connect: Z To: serverHome%username% (Home folder is a Data Server) Apply Ok Double-click on user3 Select Profile tab Profile path: serverRoaming%username% Select Connect: Z To: serverHome%username% (Home folder is a Data Server) Apply Ok To check Profiling Right-click on My Computers Select Advanced tab User Profiles Click Settings DNS: Web Server + FTP Server Installation & Configuration of Web Server + FTP Server Web Server: We require IIS and DNS to configure Web Server. Enter Server 2003 CD into CD-ROM 1. Goto Start 2. Click Run 3. Type appwiz.cpl 4. Click OK
  • 32. E:WordMCSE NotesMCSE Practical.doc; RAJA YASSER NAWAZ E-mail: RajaYasser@Hotmail.com, RajaYasser@Yahoo.com Page(s) 32 of 93 5. Click Add/Remove Windows Components 6. Select Application Server 7. Click Details… 8. Select Internet Information Services (IIS) 9. Click Details… 10. Check Internet Information Services Manager (IISM) 11. Check World Wide Web Service 12. Click OK 13. Click OK 14. Click Next (Installation of Web Server started.) 15. Click Finish FTP Server: We require FTP to configure Web Server. 1. Goto Start 2. Click Run 3. Type appwiz.cpl 4. Click OK 5. Click Add/Remove Windows Components 6. Select Application Server 7. Click Details… 8. Select Internet Information Services (IIS) 9. Click Details… 10. Check File Transfer Protocol (FTP) Service 11. Check World Wide Web Service 12. Click OK 13. Click OK 14. Click Next (Installation of FTP Server started.) 15. Click Finish Note: We can install Web Server + FTP Server on same PC or different PC's. Enable DNS Server We do so, because to open the website by its real name i.e. corvit.com not by it IP address 1. Goto Start 2. Click Run 3. Type appwiz.cpl 4. Click OK 5. Click Add/Remove Windows Components 6. Select Networking Services 7. Click Details… 8. Check Domain Name System (DNS)
  • 33. E:WordMCSE NotesMCSE Practical.doc; RAJA YASSER NAWAZ E-mail: RajaYasser@Hotmail.com, RajaYasser@Yahoo.com Page(s) 33 of 93 9. Click OK 10. Click Next (Installation of DNS Server started.) 11. Click OK (if Insert Disk message appears) 12. Click Browse… 13. Select DNS.EX_ 14. Click Open 15. Click OK 16. Click Finish Configuration of Web Server First disconnect real WAN connection. We are going to add make new website i.e. corvit.com. 1. Goto Start 2. Point to Programs 3. Point to Administrative Tools 4. Click Internet Information Services (IIS) Manager 5. Right-click on Web Sites 6. Point to New 7. Click Web Site… Welcome to the Web Site Creation Wizard 8. Click Next Web Site Description 9. Enter Description corvit.com 10. Click Next IP Address and Port Settings 11. Enter any IP address: 192.168.0.30 12. Click Next Web Site Home Directory 13. Click Browse 14. Select D:corvit 15. Click OK 16. Click Next Web Site Access Permissions 17. Check Read 18. Check Browse 19. Click Next You have successfully completed the Web Site Creation Wizard. 20. Click Finish For adding making new website, you must have "Web Server" i.e. where the web server is placed in your network (other PC) if you have not use your own PC web server, then pick web server from other PC by Goto.
  • 34. E:WordMCSE NotesMCSE Practical.doc; RAJA YASSER NAWAZ E-mail: RajaYasser@Hotmail.com, RajaYasser@Yahoo.com Page(s) 34 of 93 Now we try to open the same website i.e. corvit.com by its won real name, not by IP address. To open websites by its name we need / require DNS, that we have already installed. To open Website by Its Name 1. Goto Start 2. Point to Programs 3. Point to Administrative Tools 4. Click DNS 5. Double-click PC2 6. Right-click Forward Lookup Zones 7. Click New Zone... Welcome to the New Zone Wizard 8. Click Next Zone Type 9. Click Primary zone 10. Click Next Zone Name 11. Enter Zone name: corvit.com 12. Click Next Zone File 13. Click Create a new file with this file name 14. Click Next Dynamic Update 15. Click Do not allow dynamic updates 16. Click Next Completing the New Zone Wizard 17. Click Finish 1. Goto Start 2. Point to Programs 3. Point to Administrative Tools 4. Click DNS 5. Double-click PC2 6. Double-click Forward Lookup Zones 7. Right-click corvit.com 8. Click New Host (A)… 9. Enter Name: www 10. Enter IP address: 192.168.0.30 11. Click Add Host
  • 35. E:WordMCSE NotesMCSE Practical.doc; RAJA YASSER NAWAZ E-mail: RajaYasser@Hotmail.com, RajaYasser@Yahoo.com Page(s) 35 of 93 12. Click OK (the host record www.corvit.com was successfully created. 13. Click Done Now open browser and browse www.corvit.com it will be opened successfully by name. Configuration of FTP Server FTP is used for downloading. 1. Goto Start 2. Point to Programs 3. Point to Administrative Tools 4. Click Internet Information Services (IIS) Manager 5. Double-click PC2 (any pc name) 6. Right-click FTP Sites 7. Point to New 8. Click FTP Site… Welcome to the FTP Site Creation Wizard 9. Click Next FTP Site Description 10. Enter Description: corvit.com 11. Click Next IP Address and Port Settings 12. Enter the IP Address: 192.168.0.30 13. Click Next FTP User Isolation 14. Click Do not isolate users 15. Click Next FTP Site Home Directory 16. Click Browse… 17. Select D:corvit 18. Click Next FTP Site Access Permissions 19. Check Read 20. Click Next You have successfully completed the FTP Site Creation Wizard 21. Click Finish Now check it in browser Open browser and browse FTP:192.168.0.30 or FTP:www.corvit.com Now all folder shown in D: drive
  • 36. E:WordMCSE NotesMCSE Practical.doc; RAJA YASSER NAWAZ E-mail: RajaYasser@Hotmail.com, RajaYasser@Yahoo.com Page(s) 36 of 93 Alises: It mean that change "www" to any number of wwwwww……. i.e. 10 number of w's. 1. Goto Start 2. Point to Programs 3. Point to Administrative Tools 4. Click DNS 5. Double-click PC2 6. Double-click Forward Lookup Zones 7. Right-click corvit.com (domain name) 8. Click New Host (A)… 9. Name wwwwwwwwww.corvit.com (i.e. give 10 w's) 10. Enter IP address: 192.168.0.30 11. Click Add Host 12. Click OK (The host record wwwwwwwwww.corvit.com was successfully created. 13. Click OK 14. Click Done Now check it in browser Open browser and browse wwwwwwwwww.corvit.com It will open successfully, but also open on www.corvit.com. Now if you want to open on only "10 w's" you must remove cache by go through: 1. Goto Start 2. Click Run 3. Type cmd 4. Click OK 5. C:>ipconfig /flushdns Now it will open only on "10 w's", not by 3 w's. Router For routing, 2 NIC cards are necessary. Therefore we need 2 IP addresses. The router IP address becomes a gateway address of any network. Network 1: 172.16.0.0 (i.e. PC7) write in IP address 172.16.0.7 Network 2: 192.168.0.0 (i.e. PC3) write in IP address 192.168.0.3 Run cmd on PC7 Ping 172.16.0.150 But the answer will in such message "Destination host unreacheable" The reason is that, no "Gateway" is specified on the PC7 while we assign the IP address. Therefore we have to enter gateway: 1. Right-click My Network Places 2. Right-click LAN 3. Click Properties
  • 37. E:WordMCSE NotesMCSE Practical.doc; RAJA YASSER NAWAZ E-mail: RajaYasser@Hotmail.com, RajaYasser@Yahoo.com Page(s) 37 of 93 4. Click Internet Protocol (TCP/IP) 5. Click Use the following IP address 6. Enter IP address: 172.16.0.7 7. Enter Subnet mask: 255.255.0.0 8. Enter Default gateway 172.16.0.150 9. Click OK 10. Click Close Now it will not show error message like "Destination host Unreachable" Note: when your network is (172).X.X.X then your gate way will also be (172).X.X.X. Now ping again: Run cmd on PC7 Ping 172.16.0.150 But the answer will in such message "Request time out" It is because that there is "no way" or "router" between 2 networks i.e. 172.16.0.0 and 192.168.0.0 Write on PC7: 1. Right-click My Network Places 2. Right-click LAN 3. Click Properties 4. Click Internet Protocol (TCP/IP) 5. Click Use the following IP address 6. Enter IP address: 172.16.0.0 7. Enter Subnet mask: 255.255.0.0 8. Enter Default gateway 172.16.0.150 9. Click OK 10. Click Close Write on PC3: 1. Right-click My Network Places 11. Right-click LAN 12. Click Properties 13. Click Internet Protocol (TCP/IP) 14. Click Use the following IP address 15. Enter IP address: 192.168.0.0 16. Enter Subnet mask: 255.255.0.0 17. Enter Default gateway 192.168.0.150 18. Click OK 19. Click Close Now PC3 and PC7 will ping each other.
  • 38. E:WordMCSE NotesMCSE Practical.doc; RAJA YASSER NAWAZ E-mail: RajaYasser@Hotmail.com, RajaYasser@Yahoo.com Page(s) 38 of 93 To make a Route on PC6 1. Goto Start 2. Point to Programs 3. Point to Administrative 4. Click Routing and Remote Access 5. Right-click on PC6 6. Click Configure and Enable Routing and Remote Access Welcome to the Routing and Remote Access Server Setup Wizard 7. Click Next Configuration 8. Click Custom configuration Custom Configuration 9. Click LAN routing 10. Click Next Completing the Routing and Remote Access Server Setup Wizard 11. Click Finish 12. Click Yes (The Routing and Remote Access Service has now been installed. Do you want to start the service? Now PC6 becomes our Router. Note: Router IP is the gateway of other network. WINS Server WINS Server (Windows Internet Name Services) support / control broadcasting. As we know that "NetBIOS" make a cache table on each PC, which make each PC in network very heavy. Now to resolve this problem WINS Server is needed in network to control cache. Installation of WINS Server Insert Server 2003 CD into CD-ROM 1. Goto Start 2. Click Run 3. Type appwiz.cpl 4. Click OK 5. Click Add/Remove Windows Components 6. Click Networking Services 7. Click Details 8. Check Windows Internet Name Services (WINS) 9. Click OK 10. Click Next 11. Click Finish
  • 39. E:WordMCSE NotesMCSE Practical.doc; RAJA YASSER NAWAZ E-mail: RajaYasser@Hotmail.com, RajaYasser@Yahoo.com Page(s) 39 of 93 Logon as a Administrator Configuration of WINS Server To configure WINS Server on PC3, first give IP address of PC 3 (WINS Server PC) on another PC4. 1. Right-click on My Network Places (PC4) 2. Click Properties 3. Right-click on LAN 4. Click Properties 5. Select Internet Protocol (TCP/IP) 6. Click Properties 7. Click Advanced… 8. Click WINS tab 9. Click Add… 10. Enter WINS server: 192.168.0.3 11. Click Add 12. Click OK 13. Click OK 14. Click Close This process will add PC4 into WINS server PC3 Now ping by name i.e. ping pc4 or ping pc3 not by IP address. Goto PC3 and ping PC4 it will work. Check that PC4 is added into PC3 (WINS server PC) Goto PC3 1. Goto Start 2. Point to Programs 3. Point to Administrative Tools 4. Click WINS 5. Double-click PC3[192.168.0.3] 6. Right-click Active Registration 7. Click Display Records… 8. Click Find Now Now it will show / give the PC4 IP address and also cache of PC4 IP address and also cache of PC4. as we added like PC4 into WINS server PC3, we can add also other network PC's into WINS server PC3 and also cache of all. Therefore cache of each PC's will be shown on PC3 (WINS server) but not on his won PC. In other words WINDS server keep record of all PC's What is DHCP?
  • 40. E:WordMCSE NotesMCSE Practical.doc; RAJA YASSER NAWAZ E-mail: RajaYasser@Hotmail.com, RajaYasser@Yahoo.com Page(s) 40 of 93 Dynamic Host Configuration Protocol (DHCP) is a network protocol that enables a server to automatically assign an IP address to an individual computer's TCP/IP stack software. DHCP assigns a number dynamically from a defined range of numbers (i.e., a scope) configured for a given network. Almost all wireless access points, many wired Ethernet routers, and computers running Internet Connection Sharing have built-in DHCP servers. While this makes configuration of a small network easier, it can cause problems when the DHCP servers are used in larger networks. Client computers configured to use DHCP for IP assignment do not need to have a statically assigned IP address. In addition, they generally do not need to have addresses configured for DNS servers or WINS servers, as these are also set by the DHCP server. DHCP assigns a TCP/IP address when a system is started. Typically, it works like this: 1. A user turns on a computer with a DHCP client. 2. The client computer sends a broadcast request (called a DISCOVER or DHCPDISCOVER), looking for a DHCP server to answer. 3. The router directs the DISCOVER packet to the correct DHCP server. 4. The server receives the DISCOVER packet. Based on availability and usage policies set on the server, the server determines an appropriate address (if any) to give to the client. The server then temporarily reserves that address for the client and sends back to the client an OFFER (or DHCPOFFER) packet, with that address information. The server also configures the client's DNS servers, WINS servers, NTP servers, and sometimes other services as well. 5. The client sends a REQUEST (or DHCPREQUEST) packet, letting the server know that it intends to use the address. 6. The server sends an ACK (or DHCPACK) packet, confirming that the client has a been given a lease on the address for a server-specified period of time. When a computer uses a static IP address, it means that the computer is manually configured to use a specific IP address. One problem with static assignment, which can result from user error or inattention to detail, occurs when two computers are configured with the same IP address. This creates a conflict that results in loss of service. Using DHCP to dynamically assign IP addresses minimizes these conflicts. DHCP is the most wanted server. Installation of DHCP Server (on PC3) Insert Server 2003 CD into CD-ROM 1. Goto Start 2. Click Run 3. Type appwiz.cpl 4. Click Add/Remove Windows Components 5. Select networking Services 6. Click Details… 7. Check Dynamic Host Configuration Protocol (DHCP) 8. Click OK 9. Click Next 10. Click Finish We can install both DHCP and WINS server on a same PC.
  • 41. E:WordMCSE NotesMCSE Practical.doc; RAJA YASSER NAWAZ E-mail: RajaYasser@Hotmail.com, RajaYasser@Yahoo.com Page(s) 41 of 93 Configuration of DHCP Server 1. Goto Start 2. Point to Programs 3. Point to Administrative Tools 4. Click DHCP 5. Right-click on PC3[192.168.0.3] 6. Click New Scope… Welcome to the New Scope Wizard 7. Click Next Scope Name (You have to provide an identifying scope name) 8. Type Name: corvit (any name) 9. Click Next IP Address Range (You define the scope address range by identifying a set of consecutive IP address, any rage can be specified) 10. Start IP address: 192.168.0.150 11. End IP address: 192.168.0.200 12. Click Next Add Exclusions (Exclusions are addresses or a range of addresses that are not distributed by the server.) 13. Start IP address: 192.168.0.150 (150 to 155 Reserve IP's for Server) 14. End IP address: 192.168.0.155 15. Click Next Lease Duration (The lease duration specifies how long a client can use an IP address from this scope. 16. Enter Days: 30 17. Click Next Configure DHCP Options (You have to configure the most common DHCP options before clients can use the scope.) 18. Click Yes, I want to configure these options now 19. Click Next Router (Default Gateway) (you can specify the routers, or default gateways, to be distributed by this scope. From Exclude / Reserved IP's or from above IP's range.) 20. Enter Gateway IP address: 192.168.0.156 21. Click Next Domain Name and DNS Servers(The DNS maps & translates domain anmes used by clients on your network.) 22. Enter Parent domain: PC4 (any name) 23. Enter IP address: 192.168.0.157 24. Click Add 25. Click Next WINS Servers (Computers running Windows can use WINS servers to convert NetBIOS computer names to IP addresses.)
  • 42. E:WordMCSE NotesMCSE Practical.doc; RAJA YASSER NAWAZ E-mail: RajaYasser@Hotmail.com, RajaYasser@Yahoo.com Page(s) 42 of 93 26. Enter WINS Server name: PC5 (any name) 27. Enter WINS Server IP address: 192.168.0.160 28. Click Add 29. Click Next Activate Scope (Clients can obtain address leases only if a scope is activated.) 30. Click Yes, I want to activate this scope now 31. Click Next Completing the New Scope Wizard 32. Click Finish To check IP our own giving IP address to PC4 as server name and IP address i.e. 192.168.0.157: Goto PC4 1. Goto Start 2. Click Run 3. Type cmd 4. Click OK C:>ipconfig /all (it will show all previous type of IP's detail) C:>ipconfig /release (it will leave all the previous type of IP's detail) C:>ipconfig /renew (now it will shown our won new assign IP address) RAS Child Domain Create Domain on PC1 Child Domain on PC2 (Member Server) Domain PC1 Goto Domain (PC1) Start Programs Administrative Tools Active Directory Users and Computers Right-click on yasser.com (Domain name) Select Properties
  • 43. E:WordMCSE NotesMCSE Practical.doc; RAJA YASSER NAWAZ E-mail: RajaYasser@Hotmail.com, RajaYasser@Yahoo.com Page(s) 43 of 93 Click Group Policy tab Click Edit button Group Policy Object Editor Default Domain Policy [Computer name.yasser.com] Policy Computer Configuration Double-click Windows Settings Double-click Security Settings Double-click Account Policies Double-click Password Policies Double-click Password must meet complexity requirements Click Disabled Apply OK Double-click Minimum password length Enter 0 characters Apply OK OK Close Group Policy Object Editor Close Active Directory Users and Computers Goto Start Run Enter gpupdate OK Child Domain on PC2 (Member Server) Right-click on My Network Places Select properties Right-click on Local Area Connection Select Properties Select internet Protocol (TCP/IP) Click Properties button Use the following IP address: IP address: 192.168.0.2 Subnet mask: 255.255.255.0 Use the following DNS server addresses: Preferred DNS server: 192.168.0.2 (PC2 i.e Child Domain IP address) Alternate DNS server: 192.168.0.1 (PC1 i.e Domain IP address) OK Close Close Right-click on My Computer (PC2) Select Computer Name tab Click Change button Select Domain Enter domain name: yasser.com (Domain name PC1) OK Enter the name and password of an account with permission to join the domain.
  • 44. E:WordMCSE NotesMCSE Practical.doc; RAJA YASSER NAWAZ E-mail: RajaYasser@Hotmail.com, RajaYasser@Yahoo.com Page(s) 44 of 93 User name: Administrator (Domain Administrator) Password: 123 (Domain Administrator Password) OK OK OK OK Yes (to restart computer) Log On to Windows Enter user name Enter password Log on to: YASSER (select domain name) OK Goto start (PC2) Run Enter dcpromo OK Welcome to the Active directory Installation Wizard Next Operating System Compatibility Next Domain Controller Type Select Domain controller for a new domain Next Create New Domain Select Child domain in an existing domain tree Next Network Credentials User name: Administrator (Domain, PC1) Password: 123 (Domain, PC1) Domain: yasser.com Next Child domain installation Parent domain: yasser.com Child domain: raja Next NetBIOS Domain Name Domain NetBIOS name: RAJA Next Database and Log Folders Next Shared System Volume Next DNS Registration Diagnostics Next Permissions Select Permissions compatible only with Windows 2000 or Windows Server 2003 Next Directory Services Restore Mode Administrator Password Next If error message:
  • 45. E:WordMCSE NotesMCSE Practical.doc; RAJA YASSER NAWAZ E-mail: RajaYasser@Hotmail.com, RajaYasser@Yahoo.com Page(s) 45 of 93 "The password does not meet the minimum password length requirement of the password policy on this computer. Enter a longer password." Then resolve the password minimum length on Domain (PC1) and start create child domain again. Summary Next Installation starts… Completing the Active Directory Installation Wizard Finish Restart Now Log On to Windows Enter user name Enter password Log on to: RAJA (select child domain name) OK ISA (Internet Security Acceleration) First of all ISA, internet is must. Also 2 NIC cards are too must one live IP is needed for ISA. ISA work with DSL or other connections only but not for dial up connection. ISA Internet NAT (Network Access Translation) In NAT by default internet is working. Proxy Server made up with NAT. In ISA if internet connect on 1 NIC card. It will run on all other NIC cards automatically. ISA Security Firewall (work as watchman) Traffic Control (i.e port) What means by traffic? In TCP/IP there are 2 types of traffics. TCP / UOP Total ports: 65535 Registered ports: 1024 Free ports: 64511 Traffic Port Download FTP 20/21 Website HTTP 80 Mail Send SMTP 25 Mail Received Pop3 110 FQDN DNS 53
  • 46. E:WordMCSE NotesMCSE Practical.doc; RAJA YASSER NAWAZ E-mail: RajaYasser@Hotmail.com, RajaYasser@Yahoo.com Page(s) 46 of 93 Remotely Access Telnet 23 Secure Web HTTPS 443 Dynamic…. DHCP 67 Firewall control all above traffic. In ISA, if another outer client PC1 make a request for yahoo page, then ISA stop his request in ISA server, and ISA pick his request itself and bring yahoo page from Web Publishing Server and give back to client PC1. it means that ISA not allow the outer clients to communicate directly to other servers in the network. ISA Acceleration Cache Speed If client PC2 make a request for google page then ISA server pick his request from internet (i.e from google.com server) and give / put one copy of google in "cache Database" and another copy gives to client PC2. At the same time another client PC1 make request for same page , then this time ISA server pick from "Cache Database" but not from internet. Through this load on "link" is minimizes. Installation of ISA Insert ISA 2000 Enterprise CD into CD-ROM Double-click on CD-ROM icon Double-click ISA 2000 Enterprise on Double-click ISA Run setup.exe Message: "ISA 2000 requires Service Pack 1 to function correctly on this version of Windows." We will install Service Pack 1 after this installation is complete. Click Continue button Welcome to the Microsoft ISA Server Installation program. Continue Microsoft ISA Server Setup I Agree Click Typical Installation Message: "This computer cannot join an array until is part of a Windows 2000 domain, and an updated ISA Server schema is installed in Active Directory. If you continue with Setup now, this computer will be installed as a stand-alone server." Do you want to continue? Click Yes button Select the mode for this server. ๏ Firewall mode ๏ Cache mode
  • 47. E:WordMCSE NotesMCSE Practical.doc; RAJA YASSER NAWAZ E-mail: RajaYasser@Hotmail.com, RajaYasser@Yahoo.com Page(s) 47 of 93 ๏ Integrated mode Select Integrated mode Click Continue Specify the NTFS drives on which caches should be located and the maximum size of each cache. Click E: drive Enter Cache size (MB): 200 Click Set button OK Note: Cache size should be small for efficiency. Enter the IP address rages that span the internal network address space. Give IP address From: 192.168.0.1 To: 192.168.0.99 Click Add button OK Now installation of ISA server started. Message: Launch ISA management Tool OK Message: Microsoft Internet Security and Acceleration Server Enterpirse Edition Setup was completed successfully. OK Setup Warning Message: "Setup has failed to start one or more services. Please examine the event log for details." Just ignore warning message. OK To Check that ISA Server installed properly. Goto Start Programs Microsoft ISA Server ISA Management Click View menu Select Advance + Servers and Arrays + PC1 + Monitoring + Services x PC1 Web proxy x PC1 Firewall x PC1 Scheduled content Download Above 3 services are not in working and stopped, because we installed ISA Server on Windows Server 2003 not on Windows Server 2000. To activate these services properly we need to install ISA Services Pack 1 with on Windows Server 2003.
  • 48. E:WordMCSE NotesMCSE Practical.doc; RAJA YASSER NAWAZ E-mail: RajaYasser@Hotmail.com, RajaYasser@Yahoo.com Page(s) 48 of 93 Before installation, check the browser yahoo.com working or not. We see that browser working. ISA Service Pack 1 Installation Insert ISA 2003 Enterprise CD into CD-ROM Double-click on CD-ROM icon Double-click ISA Plugins Double-click ISA Service Pack 1 Run isasp1.exe I Agree Now installation started. OK and server restart automatically Now above 3 services are on and running. Now browser again yahoo.com. it will not browsing, because we have not defined the "Allow Rule". Protocol Rule Goto Start Programs Microsoft ISA Server ISA Management – Access Policy Right-click on Protocol Rules New > Select Rule… Welcome to the new Protocol Rule Wizard Enter Protocol rule name: Allow Click Next Rule Action: Specify how you want the protocol rule respond to client requests. Check Allow Click Next Protocols: Select the protocols to which this rule applies. Select All IP traffic Click Next Schedule: Select a schedule for applying this rule. Select Always Click Next Client Type: you can specify client type by user name, group name or IP address. Select Any request Click Next Completing the new Protocol Rule Wizard Click Finish Web proxy Client (on client PC2) Goto Client (i.e PC2)
  • 49. E:WordMCSE NotesMCSE Practical.doc; RAJA YASSER NAWAZ E-mail: RajaYasser@Hotmail.com, RajaYasser@Yahoo.com Page(s) 49 of 93 Double-click Internet Explorer on Desktop Click Tools menu Select Internet Options… Select Connections tab Click LAN Settings… Check use a proxy server for your LAN Enter IP Address: 192.168.0.100 (i.e IP address of ISA Server) Enter Port: 8080 (i.e Internet Port) Check Bypass proxy server for local addresses OK OK Now browse any site it will work. Secure NAT Client (on client PC2) To make a secure Nat client follow the under mentioned steps: Right-click on My Network Places Select Properties Right-click on Local Area Connection Select Properties Select Internet Protocol (TCP/IP) Click Properties Enter IP address: 192.168.0.2 (Client PC2) Subnet mask: 255.255.255.0 Default gateway: 192.168.0.100 (Server IP) Preferred DNS server:192.168.0.100 (to access Internet it is must) Now open browser and browse any site it will not work. Goto ISA Server Start Run enter cmd OK Enter command ipconfig /all See the IP address of WAN i.e 10.0.0.132 live IP address. Come back to client PC2 Enter preferred DNS server: 10.0.0.132 (live IP address) Now open the browser and browser any site it will browse. Note: on ISA Serve we cannot make "Secure Nat", because on server we need another Gateway. Firewall Client (on client PC2) First disable the NIC card changes i.e clear Preferred DNS server + Default gateway. Now browse any website it will not work. Now for Firewall follow the following steps: Goto Start Run server Double-click mspclnt folder Run setup.exe
  • 50. E:WordMCSE NotesMCSE Practical.doc; RAJA YASSER NAWAZ E-mail: RajaYasser@Hotmail.com, RajaYasser@Yahoo.com Page(s) 50 of 93 Next Next Install Finish Now Firewall is installed on client PC2. You can see the Firewall icon in taskbar. Browse any site it will work. Web proxy give IP address and port by default. See in Open browser Tools Internet Option Connections LAN Setting. To Remove: Firewall icon from taskbar Double click Firewall icon in taskbar Uncheck show firewall client icon on taskbar OK To Show: Firewall icon on taskbar Goto Start Settings Control panel Double-click Firewall client Check show firewall client icon on task bar OK Note:- on Server PC, we cannot make "Firewall client", because it slow down the speed of server. Note:- If on client PC Windows 95, 98, 200 XP, Or 2003 is installed and access configure internet, then use "Web proxy" Or "Firewall Client" installation. But if on client PC Unix, Linnx, or Sun is installed and access Internet, the n we use "Secure NAT" client installation. ISA Installation on Window XP ISA Server is not installed on XP windows. To install on XP we use "Customize Installation". Insert ISA 2000 Enterprise CD into CD-ROM Double-click on CD-ROM icon Double-click ISA 2000 Enterprise on Double-click ISA Run setup.exe Welcome to the Microsoft ISA Server Installation program. Continue Microsoft ISA Server Setup I Agree Click Custom Installation Uncheck ISA Services Uncheck Add-in servies Check only Administration tools Click Continue Now installation of ISA server started. Message: Launch ISA management Tool
  • 51. E:WordMCSE NotesMCSE Practical.doc; RAJA YASSER NAWAZ E-mail: RajaYasser@Hotmail.com, RajaYasser@Yahoo.com Page(s) 51 of 93 OK Message: Microsoft Internet Security and Acceleration Server Enterpirse Edition Setup was completed successfully. OK To Check that ISA Server installed properly. Goto Start Programs Microsoft ISA Server ISA Management Click View menu Select Advance Right-click Internet Security and Acceleration Server Connect to… Connect to this stand-alone server: Enter IP address 192.168.0.100 (give ISA Server IP address) OK To Check that ISA Server installed properly on Windows XP. Goto Start Programs Microsoft ISA Server ISA Management Click View menu Select Advance + Servers and Arrays + PC1 + Monitoring + Services PC1 Web proxy PC1 Firewall PC1 Scheduled content Download All the 3 services are enabled and working. To Block Some Sites To block some sites, there are 2 works to be done on ISA Server. Policy Element Access Policy First we mention those sites to which we want to block in "Policy Element". Or First we set a destination. Goto Start Programs Microsoft ISA Server ISA Management Double-click Policy Element Right-Click on Destination Sets Select New
  • 52. E:WordMCSE NotesMCSE Practical.doc; RAJA YASSER NAWAZ E-mail: RajaYasser@Hotmail.com, RajaYasser@Yahoo.com Page(s) 52 of 93 Select Set… Enter Name: Block Sites Click Add Enter Destination: *.yahoo.com *.yahoo.* *.google.com *.msn.com *.hotmail.com *.geo.tv OK OK We have created a list of sites to block. Now we will apply rule on these sites. Double-click on Access Policy Right-click on Site and Content Rule Select New Select Rule Welcome to the New Site and content Rule Wizard Enter name: Block Sites Click Next Rule Action: Select the type of action this rule performs. Select Deny Click Next Rule Configuration: This rule cn apply to destinations, schedules , clients or all three. Select Custom Click Next Destination Sets: Select the destination to which this rule applies. Select Specified destination set Select Name: Block Sites Click Next Schedule: Select a schedule for applying this rule. Select Always Click Next Client Type: You can specify client type by user name, group name or IP address. Select Any request Click Next Content Groups: content groups include different file types and MIME types. Select Any content type Click Next Completing the New Site and Content Rule Wizard Click Finish On Client PC2 Browse any site from above sites i.e google.com. It will not be opened and give error message. To Block Internet Access on all PC's
  • 53. E:WordMCSE NotesMCSE Practical.doc; RAJA YASSER NAWAZ E-mail: RajaYasser@Hotmail.com, RajaYasser@Yahoo.com Page(s) 53 of 93 Goto Start Programs Microsoft ISA Server ISA Management Double-click Policy Element Right-Click on Destination Sets Select New Select Set… Enter Name: Block Internet Click Add Enter Destination: * (* means to block a whole internet) OK OK Now we apply a Rule to Block the Internet. Double-click on Access Policy Right-click on Site and Content Rule Select New Select Rule Welcome to the New Site and content Rule Wizard Enter name: Block Internet Click Next Rule Action: Select the type of action this rule performs. Select Deny Click Next Rule Configuration: This rule cn apply to destinations, schedules , clients or all three. Select Custom Click Next Destination Sets: Select the destination to which this rule applies. Select Specified destination set Select Name: Block Internet Click Next Schedule: Select a schedule for applying this rule. Select Always Click Next Client Type: You can specify client type by user name, group name or IP address. Select Any request Click Next Content Groups: content groups include different file types and MIME types. Select Any content type Click Next Completing the New Site and Content Rule Wizard Click Finish On any PC
  • 54. E:WordMCSE NotesMCSE Practical.doc; RAJA YASSER NAWAZ E-mail: RajaYasser@Hotmail.com, RajaYasser@Yahoo.com Page(s) 54 of 93 Browse any site it will not be opened and give error message. To Block Internet on some specific PC (PC2) Goto Start Programs Microsoft ISA Server ISA Management Double-click Policy Element Right-Click on Destination Sets Select New Select Set… Enter Name: Block Net Click Add Enter Destination: * (* means to block a whole internet) OK OK Refresh Now we apply a Rule to Block the Internet. Double-click on Access Policy Right-click on Site and Content Rule Select New Select Rule Welcome to the New Site and content Rule Wizard Enter name: Block Internet Click Next Rule Action: Select the type of action this rule performs. Select Deny Click Next Rule Configuration: This rule cn apply to destinations, schedules , clients or all three. Select Custom Click Next Destination Sets: Select the destination to which this rule applies. Select Specified destination set Select Name: Block Internet Click Next Schedule: Select a schedule for applying this rule. Select Always Click Next Client Type: You can specify client type by user name, group name or IP address. Select Specific computers (client address sets) Click Next Client Sets: Specify the client sets to which this rule applies. Click Add… Click New… Enter Name: Block Net
  • 55. E:WordMCSE NotesMCSE Practical.doc; RAJA YASSER NAWAZ E-mail: RajaYasser@Hotmail.com, RajaYasser@Yahoo.com Page(s) 55 of 93 Click Add… Enter IP address range that you want to block. From: 192.168.0.20 To: 192.168.0.30 OK OK OK Click Next Content Groups: content groups include different file types and MIME types. Select Any content type Click Next Completing the New Site and Content Rule Wizard Click Finish To Block Pictures / Images Goto Start Programs Microsoft ISA Server ISA Management Double-click Policy Element Right-Click on Destination Sets Select New Select Set… Enter Name: Block Images Click Add Enter Destination: geo.tv (block images of geo.tv) OK OK Now we will apply rule to block images. Double-click on Access Policy Right-click on Site and Content Rule Select New Select Rule Welcome to the New Site and content Rule Wizard Enter name: Block Sites Click Next Rule Action: Select the type of action this rule performs. Select Deny Click Next Rule Configuration: This rule cn apply to destinations, schedules , clients or all three. Select Custom Click Next Destination Sets: Select the destination to which this rule applies. Select Specified destination set Select Name: Block Sites Click Next
  • 56. E:WordMCSE NotesMCSE Practical.doc; RAJA YASSER NAWAZ E-mail: RajaYasser@Hotmail.com, RajaYasser@Yahoo.com Page(s) 56 of 93 Schedule: Select a schedule for applying this rule. Select Always Click Next Client Type: You can specify client type by user name, group name or IP address. Select Any request Click Next Content Groups: content groups include different file types and MIME types. Select Only the following content types: Check images Click Next Completing the New Site and Content Rule Wizard Click Finish To Block Audio and Video on All Sites Goto Start Programs Microsoft ISA Server ISA Management Double-click Policy Element Right-Click on Destination Sets Select New Select Set… Enter Name: Block Audio & Video Click Add Enter Destination: * OK OK Now we will apply rule to block Audio & Video. Double-click on Access Policy Right-click on Site and Content Rule Select New Select Rule Welcome to the New Site and content Rule Wizard Enter name: Block Sites Click Next Rule Action: Select the type of action this rule performs. Select Deny Click Next Rule Configuration: This rule cn apply to destinations, schedules , clients or all three. Select Custom Click Next Destination Sets: Select the destination to which this rule applies. Select Specified destination set Select Name: Block Sites
  • 57. E:WordMCSE NotesMCSE Practical.doc; RAJA YASSER NAWAZ E-mail: RajaYasser@Hotmail.com, RajaYasser@Yahoo.com Page(s) 57 of 93 Click Next Schedule: Select a schedule for applying this rule. Select Always Click Next Client Type: You can specify client type by user name, group name or IP address. Select Any request Click Next Content Groups: content groups include different file types and MIME types. Select Only the following content types: Check Audio Check Video Click Next Completing the New Site and Content Rule Wizard Click Finish Re-direct to Specific website When client enter URL of any site. He will redirect to a specific website. Goto Start Run cmd OK Enter comment: ping www.urdupoint.com i.e IP address 66.116.125.170 Goto Start Programs Microsoft ISA Server ISA Management Double-click Policy Element Right-Click on Destination Sets Select New Select Set… Enter Name: Route Click Add Enter Destination: * OK OK Routing You can create touting rules, which determine whether a Web Proxy client Request is: - Retrieved directly from the specified destination - Sent to an upstream server - Redirected to an alternate site Routing rules apply to both incoming Web request and outgoing Web Requests. Double-click on Network Configuration Right-click on Routing Select New… Select Rule… Welcome to the New Routing Rule Wizard
  • 58. E:WordMCSE NotesMCSE Practical.doc; RAJA YASSER NAWAZ E-mail: RajaYasser@Hotmail.com, RajaYasser@Yahoo.com Page(s) 58 of 93 Enter name: Route Internet Click Next Destination Sets: Select the destinations to which this rule applies. Select Specified destination set Select Route Click Next Request Action: How should the rule process requests from clients? Select Redirect to Hosted site: 66.116.125.170 (IP address of www.urdupoint.com) Port: 80 SSL Port: 443 (Internet port or STTP Port) Click Next Cache Retrieval Configuration: Specify how the rule searches the cache for requested objects and how requests will be routed if no valid object exists. Select Any version of the requested object. Never route the request Click Next Completing the New Routing Rule Wizard Click Finish To Allow Internet in Office Time Only Goto Start Programs Microsoft ISA Server ISA Management Double-click Policy Element Right-Click on Schedules Select New Select Schedule… Enter Name: Office Time Select time in AM/PM Select Monday to Saturday Select 8 AM to 4 PM Select Active OK Now we will apply rule to use internet in office time. Double-click on Access Policy Right-click on Site and Content Rule Select New Select Rule Welcome to the New Site and content Rule Wizard Enter name: Office Time Click Next Rule Action: Select the type of action this rule performs. Select Deny Click Next
  • 59. E:WordMCSE NotesMCSE Practical.doc; RAJA YASSER NAWAZ E-mail: RajaYasser@Hotmail.com, RajaYasser@Yahoo.com Page(s) 59 of 93 Rule Configuration: This rule cn apply to destinations, schedules , clients or all three. Select Custom Click Next Destination Sets: Select the destination to which this rule applies. Select Specified destination set Select Name: Block Internet Click Next Schedule: Select a schedule for applying this rule. Select Office Time Click Next Client Type: You can specify client type by user name, group name or IP address. Select Specific computers (client address sets) Client Sets: Specify the client sets to which this rule applies. Click Add… Click New… Name: Side A Add… From: 192.168.0.10 To: 192.168.0.50 OK OK Click New… Name: Side B Add… From: 172.16.0.10 To: 172.16.0.50 OK OK OK Click Next Content Groups: content groups include different file types and MIME types. Select Any content type Click Next Completing the New Site and Content Rule Wizard Click Finish Web Publishing We use PC2 as a Web Server. Now first we make a client PC i.e. PC2 a "Proxy Client" of ISA server. Goto PC2 Open web browser Tools Internet Options… Connections LAN Settings… Check Use a proxy server for your LAN
  • 60. E:WordMCSE NotesMCSE Practical.doc; RAJA YASSER NAWAZ E-mail: RajaYasser@Hotmail.com, RajaYasser@Yahoo.com Page(s) 60 of 93 Enter IP Address: 192.168.0.100 ISA Server IP Address Enter Port: 8080 Check Bypass proxy server for local addresses OK OK Now PC2 become "Proxy Client" of ISA Server. Internet is also working properly. To Connect to ISA Server Goto Start Programs Microsoft ISA Server ISA Management Right-click on Internet Security and Acceleration Server Select Connect to… Enter IP Address: 192.168.0.100 ISA Server IP Address Now this IP address will connect PC2 client to ISA Server. OK Exchange Server 2003 Through Exchange Server. We can send/receive mails organization (LAN) and also outer world (WAN). But Exchange Server is not installed on "Pirated Server". Or Simply Pirated Server CD not workable in Exchange Server. Therefore we need original registered Server 2003 CD. Requirement: Exchange Server 2003 have 4 requirements to work properly: 1- Register Window (Win 2003 Server for Exchange) 2- Registered Domain (Active Directory i.e. corvit.com) 3- 2 register DNS Servers (i.e. corvit.com + cisco.com) 4- Live IP Address To install Exchange 2003 Server above are our requirements. Services: For Exchange following services must be on: 1- Internet Information Services (IIS, for web accessing) 2- ASP.Net 3- SMTP (for mail sending) 4- NNTP (Network News Transfer Protocol, for public folder) 5- WWW 6- Common File To add above 6 windows components: Insert Server 2003 CD in to CD-ROM Goto Start Run enter appwiz.cpl OK Click Add/Remove Windows Components Select Application Server Click Details… Select Internet Information Services (IIS) Click Details… Check NNTP Service (It will also check Common Files, Internet Information Services Manager)
  • 61. E:WordMCSE NotesMCSE Practical.doc; RAJA YASSER NAWAZ E-mail: RajaYasser@Hotmail.com, RajaYasser@Yahoo.com Page(s) 61 of 93 Check SMTP Service Check World Wide Web Service OK Check ASP.NET OK Click Next Installation of Exchange Server 2003 For installation of Exchange Server 2 CD's are used. a) Win2k3 Server b) Exchange Server (for Exchange) As we know, that Exchange Server 2003 is not installed on pirated CD Server. So we first install registered Widows Server i.e. Win2k3 for Exchange on Server Window, which is already installed on PC2. this will make this installed pirated Server on, become registered Windows Server. Enter Win 2003 Server for exchange on Server ope nwindow Install Active directory also Install DNS Server Install Exchange To install Exchange 2 methods are used. a) On member Server (no active directory on it) b) Simple Server. On Member Server Enter Exchange CD into CD-ROM Right-click on CD-ROM Select Open Double-click Setup Double-click I386 folder Run Setup.exe Welcome to the Microsoft Exchange Installation Wizard. Click Next License Agreement: Read the agreement carefully and click the appropriate option. Select I agree Click Next Component Selection:Select and modify components to fit your custom solution. Typical Click Next Installation Type: Select an installation type. Create a new Exchange Organization Click Next Organization Name: Name the Microsoft Exchange Organization you want to create. Organization Name: FMT Click Next Licensing Agreement:Indicate your agreement to terms of Exchange Server Licensing.
  • 62. E:WordMCSE NotesMCSE Practical.doc; RAJA YASSER NAWAZ E-mail: RajaYasser@Hotmail.com, RajaYasser@Yahoo.com Page(s) 62 of 93 Select I agree that I have read and will be bound by the license agreements for this product Click Next Installation Summary Click Next (if any message appear click OK) Completing the Microsoft Exchange Wizard Click Finish To Check status of Exchange Server To check that Exchange Server is installed properly or not. There are two methods are used: 1st Method: Goto Start Run cmd OK Type 192.168.0.1 25 Note: 192.168.0.1 is IP address of PC on which Exchange is installed and 25 for mail sending. If following message appears it means Exchange installed successfully: "220 server.yasser.com Microsoft ESMTP MAIL Service, Version: 6.0.3790.0 ready at date and time + time zone (i.e Thu, 30 Apr 2009 21:27:47 +0500)" Type: ehlo after ehlo command following message will appear: 250-server.yasser.com Hello [192.168.0.1] 250-TURN 250-SIZE 250-ETRN 250-PIPELINING 250-DSN 250-ENHANCEDSTATUSCODES 250-8bitmime 250-BINARYMIME 250-CHUNKING 250-VRFY 250-X-EXPS GSSAPI NTLM LOGIN 250-X-EXPS=LOGIN 250-AUTH GSSAPI NTLM LOGIN 250-AUTH=LOGIN 250-X-LINK2STATE 250-XEXCH50 250 OK Note: If 4 X’s appear then Exchange Server installed properly. To Verify all Service are Running After installation of Exchange Server check the status of Exchange Server. Goto Start Programs
  • 63. E:WordMCSE NotesMCSE Practical.doc; RAJA YASSER NAWAZ E-mail: RajaYasser@Hotmail.com, RajaYasser@Yahoo.com Page(s) 63 of 93 Microsoft Exchange System Manager Double-click Tools Double-click Monitoring and Status Select Status Double-click Server (name of pc on which Exchange Server is installed) Select Default Microsoft Exchange Services Click Detail… button Following 6 services will be running: 1- Microsoft Exchange Information Store Running 2- Microsoft Exchange MTA Stacks Running 3- Microsoft Exchange Routing Engine Running 4- Microsoft Exchange System Attendant Running 5- Simple Mail Transfer Protocol (SMTP) Running 6- World Wide Web Publishing Service Running All services of Exchange are running. 2nd Method: Open Browser Type Address: 192.168.0.1/exchange User name: Administrator Password: 123 OK If Outlook Web Access appears then Exchange Server installed properly. To Send / Receive Mail To send and receive mail from users to Server / Administrator. Goto PC2 Open Browser Type Address:192.168.0.1/exchange User name: Administrator Password: 123 OK Click New tab To: Administrator@yasser.com Subject: First Mail Type any message i.e This is a test message. Click on Send Goto PC1 Click Inbox And mail will appear What is Exchange Server Do ? Exchange Server performs 2 works. a) Mail Administration b) Save & Manage the Data in mails
  • 64. E:WordMCSE NotesMCSE Practical.doc; RAJA YASSER NAWAZ E-mail: RajaYasser@Hotmail.com, RajaYasser@Yahoo.com Page(s) 64 of 93 There are 2 things in Exchange Server. (i) Storage Group (4 storage groups in members) (ii) Mail Box Store (5 mail box store in members) 1- Storage Group ——— ——— ——— 5 mail box store ——— ——— 2- Storage Group ——— ——— ——— ——— ——— 3- Storage Group ——— ——— ——— ——— ——— 4- Storage Group ——— ——— ——— ——— ——— 4 storage groups 5 mail box store = 20 mail box store and it have unlimited capacity. To Check Exchange Server File in PC drive Double-click My Computer Double-click C: drive Double-click Program Files Double-click Exchsrvr Double-click MDBDATA Mail box store: It consist of 2 files Priv1.edb (for text date, by default size 4mb) Priv1.stm (for attachments, by default size 4mb) Public Folder: it consist of 2 files Pub1.edb (by default size 3mb) Pub1.stm (by default size 2mb) Change View of Exchange Goto Start Programs Microsoft Exchange System Manager Right-click FMT(Exchange) (FMT organization name)
  • 65. E:WordMCSE NotesMCSE Practical.doc; RAJA YASSER NAWAZ E-mail: RajaYasser@Hotmail.com, RajaYasser@Yahoo.com Page(s) 65 of 93 Select Properties Check Display administrative groups Apply OK OK Enable Security Tab Right-click on FMT (Exchange) and select properties. If security tab does not appear then perform the following steps: Goto Start Run regedit OK Double-click HKEY_CUURNT_USER Double-click Software Double-click Microsoft Double-click Exchange Right-click EXAdmin New Select DWORD Value Enter name: showsecuritypage Double-click showsecuritypage Enter Value data: 1 OK Storage Groups & Stores (Mailbox or Public Stores) Each Exchange Server contain only 4 storage groups. Each storage groups contain only 5 mailbox stores or public stores. By default first storage group is physically store on c:Program FilesExchsrvrmdbdata. However we can change the location. Configuring the Exchange Store The Microsoft Exchange Information Store service manages the Exchange store, where you can store mailboxes, public folders, documents, files, and applications. The Exchange store uses two types of databases: - Mailbox stores The part of the Exchange store that maintains information in user mailboxes. A mailbox store consists of a rich-text .edb file, plus a streaming native Internet content .stm file. - Public folder stores The part of the Exchange store that maintains information in public folders, a public folder store consists of a rich-text .edb file, plus a streaming native Internet content .stm file. Add a Storage Groups Exchange supports multiple databases contained within a storage group. A storage group includes one to five databases and one set of transaction log files for all databases in the storage group. To add a storage group: 1. Goto Start
  • 66. E:WordMCSE NotesMCSE Practical.doc; RAJA YASSER NAWAZ E-mail: RajaYasser@Hotmail.com, RajaYasser@Yahoo.com Page(s) 66 of 93 2. Programs 3. Microsoft Exchange 4. System Manager 5. Right-click FMT(Exchange) (FMT organization name) 6. Select Properties 7. Check Display administrative groups 8. Apply 9. OK 10. OK 11. Double-click Administrative Groups 12. Double-click First Administrative Group 13. Double-click Servers 14. Right-click PC1 (PC1 PC name on which Exchange installed) 15. Select New 16. Select Storage Group... 17. Type Name: 1st Storage Group 18. Apply 19. OK By following the above steps you can create 4 storage groups. Optional: On the General tab, set the following properties: - To change the name and location of the transaction logs, use Transaction log location. To move the logs, use System Manager on the server on which the logs reside. - To change the name and location of the system path, use System path location. This is where temporary (tmp.edb) and recovered (edb.chk) files are stored. - To clear each 4 KB page of data from the drive at deletion, click Zero out deleted database pages. This is a security precaution. ! WARNING Enabling this option can slow server performance. - To reuse the same log file instead of creating a new one when the 5 MB limit is reached, click Enable circular logging. ! WARNING Enabling this option prevents you from creating a set of log files and you can restore only from your last backup. Reserve this option for storage groups that support Network News Transfer Protocol (NNTP) folders (in public folder stores), which do not require log files. - To add additional information, on the Details tab, use Administrative note. Configure Mailbox Stores Mailboxes are the delivery location for all incoming mail messages for a designated owner. Information in a user's mailbox is stored in a mailbox store on an Exchange server. A mailbox can contain received messages, message attachments, folders, documents, and other files.
  • 67. E:WordMCSE NotesMCSE Practical.doc; RAJA YASSER NAWAZ E-mail: RajaYasser@Hotmail.com, RajaYasser@Yahoo.com Page(s) 67 of 93 This section contains the following topics: • Add a Mailbox Store • Set Mailbox Store Properties • Administer a Mailbox Store • Recover a Mailbox • Delete a Mailbox Add a Mailbox Store The mailbox store is a storage device for a server's mailboxes. Exchange supports multiple mailbox stores for each server. Each mailbox store is contained in a storage group. The only properties required to add a mailbox store are a name and a default public folder store. To add a mailbox store: 1. On the Start menu, point to Programs, point to Microsoft Exchange, and then click System Manager. 2. Double-click Administrative Groups 3. Double-click First Administrative Group 4 Double-click Servers 5. Double-click PC1 6. Right-click First Storage Group (storage group container to which you want to add the mailbox store) 7. Select New 8. Select Mailbox Store… 9. Enter name: 1-Mailbox Store 10. Apply 11. OK 12. Yes 13. The Store was successfully mounted. Click OK Set Mailbox Store Properties You can change the properties of mailbox stores (and the mailboxes they contain) with System Manager. Note The Limits tab displays the default limits of the mailboxes in the mailbox store. Once you create a mailbox, you can change its limits with Active Directory Users and Computers. To set mailbox properties: 11. On the Start menu, point to Programs, point to Microsoft Exchange, and then click System Manager. 12. Administrative Groups