The document provides an introduction to creating mid-fidelity prototypes using PowerPoint, including examples of hospital, e-commerce, and CD player prototypes, and discusses various PowerPoint functions for adding and formatting text, images, backgrounds, and slide layouts.
This is a tutorial that shows you the basics of how to use OpenOffice Impress. OpenOffice Impress is a free multmedia presentation equivalent to Microsoft PowerPoint.
Presentacion completa en inglés sobre PowerPoint,es uno de los programas de presentación más extendidos. Es ampliamente utilizado en distintos campos de la enseñanza, los negocios.. etc.
Impress is the presentation (slide show) program included in LibreOffice. You can create slides that contain many different elements, including text, bulleted and numbered lists, tables, charts, and a wide range of graphic objects such as clip-art, drawings and photographs. Impress also includes a spelling checker, a thesaurus, text styles, and background styles.
What is Impress?
Starting a presentation.
Formatting a presentation.
Design a presentation.
Working with templates.
I hope this free "cheat sheets" are useful to my customers, clients and friends.
Bill McIntosh
School Vision Inc.
Phone : 843-442-8888
Email : WKMcIntosh@Comcast.net
Safalta Digital marketing institute in Noida, provide complete applications that encompass a huge range of virtual advertising and marketing additives, which includes search engine optimization, virtual communication advertising, pay-per-click on marketing, content material advertising, internet analytics, and greater. These university courses are designed for students who possess a comprehensive understanding of virtual marketing strategies and attributes.Safalta Digital Marketing Institute in Noida is a first choice for young individuals or students who are looking to start their careers in the field of digital advertising. The institute gives specialized courses designed and certification.
for beginners, providing thorough training in areas such as SEO, digital communication marketing, and PPC training in Noida. After finishing the program, students receive the certifications recognised by top different universitie, setting a strong foundation for a successful career in digital marketing.
The simplified electron and muon model, Oscillating Spacetime: The Foundation...RitikBhardwaj56
Discover the Simplified Electron and Muon Model: A New Wave-Based Approach to Understanding Particles delves into a groundbreaking theory that presents electrons and muons as rotating soliton waves within oscillating spacetime. Geared towards students, researchers, and science buffs, this book breaks down complex ideas into simple explanations. It covers topics such as electron waves, temporal dynamics, and the implications of this model on particle physics. With clear illustrations and easy-to-follow explanations, readers will gain a new outlook on the universe's fundamental nature.
Thinking of getting a dog? Be aware that breeds like Pit Bulls, Rottweilers, and German Shepherds can be loyal and dangerous. Proper training and socialization are crucial to preventing aggressive behaviors. Ensure safety by understanding their needs and always supervising interactions. Stay safe, and enjoy your furry friends!
Executive Directors Chat Leveraging AI for Diversity, Equity, and InclusionTechSoup
Let’s explore the intersection of technology and equity in the final session of our DEI series. Discover how AI tools, like ChatGPT, can be used to support and enhance your nonprofit's DEI initiatives. Participants will gain insights into practical AI applications and get tips for leveraging technology to advance their DEI goals.
A workshop hosted by the South African Journal of Science aimed at postgraduate students and early career researchers with little or no experience in writing and publishing journal articles.
This presentation includes basic of PCOS their pathology and treatment and also Ayurveda correlation of PCOS and Ayurvedic line of treatment mentioned in classics.
Biological screening of herbal drugs: Introduction and Need for
Phyto-Pharmacological Screening, New Strategies for evaluating
Natural Products, In vitro evaluation techniques for Antioxidants, Antimicrobial and Anticancer drugs. In vivo evaluation techniques
for Anti-inflammatory, Antiulcer, Anticancer, Wound healing, Antidiabetic, Hepatoprotective, Cardio protective, Diuretics and
Antifertility, Toxicity studies as per OECD guidelines
Strategies for Effective Upskilling is a presentation by Chinwendu Peace in a Your Skill Boost Masterclass organisation by the Excellence Foundation for South Sudan on 08th and 09th June 2024 from 1 PM to 3 PM on each day.
Introduction to AI for Nonprofits with Tapp NetworkTechSoup
Dive into the world of AI! Experts Jon Hill and Tareq Monaur will guide you through AI's role in enhancing nonprofit websites and basic marketing strategies, making it easy to understand and apply.
A Strategic Approach: GenAI in EducationPeter Windle
Artificial Intelligence (AI) technologies such as Generative AI, Image Generators and Large Language Models have had a dramatic impact on teaching, learning and assessment over the past 18 months. The most immediate threat AI posed was to Academic Integrity with Higher Education Institutes (HEIs) focusing their efforts on combating the use of GenAI in assessment. Guidelines were developed for staff and students, policies put in place too. Innovative educators have forged paths in the use of Generative AI for teaching, learning and assessments leading to pockets of transformation springing up across HEIs, often with little or no top-down guidance, support or direction.
This Gasta posits a strategic approach to integrating AI into HEIs to prepare staff, students and the curriculum for an evolving world and workplace. We will highlight the advantages of working with these technologies beyond the realm of teaching, learning and assessment by considering prompt engineering skills, industry impact, curriculum changes, and the need for staff upskilling. In contrast, not engaging strategically with Generative AI poses risks, including falling behind peers, missed opportunities and failing to ensure our graduates remain employable. The rapid evolution of AI technologies necessitates a proactive and strategic approach if we are to remain relevant.
This slide is special for master students (MIBS & MIFB) in UUM. Also useful for readers who are interested in the topic of contemporary Islamic banking.
2. Mid-Fidelity Prototyping (MFP)
Please read the following text as an
introduction in mid-fi[delity] prototyping using
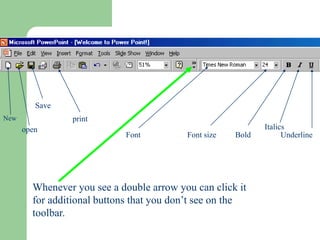
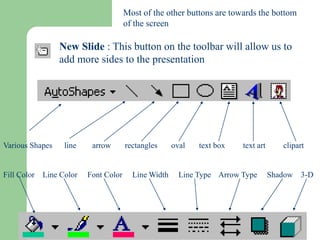
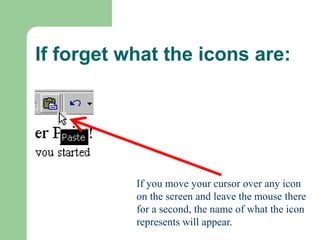
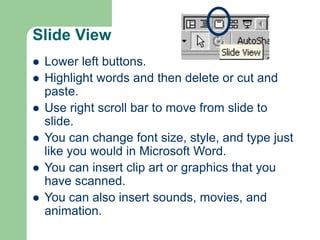
PowerPoint [URL]
Example-1: Dr Health Hospital [URL]
Example-2: E-Commerce [URL]
Example-3: CD-player [URL]
3. What PowerPoint will not do
It will not replace having to think
It will not eliminate the need for planning and
designing with paper and pen
It will not make the students ‘smarter’
It will not take over from the teacher’s many roles
It is not indispensable
It will not make your world dissolve if you do not use
it
To get a full animated impression of this
tutorial, please download the PPT and
run it from your computer!
4. New presentation (1)
To open an existing Presentation:
1 Open MS PPT
2 Select Open an existing presentation
3 Select the presentation and press OK
Click in the area “Click to add title” to add Title to add title
Click in the area “Click to add text” to add Text
5. Use this to start a
new presentation
This is where you will
open a presentation
you have already
saved
Choose OK when
finished
When you open PowerPoint this is what you
will see….
6. New presentation (2)
Inserting a new Slide:
1 Select New Slide from the Insert Menu
2 Select the Bulleted List Slide Layout
Formatting Text Using Outline:
1 Select The Outline View and Type
2 Use the Promote, Demote icons to indent and create new slides
7. Slide Layout
Choose Your
Slide Type:
Bullet List
2 Columns
Of Lists
With or Without
Chart
With or Without
Picture or other
variations
Title Slide
Selected
Choose a slide layout
from the “New Slide”
dialog box
8. What are Auto-layout slides?
PowerPoint provides users with a choice of some
commonly used slide formats
Each slide is made up of one or more frames or
boxes
There are text frames, pictures frames, chart frames,
etc.
These frames are pre-formatted to certain fonts,
sizes and alignments, but they can be changed to
suit the user
Each time a new slide is required, go to the Insert
menu and choose New slide
9. Title Slide
Blank Slide Slide Description
When Power Point begins it will ask what
type of auto-layout slide to insert first
10. Practice: Getting Started
Open Microsoft PowerPoint.
Choose “Template” from opening dialog box.
You will see a series of menu tabs.
11. Practice: Select a Template
To use a template, click on the tab labeled.
“Presentation Designs” and choose a template.
To choose a blank presentation, click on “Blank
Presentation” under the “General” tab.
File > New > General
13. New
open
print
Font Font size Bold
Italics
Underline
Whenever you see a double arrow you can click it
for additional buttons that you don’t see on the
toolbar.
Save
14. These are other helpful tools
Cut: This is used to cut things out of your project
Copy: this is used to copy from one portion of
your project to another
Paste: When you cut or copy something from your
project, it is put on an “imaginary” clipboard. The
paste button retrieves it from the clipboard and
places it in your project
15. New Slide : This button on the toolbar will allow us to
add more sides to the presentation
Most of the other buttons are towards the bottom
of the screen
Various Shapes line arrow rectangles oval text box text art clipart
Fill Color Line Color Font Color Line Width Line Type Arrow Type Shadow 3-D
16. If forget what the icons are:
If you move your cursor over any icon
on the screen and leave the mouse there
for a second, the name of what the icon
represents will appear.
17. Slide View
Lower left buttons.
Highlight words and then delete or cut and
paste.
Use right scroll bar to move from slide to
slide.
You can change font size, style, and type just
like you would in Microsoft Word.
You can insert clip art or graphics that you
have scanned.
You can also insert sounds, movies, and
animation.
18. Slide Sorter View
Tiny-squares button on lower left.
View mini-icons of slides.
Easily view and create transitions and
animations.
Another way to reorder and insert slides.
View All
Slides
in
Slide
Sorter
View
19. Saving a presentation
Saving a Presentation:
1 Select Save or Save as from File menu
2 Specify location
3 Type in the desired Filename
4 Click Save
PPT Help Features: Select the Office assistant under the Help
Menu or press F1 KEY
20. Working with Text
It is basically like a word
processor
Various fonts and sizes
Font colours
Word Art
Alignments
Bullets and numbering
Tables
Examples:
Show card, comic sans
RED, PURPLE
Left, centred, right,
justified
21. Working with pictures and sounds
PICTURES
Go to the INSERT menu
Choose Picture from…
ClipArt or File
Clip Art gives you a selection
File…you have to find the
picture file you want to use
SOUNDS
Go to the INSERT menu
Choose Movies and Sounds
(in PowerPoint 2000) from…
Sound Gallery gives you a
selection
Sound file…you have to find
the sound file you have
recorded or saved and want
to use
22. Format Background
Click on the
drop-down
menu and see
the set of
colors
suggested for
your scheme
Choose
“More Colors”
for more solids
or “Fill Effects”
for patterns
Format > Background . . .
23. Practice: Background
Go to Format > Background.
Click on the down arrow on the drop-down list
box to choose a new color.
Clicking on “Apply” modifies a particular slide;
“Apply to all” modifies the entire presentation.
Note: Some templates use background
graphics. If you can’t see changes, click on
“Omit background graphics from master.”
24. Slide background colors
The default background color of your slide is white
You can change this to a different color, a pattern or a
design template
Go to the FORMAT menu and choose Background…
Click on the down arrow button next to the narrow
box for a selection of colors
25. Background colors
The FORMAT menu – Slide Color Scheme, has some
pre-set options for background and text colors
The FORMAT menu – Apply Design Template, gives
you some picture designs for the background of the
slides
WARNING !! Removing and/or changing a Design
Template is almost impossible! Choose wisely
26. Editing Style and Color
Choose Format > Background to change
background color and shading.
Click the down arrow on drop-down list box
for color and fill effects options.
Click on “Fill Effects” to customize the
background with lighting, textures, and
patterns.
The “Preview” button allows you to try out
your changes before you commit to them.
Format > Slide Color Scheme to change text,
accent, and line colors and to create
shadows.
27. Format Color Scheme
Click on the
“Custom” tag to
select alternate
colors for standard
features. You can
apply these
selections to all of
your slides or just
the active one.
Format > Slide Color Scheme
28. Practice: Color Scheme
Click on Format > Slide Color Scheme.
Click on the “Custom” tab to alter colors for
individual elements; choose the “Standard”
tab to select pre-defined schemes.
Double-click on the colored square labeled
“Text and lines.”
Choose a new color.
Click on “Preview”; then click on “Apply”
to accept.
29. Action Buttons
Use Action Buttons if you want the viewer to be able
to move backward and forwards between slides
Go to the SLIDE SHOW menu and choose Action
Buttons
The forward and backward buttons act like hyperlinks
This means that when you click on them, the action
will take you back to the previous or next slide
30. Moving Through Presentations
Use the down arrow or “Enter” key or a
mouse click to move forward through a
presentation.
Up arrow returns to the previous slide.
Type a number followed by the “Enter” key to
jump to a particular slide.
The “B” key temporarily blacks out the
screen.
The arrows in the lower left corner of the
screen provide menu options such as a pen
to highlight particular points in your
presentation.
31. Practice: Adding Content
Add points to each of your slides by
clicking in the text area and typing.
– To Add text, choose Insert > Text Box, draw
the box boundaries, and begin typing.
When you hit return on a list slide, a
new bullet will appear.
– Use the tab key if you want to create a sub-
entry like this one.
Use This Button
to quickly add
a text box.
Use This Button to
add Clip Art
32. Inserting Objects
Use Insert > Picture for a graphic.
Choose Insert > Picture > Clip Art.
Choose Insert > Object for other MS objects.
For scanned images, select “Adobe
Photoshop Image” from the dialog under
Insert > Object.
33. Manipulating Objects
To move, click in the center of the object to
select, hold and move.
To resize, click on one of the handles and
resize.
To delete, click to select and hit the delete
key.
34. Practice: Manipulating Objects
Resize or scale the object on your title page.
Move the object to the place on the page you
want it to be.
Your image must
show the white
squares in order
to move or
resize. Click on
the center of the
image to make
these appear.
To keep the
proportions of the
shape, only resize
by clicking and
dragging the
corner markers.
35. Layering Objects
To control the layering of objects, choose
Draw (lower left button) > Order > Send to
Back or Send to Front.
To rotate, choose Draw > Rotate or Flip.
Tip: Right click (or
Control click on
MAC) to see the
order menu
36. Practice: Objects
Take a few minutes to arrange or delete the
object we have been experimenting with.
If you have time, insert appropriate clip art
elsewhere in your presentation.
37. Insert Picture
Insert > Picture
Use Clip Art to
select from a
database of
images
Use “From File”
to select your
own saved image
files
Or insert
Movies,
Charts,
Tables, or
Objects
38. Practice: Insert Clip Art
Go to any slide.
Go to Insert > Picture > Clip Art.
Use the category list to browse kinds of clip
art.
Click on a picture you would like to include.
Click on “Insert.”
39. Animation
Each slide is made up of a number of
parts/frames
Animation is the tool which gives you control
over the way your slide appears on the
screen
40. Slide Transition
This tool controls the way the whole slide appears on
the screen
Each slide in a presentation can appear in a different
way
To do this you need to view all your slides in the slide
sorter
Go to the VIEW menu and choose the Slide Sorter
option
Click once on the slide on which you want to use the
slide transition
41. Slide Transition - continued
Go to the SLIDE SHOW menu
Choose the Slide Transition option
You are given a number of effects to choose from
You can select an effect and preview it before
deciding one you like
Then click on the Apply button to activate this on the
selected slide, or Apply All to apply it to all the slides
in your presentation
42. Transitions
Transitions are effects for
moving from slide to slide
You can choose different
transitions for each slide,
“Apply to All” the same
transition effect, or choose
“random” to vary effects.
You can also control the
speed of the transition –
choose slow to “Fade” into
each slide
Choose “Automatically
After” to automate your
slide show; each slide
appears for X seconds.
Slide Show > Slide Transition
43. Practice: Transitions
Click on the “Slide Sorter View” button.
Double-click the slide to which you want to
assign a transition. This will return you to
Slide View.
Choose Slide Show > Slide Transitions, and
select a transition.
44. Animating slides
Each slide is made of one or more frames of
text, pictures, sounds
View one slide in the normal view
Go to the SLIDE SHOW menu and choose
Custom Animation
This displays all the separate
elements/frames in this slide
45. Custom Animation
Click on one element. E.g.: Text 1
This gets highlighted in the preview box
Click on the Effects tag
This gives you a number of effects to choose from
Select the one you want and use Preview to see what
it will look like
Then move to the next element and repeat the
process
46. Animations
Animations change how objects, text boxes,
and pictures appear in your slide.
You can choose a “Preset Animation” or
design a “Custom Animation” from the
“Slide Show” menu.
Slide Show > Custom Animation
47. Custom Animation: Timing
Check the boxes next
to the objects you want
to animate. They
appear below in the
Animation Order box –
you can change the
order using the arrows
to the right.
Choose “Preview” to
see how the animation
will appear.
Choose “On mouse click” to control when
animation appears or choose “Automatically”
and insert a number of seconds.
48. Custom Animation: Effects
Select each object
in the top window,
then select an
animation from the
drop-down list in
the boxes below.
Choose “Grouped
By” greater than
“1st” to make text
appear in hierarchal
order rather than all
at once.
49. Practice: Animations
Make sure you are in the Slide Sorter View.
Double-click the slide to which you want to
assign an animation. This will return you to
Slide View.
Select an object on the slide.
Choose Slide Show > Custom Animation, and
pick an effect.
50. Slide Show menu
This will run your show
This will have you set up
animations with the objects on
your slide
This allows you to
change the transitions
between slides
51. Viewing the slide show
After creating your slides, go to the VIEW menu and
choose Slide Show
When the first element in the first slide loads on
screen you will need to click once on the left mouse
button to proceed to the next step
Click on the mouse to progress through the
presentation
Press the ESC key (top left of keyboard) to exit a
presentation at any time
Clicking on the SLIDE SHOW menu and Set Up
Show option allows you to select the slides you want
to view.
52. Record Automatic slide timings
You can set the slides to run continuously and
automatically
Firstly, complete creating the slides, setting slide
transitions and animations
Go to the SLIDE SHOW menu and choose Rehearse
Timings
The first slide appears on screen
Click the left mouse button to proceed to the next
step
At the next viewing of the slides you can choose to
save the timings or rehearse new timings
New timings can be recorded at a later stage as well
53. Run slide show continuously
Go to the SLIDE SHOW menu
Choose Set Up Show
Select the “Loop Continuously until ‘Esc’” box,
then click on OK
The slide show will now run repeatedly until
the ESC key on the keyboard is pressed
54. Slide Show
Last button on lower left.
Preview your presentation.
Use the “Enter” or arrow keys or click the
mouse click to advance through your
presentation.
Press “ESC” to exit the show and return to
your editing
55. Practice: Preview
Click on the “Slide Show” button.
View your entire presentation, thinking about
your transitions and animations.
56. Printing Presentations, Part 1
Go to the File menu and choose Print
Make sure the box marked “Pure Black and
White” at the bottom of the screen is checked.
57. Printing Presentations, Part 2
Under the Pull Down menu “Print What,” there are
several options:
– Slides (choose without animations) will print one
slide to a page (good for making transparencies of
your slides).
– Handouts (2, 3, or 6 sides per page) prints mini-
versions of your slides on the left with blank lines for
notes on the right. (Good for a presentation where
people may want the ability to take notes).
– Notes will print out the notes you’ve written for
yourself to accompany your slides.
– Outline prints the text of your slides in a linear
outline format.
58. Useful links to relevant information
Introduction to Power Point [URL]
Other Power Point Tutorials [URL]
STEVEN BELL'S PowerPoint and
Presentation Skills Resource Page [URL]
If this tutorial does not provide sufficient information to you,
please try one of the following references...
59. Conclusion
There are many other features available in
this program
Trial and error – although very stressful - is a
very good teacher
Necessity is the mother of invention
GOOD LUCK!
Once again...