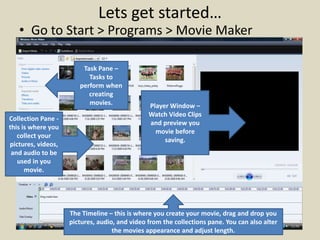
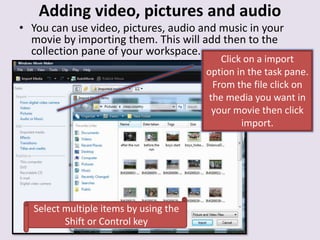
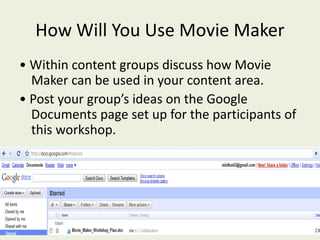
Objectives
The Critics Agree
• "In the past, I assigned a project where
students created their own comic strips,
but students who are not very artistic
did not enjoy the project at all. Movie
Maker is a great alternative to that
project, and it gets more students
involved; they really enjoy making
digital stories on the computer.".
– Rebecah Lowery,
• "Since first introducing Movie Maker
in my class, I have found dozens of
uses. It's a great tool to engage
students in research, writing, and
creating. Kids love it and, once you
know the basics, it's easy to use.“
– Betsey Kennedy, Cobb County Schools
Students Love It Too!
• "It was great to take pictures and
videos about an author and turn
them into an actual movie. I know
so much more about Hawthorne
now than I would have from just
taking notes.“
– 8th grade student, Hall County
• "I'll never forget the Movie Maker
projects we did in 5th grade. I
learned so much, plus I totally love
making movies. I started making
them at my house too.“
– 6th grade student, Sandy Springs
Movie Maker is free software that comes with
Windows Service Pack; so if you have Windows you
should have it installed already on your computer.
It is a popular program for creating digital stories
because it is free and it is fairly easy to use.
Teachers can use Movie Maker to create digital
stories in that introduce a lesson, as part of a
lesson, or to summarize a lesson.
Students can use Movie Maker to enhance their
critical thinking skills while preparing their own
digital stories as class projects.
What is Movie Maker?
Here Are Some Examples
Lets get started…
• Go to Start > Programs > Movie Maker
Task Pane –
Tasks to
perform when
creating
movies.
The Timeline – this is where you create your movie, drag and drop you
pictures, audio, and video from the collections pane. You can also alter
the movies appearance and adjust length.
Collection Pane -
this is where you
collect your
pictures, videos,
and audio to be
used in you
movie.
Player Window –
Watch Video Clips
and preview you
movie before
saving.
Adding video, pictures and audio
• You can use video, pictures, audio and music in your
movie by importing them. This will add then to the
collection pane of your workspace.
Click on a import
option in the task pane.
From the file click on
the media you want in
your movie then click
import.
Select multiple items by using the
Shift or Control key
You then just drag and drop from your collection pane onto
your timeline where you want them to play in your movie.
Click the picture,
video clip, audio and
music for your movie
from the Collection
Pane and drag into
the Timeline.
You can change how long video clips, pictures and audio play by
clicking on them and dragging to increasing or decreasing the
length they play.
Editing Options
• Movie Maker has a range of Edit Movie
options that will enhance your movie.
Adding video effects
A video effect determines how a video clip, picture, or title displays
in your project and final movie. Video effects let you add special
effects to your movie. A video effect is applied for the entire duration
that the video clip, picture, or title displays in our movie
1. To add a video effect click
on view Video effects.
2. Then click and drag
desired video effects onto
clip in timeline. You can
play video to check out
how the effect is working.
3. Don't stress you can
always remove the effect
if you don't like it by right
clicking on the clip and
selecting Video effect.
Adding transitions
A video transition controls how your movie plays from one video clip or
picture to the next. You can add a transition between two pictures, video
clips, or titles, in any combination, on the storyboard/timeline. The
transition plays before the one clip ends and while the other clip starts to
play.
1. To add a video transition
click on view Video
transitions.
2. Then click and drag
desired video transitions
onto clips in timeline.
You can play video to
check out how the
transition is working.
3. Don't stress you can
always remove the
transition if you don't
like it by clicking on the
transition and pressing
delete.
Adding Titles and Credits
Finally to finish your movie it is great fun to add titles on your clips
and credits at the end.
1. To add titles or credits
click on view Titles or
Credits.
2. Choose the option you
want to add. I suggest
that you check out the
different options and
watch them. Remember
you can always remove
them by clicking on the
title and pressing delete.
You can also change
their location by
dragging them to
different places on your
timeline, and can click
and drag to
increase/decrease the
length of time they play
Adding Narration
You can add narration to your movie by clicking on the narrate
timeline icon.
Saving or Publishing Your Movie
• To save your movie go to File > Save Project> then
choose the option you want to save as.
– Enter a name of your movie and then press next.
• The Publish Movie option allows you to share
your movie in many different ways..
– If publishing your movie select the Publish Movie
button and choose the location for publication.
– Choose a file name and a location to publish to
– If saving to your computer select on best quality for
my computer.
– However if you plan to put it on the Internet click on
Show more Choices and select other settings Video for
Broadband (512 kbps) then click save.
How Will You Use Movie Maker
• Within content groups discuss how Movie
Maker can be used in your content area.
• Post your group’s ideas on the Google
Documents page set up for the participants of
this workshop.
Math Probability
Reading – Choosing the Right Book
7464 Movie Maker Presentation Show Mtl

7464 Movie Maker Presentation Show Mtl

  • 2.
  • 3.
    The Critics Agree •"In the past, I assigned a project where students created their own comic strips, but students who are not very artistic did not enjoy the project at all. Movie Maker is a great alternative to that project, and it gets more students involved; they really enjoy making digital stories on the computer.". – Rebecah Lowery, • "Since first introducing Movie Maker in my class, I have found dozens of uses. It's a great tool to engage students in research, writing, and creating. Kids love it and, once you know the basics, it's easy to use.“ – Betsey Kennedy, Cobb County Schools
  • 4.
    Students Love ItToo! • "It was great to take pictures and videos about an author and turn them into an actual movie. I know so much more about Hawthorne now than I would have from just taking notes.“ – 8th grade student, Hall County • "I'll never forget the Movie Maker projects we did in 5th grade. I learned so much, plus I totally love making movies. I started making them at my house too.“ – 6th grade student, Sandy Springs
  • 5.
    Movie Maker isfree software that comes with Windows Service Pack; so if you have Windows you should have it installed already on your computer. It is a popular program for creating digital stories because it is free and it is fairly easy to use. Teachers can use Movie Maker to create digital stories in that introduce a lesson, as part of a lesson, or to summarize a lesson. Students can use Movie Maker to enhance their critical thinking skills while preparing their own digital stories as class projects. What is Movie Maker?
  • 6.
    Here Are SomeExamples
  • 7.
    Lets get started… •Go to Start > Programs > Movie Maker Task Pane – Tasks to perform when creating movies. The Timeline – this is where you create your movie, drag and drop you pictures, audio, and video from the collections pane. You can also alter the movies appearance and adjust length. Collection Pane - this is where you collect your pictures, videos, and audio to be used in you movie. Player Window – Watch Video Clips and preview you movie before saving.
  • 8.
    Adding video, picturesand audio • You can use video, pictures, audio and music in your movie by importing them. This will add then to the collection pane of your workspace. Click on a import option in the task pane. From the file click on the media you want in your movie then click import. Select multiple items by using the Shift or Control key
  • 9.
    You then justdrag and drop from your collection pane onto your timeline where you want them to play in your movie. Click the picture, video clip, audio and music for your movie from the Collection Pane and drag into the Timeline.
  • 10.
    You can changehow long video clips, pictures and audio play by clicking on them and dragging to increasing or decreasing the length they play.
  • 11.
    Editing Options • MovieMaker has a range of Edit Movie options that will enhance your movie.
  • 12.
    Adding video effects Avideo effect determines how a video clip, picture, or title displays in your project and final movie. Video effects let you add special effects to your movie. A video effect is applied for the entire duration that the video clip, picture, or title displays in our movie 1. To add a video effect click on view Video effects. 2. Then click and drag desired video effects onto clip in timeline. You can play video to check out how the effect is working. 3. Don't stress you can always remove the effect if you don't like it by right clicking on the clip and selecting Video effect.
  • 13.
    Adding transitions A videotransition controls how your movie plays from one video clip or picture to the next. You can add a transition between two pictures, video clips, or titles, in any combination, on the storyboard/timeline. The transition plays before the one clip ends and while the other clip starts to play. 1. To add a video transition click on view Video transitions. 2. Then click and drag desired video transitions onto clips in timeline. You can play video to check out how the transition is working. 3. Don't stress you can always remove the transition if you don't like it by clicking on the transition and pressing delete.
  • 14.
    Adding Titles andCredits Finally to finish your movie it is great fun to add titles on your clips and credits at the end. 1. To add titles or credits click on view Titles or Credits. 2. Choose the option you want to add. I suggest that you check out the different options and watch them. Remember you can always remove them by clicking on the title and pressing delete. You can also change their location by dragging them to different places on your timeline, and can click and drag to increase/decrease the length of time they play
  • 15.
    Adding Narration You canadd narration to your movie by clicking on the narrate timeline icon.
  • 16.
    Saving or PublishingYour Movie • To save your movie go to File > Save Project> then choose the option you want to save as. – Enter a name of your movie and then press next. • The Publish Movie option allows you to share your movie in many different ways.. – If publishing your movie select the Publish Movie button and choose the location for publication. – Choose a file name and a location to publish to – If saving to your computer select on best quality for my computer. – However if you plan to put it on the Internet click on Show more Choices and select other settings Video for Broadband (512 kbps) then click save.
  • 17.
    How Will YouUse Movie Maker • Within content groups discuss how Movie Maker can be used in your content area. • Post your group’s ideas on the Google Documents page set up for the participants of this workshop.
  • 18.
  • 19.
    Reading – Choosingthe Right Book