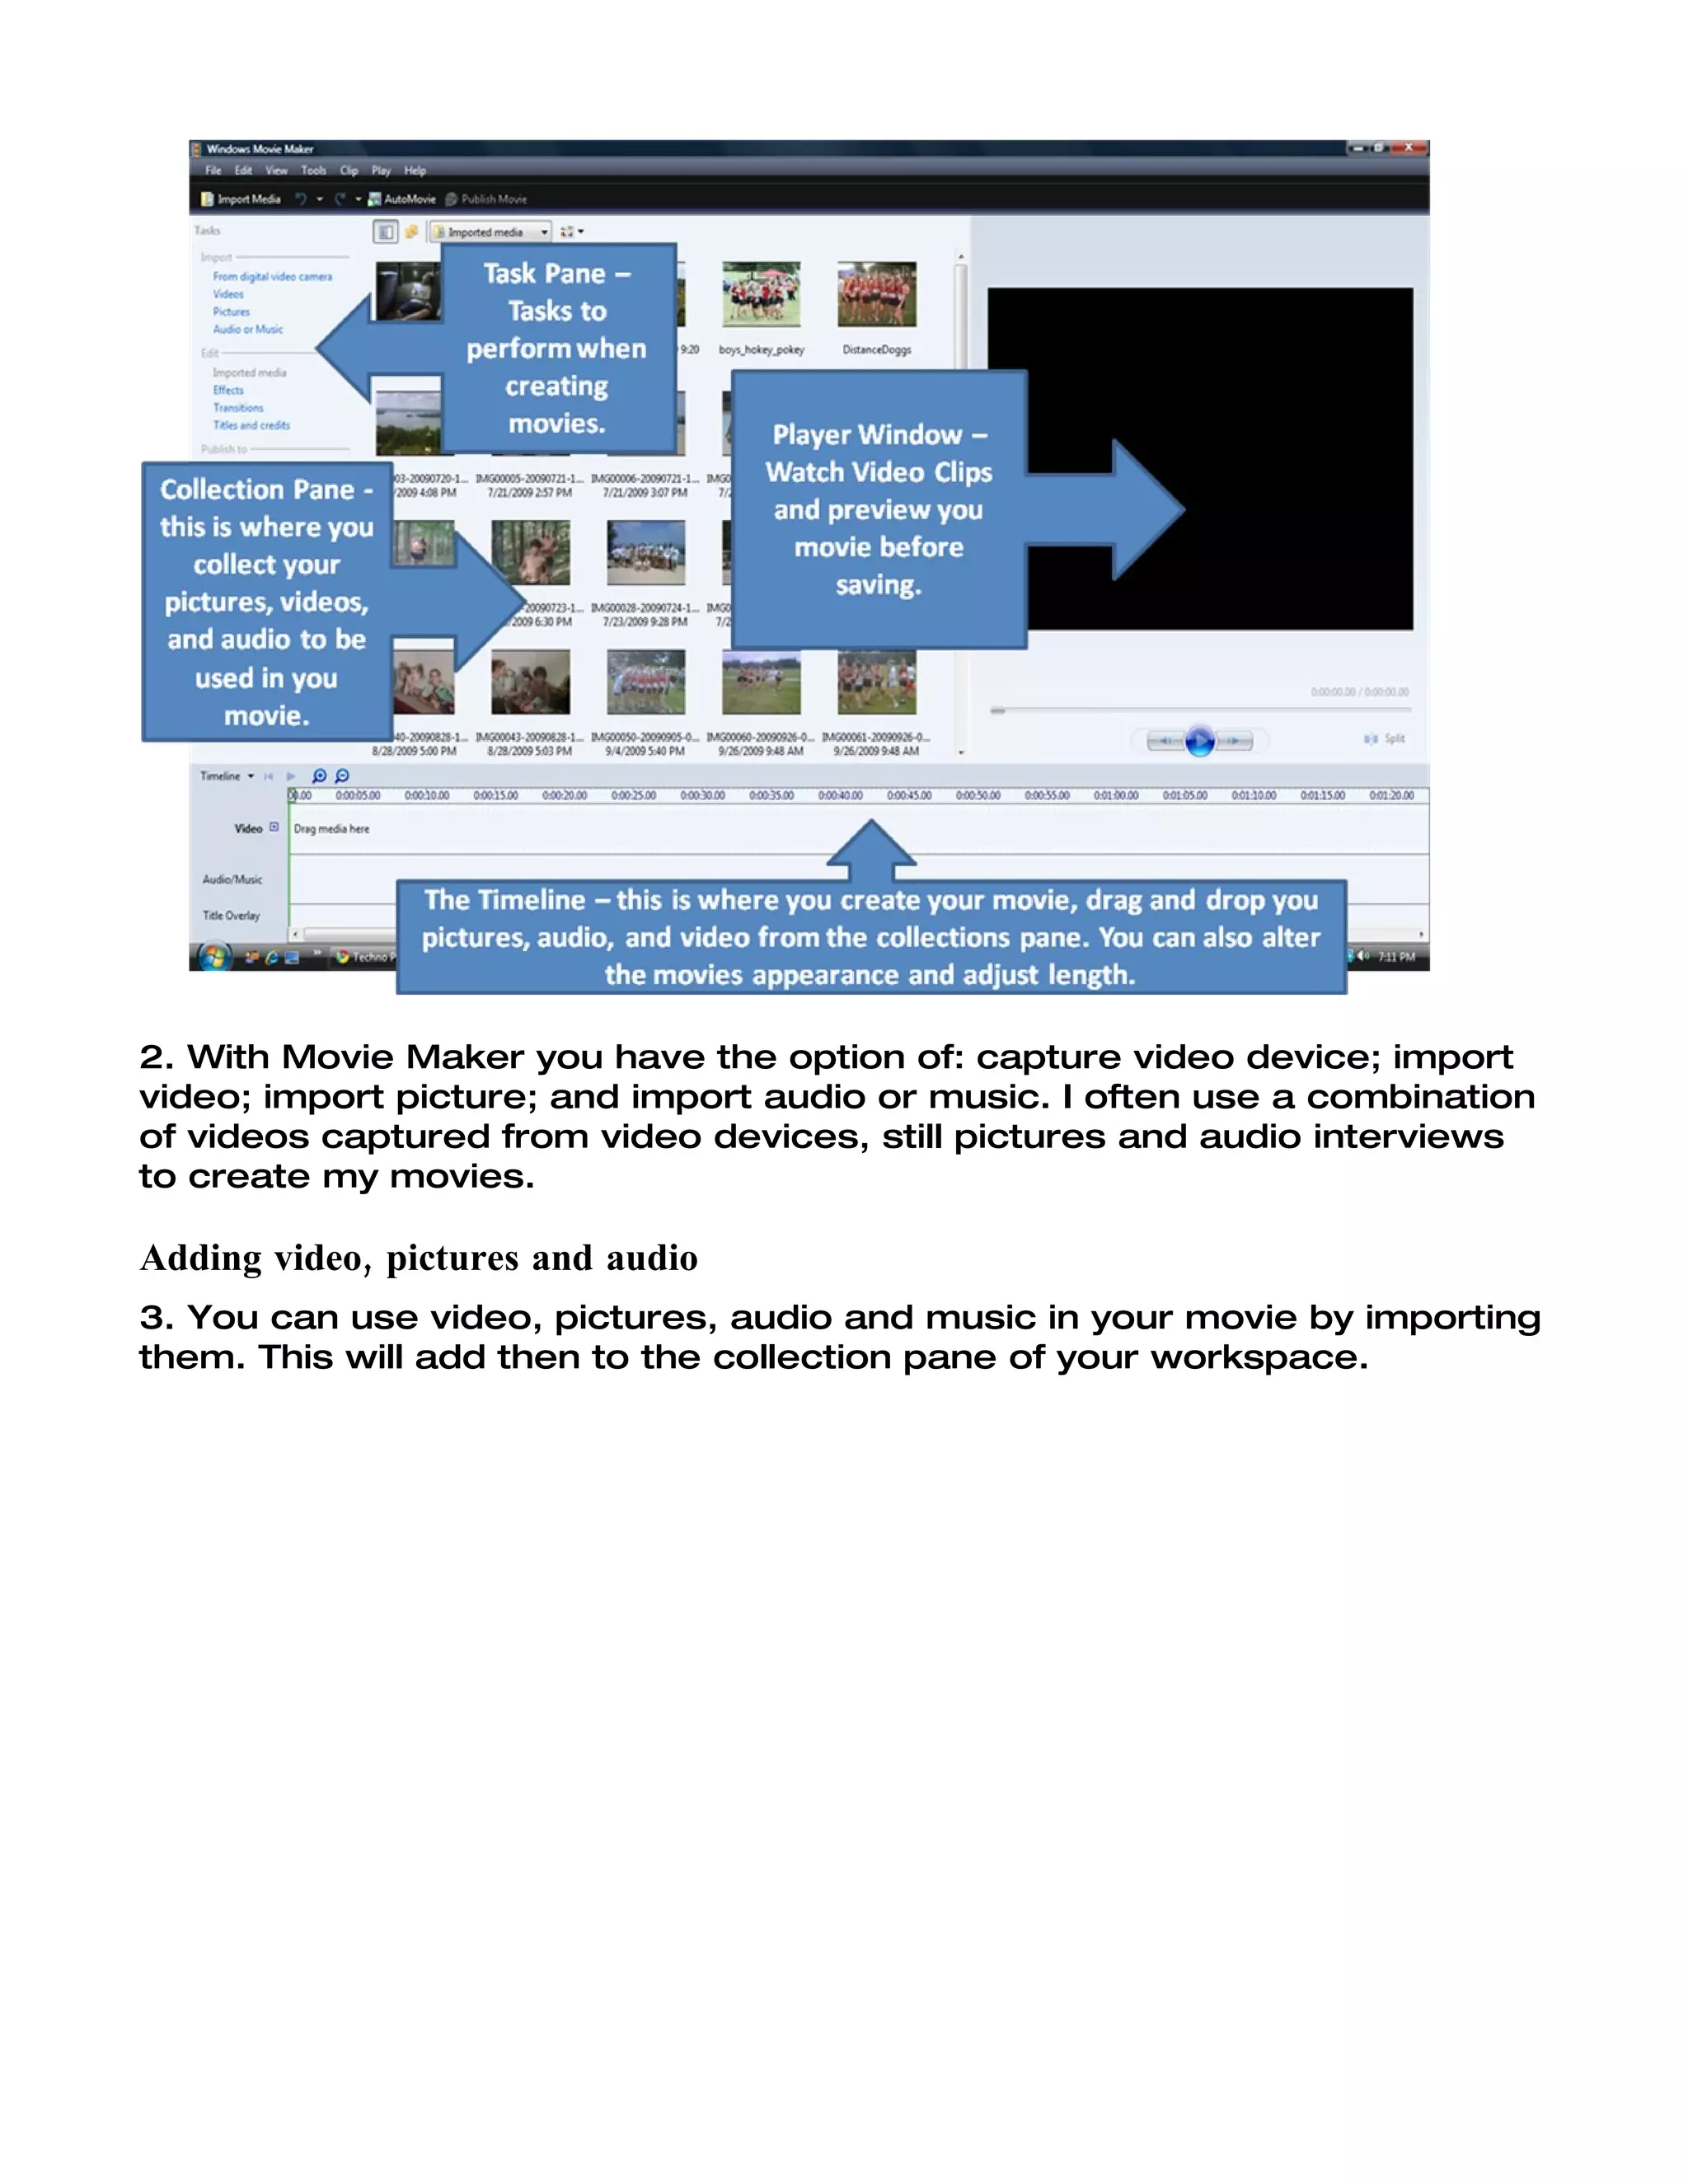
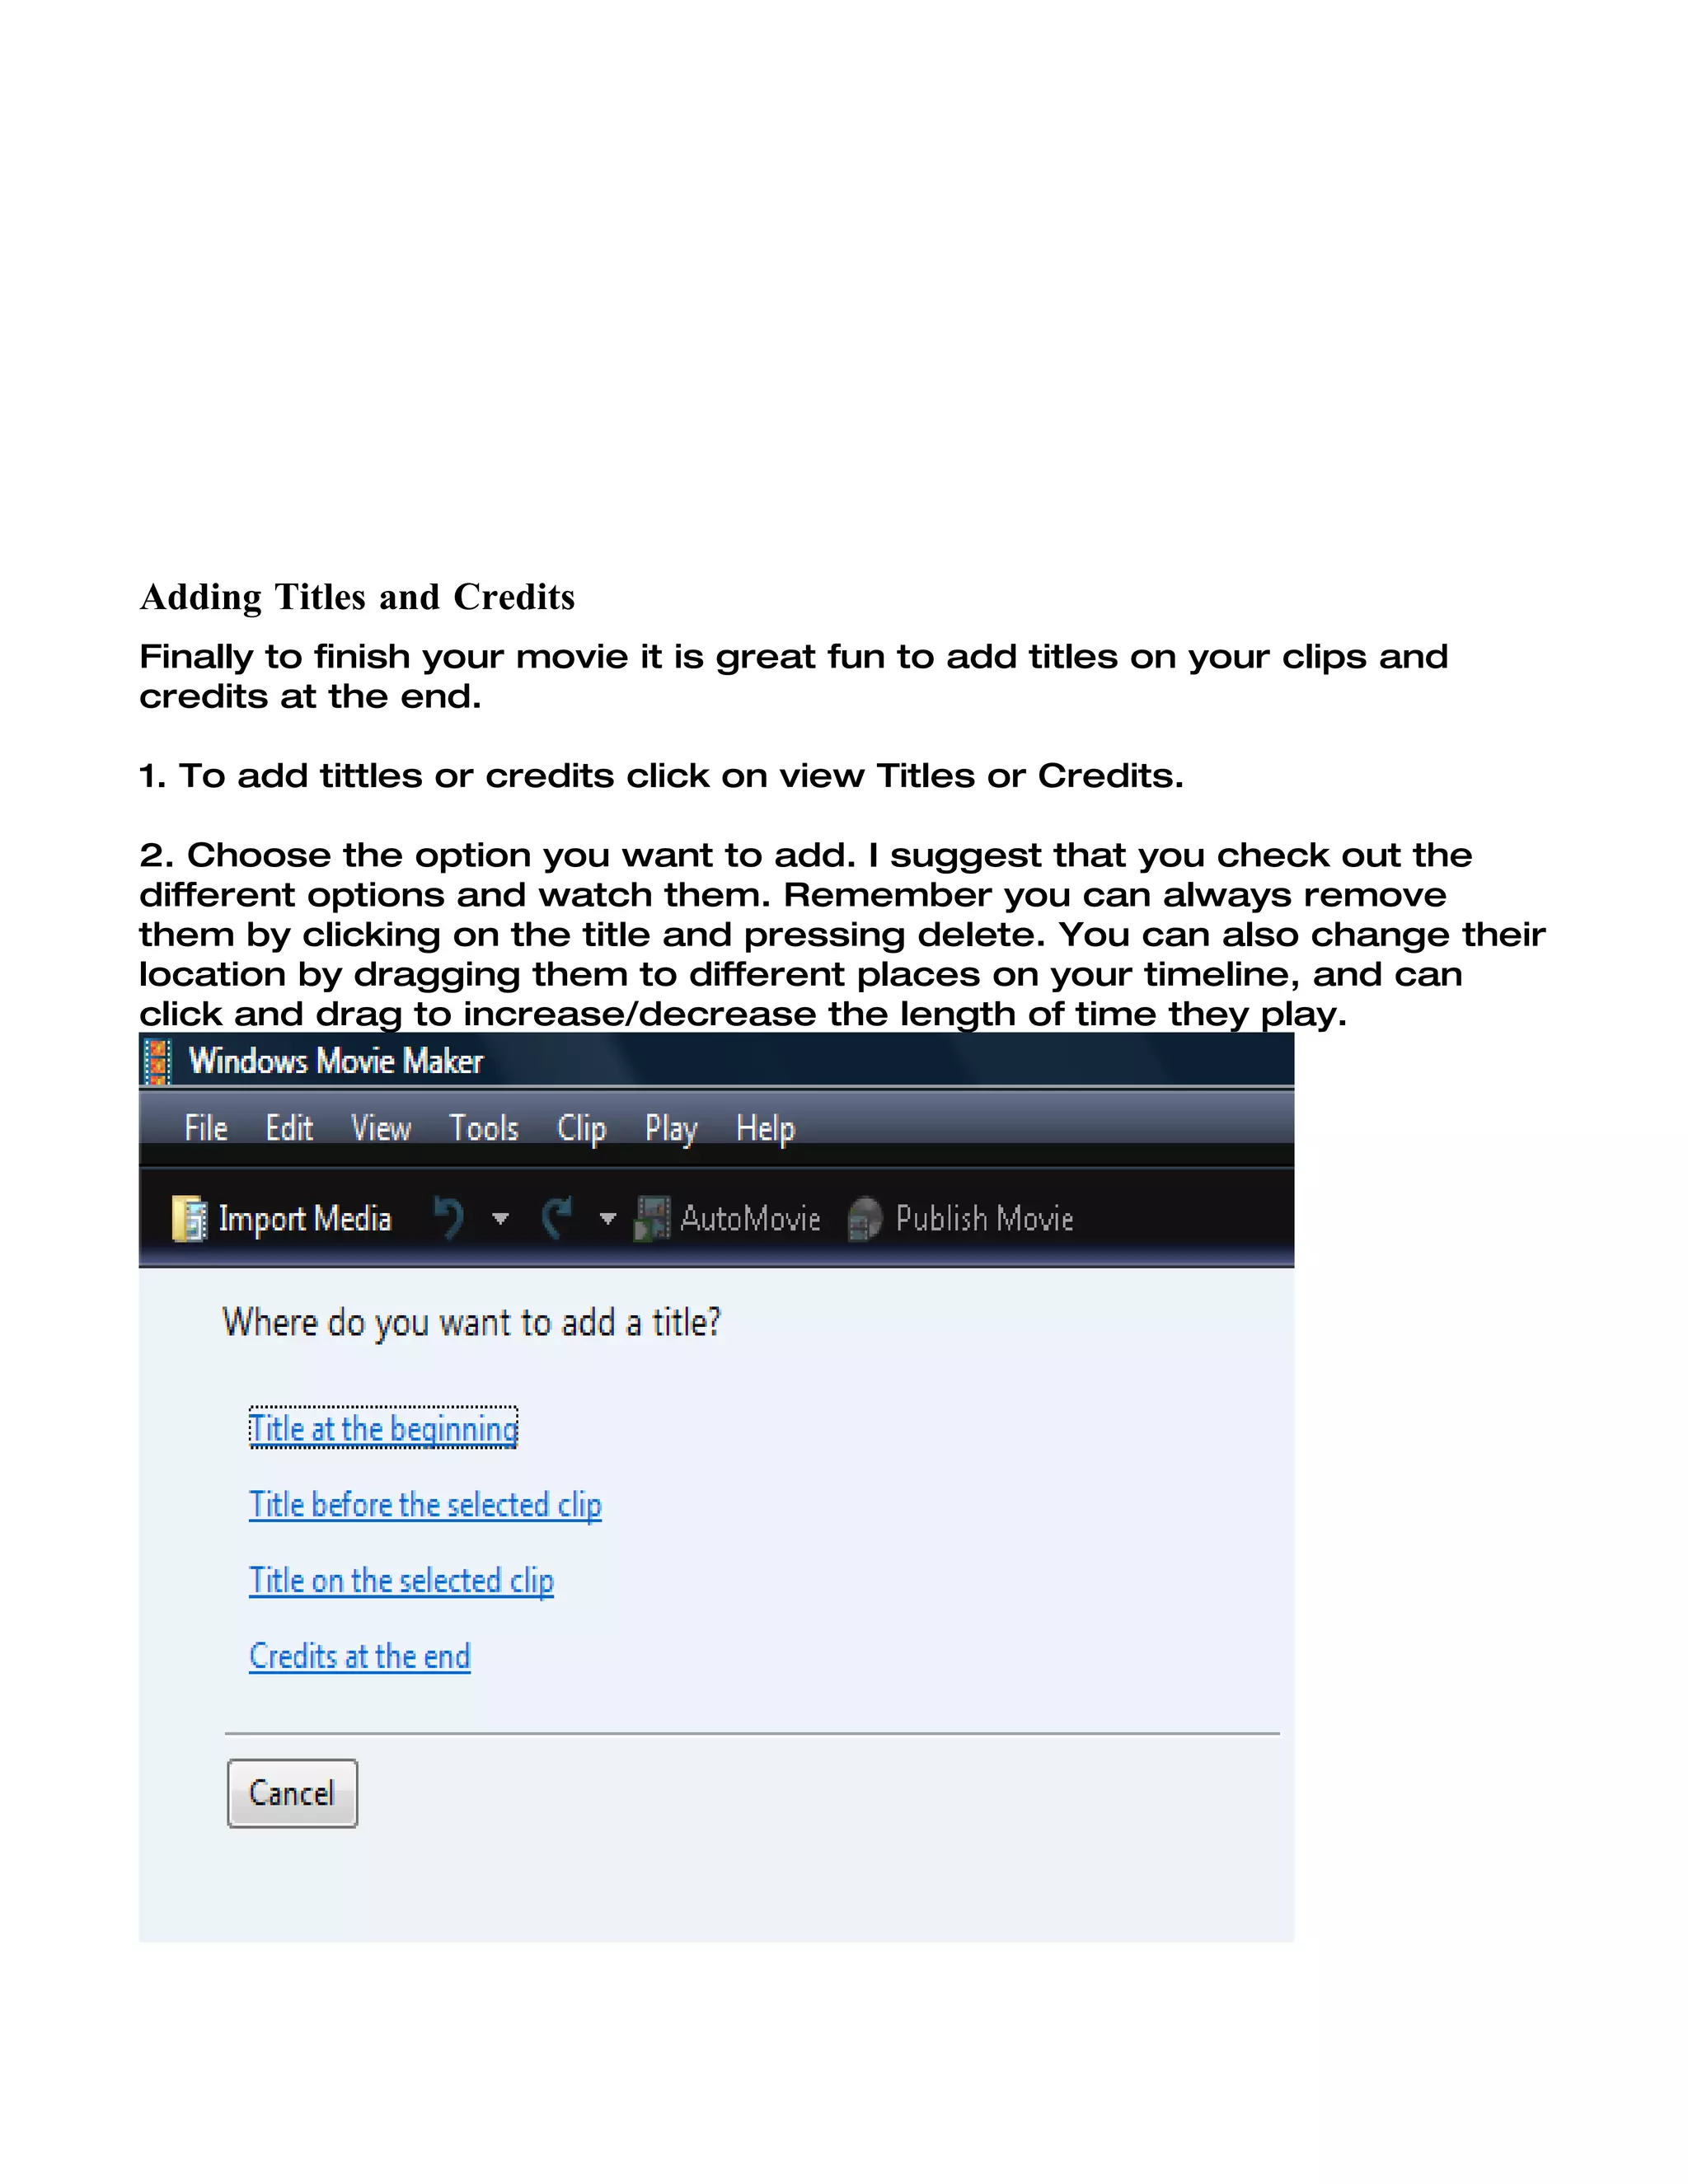
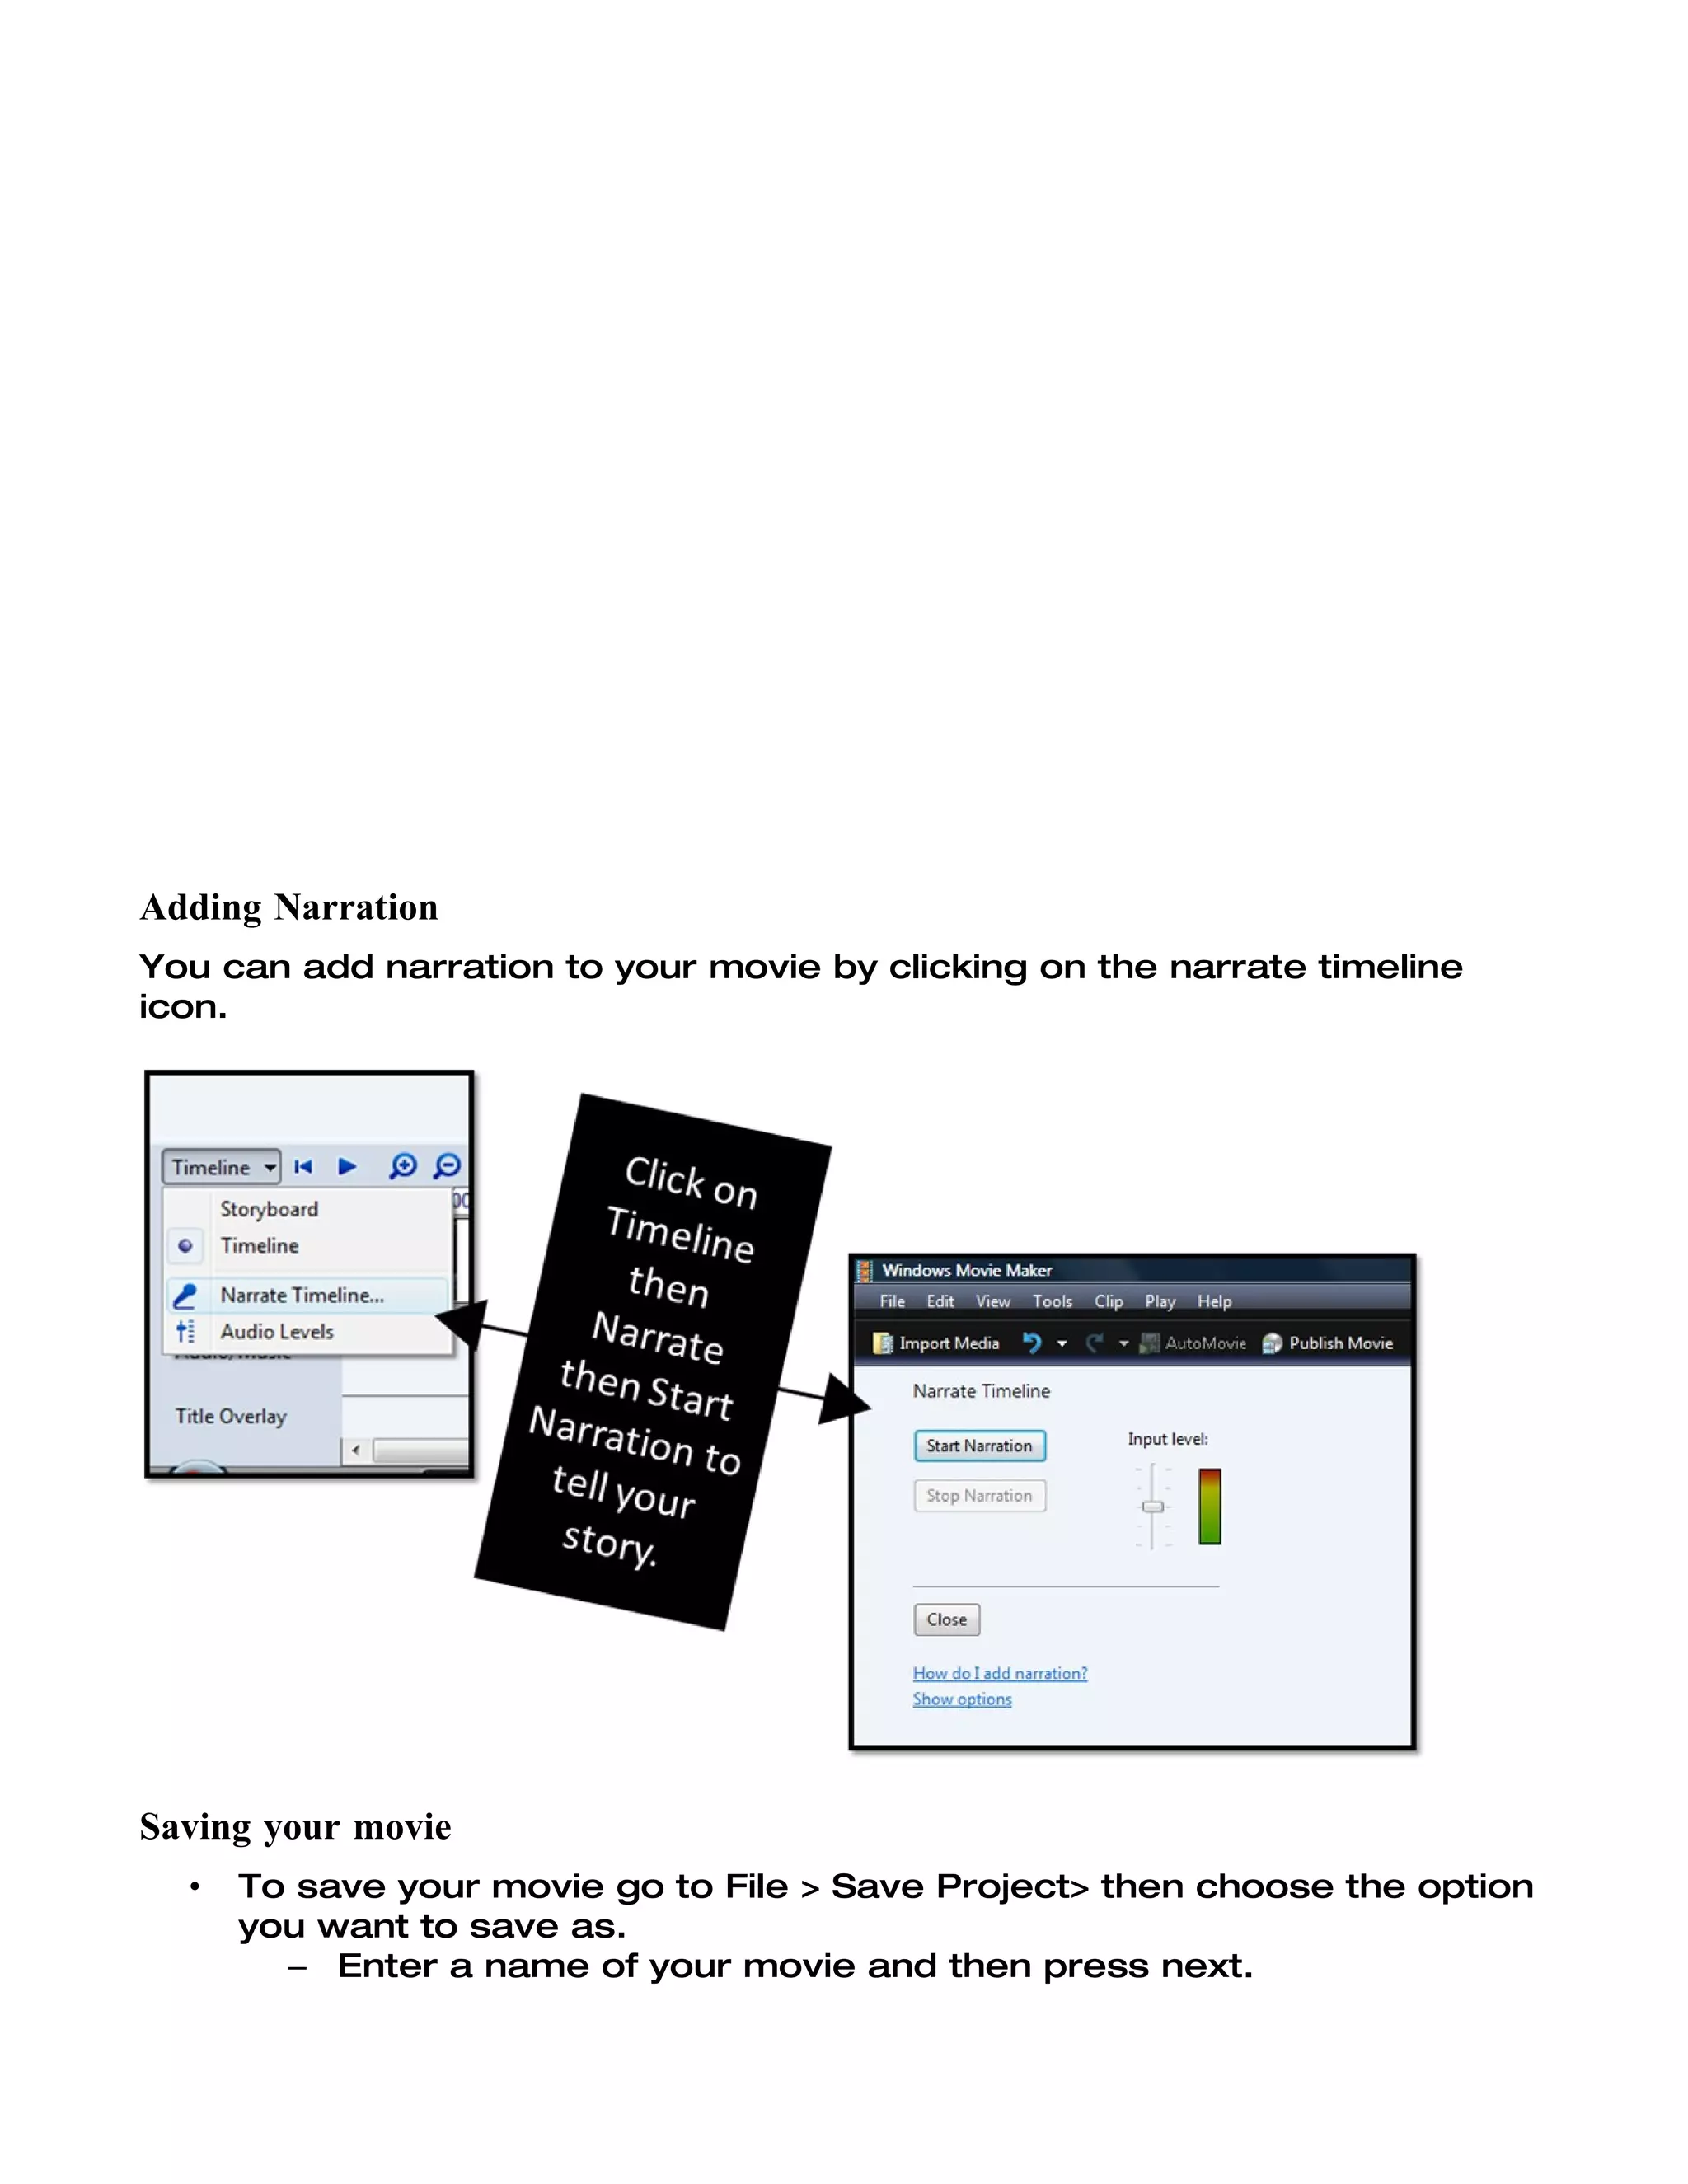
The Movie Maker How to Guide
Movie Maker is free software that comes with Windows Service Pack; so if
you have Windows you should have it installed already on your computer. It
is a popular program for creating digital stories and movies for
presentations or student projects because it is free and it is fairly easy to
use. The great feature of this program is you can import videos, pictures,
audio and music into the same movie project and edit how each is used to
create a great digital story. Educators and students can use this software
for creating digital stories and even video podcasts.

TIP:
Remember as you are editing to regularly save your project as a Movie
Maker Project by File > Save Project As (this means if you want to edit this
project again in Movie Maker you can go back and open up the project and
continue where you were up to; don't delete or change the location of your
photos, audio, videos associated with this project because then you will
not be able to edit the project).

Movie Maker Workspace

1. Go to Start > Programs > Movie Maker. If it is not on your computer or
you have Movie Maker 1 you will need to download Windows Movie Maker
2
2. With Movie Maker you have the option of: capture video device; import
video; import picture; and import audio or music. I often use a combination
of videos captured from video devices, still pictures and audio interviews
to create my movies.

Adding video, pictures and audio
3. You can use video, pictures, audio and music in your movie by importing
them. This will add then to the collection pane of your workspace.
4. You then just drop and drag from the video clips, pictures, audio and
music from your collection pane onto your timeline where you want them
to play in your movie.


5. You can change how long video clips, pictures and audio play by clicking
on them and dragging to increasing or decreasing the length they play.


Editing Options
Movie Maker has a range of Edit Movie options that will enhance your
movie.
Adding video effects
A video effect determines how a video clip, picture, or title displays in your
project and final movie. Video effects let you add special effects to your
movie. A video effect is applied for the entire duration that the video clip,
picture, or title displays in your movie.

1. To add a video effect click on view Video effects.

2. Then click and drag desired video effects onto clip in timeline. You can
play video to check out how the effect is working.

3. Don't stress you can always remove the effect if you don't like it by right
clicking on the clip and selecting Video effect.
Adding transitions
A video transition controls how your movie plays from one video clip or
picture to the next. You can add a transition between two pictures, video
clips, or titles, in any combination, on the storyboard/timeline. The
transition plays before the one clip ends and while the other clip starts to
play.

1. To add a video transition click on view Video transitions.

2. Then click and drag desired video transitions onto clips in timeline. You
can play video to check out how the transition is working.

3. Don't stress you can always remove the transition if you don't like it by
clicking on the transition and pressing delete.
Adding Titles and Credits
Finally to finish your movie it is great fun to add titles on your clips and
credits at the end.

1. To add tittles or credits click on view Titles or Credits.

2. Choose the option you want to add. I suggest that you check out the
different options and watch them. Remember you can always remove
them by clicking on the title and pressing delete. You can also change their
location by dragging them to different places on your timeline, and can
click and drag to increase/decrease the length of time they play.
Adding Narration
You can add narration to your movie by clicking on the narrate timeline
icon.


Saving your movie
  •   To save your movie go to File > Save Project> then choose the option
      you want to save as.
        – Enter a name of your movie and then press next.
•   The Publish Movie option allows you to share your movie in many
        different ways..
           – If publishing your movie select the Publish Movie button and
              choose the location for publication.
           – Choose a file name and a location to publish to
           – If saving to your computer select on best quality for my
              computer.
           – However if you plan to put it on the Internet click on Show more
              Choices and select other settings Video for Broadband (512
              kbps) then click save.
.

7464 Movie Maker How To Guide Mtl

  • 1.
    The Movie MakerHow to Guide Movie Maker is free software that comes with Windows Service Pack; so if you have Windows you should have it installed already on your computer. It is a popular program for creating digital stories and movies for presentations or student projects because it is free and it is fairly easy to use. The great feature of this program is you can import videos, pictures, audio and music into the same movie project and edit how each is used to create a great digital story. Educators and students can use this software for creating digital stories and even video podcasts. TIP: Remember as you are editing to regularly save your project as a Movie Maker Project by File > Save Project As (this means if you want to edit this project again in Movie Maker you can go back and open up the project and continue where you were up to; don't delete or change the location of your photos, audio, videos associated with this project because then you will not be able to edit the project). Movie Maker Workspace 1. Go to Start > Programs > Movie Maker. If it is not on your computer or you have Movie Maker 1 you will need to download Windows Movie Maker 2
  • 2.
    2. With MovieMaker you have the option of: capture video device; import video; import picture; and import audio or music. I often use a combination of videos captured from video devices, still pictures and audio interviews to create my movies. Adding video, pictures and audio 3. You can use video, pictures, audio and music in your movie by importing them. This will add then to the collection pane of your workspace.
  • 3.
    4. You thenjust drop and drag from the video clips, pictures, audio and music from your collection pane onto your timeline where you want them to play in your movie. 5. You can change how long video clips, pictures and audio play by clicking
  • 4.
    on them anddragging to increasing or decreasing the length they play. Editing Options Movie Maker has a range of Edit Movie options that will enhance your movie.
  • 5.
    Adding video effects Avideo effect determines how a video clip, picture, or title displays in your project and final movie. Video effects let you add special effects to your movie. A video effect is applied for the entire duration that the video clip, picture, or title displays in your movie. 1. To add a video effect click on view Video effects. 2. Then click and drag desired video effects onto clip in timeline. You can play video to check out how the effect is working. 3. Don't stress you can always remove the effect if you don't like it by right clicking on the clip and selecting Video effect.
  • 6.
    Adding transitions A videotransition controls how your movie plays from one video clip or picture to the next. You can add a transition between two pictures, video clips, or titles, in any combination, on the storyboard/timeline. The transition plays before the one clip ends and while the other clip starts to play. 1. To add a video transition click on view Video transitions. 2. Then click and drag desired video transitions onto clips in timeline. You can play video to check out how the transition is working. 3. Don't stress you can always remove the transition if you don't like it by clicking on the transition and pressing delete.
  • 7.
    Adding Titles andCredits Finally to finish your movie it is great fun to add titles on your clips and credits at the end. 1. To add tittles or credits click on view Titles or Credits. 2. Choose the option you want to add. I suggest that you check out the different options and watch them. Remember you can always remove them by clicking on the title and pressing delete. You can also change their location by dragging them to different places on your timeline, and can click and drag to increase/decrease the length of time they play.
  • 8.
    Adding Narration You canadd narration to your movie by clicking on the narrate timeline icon. Saving your movie • To save your movie go to File > Save Project> then choose the option you want to save as. – Enter a name of your movie and then press next.
  • 9.
    The Publish Movie option allows you to share your movie in many different ways.. – If publishing your movie select the Publish Movie button and choose the location for publication. – Choose a file name and a location to publish to – If saving to your computer select on best quality for my computer. – However if you plan to put it on the Internet click on Show more Choices and select other settings Video for Broadband (512 kbps) then click save. .