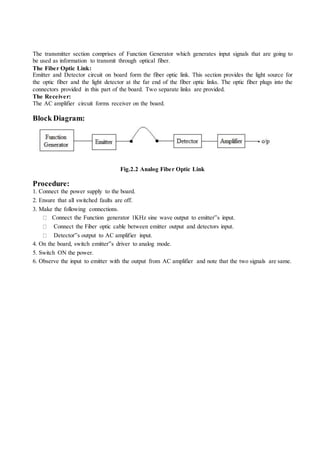
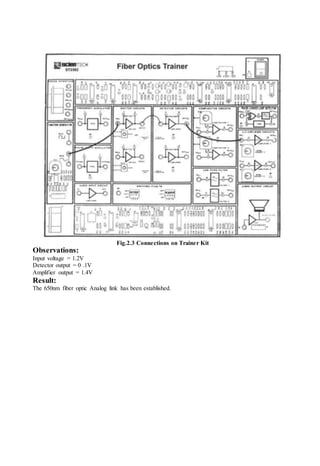
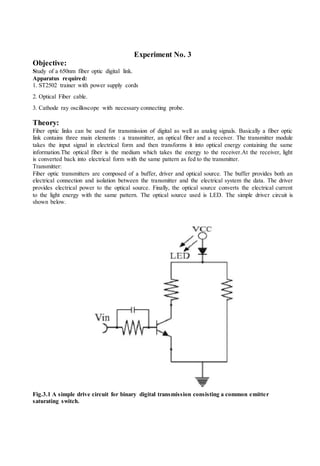
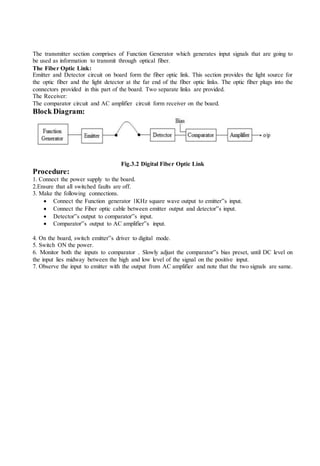
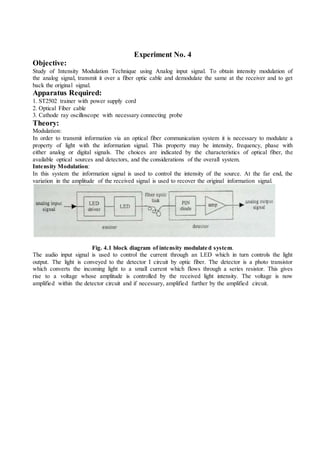
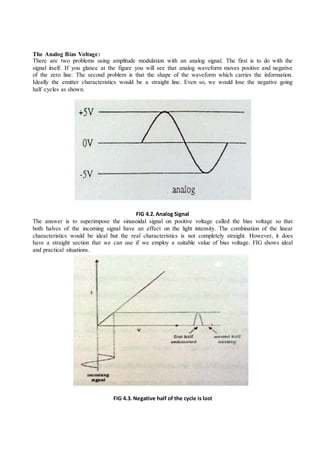
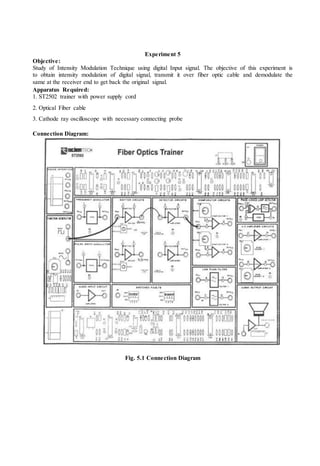
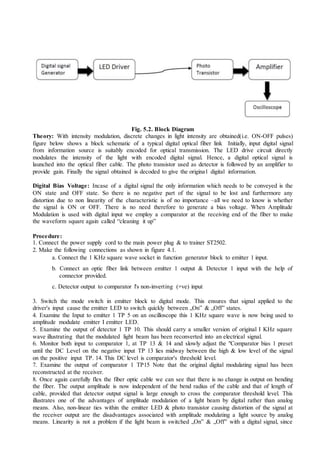
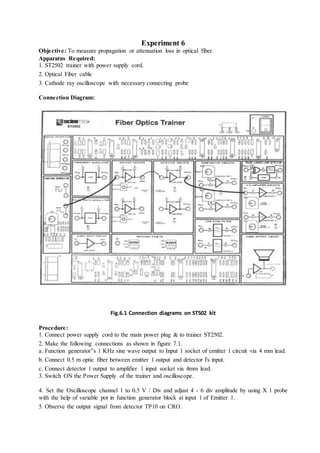
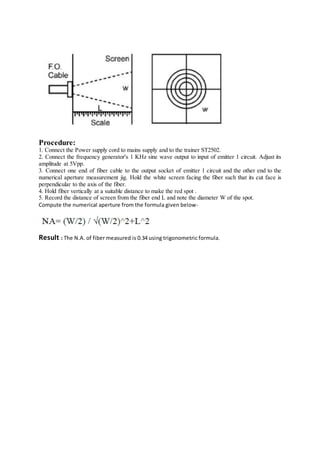
SlideShare a Scribd company logo
LAB MANUAL
Subject: Optical Communication
Paper: EC 758
Lab No. 415
List of Experiments:
1. Demonstration and study of different types of Optical Fibers and connectors.
2. To establish and Study of a 650nm fiber optic analog link.
3. To establish and Study of a 650nm fiber optic digital link.
4. Study of Intensity Modulation Technique using Analog input signal. To obtain intensity modulation of
the analog signal, transmit it over a fiber optic cable and demodulate the same at the receiver and to get
back the original signal.
5. Study of Intensity Modulation Technique using digital Input signal. The objective of this experiment
is to obtain intensity modulation of digital signal, transmit it over fiber optic cable and demodulate the
same at the receiver end to get back the original signal.
6. To measure propagation or attenuation loss in optical fiber.
7. To measure propagation loss in optical fiber using optical power meter.
8. To measurement of the Numerical Aperture (NA) of the fiber.
Experiment No. 1
Objective:
Demonstration and study of different types of Optical Fibers and connectors.
Apparatus Required:
Demonstration Kit of Optical Fibers and connectors.
Theory:
For much of modern telecommunication, the path over which the signals travel is optical fiber. Optical
fiber for most purposes is made of a very special kind of glass that is drawn into a very thin, long fiber.
In some ways, this is similar to the fiberglass that is used for insulation in homes. Unlike fiber glass,
however, optical fiber is made of a much different kind of glass and comes in lengths that may be many
kilometers long. Standard optical fiber is shaped like a very long thin cylinder. In the center of the
cylinder there is a core, and surrounding the core is a layer called the cladding. Both core and cladding
are glass; they are slightly different types, however. A cross section of the fiber is shown in Figure 1.1.
Fig.1.1. Cross-sectional views of an optical fiber.
Single mode optical fiber: In fiber-optic communication, a single-mode optical fiber (SMF) (mono
mode optical fiber, single-mode optical waveguide, or uni mode fiber) is an optical fibre designed to
carry only a single ray of light (mode). These modes define the way the wave travels through space, i.e.
how the wave is distributed in space. Waves can have the same mode but have different frequencies.
This is the case in single-mode fibers, where we can have waves with different frequencies, but of the
same mode, which means that they are distributed in space in the same way, and that gives us a single
ray of light. Although the ray travels parallel to the length of the fiber, it is often called transverse mode
since its electromagnetic vibrations occur perpendicular (transverse) to the length of the fibre. A typical
single mode optical fiber has a core diameter between 8 and 10.5 μm and a cladding diameter of 125 μm.
Multi-mode optical fiber: Multimode fiber optic cable has a large diametrical core that allows
multiple modes of light to propagate. Because of this, the number of light reflections created as the light
passes through the core increases, creating the ability for more data to pass through at a given time.
Because of the high dispersion and attenuation rate with this type of fiber, the quality of the signal is
reduced over long distances. This application is typically used for short distance, data and audio/video
applications in LANs. RF broadband signals, such as what cable companies commonly use, cannot be
transmitted over multimode fiber. Multimode fiber is usually 50/125 and 62.5/125 in construction. This
means that the core to cladding diameter ratio is 50 microns to 125 microns and 62.5 microns to 125
microns.
Multi-mode optical fiber can be built with either graded index or step index-Step-Index Multimode
Fiber: Due to its large core, some of the light rays that make up the digital pulse may travel a direct
route, whereas others zigzag as they bounce off the cladding. These alternate paths cause the different
groups of light rays, referred to as modes, to arrive separately at the receiving point. The pulse, an
aggregate of different modes, begins to spread out, losing its well-defined shape. The need to leave
spacing between pulses to prevent overlapping limits the amount of information that can be sent. This
type of fiber is best suited for transmission over short distances.
Graded-Index Multimode Fiber: Contains a core in which the refractive index diminishes gradually from
the center axis out toward the cladding. The higher refractive index at the center makes the light rays
moving down the axis advance more slowly than those near the cladding. Due to the graded index, light
in the core curves helically rather than zigzag off the cladding, reducing its travel distance. The
shortened path and the higher speed allow light at the periphery to arrive at a receiver at about the same
time as the slow but straight rays in the core axis. The result: digital pulse suffers less dispersion. This
type of fiber is best suited for local-area networks.
Fig.1.2 Propagation of light through different types of optical fibers.
Various optical fibers
Fig.1.3. Demonstration of different types of glass fibers and plastic fibers.
Various fiber optical connectors andadaptors
Fig.1.4. Demonstration of different types of fiber connectors and adaptors.
Result:
Various optical fibers and fiber optic connectors and adaptors have been studied through the
demonstration kit.
Experiment No. 2
Objective:
The Study of a 650nm fiber optic analog link.
Apparatus required:
1. ST2502 trainer with power supply cords
2. Optical Fiber cable.
3. Cathode ray oscilloscope with necessary connecting probe.
Theory:
Fiber optic links can be used for transmission of digital as well as analog signals. Basically a fiber optic
link contains three main elements : a transmitter, an optical fiber and a receiver. The transmitter module
takes the input signal in electrical form and then transforms it into optical energy containing the same
information.
The optical fiber is the medium which takes the energy to the receiver.
At the receiver, light is converted back into electrical form with the same pattern as fed to the
transmitter.
Transmitter:
Fiber optic transmitters are composed of a buffer, driver and optical source. The buffer provides both an
electrical connection and isolation between the transmitter and the electrical system the data. The driver
provides electrical power to the optical source. Finally, the optical source converts the electrical current
to the light energy with the same pattern. The optical source used is LED. Simple LED circuit for analog
transmission is shown below.
Fig.2.1 Transconductance drive circuit for analog transmission-common emitter configuration
The transmitter section comprises of Function Generator which generates input signals that are going to
be used as information to transmit through optical fiber.
The Fiber Optic Link:
Emitter and Detector circuit on board form the fiber optic link. This section provides the light source for
the optic fiber and the light detector at the far end of the fiber optic links. The optic fiber plugs into the
connectors provided in this part of the board. Two separate links are provided.
The Receiver:
The AC amplifier circuit forms receiver on the board.
Block Diagram:
Fig.2.2 Analog Fiber Optic Link
Procedure:
1. Connect the power supply to the board.
2. Ensure that all switched faults are off.
3. Make the following connections.
Connect the Function generator 1KHz sine wave output to emitter‟s input.
Connect the Fiber optic cable between emitter output and detectors input.
Detector‟s output to AC amplifier input.
4. On the board, switch emitter‟s driver to analog mode.
5. Switch ON the power.
6. Observe the input to emitter with the output from AC amplifier and note that the two signals are same.
Fig.2.3 Connections on Trainer Kit
Observations:
Input voltage = 1.2V
Detector output = 0 .1V
Amplifier output = 1.4V
Result:
The 650nm fiber optic Analog link has been established.
Experiment No. 3
Objective:
Study of a 650nm fiber optic digital link.
Apparatus required:
1. ST2502 trainer with power supply cords
2. Optical Fiber cable.
3. Cathode ray oscilloscope with necessary connecting probe.
Theory:
Fiber optic links can be used for transmission of digital as well as analog signals. Basically a fiber optic
link contains three main elements : a transmitter, an optical fiber and a receiver. The transmitter module
takes the input signal in electrical form and then transforms it into optical energy containing the same
information.The optical fiber is the medium which takes the energy to the receiver.At the receiver, light
is converted back into electrical form with the same pattern as fed to the transmitter.
Transmitter:
Fiber optic transmitters are composed of a buffer, driver and optical source. The buffer provides both an
electrical connection and isolation between the transmitter and the electrical system the data. The driver
provides electrical power to the optical source. Finally, the optical source converts the electrical current
to the light energy with the same pattern. The optical source used is LED. The simple driver circuit is
shown below.
Fig.3.1 A simple drive circuit for binary digital transmission consisting a common emitter
saturating switch.
The transmitter section comprises of Function Generator which generates input signals that are going to
be used as information to transmit through optical fiber.
The Fiber Optic Link:
Emitter and Detector circuit on board form the fiber optic link. This section provides the light source for
the optic fiber and the light detector at the far end of the fiber optic links. The optic fiber plugs into the
connectors provided in this part of the board. Two separate links are provided.
The Receiver:
The comparator circuit and AC amplifier circuit form receiver on the board.
Block Diagram:
Fig.3.2 Digital Fiber Optic Link
Procedure:
1. Connect the power supply to the board.
2.Ensure that all switched faults are off.
3. Make the following connections.
 Connect the Function generator 1KHz square wave output to emitter‟s input.
 Connect the Fiber optic cable between emitter output and detector‟s input.
 Detector‟s output to comparator‟s input.
 Comparator‟s output to AC amplifier‟s input.
4. On the board, switch emitter‟s driver to digital mode.
5. Switch ON the power.
6. Monitor both the inputs to comparator . Slowly adjust the comparator‟s bias preset, until DC level on
the input lies midway between the high and low level of the signal on the positive input.
7. Observe the input to emitter with the output from AC amplifier and note that the two signals are same.
Fig.3.3 Connections on Trainer Kit
Observations:
Input Voltage = 0.16V
Comparator output = 0.05V
Amplifier output = 1V
Result:
The 650nm fiber optic Digital link has been established.
Experiment No. 4
Objective:
Study of Intensity Modulation Technique using Analog input signal. To obtain intensity modulation of
the analog signal, transmit it over a fiber optic cable and demodulate the same at the receiver and to get
back the original signal.
Apparatus Required:
1. ST2502 trainer with power supply cord
2. Optical Fiber cable
3. Cathode ray oscilloscope with necessary connecting probe
Theory:
Modulation:
In order to transmit information via an optical fiber communication system it is necessary to modulate a
property of light with the information signal. This property may be intensity, frequency, phase with
either analog or digital signals. The choices are indicated by the characteristics of optical fiber, the
available optical sources and detectors, and the considerations of the overall system.
Intensity Modulation:
In this system the information signal is used to control the intensity of the source. At the far end, the
variation in the amplitude of the received signal is used to recover the original information signal.
Fig. 4.1 block diagram of intensity modulated system.
The audio input signal is used to control the current through an LED which in turn controls the light
output. The light is conveyed to the detector I circuit by optic fiber. The detector is a photo transistor
which converts the incoming light to a small current which flows through a series resistor. This gives
rise to a voltage whose amplitude is controlled by the received light intensity. The voltage is now
amplified within the detector circuit and if necessary, amplified further by the amplified circuit.
The Analog Bias Voltage:
There are two problems using amplitude modulation with an analog signal. The first is to do with the
signal itself. If you glance at the figure you will see that analog waveform moves positive and negative
of the zero line. The second problem is that the shape of the waveform which carries the information.
Ideally the emitter characteristics would be a straight line. Even so, we would lose the negative going
half cycles as shown.
FIG 4.2. Analog Signal
The answer is to superimpose the sinusoidal signal on positive voltage called the bias voltage so that
both halves of the incoming signal have an effect on the light intensity. The combination of the linear
characteristics would be ideal but the real characteristics is not completely straight. However, it does
have a straight section that we can use if we employ a suitable value of bias voltage. FIG shows ideal
and practical situations.
FIG 4.3. Negative half of the cycle is lost
FIG 4.4 Emitter characteristics : Ideal and Real
Connection Diagram:
Fig. 4.5 Connection Diagram
Procedure:
1. Connect the power supply cord to the main power plug & to trainer ST2502.
2. Make the following connections as shown in FIG. 5
a. Connect the FG output marked 1 KHz sine wave to input if emitter 1.
b. Plug in a fiber optic link from output of emitter 1 LED to the photo transistor of the detector 1.
c. Detector 1 output TP 10 to input of Amplifier TP 27.
3. In the emitter 1 block switch the mode select to analog.
4. Turn the 1 KHz preset in function generator block to fully clockwise (maximum amplitude)
position.
5. Switch on the Power Supply of the trainer and oscilloscope.
6. With the help of dual trace oscilloscope observe the input signal at emitter 1 TP 5 also; observe the
output from the detector 1. It should carry a smaller version of the original 1 KHz sine wave, illustrating
that the modulated light beam has been reconverted back into an electrical signal.
7. The output from detector 1 is further amplified by AC amplifier 1. This amplifier increases the
amplitude of the received signal, and also removes the DC component, which is present at detector
output. Monitor the output of amplifier 1 TP28 and adjust the gain adjust 1 preset until the monitored
signal has same amplitude as that applied to emitter 1 Input TP 5 .
8. While monitoring the output of Amplifier 1 TP 28 change the amplitude of modulating sine wave by
varying the 1 KHz preset in the function generator block. Note that as expected, the amplitude of the
receiver output signal changes.
Observations:
Frequency=1 KHz S.No. Input Voltage(V) Output Voltage(V)
1 0.10 0.08
2 0.20 0.12
3 0.24 0.18
4 0.44 0.24
FIG 4.7. Output V=0.08V
FIG 4.6. Input V=0.10V
Result:
The Intensity Modulation and Demodulation of the Analog signal has been implemented.
Experiment 5
Objective:
Study of Intensity Modulation Technique using digital Input signal. The objective of this experiment is
to obtain intensity modulation of digital signal, transmit it over fiber optic cable and demodulate the
same at the receiver end to get back the original signal.
Apparatus Required:
1. ST2502 trainer with power supply cord
2. Optical Fiber cable
3. Cathode ray oscilloscope with necessary connecting probe
Connection Diagram:
Fig. 5.1 Connection Diagram
Fig. 5.2. Block Diagram
Theory: With intensity modulation, discrete changes in light intensity are obtained(i.e. ON-OFF pulses)
figure below shows a block schematic of a typical digital optical fiber link Initially, input digital signal
from information source is suitably encoded for optical transmission. The LED drive circuit directly
modulates the intensity of the light with encoded digital signal. Hence, a digital optical signal is
launched into the optical fiber cable. The photo transistor used as detector is followed by an amplifier to
provide gain. Finally the signal obtained is decoded to give the original digital information.
Digital Bias Voltage: Incase of a digital signal the only information which needs to be conveyed is the
ON state and OFF state. So there is no negative part of the signal to be lost and furthermore any
distortion due to non linearity of the characteristic is of no importance –all we need to know is whether
the signal is ON or OFF. There is no need therefore to generate a bias voltage. When Amplitude
Modulation is used with digital input we employ a comparator at the receiving end of the fiber to make
the waveform square again called “cleaning it up”
Procedure:
1. Connect the power supply cord to the main power plug & to trainer ST2502.
2. Make the following connections as shown in figure 4.1.
a. Connect the 1 KHz square wave socket in function generator block to emitter 1 input.
b. Connect an optic fiber link between emitter 1 output & Detector 1 input with the help of
connector provided.
c. Detector output to comparator l's non-inverting (+ve) input
3. Switch the mode switch in emitter block to digital mode. This ensures that signal applied to the
driver's input cause the emitter LED to switch quickly between „On‟ & „Off‟ states.
4. Examine the Input to emitter 1 TP 5 on an oscilloscope this 1 KHz square wave is now being used to
amplitude modulate emitter I emitter LED.
5. Examine the output of detector 1 TP 10. This should carry a smaller version of original I KHz square
wave illustrating that the modulated light beam has been reconverted into an electrical signal.
6. Monitor both input to comparator 1, at TP 13 & 14 and slowly adjust the "Comparator bias 1 preset
until the DC Level on the negative input TP 13 lies midway between the high & low level of the signal
on the positive input TP. 14. This DC level is comparator's threshold level.
7. Examine the output of comparator 1 TP15 Note that the original digital modulating signal has been
reconstructed at the receiver.
8. Once again carefully flex the fiber optic cable we can see that there is no change in output on bending
the fiber. The output amplitude is now independent of the bend radius of the cable and that of length of
cable, provided that detector output signal is large enough to cross the comparator threshold level. This
illustrates one of the advantages of amplitude modulation of a light beam by digital rather than analog
means. Also, non-linear ties within the emitter LED & photo transistor causing distortion of the signal at
the receiver output are the disadvantages associated with amplitude modulating a light source by analog
means. Linearity is not a problem if the light beam is switched „On‟ & „Off‟ with a digital signal, since
the detector output is simply squared up by a comparator circuit. To overcome problems associated with
amplitude modulation of a light beam by analog means, analog signals are often used to vary or
modulate some characteristic of a digital signal (e.g. frequency or pulse width.). The digital signal being
used to switch the light beam „On‟ & „Off‟.
Observations
Results:
Intensity Modulation has been performed and its uses over analog intensity modulation have been
verified.
Experiment 6
Objective: To measure propagation or attenuation loss in optical fiber.
Apparatus Required:
1. ST2502 trainer with power supply cord.
2. Optical Fiber cable
3. Cathode ray oscilloscope with necessary connecting probe
Connection Diagram:
Fig.6.1 Connection diagrams on ST502 kit
Procedure:
1. Connect power supply cord to the main power plug & to trainer ST2502.
2. Make the following connections as shown in figure 7.1.
a. Function generator‟s 1 KHz sine wave output to Input 1 socket of emitter 1 circuit via 4 mm lead.
b. Connect 0.5 m optic fiber between emitter 1 output and detector l's input.
c. Connect detector 1 output to amplifier 1 input socket via 4mm lead.
3. Switch ON the Power Supply of the trainer and oscilloscope.
4. Set the Oscilloscope channel 1 to 0.5 V / Div and adjust 4 - 6 div amplitude by using X 1 probe
with the help of variable pot in function generator block at input 1 of Emitter 1.
5. Observe the output signal from detector TP10 on CRO.
6. Adjust the amplitude of the received signal same as that of transmitted one with the help of gain
adjust potentiometer in AC amplifier block. Note this amplitude and name it V1.
7. Now replace the previous FG cable with 1 m cable without disturbing any previous setting.
8. Measure the amplitude at the receiver side again at output of amplifier 1 socket TP 28. Note this
value end name it V2.
Observations:
1. Using output of cables of different diameters:
O/P of .5m cable-.56V
O/P of 1m cable-.52V
Attenuation=20log56/52=.64dB
2. Using formula α= -1/(L1+L2)ln(V1/V2)=.429dB/m
3. Using OPM, Pn=-31.3dBm, Pf=-31.4dBm
α = .1dB
Calculations:
Calculate the propagation (attenuation) loss with the help of following formula.
V1 / V2 = e- α (L1 + L2)
Where α is loss in nepers / meter
1 neper = 8. 686 dB
L 1 = length of shorter cable (0.5 m)
L 2 = Length of longer cable (1 m)
Precautions:
a. The optical fiber must not be bent, so as to avoid bending losses.
b. The circuit must be neat and secure.
Experiment 7
Objective: To measure propagation loss in optical fiber using optical power meter.
Apparatus Required:
1. ST2502 trainer with power supply cord
2. Optical fiber cable
3. Cathode ray oscilloscope with necessary connecting probe
4. Power Meter ST2551 with power supply cord
Connection Diagram:
Fig. 7.1 Connection diagram on ST2502 kit.
Procedure:
1. Connect the Power supply cord to mains supply and to the trainer ST2501.
2. Keep the mode switch in emitter 1 circuit in analog mode
3. Connect the 0.5m fiber cable in between the emitter LED & I/P of power meter.
4. Switch on the instrument fiber optic trainer & power meter (Keep the wavelength switch in 660
nm, position). Note the reading in power meter.
5. Replace the 0.5m fiber cable with the 1m cables without disturbing any setting.
6. Again note the reading in power. This reading will be lesser then the previous one, indicating
that the propagation loss increases with increase in length.
7. Perform the same experiment with emitter 2.
Observations: Using OPM, Pn=-31.3dBm, Pf=-31.4dBm α = .1dB
Precautions:
a. The optical fiber must not be bent, so as to avoid bending losses.
b. The circuit must be neat and secure.
Experiment 8
Objective: To measurement of the Numerical Aperture (NA) of the fiber.
Apparatus Required:
1. ST2502 trainer with power supply cord
2. Optical Fiber cable.
3. Numerical Aperture measurement Jig/Paper & Scale.
Fig.8.1 Connection diagram on ST2502
Theory:
The numerical aperture refers to maximum angle at which the incident on fiber end is totally
internally reflected and is transmitted along the fiber. The cone formed by rotation of this angle
along the axis of the fiber is the cone of acceptance of fiber. if light ray should strike the fiber end
within this cone of acceptance it will be transmitted properly else it is refracted out of fiber.
Procedure:
1. Connect the Power supply cord to mains supply and to the trainer ST2502.
2. Connect the frequency generator's 1 KHz sine wave output to input of emitter 1 circuit. Adjust its
amplitude at 5Vpp.
3. Connect one end of fiber cable to the output socket of emitter 1 circuit and the other end to the
numerical aperture measurement jig. Hold the white screen facing the fiber such that its cut face is
perpendicular to the axis of the fiber.
4. Hold fiber vertically at a suitable distance to make the red spot .
5. Record the distance of screen from the fiber end L and note the diameter W of the spot.
Compute the numerical aperture from the formula given below-
Result : The N.A. of fiber measured is 0.34 using trigonometric formula.
1. Dispersionismaximumat(FORSMF)
a) 1310 nm b) 1550nm c)1330nm d) none of the above
2. If zeroDC bias isprovidedtothe inputof comparator circuit,(incase of digital optical fiberlink).
the outputof the CRO will be
a)'1' b) '0' c) circuit will notworkproperlyd) outputwill be same asthe input.
3. The full formof PMMA is
........................................................................................................................
4. The full formof 'FC' connectorstands for
.................................................................................................
5. A lightray ismovingfromdensertorarer medium, itwill bendawayfromthe normal.T/F

More Related Content

What's hot

Fiber alignment and joint loss
Fiber alignment and joint lossFiber alignment and joint loss
Fiber alignment and joint loss
Ali Baig
 
Optical Fiber
Optical FiberOptical Fiber
Optical Fiber
Eklavya Singh
 
Optical add drop multiplexer in Optical Fiber Communication
Optical add drop multiplexer in Optical Fiber CommunicationOptical add drop multiplexer in Optical Fiber Communication
Optical add drop multiplexer in Optical Fiber Communication
Tanvir Amin
 
Modulation of LED
Modulation of LEDModulation of LED
Modulation of LED
Priyanka Anni
 
What is Mode Field Diameter?
What is Mode Field Diameter?What is Mode Field Diameter?
What is Mode Field Diameter?
Caroline Connolly
 
optical transmitter
optical transmitteroptical transmitter
optical transmitter
@zenafaris91
 
Losses in fiber
Losses in fiberLosses in fiber
Losses in fiber
Sagar Adroja
 
Optical fiber communiction system
Optical fiber communiction systemOptical fiber communiction system
Optical fiber communiction systemrahulohlan14
 
Fibre splicing
Fibre splicingFibre splicing
Fibre splicing
Nijas Mohamed
 
Optical network architecture
Optical network architectureOptical network architecture
Optical network architecture
Siddharth Singh
 
Analog and digital modulation formats of optical fiber communication within a...
Analog and digital modulation formats of optical fiber communication within a...Analog and digital modulation formats of optical fiber communication within a...
Analog and digital modulation formats of optical fiber communication within a...IAEME Publication
 
Antenna PARAMETERS
Antenna PARAMETERSAntenna PARAMETERS
Antenna PARAMETERS
AJAL A J
 
Fiber optical coupler
Fiber optical couplerFiber optical coupler
Fiber optical coupler
saad mahdi
 
Connector losses Optical Fiber Cable
Connector losses Optical Fiber CableConnector losses Optical Fiber Cable
Connector losses Optical Fiber Cable
Kalyan Acharjya
 
Topic : B ISDN
Topic : B ISDNTopic : B ISDN
Topic : B ISDN
Dr Rajiv Srivastava
 
OPTICAL FIBER COMMUNICATION UNIT-1
OPTICAL FIBER COMMUNICATION UNIT-1OPTICAL FIBER COMMUNICATION UNIT-1
OPTICAL FIBER COMMUNICATION UNIT-1
Asif Iqbal
 
Outdoor indoor Propagation
Outdoor indoor PropagationOutdoor indoor Propagation
Outdoor indoor Propagation
METHODIST COLLEGE OF ENGG & TECH
 
Satellite link design
Satellite link designSatellite link design

What's hot (20)

Fiber alignment and joint loss
Fiber alignment and joint lossFiber alignment and joint loss
Fiber alignment and joint loss
 
Optical Fiber
Optical FiberOptical Fiber
Optical Fiber
 
Optical add drop multiplexer in Optical Fiber Communication
Optical add drop multiplexer in Optical Fiber CommunicationOptical add drop multiplexer in Optical Fiber Communication
Optical add drop multiplexer in Optical Fiber Communication
 
Modulation of LED
Modulation of LEDModulation of LED
Modulation of LED
 
What is Mode Field Diameter?
What is Mode Field Diameter?What is Mode Field Diameter?
What is Mode Field Diameter?
 
optical transmitter
optical transmitteroptical transmitter
optical transmitter
 
Losses in fiber
Losses in fiberLosses in fiber
Losses in fiber
 
Optical fiber communiction system
Optical fiber communiction systemOptical fiber communiction system
Optical fiber communiction system
 
Losses in optical fiber
Losses in optical fiberLosses in optical fiber
Losses in optical fiber
 
Mwe lab manual
Mwe lab manualMwe lab manual
Mwe lab manual
 
Fibre splicing
Fibre splicingFibre splicing
Fibre splicing
 
Optical network architecture
Optical network architectureOptical network architecture
Optical network architecture
 
Analog and digital modulation formats of optical fiber communication within a...
Analog and digital modulation formats of optical fiber communication within a...Analog and digital modulation formats of optical fiber communication within a...
Analog and digital modulation formats of optical fiber communication within a...
 
Antenna PARAMETERS
Antenna PARAMETERSAntenna PARAMETERS
Antenna PARAMETERS
 
Fiber optical coupler
Fiber optical couplerFiber optical coupler
Fiber optical coupler
 
Connector losses Optical Fiber Cable
Connector losses Optical Fiber CableConnector losses Optical Fiber Cable
Connector losses Optical Fiber Cable
 
Topic : B ISDN
Topic : B ISDNTopic : B ISDN
Topic : B ISDN
 
OPTICAL FIBER COMMUNICATION UNIT-1
OPTICAL FIBER COMMUNICATION UNIT-1OPTICAL FIBER COMMUNICATION UNIT-1
OPTICAL FIBER COMMUNICATION UNIT-1
 
Outdoor indoor Propagation
Outdoor indoor PropagationOutdoor indoor Propagation
Outdoor indoor Propagation
 
Satellite link design
Satellite link designSatellite link design
Satellite link design
 

Viewers also liked

Communicationlabmanual
CommunicationlabmanualCommunicationlabmanual
Communicationlabmanualjkanth26
 
Data communication lab manual
Data communication lab manualData communication lab manual
Data communication lab manualNafe Singh Yadav
 
Dc lab Manual
Dc lab ManualDc lab Manual
Dc lab Manual
manu anand
 
Advanced communication lab manual
Advanced communication lab manual Advanced communication lab manual
Advanced communication lab manual
AJAL A J
 
Computer Networking Lab File
Computer Networking Lab FileComputer Networking Lab File
Computer Networking Lab File
Nitin Bhasin
 

Viewers also liked (6)

Communicationlabmanual
CommunicationlabmanualCommunicationlabmanual
Communicationlabmanual
 
Data communication lab manual
Data communication lab manualData communication lab manual
Data communication lab manual
 
Dc lab Manual
Dc lab ManualDc lab Manual
Dc lab Manual
 
Advanced communication lab manual
Advanced communication lab manual Advanced communication lab manual
Advanced communication lab manual
 
Os lab manual
Os lab manualOs lab manual
Os lab manual
 
Computer Networking Lab File
Computer Networking Lab FileComputer Networking Lab File
Computer Networking Lab File
 

Similar to Lab manual

For presentation
For presentationFor presentation
For presentation
Joel P
 
Optical fiber communiction
Optical fiber communictionOptical fiber communiction
Optical fiber communiction
Aravind Shaji
 
Optical communication and Equipments
Optical communication and EquipmentsOptical communication and Equipments
Optical communication and Equipments
Ravi Bhasker
 
pptonsummertraining-161231124242.pdf
pptonsummertraining-161231124242.pdfpptonsummertraining-161231124242.pdf
pptonsummertraining-161231124242.pdf
MihirDatir1
 
Ppt on optical fiber
Ppt on optical fiberPpt on optical fiber
Ppt on optical fiber
Ram Singh Patel
 
Optical Communications - Presentation.pdf
Optical Communications - Presentation.pdfOptical Communications - Presentation.pdf
Optical Communications - Presentation.pdf
Eshwar Prasad
 
opsahu advanced communication lab 6 sem.file r.k.r govt poly janjgir
opsahu advanced communication lab 6 sem.file r.k.r govt poly janjgiropsahu advanced communication lab 6 sem.file r.k.r govt poly janjgir
opsahu advanced communication lab 6 sem.file r.k.r govt poly janjgir
Government Engineering College, Raipur
 
Optical fiber by debraj maji
Optical fiber by debraj majiOptical fiber by debraj maji
Optical fiber by debraj maji
Debraj Maji
 
Fiber Optics Course
Fiber Optics Course Fiber Optics Course
Fiber Optics Course
Ahmed OM
 
Optical Communications presentation.pptx
Optical Communications presentation.pptxOptical Communications presentation.pptx
Optical Communications presentation.pptx
helixmanglalina820
 
Principles_of_Communication_Lecture_11.pptx
Principles_of_Communication_Lecture_11.pptxPrinciples_of_Communication_Lecture_11.pptx
Principles_of_Communication_Lecture_11.pptx
abirk2773
 
Mw&oc manual
Mw&oc manualMw&oc manual
Mw&oc manualvkop100
 
OPTICAL_FIBRE_COMMUNICATION.pptx
OPTICAL_FIBRE_COMMUNICATION.pptxOPTICAL_FIBRE_COMMUNICATION.pptx
OPTICAL_FIBRE_COMMUNICATION.pptx
DavidBrown748658
 
Optical fiber
Optical fiberOptical fiber
Optical fiber
vishakha trivedi
 
Opticalfiber 13015411-151122111147-lva1-app6891-converted
Opticalfiber 13015411-151122111147-lva1-app6891-convertedOpticalfiber 13015411-151122111147-lva1-app6891-converted
Opticalfiber 13015411-151122111147-lva1-app6891-converted
Jayaraman Lakshmanasamy
 
B.Tech ECE IV Year I Sem, MWOC UNIT 5 Optical CommunicationsUNIT 5 MWOC.pptx
B.Tech ECE IV Year I Sem, MWOC UNIT 5  Optical CommunicationsUNIT 5 MWOC.pptxB.Tech ECE IV Year I Sem, MWOC UNIT 5  Optical CommunicationsUNIT 5 MWOC.pptx
B.Tech ECE IV Year I Sem, MWOC UNIT 5 Optical CommunicationsUNIT 5 MWOC.pptx
janakiravi
 
Em and optics project 3 (1st) converted
Em and optics project 3 (1st) convertedEm and optics project 3 (1st) converted
Em and optics project 3 (1st) converted
DurgeshJoshi6
 
fibre optics to under stand the basic.pptx
fibre optics  to under stand the basic.pptxfibre optics  to under stand the basic.pptx
fibre optics to under stand the basic.pptx
RohitPatil898754
 
Fibreoptic System
Fibreoptic SystemFibreoptic System
Fibreoptic System
Fibreoptic
 
optical fibre
optical fibreoptical fibre
optical fibre
Rohit Singh
 

Similar to Lab manual (20)

For presentation
For presentationFor presentation
For presentation
 
Optical fiber communiction
Optical fiber communictionOptical fiber communiction
Optical fiber communiction
 
Optical communication and Equipments
Optical communication and EquipmentsOptical communication and Equipments
Optical communication and Equipments
 
pptonsummertraining-161231124242.pdf
pptonsummertraining-161231124242.pdfpptonsummertraining-161231124242.pdf
pptonsummertraining-161231124242.pdf
 
Ppt on optical fiber
Ppt on optical fiberPpt on optical fiber
Ppt on optical fiber
 
Optical Communications - Presentation.pdf
Optical Communications - Presentation.pdfOptical Communications - Presentation.pdf
Optical Communications - Presentation.pdf
 
opsahu advanced communication lab 6 sem.file r.k.r govt poly janjgir
opsahu advanced communication lab 6 sem.file r.k.r govt poly janjgiropsahu advanced communication lab 6 sem.file r.k.r govt poly janjgir
opsahu advanced communication lab 6 sem.file r.k.r govt poly janjgir
 
Optical fiber by debraj maji
Optical fiber by debraj majiOptical fiber by debraj maji
Optical fiber by debraj maji
 
Fiber Optics Course
Fiber Optics Course Fiber Optics Course
Fiber Optics Course
 
Optical Communications presentation.pptx
Optical Communications presentation.pptxOptical Communications presentation.pptx
Optical Communications presentation.pptx
 
Principles_of_Communication_Lecture_11.pptx
Principles_of_Communication_Lecture_11.pptxPrinciples_of_Communication_Lecture_11.pptx
Principles_of_Communication_Lecture_11.pptx
 
Mw&oc manual
Mw&oc manualMw&oc manual
Mw&oc manual
 
OPTICAL_FIBRE_COMMUNICATION.pptx
OPTICAL_FIBRE_COMMUNICATION.pptxOPTICAL_FIBRE_COMMUNICATION.pptx
OPTICAL_FIBRE_COMMUNICATION.pptx
 
Optical fiber
Optical fiberOptical fiber
Optical fiber
 
Opticalfiber 13015411-151122111147-lva1-app6891-converted
Opticalfiber 13015411-151122111147-lva1-app6891-convertedOpticalfiber 13015411-151122111147-lva1-app6891-converted
Opticalfiber 13015411-151122111147-lva1-app6891-converted
 
B.Tech ECE IV Year I Sem, MWOC UNIT 5 Optical CommunicationsUNIT 5 MWOC.pptx
B.Tech ECE IV Year I Sem, MWOC UNIT 5  Optical CommunicationsUNIT 5 MWOC.pptxB.Tech ECE IV Year I Sem, MWOC UNIT 5  Optical CommunicationsUNIT 5 MWOC.pptx
B.Tech ECE IV Year I Sem, MWOC UNIT 5 Optical CommunicationsUNIT 5 MWOC.pptx
 
Em and optics project 3 (1st) converted
Em and optics project 3 (1st) convertedEm and optics project 3 (1st) converted
Em and optics project 3 (1st) converted
 
fibre optics to under stand the basic.pptx
fibre optics  to under stand the basic.pptxfibre optics  to under stand the basic.pptx
fibre optics to under stand the basic.pptx
 
Fibreoptic System
Fibreoptic SystemFibreoptic System
Fibreoptic System
 
optical fibre
optical fibreoptical fibre
optical fibre
 

Recently uploaded

20 slides of research movie and artists .pdf
20 slides of research movie and artists .pdf20 slides of research movie and artists .pdf
20 slides of research movie and artists .pdf
ameli25062005
 
一比一原版(Columbia毕业证)哥伦比亚大学毕业证如何办理
一比一原版(Columbia毕业证)哥伦比亚大学毕业证如何办理一比一原版(Columbia毕业证)哥伦比亚大学毕业证如何办理
一比一原版(Columbia毕业证)哥伦比亚大学毕业证如何办理
asuzyq
 
Design Thinking Design thinking Design thinking
Design Thinking Design thinking Design thinkingDesign Thinking Design thinking Design thinking
Design Thinking Design thinking Design thinking
cy0krjxt
 
White wonder, Work developed by Eva Tschopp
White wonder, Work developed by Eva TschoppWhite wonder, Work developed by Eva Tschopp
White wonder, Work developed by Eva Tschopp
Mansi Shah
 
Can AI do good? at 'offtheCanvas' India HCI prelude
Can AI do good? at 'offtheCanvas' India HCI preludeCan AI do good? at 'offtheCanvas' India HCI prelude
Can AI do good? at 'offtheCanvas' India HCI prelude
Alan Dix
 
Borys Sutkowski portfolio interior design
Borys Sutkowski portfolio interior designBorys Sutkowski portfolio interior design
Borys Sutkowski portfolio interior design
boryssutkowski
 
Timeless Principles of Good Design
Timeless Principles of Good DesignTimeless Principles of Good Design
Timeless Principles of Good Design
Carolina de Bartolo
 
Design Thinking Design thinking Design thinking
Design Thinking Design thinking Design thinkingDesign Thinking Design thinking Design thinking
Design Thinking Design thinking Design thinking
cy0krjxt
 
一比一原版(UW毕业证)西雅图华盛顿大学毕业证如何办理
一比一原版(UW毕业证)西雅图华盛顿大学毕业证如何办理一比一原版(UW毕业证)西雅图华盛顿大学毕业证如何办理
一比一原版(UW毕业证)西雅图华盛顿大学毕业证如何办理
kecekev
 
Design-Thinking-eBook for Public Service Delivery
Design-Thinking-eBook for Public Service DeliveryDesign-Thinking-eBook for Public Service Delivery
Design-Thinking-eBook for Public Service Delivery
farhanaslam79
 
一比一原版(CITY毕业证书)谢菲尔德哈勒姆大学毕业证如何办理
一比一原版(CITY毕业证书)谢菲尔德哈勒姆大学毕业证如何办理一比一原版(CITY毕业证书)谢菲尔德哈勒姆大学毕业证如何办理
一比一原版(CITY毕业证书)谢菲尔德哈勒姆大学毕业证如何办理
9a93xvy
 
Research 20 slides Amelia gavryliuks.pdf
Research 20 slides Amelia gavryliuks.pdfResearch 20 slides Amelia gavryliuks.pdf
Research 20 slides Amelia gavryliuks.pdf
ameli25062005
 
一比一原版(毕业证)长崎大学毕业证成绩单如何办理
一比一原版(毕业证)长崎大学毕业证成绩单如何办理一比一原版(毕业证)长崎大学毕业证成绩单如何办理
一比一原版(毕业证)长崎大学毕业证成绩单如何办理
taqyed
 
原版定做(penn毕业证书)美国宾夕法尼亚大学毕业证文凭学历证书原版一模一样
原版定做(penn毕业证书)美国宾夕法尼亚大学毕业证文凭学历证书原版一模一样原版定做(penn毕业证书)美国宾夕法尼亚大学毕业证文凭学历证书原版一模一样
原版定做(penn毕业证书)美国宾夕法尼亚大学毕业证文凭学历证书原版一模一样
gpffo76j
 
一比一原版(Bolton毕业证书)博尔顿大学毕业证成绩单如何办理
一比一原版(Bolton毕业证书)博尔顿大学毕业证成绩单如何办理一比一原版(Bolton毕业证书)博尔顿大学毕业证成绩单如何办理
一比一原版(Bolton毕业证书)博尔顿大学毕业证成绩单如何办理
h7j5io0
 
Maximize Your Content with Beautiful Assets : Content & Asset for Landing Page
Maximize Your Content with Beautiful Assets : Content & Asset for Landing Page Maximize Your Content with Beautiful Assets : Content & Asset for Landing Page
Maximize Your Content with Beautiful Assets : Content & Asset for Landing Page
pmgdscunsri
 
UNIT V ACTIONS AND COMMANDS, FORMS AND CONTROLS.pptx
UNIT V ACTIONS AND COMMANDS, FORMS AND CONTROLS.pptxUNIT V ACTIONS AND COMMANDS, FORMS AND CONTROLS.pptx
UNIT V ACTIONS AND COMMANDS, FORMS AND CONTROLS.pptx
GOWSIKRAJA PALANISAMY
 
RTUYUIJKLDSADAGHBDJNKSMAL,D
RTUYUIJKLDSADAGHBDJNKSMAL,DRTUYUIJKLDSADAGHBDJNKSMAL,D
RTUYUIJKLDSADAGHBDJNKSMAL,D
cy0krjxt
 
一比一原版(BU毕业证书)伯恩茅斯大学毕业证成绩单如何办理
一比一原版(BU毕业证书)伯恩茅斯大学毕业证成绩单如何办理一比一原版(BU毕业证书)伯恩茅斯大学毕业证成绩单如何办理
一比一原版(BU毕业证书)伯恩茅斯大学毕业证成绩单如何办理
h7j5io0
 
一比一原版(Glasgow毕业证书)格拉斯哥大学毕业证成绩单如何办理
一比一原版(Glasgow毕业证书)格拉斯哥大学毕业证成绩单如何办理一比一原版(Glasgow毕业证书)格拉斯哥大学毕业证成绩单如何办理
一比一原版(Glasgow毕业证书)格拉斯哥大学毕业证成绩单如何办理
n0tivyq
 

Recently uploaded (20)

20 slides of research movie and artists .pdf
20 slides of research movie and artists .pdf20 slides of research movie and artists .pdf
20 slides of research movie and artists .pdf
 
一比一原版(Columbia毕业证)哥伦比亚大学毕业证如何办理
一比一原版(Columbia毕业证)哥伦比亚大学毕业证如何办理一比一原版(Columbia毕业证)哥伦比亚大学毕业证如何办理
一比一原版(Columbia毕业证)哥伦比亚大学毕业证如何办理
 
Design Thinking Design thinking Design thinking
Design Thinking Design thinking Design thinkingDesign Thinking Design thinking Design thinking
Design Thinking Design thinking Design thinking
 
White wonder, Work developed by Eva Tschopp
White wonder, Work developed by Eva TschoppWhite wonder, Work developed by Eva Tschopp
White wonder, Work developed by Eva Tschopp
 
Can AI do good? at 'offtheCanvas' India HCI prelude
Can AI do good? at 'offtheCanvas' India HCI preludeCan AI do good? at 'offtheCanvas' India HCI prelude
Can AI do good? at 'offtheCanvas' India HCI prelude
 
Borys Sutkowski portfolio interior design
Borys Sutkowski portfolio interior designBorys Sutkowski portfolio interior design
Borys Sutkowski portfolio interior design
 
Timeless Principles of Good Design
Timeless Principles of Good DesignTimeless Principles of Good Design
Timeless Principles of Good Design
 
Design Thinking Design thinking Design thinking
Design Thinking Design thinking Design thinkingDesign Thinking Design thinking Design thinking
Design Thinking Design thinking Design thinking
 
一比一原版(UW毕业证)西雅图华盛顿大学毕业证如何办理
一比一原版(UW毕业证)西雅图华盛顿大学毕业证如何办理一比一原版(UW毕业证)西雅图华盛顿大学毕业证如何办理
一比一原版(UW毕业证)西雅图华盛顿大学毕业证如何办理
 
Design-Thinking-eBook for Public Service Delivery
Design-Thinking-eBook for Public Service DeliveryDesign-Thinking-eBook for Public Service Delivery
Design-Thinking-eBook for Public Service Delivery
 
一比一原版(CITY毕业证书)谢菲尔德哈勒姆大学毕业证如何办理
一比一原版(CITY毕业证书)谢菲尔德哈勒姆大学毕业证如何办理一比一原版(CITY毕业证书)谢菲尔德哈勒姆大学毕业证如何办理
一比一原版(CITY毕业证书)谢菲尔德哈勒姆大学毕业证如何办理
 
Research 20 slides Amelia gavryliuks.pdf
Research 20 slides Amelia gavryliuks.pdfResearch 20 slides Amelia gavryliuks.pdf
Research 20 slides Amelia gavryliuks.pdf
 
一比一原版(毕业证)长崎大学毕业证成绩单如何办理
一比一原版(毕业证)长崎大学毕业证成绩单如何办理一比一原版(毕业证)长崎大学毕业证成绩单如何办理
一比一原版(毕业证)长崎大学毕业证成绩单如何办理
 
原版定做(penn毕业证书)美国宾夕法尼亚大学毕业证文凭学历证书原版一模一样
原版定做(penn毕业证书)美国宾夕法尼亚大学毕业证文凭学历证书原版一模一样原版定做(penn毕业证书)美国宾夕法尼亚大学毕业证文凭学历证书原版一模一样
原版定做(penn毕业证书)美国宾夕法尼亚大学毕业证文凭学历证书原版一模一样
 
一比一原版(Bolton毕业证书)博尔顿大学毕业证成绩单如何办理
一比一原版(Bolton毕业证书)博尔顿大学毕业证成绩单如何办理一比一原版(Bolton毕业证书)博尔顿大学毕业证成绩单如何办理
一比一原版(Bolton毕业证书)博尔顿大学毕业证成绩单如何办理
 
Maximize Your Content with Beautiful Assets : Content & Asset for Landing Page
Maximize Your Content with Beautiful Assets : Content & Asset for Landing Page Maximize Your Content with Beautiful Assets : Content & Asset for Landing Page
Maximize Your Content with Beautiful Assets : Content & Asset for Landing Page
 
UNIT V ACTIONS AND COMMANDS, FORMS AND CONTROLS.pptx
UNIT V ACTIONS AND COMMANDS, FORMS AND CONTROLS.pptxUNIT V ACTIONS AND COMMANDS, FORMS AND CONTROLS.pptx
UNIT V ACTIONS AND COMMANDS, FORMS AND CONTROLS.pptx
 
RTUYUIJKLDSADAGHBDJNKSMAL,D
RTUYUIJKLDSADAGHBDJNKSMAL,DRTUYUIJKLDSADAGHBDJNKSMAL,D
RTUYUIJKLDSADAGHBDJNKSMAL,D
 
一比一原版(BU毕业证书)伯恩茅斯大学毕业证成绩单如何办理
一比一原版(BU毕业证书)伯恩茅斯大学毕业证成绩单如何办理一比一原版(BU毕业证书)伯恩茅斯大学毕业证成绩单如何办理
一比一原版(BU毕业证书)伯恩茅斯大学毕业证成绩单如何办理
 
一比一原版(Glasgow毕业证书)格拉斯哥大学毕业证成绩单如何办理
一比一原版(Glasgow毕业证书)格拉斯哥大学毕业证成绩单如何办理一比一原版(Glasgow毕业证书)格拉斯哥大学毕业证成绩单如何办理
一比一原版(Glasgow毕业证书)格拉斯哥大学毕业证成绩单如何办理
 

Lab manual

  • 1. LAB MANUAL Subject: Optical Communication Paper: EC 758 Lab No. 415
  • 2. List of Experiments: 1. Demonstration and study of different types of Optical Fibers and connectors. 2. To establish and Study of a 650nm fiber optic analog link. 3. To establish and Study of a 650nm fiber optic digital link. 4. Study of Intensity Modulation Technique using Analog input signal. To obtain intensity modulation of the analog signal, transmit it over a fiber optic cable and demodulate the same at the receiver and to get back the original signal. 5. Study of Intensity Modulation Technique using digital Input signal. The objective of this experiment is to obtain intensity modulation of digital signal, transmit it over fiber optic cable and demodulate the same at the receiver end to get back the original signal. 6. To measure propagation or attenuation loss in optical fiber. 7. To measure propagation loss in optical fiber using optical power meter. 8. To measurement of the Numerical Aperture (NA) of the fiber.
  • 3. Experiment No. 1 Objective: Demonstration and study of different types of Optical Fibers and connectors. Apparatus Required: Demonstration Kit of Optical Fibers and connectors. Theory: For much of modern telecommunication, the path over which the signals travel is optical fiber. Optical fiber for most purposes is made of a very special kind of glass that is drawn into a very thin, long fiber. In some ways, this is similar to the fiberglass that is used for insulation in homes. Unlike fiber glass, however, optical fiber is made of a much different kind of glass and comes in lengths that may be many kilometers long. Standard optical fiber is shaped like a very long thin cylinder. In the center of the cylinder there is a core, and surrounding the core is a layer called the cladding. Both core and cladding are glass; they are slightly different types, however. A cross section of the fiber is shown in Figure 1.1. Fig.1.1. Cross-sectional views of an optical fiber. Single mode optical fiber: In fiber-optic communication, a single-mode optical fiber (SMF) (mono mode optical fiber, single-mode optical waveguide, or uni mode fiber) is an optical fibre designed to carry only a single ray of light (mode). These modes define the way the wave travels through space, i.e. how the wave is distributed in space. Waves can have the same mode but have different frequencies. This is the case in single-mode fibers, where we can have waves with different frequencies, but of the same mode, which means that they are distributed in space in the same way, and that gives us a single ray of light. Although the ray travels parallel to the length of the fiber, it is often called transverse mode since its electromagnetic vibrations occur perpendicular (transverse) to the length of the fibre. A typical single mode optical fiber has a core diameter between 8 and 10.5 μm and a cladding diameter of 125 μm. Multi-mode optical fiber: Multimode fiber optic cable has a large diametrical core that allows multiple modes of light to propagate. Because of this, the number of light reflections created as the light passes through the core increases, creating the ability for more data to pass through at a given time. Because of the high dispersion and attenuation rate with this type of fiber, the quality of the signal is reduced over long distances. This application is typically used for short distance, data and audio/video applications in LANs. RF broadband signals, such as what cable companies commonly use, cannot be transmitted over multimode fiber. Multimode fiber is usually 50/125 and 62.5/125 in construction. This means that the core to cladding diameter ratio is 50 microns to 125 microns and 62.5 microns to 125 microns. Multi-mode optical fiber can be built with either graded index or step index-Step-Index Multimode Fiber: Due to its large core, some of the light rays that make up the digital pulse may travel a direct route, whereas others zigzag as they bounce off the cladding. These alternate paths cause the different groups of light rays, referred to as modes, to arrive separately at the receiving point. The pulse, an aggregate of different modes, begins to spread out, losing its well-defined shape. The need to leave
  • 4. spacing between pulses to prevent overlapping limits the amount of information that can be sent. This type of fiber is best suited for transmission over short distances. Graded-Index Multimode Fiber: Contains a core in which the refractive index diminishes gradually from the center axis out toward the cladding. The higher refractive index at the center makes the light rays moving down the axis advance more slowly than those near the cladding. Due to the graded index, light in the core curves helically rather than zigzag off the cladding, reducing its travel distance. The shortened path and the higher speed allow light at the periphery to arrive at a receiver at about the same time as the slow but straight rays in the core axis. The result: digital pulse suffers less dispersion. This type of fiber is best suited for local-area networks. Fig.1.2 Propagation of light through different types of optical fibers.
  • 5. Various optical fibers Fig.1.3. Demonstration of different types of glass fibers and plastic fibers. Various fiber optical connectors andadaptors Fig.1.4. Demonstration of different types of fiber connectors and adaptors. Result: Various optical fibers and fiber optic connectors and adaptors have been studied through the demonstration kit.
  • 6. Experiment No. 2 Objective: The Study of a 650nm fiber optic analog link. Apparatus required: 1. ST2502 trainer with power supply cords 2. Optical Fiber cable. 3. Cathode ray oscilloscope with necessary connecting probe. Theory: Fiber optic links can be used for transmission of digital as well as analog signals. Basically a fiber optic link contains three main elements : a transmitter, an optical fiber and a receiver. The transmitter module takes the input signal in electrical form and then transforms it into optical energy containing the same information. The optical fiber is the medium which takes the energy to the receiver. At the receiver, light is converted back into electrical form with the same pattern as fed to the transmitter. Transmitter: Fiber optic transmitters are composed of a buffer, driver and optical source. The buffer provides both an electrical connection and isolation between the transmitter and the electrical system the data. The driver provides electrical power to the optical source. Finally, the optical source converts the electrical current to the light energy with the same pattern. The optical source used is LED. Simple LED circuit for analog transmission is shown below. Fig.2.1 Transconductance drive circuit for analog transmission-common emitter configuration
  • 7. The transmitter section comprises of Function Generator which generates input signals that are going to be used as information to transmit through optical fiber. The Fiber Optic Link: Emitter and Detector circuit on board form the fiber optic link. This section provides the light source for the optic fiber and the light detector at the far end of the fiber optic links. The optic fiber plugs into the connectors provided in this part of the board. Two separate links are provided. The Receiver: The AC amplifier circuit forms receiver on the board. Block Diagram: Fig.2.2 Analog Fiber Optic Link Procedure: 1. Connect the power supply to the board. 2. Ensure that all switched faults are off. 3. Make the following connections. Connect the Function generator 1KHz sine wave output to emitter‟s input. Connect the Fiber optic cable between emitter output and detectors input. Detector‟s output to AC amplifier input. 4. On the board, switch emitter‟s driver to analog mode. 5. Switch ON the power. 6. Observe the input to emitter with the output from AC amplifier and note that the two signals are same.
  • 8. Fig.2.3 Connections on Trainer Kit Observations: Input voltage = 1.2V Detector output = 0 .1V Amplifier output = 1.4V Result: The 650nm fiber optic Analog link has been established.
  • 9. Experiment No. 3 Objective: Study of a 650nm fiber optic digital link. Apparatus required: 1. ST2502 trainer with power supply cords 2. Optical Fiber cable. 3. Cathode ray oscilloscope with necessary connecting probe. Theory: Fiber optic links can be used for transmission of digital as well as analog signals. Basically a fiber optic link contains three main elements : a transmitter, an optical fiber and a receiver. The transmitter module takes the input signal in electrical form and then transforms it into optical energy containing the same information.The optical fiber is the medium which takes the energy to the receiver.At the receiver, light is converted back into electrical form with the same pattern as fed to the transmitter. Transmitter: Fiber optic transmitters are composed of a buffer, driver and optical source. The buffer provides both an electrical connection and isolation between the transmitter and the electrical system the data. The driver provides electrical power to the optical source. Finally, the optical source converts the electrical current to the light energy with the same pattern. The optical source used is LED. The simple driver circuit is shown below. Fig.3.1 A simple drive circuit for binary digital transmission consisting a common emitter saturating switch.
  • 10. The transmitter section comprises of Function Generator which generates input signals that are going to be used as information to transmit through optical fiber. The Fiber Optic Link: Emitter and Detector circuit on board form the fiber optic link. This section provides the light source for the optic fiber and the light detector at the far end of the fiber optic links. The optic fiber plugs into the connectors provided in this part of the board. Two separate links are provided. The Receiver: The comparator circuit and AC amplifier circuit form receiver on the board. Block Diagram: Fig.3.2 Digital Fiber Optic Link Procedure: 1. Connect the power supply to the board. 2.Ensure that all switched faults are off. 3. Make the following connections.  Connect the Function generator 1KHz square wave output to emitter‟s input.  Connect the Fiber optic cable between emitter output and detector‟s input.  Detector‟s output to comparator‟s input.  Comparator‟s output to AC amplifier‟s input. 4. On the board, switch emitter‟s driver to digital mode. 5. Switch ON the power. 6. Monitor both the inputs to comparator . Slowly adjust the comparator‟s bias preset, until DC level on the input lies midway between the high and low level of the signal on the positive input. 7. Observe the input to emitter with the output from AC amplifier and note that the two signals are same.
  • 11. Fig.3.3 Connections on Trainer Kit Observations: Input Voltage = 0.16V Comparator output = 0.05V Amplifier output = 1V Result: The 650nm fiber optic Digital link has been established.
  • 12. Experiment No. 4 Objective: Study of Intensity Modulation Technique using Analog input signal. To obtain intensity modulation of the analog signal, transmit it over a fiber optic cable and demodulate the same at the receiver and to get back the original signal. Apparatus Required: 1. ST2502 trainer with power supply cord 2. Optical Fiber cable 3. Cathode ray oscilloscope with necessary connecting probe Theory: Modulation: In order to transmit information via an optical fiber communication system it is necessary to modulate a property of light with the information signal. This property may be intensity, frequency, phase with either analog or digital signals. The choices are indicated by the characteristics of optical fiber, the available optical sources and detectors, and the considerations of the overall system. Intensity Modulation: In this system the information signal is used to control the intensity of the source. At the far end, the variation in the amplitude of the received signal is used to recover the original information signal. Fig. 4.1 block diagram of intensity modulated system. The audio input signal is used to control the current through an LED which in turn controls the light output. The light is conveyed to the detector I circuit by optic fiber. The detector is a photo transistor which converts the incoming light to a small current which flows through a series resistor. This gives rise to a voltage whose amplitude is controlled by the received light intensity. The voltage is now amplified within the detector circuit and if necessary, amplified further by the amplified circuit.
  • 13. The Analog Bias Voltage: There are two problems using amplitude modulation with an analog signal. The first is to do with the signal itself. If you glance at the figure you will see that analog waveform moves positive and negative of the zero line. The second problem is that the shape of the waveform which carries the information. Ideally the emitter characteristics would be a straight line. Even so, we would lose the negative going half cycles as shown. FIG 4.2. Analog Signal The answer is to superimpose the sinusoidal signal on positive voltage called the bias voltage so that both halves of the incoming signal have an effect on the light intensity. The combination of the linear characteristics would be ideal but the real characteristics is not completely straight. However, it does have a straight section that we can use if we employ a suitable value of bias voltage. FIG shows ideal and practical situations. FIG 4.3. Negative half of the cycle is lost
  • 14. FIG 4.4 Emitter characteristics : Ideal and Real Connection Diagram: Fig. 4.5 Connection Diagram
  • 15. Procedure: 1. Connect the power supply cord to the main power plug & to trainer ST2502. 2. Make the following connections as shown in FIG. 5 a. Connect the FG output marked 1 KHz sine wave to input if emitter 1. b. Plug in a fiber optic link from output of emitter 1 LED to the photo transistor of the detector 1. c. Detector 1 output TP 10 to input of Amplifier TP 27. 3. In the emitter 1 block switch the mode select to analog. 4. Turn the 1 KHz preset in function generator block to fully clockwise (maximum amplitude) position. 5. Switch on the Power Supply of the trainer and oscilloscope. 6. With the help of dual trace oscilloscope observe the input signal at emitter 1 TP 5 also; observe the output from the detector 1. It should carry a smaller version of the original 1 KHz sine wave, illustrating that the modulated light beam has been reconverted back into an electrical signal. 7. The output from detector 1 is further amplified by AC amplifier 1. This amplifier increases the amplitude of the received signal, and also removes the DC component, which is present at detector output. Monitor the output of amplifier 1 TP28 and adjust the gain adjust 1 preset until the monitored signal has same amplitude as that applied to emitter 1 Input TP 5 . 8. While monitoring the output of Amplifier 1 TP 28 change the amplitude of modulating sine wave by varying the 1 KHz preset in the function generator block. Note that as expected, the amplitude of the receiver output signal changes. Observations: Frequency=1 KHz S.No. Input Voltage(V) Output Voltage(V) 1 0.10 0.08 2 0.20 0.12 3 0.24 0.18 4 0.44 0.24 FIG 4.7. Output V=0.08V
  • 16. FIG 4.6. Input V=0.10V Result: The Intensity Modulation and Demodulation of the Analog signal has been implemented.
  • 17. Experiment 5 Objective: Study of Intensity Modulation Technique using digital Input signal. The objective of this experiment is to obtain intensity modulation of digital signal, transmit it over fiber optic cable and demodulate the same at the receiver end to get back the original signal. Apparatus Required: 1. ST2502 trainer with power supply cord 2. Optical Fiber cable 3. Cathode ray oscilloscope with necessary connecting probe Connection Diagram: Fig. 5.1 Connection Diagram
  • 18. Fig. 5.2. Block Diagram Theory: With intensity modulation, discrete changes in light intensity are obtained(i.e. ON-OFF pulses) figure below shows a block schematic of a typical digital optical fiber link Initially, input digital signal from information source is suitably encoded for optical transmission. The LED drive circuit directly modulates the intensity of the light with encoded digital signal. Hence, a digital optical signal is launched into the optical fiber cable. The photo transistor used as detector is followed by an amplifier to provide gain. Finally the signal obtained is decoded to give the original digital information. Digital Bias Voltage: Incase of a digital signal the only information which needs to be conveyed is the ON state and OFF state. So there is no negative part of the signal to be lost and furthermore any distortion due to non linearity of the characteristic is of no importance –all we need to know is whether the signal is ON or OFF. There is no need therefore to generate a bias voltage. When Amplitude Modulation is used with digital input we employ a comparator at the receiving end of the fiber to make the waveform square again called “cleaning it up” Procedure: 1. Connect the power supply cord to the main power plug & to trainer ST2502. 2. Make the following connections as shown in figure 4.1. a. Connect the 1 KHz square wave socket in function generator block to emitter 1 input. b. Connect an optic fiber link between emitter 1 output & Detector 1 input with the help of connector provided. c. Detector output to comparator l's non-inverting (+ve) input 3. Switch the mode switch in emitter block to digital mode. This ensures that signal applied to the driver's input cause the emitter LED to switch quickly between „On‟ & „Off‟ states. 4. Examine the Input to emitter 1 TP 5 on an oscilloscope this 1 KHz square wave is now being used to amplitude modulate emitter I emitter LED. 5. Examine the output of detector 1 TP 10. This should carry a smaller version of original I KHz square wave illustrating that the modulated light beam has been reconverted into an electrical signal. 6. Monitor both input to comparator 1, at TP 13 & 14 and slowly adjust the "Comparator bias 1 preset until the DC Level on the negative input TP 13 lies midway between the high & low level of the signal on the positive input TP. 14. This DC level is comparator's threshold level. 7. Examine the output of comparator 1 TP15 Note that the original digital modulating signal has been reconstructed at the receiver. 8. Once again carefully flex the fiber optic cable we can see that there is no change in output on bending the fiber. The output amplitude is now independent of the bend radius of the cable and that of length of cable, provided that detector output signal is large enough to cross the comparator threshold level. This illustrates one of the advantages of amplitude modulation of a light beam by digital rather than analog means. Also, non-linear ties within the emitter LED & photo transistor causing distortion of the signal at the receiver output are the disadvantages associated with amplitude modulating a light source by analog means. Linearity is not a problem if the light beam is switched „On‟ & „Off‟ with a digital signal, since
  • 19. the detector output is simply squared up by a comparator circuit. To overcome problems associated with amplitude modulation of a light beam by analog means, analog signals are often used to vary or modulate some characteristic of a digital signal (e.g. frequency or pulse width.). The digital signal being used to switch the light beam „On‟ & „Off‟. Observations Results: Intensity Modulation has been performed and its uses over analog intensity modulation have been verified.
  • 20. Experiment 6 Objective: To measure propagation or attenuation loss in optical fiber. Apparatus Required: 1. ST2502 trainer with power supply cord. 2. Optical Fiber cable 3. Cathode ray oscilloscope with necessary connecting probe Connection Diagram: Fig.6.1 Connection diagrams on ST502 kit Procedure: 1. Connect power supply cord to the main power plug & to trainer ST2502. 2. Make the following connections as shown in figure 7.1. a. Function generator‟s 1 KHz sine wave output to Input 1 socket of emitter 1 circuit via 4 mm lead. b. Connect 0.5 m optic fiber between emitter 1 output and detector l's input. c. Connect detector 1 output to amplifier 1 input socket via 4mm lead. 3. Switch ON the Power Supply of the trainer and oscilloscope. 4. Set the Oscilloscope channel 1 to 0.5 V / Div and adjust 4 - 6 div amplitude by using X 1 probe with the help of variable pot in function generator block at input 1 of Emitter 1. 5. Observe the output signal from detector TP10 on CRO.
  • 21. 6. Adjust the amplitude of the received signal same as that of transmitted one with the help of gain adjust potentiometer in AC amplifier block. Note this amplitude and name it V1. 7. Now replace the previous FG cable with 1 m cable without disturbing any previous setting. 8. Measure the amplitude at the receiver side again at output of amplifier 1 socket TP 28. Note this value end name it V2. Observations: 1. Using output of cables of different diameters: O/P of .5m cable-.56V O/P of 1m cable-.52V Attenuation=20log56/52=.64dB 2. Using formula α= -1/(L1+L2)ln(V1/V2)=.429dB/m 3. Using OPM, Pn=-31.3dBm, Pf=-31.4dBm α = .1dB Calculations: Calculate the propagation (attenuation) loss with the help of following formula. V1 / V2 = e- α (L1 + L2) Where α is loss in nepers / meter 1 neper = 8. 686 dB L 1 = length of shorter cable (0.5 m) L 2 = Length of longer cable (1 m) Precautions: a. The optical fiber must not be bent, so as to avoid bending losses. b. The circuit must be neat and secure.
  • 22. Experiment 7 Objective: To measure propagation loss in optical fiber using optical power meter. Apparatus Required: 1. ST2502 trainer with power supply cord 2. Optical fiber cable 3. Cathode ray oscilloscope with necessary connecting probe 4. Power Meter ST2551 with power supply cord Connection Diagram: Fig. 7.1 Connection diagram on ST2502 kit. Procedure: 1. Connect the Power supply cord to mains supply and to the trainer ST2501. 2. Keep the mode switch in emitter 1 circuit in analog mode 3. Connect the 0.5m fiber cable in between the emitter LED & I/P of power meter. 4. Switch on the instrument fiber optic trainer & power meter (Keep the wavelength switch in 660 nm, position). Note the reading in power meter. 5. Replace the 0.5m fiber cable with the 1m cables without disturbing any setting.
  • 23. 6. Again note the reading in power. This reading will be lesser then the previous one, indicating that the propagation loss increases with increase in length. 7. Perform the same experiment with emitter 2. Observations: Using OPM, Pn=-31.3dBm, Pf=-31.4dBm α = .1dB Precautions: a. The optical fiber must not be bent, so as to avoid bending losses. b. The circuit must be neat and secure.
  • 24. Experiment 8 Objective: To measurement of the Numerical Aperture (NA) of the fiber. Apparatus Required: 1. ST2502 trainer with power supply cord 2. Optical Fiber cable. 3. Numerical Aperture measurement Jig/Paper & Scale. Fig.8.1 Connection diagram on ST2502 Theory: The numerical aperture refers to maximum angle at which the incident on fiber end is totally internally reflected and is transmitted along the fiber. The cone formed by rotation of this angle along the axis of the fiber is the cone of acceptance of fiber. if light ray should strike the fiber end within this cone of acceptance it will be transmitted properly else it is refracted out of fiber.
  • 25. Procedure: 1. Connect the Power supply cord to mains supply and to the trainer ST2502. 2. Connect the frequency generator's 1 KHz sine wave output to input of emitter 1 circuit. Adjust its amplitude at 5Vpp. 3. Connect one end of fiber cable to the output socket of emitter 1 circuit and the other end to the numerical aperture measurement jig. Hold the white screen facing the fiber such that its cut face is perpendicular to the axis of the fiber. 4. Hold fiber vertically at a suitable distance to make the red spot . 5. Record the distance of screen from the fiber end L and note the diameter W of the spot. Compute the numerical aperture from the formula given below- Result : The N.A. of fiber measured is 0.34 using trigonometric formula.
  • 26. 1. Dispersionismaximumat(FORSMF) a) 1310 nm b) 1550nm c)1330nm d) none of the above 2. If zeroDC bias isprovidedtothe inputof comparator circuit,(incase of digital optical fiberlink). the outputof the CRO will be a)'1' b) '0' c) circuit will notworkproperlyd) outputwill be same asthe input. 3. The full formof PMMA is ........................................................................................................................ 4. The full formof 'FC' connectorstands for ................................................................................................. 5. A lightray ismovingfromdensertorarer medium, itwill bendawayfromthe normal.T/F