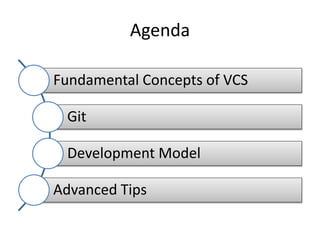
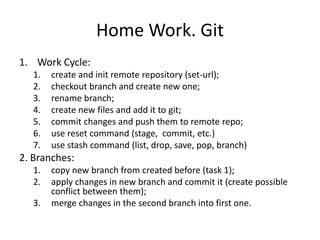
This document provides an introduction to using Git version control. It begins with an overview of version control systems and the fundamental Git concepts like repositories, working copies, commits, and branches. The document then covers how to set up and configure Git, the basic Git commands to save changes like add, commit, and push. It discusses branching and merging workflows. Additional topics include inspecting repositories, undoing changes, rewriting history, and advanced tips like stashing, filtering logs, and resolving conflicts. Homework assignments are provided to practice common Git workflows and commands.
7. How to start working with Git
• Install Git client (see useful links at the end)
– git --version
• Config you client
– git config --global user.name “Serhii Kartashov“
– git config --global user.email Serhii.Kartashov@example.com
– git config --list (check your settings)
• Clone a branch from a repository
– git clone https://myrepo.com/repo workdir
• Initialize your local repo and link to remote repo
– git init
– git remote add <my_fork> <url>
• Use git help command
– git help clone (launches browser to display HTML with instructions on how to
use this clone command)
• You may add .gitignore file to ignore some files, i.e. <*.jar>
9. Saving Changes
• Adding files to stage area:
– git add <file>
– git add <directory>
– git add --all
• Commit the staged snapshot to the project
history:
– git commit -m “<message>”
– git commit –a (will open text editor - vi)
10. Inspecting a Repository
• Display a status of working directory and the
staging are:
– git status
• Display committed snapshots:
– git log
– git log --oneline
– git log -p <file>
– git log --stat
– git log –graph --decorate –oneline
– git log –author=“Serhii Kartashov”
11. Undoing Changes. revert
• Undo a committed snapshot.
– git revert <commit>
But, instead of removing the commit from the
project history, it figures out how to undo the
changes introduced by the commit and appends
a new commit with the resulting content.
12. Undoing Changes, reset
• edit two files, stage one
• run git reset HEAD to undo the stage
• re-stage the file and commit
• run git reset --soft HEAD~ to undo the commit
but keep the staged files; commit again
• run git reset HEAD~ to undo the commit and all
staging; commit again
• run git reset --hard HEAD~ to lose the commit
and all that work
13. Undoing Changes, clean
• Remove untracked files from your working
directory
– git clean –n (just shows you what may be
removed)
– git clean -f (files only)
– git clean –df (files and directories)
14. Rewriting history
The git commit --amend command is a
convenient way to fix up the most recent
commit.
It lets you combine staged changes with the
previous commit instead of committing it as an
entirely new snapshot.
15. Rewriting history, rebase
• Rebasing is the process of moving a branch to
a new base commit.
– git rebase <base>
18. Using Branches, branch
The git branch command lets you create, list,
rename, and delete branches. It doesn’t let you
switch between branches or put a forked
history back together again.
– git branch (list branches)
– git branch <branch> (create new branch)
– git branch -d <branch> (delete the specified
branch)
– git branch -m <branch> (rename the current
branch to <branch>)
19. Using branches, checkout
The git checkout command lets you navigate
between the branches created by git branch.
– git checkout <existing-branch>
– git checkout -b <new-branch>
20. Using Branches, merge
The git merge command lets you take the
independent lines of development created by
git branch and integrate them into a single
branch.
– git merge <branch>
– git merge --no-ff <branch> (merge the specified
branch into the current branch, but always
generate a merge commit)
25. Useful links
• Git clients
– http://git-scm.com/downloads (required)
– https://code.google.com/p/tortoisegit/wiki/Download
• Useful Git resources
– https://www.atlassian.com/git/tutorials/setting-up-a-
repository/#!overview
– http://ndpsoftware.com/git-cheatsheet.html#loc=workspace
– https://training.github.com/kit/downloads/github-git-cheat-sheet.pdf
– Squash several Git commits into a single commit
• Git books and docs
– http://git-scm.com/book
– Command’s list http://git-scm.com/docs
– http://git-scm.com/documentation
26. Home Work. Git
1. Work Cycle:
1. create and init remote repository (set-url);
2. checkout branch and create new one;
3. rename branch;
4. create new files and add it to git;
5. commit changes and push them to remote repo;
6. use reset command (stage, commit, etc.)
7. use stash command (list, drop, save, pop, branch)
2. Branches:
1. copy new branch from created before (task 1);
2. apply changes in new branch and commit it (create possible
conflict between them);
3. merge changes in the second branch into first one.
Editor's Notes
Remote
rename - Rename the remote named <old> to <new>. All remote-tracking branches and configuration settings for the remote are updated.
add - Adds a remote named <name> for the repository at <url>.
rm - Remove the remote named <name>. All remote-tracking branches and configuration settings for the remote are removed.
set-url – Changes URL remote points to. Sets first URL remote points to matching regex <oldurl> (first URL if no <oldurl> is given) to <newurl>. If <oldurl> doesn’t match any URL, error occurs and nothing is changed.
i.e. git remote set-url origin git://new.url.here
List of all main git commands http://git-scm.com/docs
Often, when you’ve been working on part of your project, things are in a messy state and you want to switch branches for a bit to work on something else. The problem is, you don’t want to do a commit of half-done work just so you can get back to this point later. The answer to this issue is the git stash command.
Stash command description - http://git-scm.com/book/en/Git-Tools-Stashing
save - Save your local modifications to a new stash, and run git reset --hard to revert them.
branch - Creates and checks out a new branch named <branchname> starting from the commit at which the<stash> was originally created, applies the changes recorded in <stash> to the new working tree and index.
list - List the stashes that you currently have. Each stash is listed with its name (e.g. stash@{0} is the latest stash, stash@{1} is the one before, etc.)
show - Show the changes recorded in the stash as a diff between the stashed state and its original parent.
drop - Remove a single stashed state from the stash list. When no <stash> is given, it removes the latest one.
clear - Remove all the stashed states. Note that those states will then be subject to pruning, and may be impossible to recover.