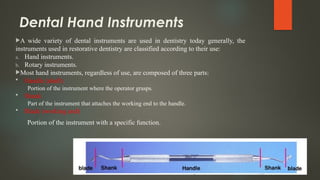
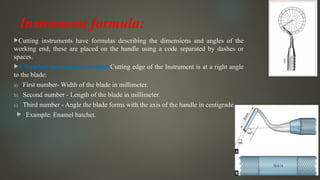
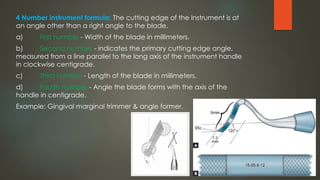
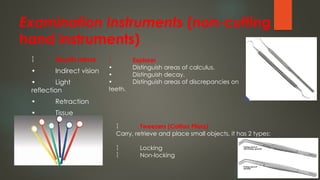
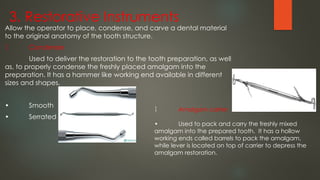
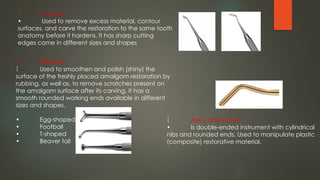
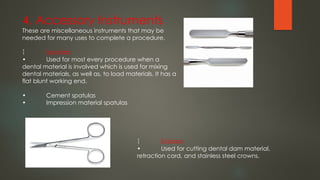
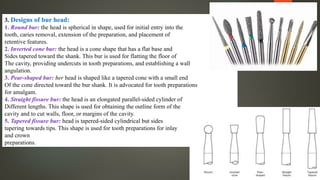
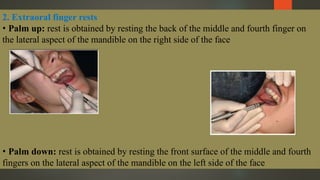
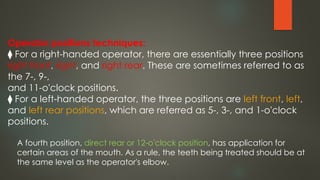
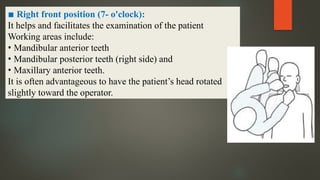
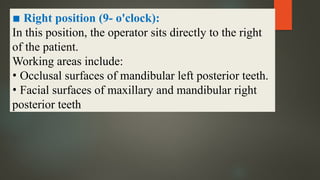
Instruments and
general
instrumentation
of cavity
preparation
Dental Hand Instruments
A wide variety of dental instruments are used in dentistry today generally, the
instruments used in restorative dentistry are classified according to their use:
a. Hand instruments.
b. Rotary instruments.
Most hand instruments, regardless of use, are composed of three parts:
 Handle (shaft)
Portion of the instrument where the operator grasps.
 Shank
Part of the instrument that attaches the working end to the handle.
 Blade (working end)
Portion of the instrument with a specific function.
Instrument formula:
Cutting instruments have formulas describing the dimensions and angles of the
working end; these are placed on the handle using a code separated by dashes or
spaces.
3 Number instrument formula: Cutting edge of the Instrument is at a right angle
to the blade:
a) First number- Width of the blade in millimeter.
b) Second number - Length of the blade in millimeter.
c) Third number - Angle the blade forms with the axis of the handle in centigrade.
 Example: Enamel hatchet.
4 Number instrument formula: The cutting edge of the Instrument is at
an angle other than a right angle to the blade.
a) First number - Width of the blade in millimeters.
b) Second number - indicates the primary cutting edge angle,
measured from a line parallel to the long axis of the instrument handle
in clockwise centigrade.
c) Third number - Length of the blade in millimeters.
d) Fourth number - Angle the blade forms with the axis of the
handle in centigrade.
Example: Gingival marginal trimmer & angle former.
Classification of hand Instruments:
 Four categories
1.Examination instruments
2.Hand-cutting instruments
3.Restorative instruments
4.Accessory instruments
Examination Instruments (non-cutting
hand instruments)
 Mouth mirror
• Indirect vision
• Light
reflection
• Retraction
• Tissue
protection
 Explorer
• Distinguish areas of calculus.
• Distinguish decay.
• Distinguish areas of discrepancies on
teeth.
 Tweezers (Cotton Pliers)
Carry, retrieve and place small objects, it has 2 types:
 Locking
 Non-locking
2. Hand-cutting Instruments
 Allow the operator to manually remove decay, as well as smooth,
finish, and prepare tooth structure to be restored back to its normal
function.
  Excavator (spoon excavator) is used for the removal of soft
dentin, debris, and decay from the tooth.
Chisel
Hoes
3. Restorative Instruments
Allow the operator to place, condense, and carve a dental material
to the original anatomy of the tooth structure.
 Condenser
Used to deliver the restoration to the tooth preparation, as well
as, to properly condense the freshly placed amalgam into the
preparation. It has a hammer like working end available in different
sizes and shapes.
• Smooth
• Serrated
 Amalgam carrier
• Used to pack and carry the freshly mixed
amalgam into the prepared tooth. It has a hollow
working ends called barrels to pack the amalgam,
while lever is located on top of carrier to depress the
amalgam restoration.
 Carvers
• Used to remove excess material, contour
surfaces, and carve the restoration to the same tooth
anatomy before it hardens. It has sharp cutting
edges come in different sizes and shapes
 Burnisher
 Used to smoothen and polish (shiny) the
surface of the freshly placed amalgam restoration by
rubbing, as well as, to remove scratches present on
the amalgam surface after its carving. It has a
smooth rounded working ends available in different
sizes and shapes.
• Egg-shaped
• Football
• T-shaped
• Beaver tail
 Ash 6 and Ash 49
• Is double-ended instrument with cylindrical
nibs and rounded ends. Used to manipulate plastic
(composite) restorative material.
4. Accessory Instruments
These are miscellaneous instruments that may be
needed for many uses to complete a procedure.
 Spatulas
• Used for most every procedure when a
dental material is involved which is used for mixing
dental materials, as well as, to load materials. It has a
flat blunt working end.
• Cement spatulas
• Impression material spatulas
 Scissors:
• Used for cutting dental dam material,
retraction cord, and stainless steel crowns.
Dycal applicator
Is small hand instrument with small round nib used for
mixing and placing dycal lining material in the cavity.
Dappen Dish, and amalgam well
Where the newly mixed amalgam is placed and
retrieved from.
Powered cutting equipment:
1. Rotary power cutting instrument
2. Ultrasonic instrument
3. Air-Abrasion instrument
Ultrasonic instruments in dentistry are advanced tools used primarily for scaling and cleaning
teeth,also in endodonti procedures by enhancing cleaning efficiency, improving the ability to navigate
complex root canal systems, and aiding in difficult cases like post removal or retrieving broken instruments.
They function by using high-frequency sound waves to create rapid vibrations, which help in
removing plaque, calculus (tartar), and stains from the tooth surfaces.
The air abrasion instrument is a hand-held tool that dentists use for a variety of purposes. A bit
like a mini-sandblaster, it uses compressed air (or another gas) to produce a fine stream of abrasive particles
that can be precisely aimed.
Rotary cutting instrument
Rotary cutting instruments are those instruments that rotate on an axis to
do the work of abrading, cutting, polishing, and finishing of tooth
structure and the restoration process. This is of two types:
1. Dental Handpieces
2. Dental Burs
1. Low-Speed handpiece:
▪ Design
• Either straight on contra-angle in appearance.
• Speed ranges from 10,000 to 30,000 rotations per minute (rpm).
• Operated either by compressed air or directly by an electric
motor.
Straight handpiece:
This is commonly used in oral surgical and laboratory procedures.
Contra-angle handpiece:
Uses of the low-speed handpiece
▪ Removal of soft decay and fine finishing of a cavity preparation.
▪ Finishing and polishing of restorations.
▪ Coronal polishing and removal of stains.
High-Speed Handpiece
▪ Design
• One-piece unit with a slight curve in
appearance.
• Operated by air pressure.
• Operates at speeds up to 450,000 rpm.
• Maintains a water-coolant system.
Uses of the high-speed handpiece
▪ Removes decay.
▪ Removes an old or faulty restoration.
▪ Reduces the crown portion of the tooth for the preparation of
a crown or bridge.
▪ Prepares the outline and retention grooves for a new
restoration.
▪ Finishes or polishes a restoration.
▪ Sections of a tooth during surgery.
Dental burs
1. Structure of Dental Burs:
• Shank: The part that fits into the dental handpiece. Shanks come in
three types:
o Straight: Used with straight handpieces, typically in laboratory settings.
o Latch-type: Used with slow-speed handpieces.
o Friction grip: Used with high-speed handpieces.
• Neck: The narrow part between the shank and the head connects them.
• Head: The cutting or grinding part of the bur, available in different shapes, sizes, and
materials depending on the procedure.
3. Designs of bur head:
1. Round bur: the head is spherical in shape, used for initial entry into the
tooth, caries removal, extension of the preparation, and placement of
retentive features.
2. Inverted cone bur: the head is a cone shape that has a flat base and
Sides tapered toward the shank. This bur is used for flatting the floor of
The cavity, providing undercuts in tooth preparations, and establishing a wall
angulation.
3. Pear-shaped bur: her head is shaped like a tapered cone with a small end
Of the cone directed toward the bur shank. It is advocated for tooth preparations
for amalgam.
4. Straight fissure bur: the head is an elongated parallel-sided cylinder of
Different lengths. This shape is used for obtaining the outline form of the
cavity and to cut walls, floor, or margins of the cavity.
5. Tapered fissure bur: head is tapered-sided cylindrical but sides
tapering towards tips. This shape is used for tooth preparations for inlay
and crown
preparations.
Advances in Bur Technology:
• Coated Burs: Newer burs may have special coatings (like zirconia) to improve
wear resistance and cutting efficiency.
• Multi-layered Diamond Burs: These are designed to provide consistent
performance over longer periods and reduce the need for frequent bur
replacement.
Instrument grasp
1. Modified Pen Grasp
• Description: Similar to the pen grasp but with
the middle finger placed on the instrument's
shank or handle for added support, and the ring
finger placed on a firm surface (like a tooth or
adjacent structure) to act as a fulcrum or rest.
• Usage: This is one of the most commonly used
grasps in operative dentistry for tasks such as
restorative procedures, including the removal of
decay, cavity preparation, or shaping fillings especially in
mandibular teeth
• Advantages:
o Provides excellent stability and control during procedures.
o Reduces hand fatigue and increases tactile sensitivity.
o The ring finger acts as a stabilizing fulcrum, improving precision.
• Limitations:
o May take time to develop skill in this grasp for certain
procedures.
Inverted Pen Grasp
• Description: The hand is rotated so that
the palm faces away from the operator.
The instrument is held in a way similar
to the modified pen grasp, but the
orientation is reversed.
• Usage: Primarily used for working on
the lingual surfaces of the maxillary
anterior teeth and certain hard-to-reach
areas.
3. Palm-and-Thumb Grasp (Palm Grasp)
• Description: The instrument is held in the palm, with the thumb resting against the instrument
for stabilization and control. The other fingers wrap around the instrument handle.
• Usage: This grasp is typically used for holding larger instruments like forceps, certain types of
pliers, or for tasks requiring more force (e.g., tooth extraction, condensing amalgam, or
holding matrix bands).
•
4. Modified Palm-and-Thumb Grasp
• Description: The palm-and-thumb grasp is
modified by resting the thumb against a firm
structure, such as a tooth or alveolar ridge, to
stabilize the hand.
• Usage: Commonly used for forceful operations,
such as manipulating handpieces for cavity
preparation or condensing restorative materials,
especially in posterior areas.
•
Finger Rest and Fulcrum Technique
A finger rest (fulcrum) is used to provide stability and control during
instrumentation. The ring finger typically serves as the fulcrum point, resting on a firm
surface such as a tooth or other stable intraoral structure
1. Intraoral Finger Rests
• Conventional: the finger rest is adjacent to the working tooth
• Cross-arch: the finger rests on the same arch but on the opposite
side
• Opposite arch: the finger rest achieved from the opposite arch
• Finger on finger: the rest is achieved from the index finger or
thumb of the nonoperating hand
2. Extraoral finger rests
• Palm up: rest is obtained by resting the back of the middle and fourth finger on
the lateral aspect of the mandible on the right side of the face
• Palm down: rest is obtained by resting the front surface of the middle and fourth
fingers on the lateral aspect of the mandible on the left side of the face
Patient positions techniques:
In a supine position, the patient's head, knees, and feet are
approximately at the same level. The patient's head
should not be lower than the feet; except in case when the
patient is in syncope.
In a reclined 45 degrees, the chair is reclined at
a 45degree, so that when the patient seated the
mandibular occlusal surface are almost 45
degree to the floor.
Operator positions techniques:
⧫ For a right-handed operator, there are essentially three positions
right front, right, and right rear. These are sometimes referred to as
the 7-, 9-,
and 11-o'clock positions.
⧫ For a left-handed operator, the three positions are left front, left,
and left rear positions, which are referred as 5-, 3-, and 1-o'clock
positions.
A fourth position, direct rear or 12-o'clock position, has application for
certain areas of the mouth. As a rule, the teeth being treated should be at
the same level as the operator's elbow.
▪ Right front position (7- o'clock):
It helps and facilitates the examination of the patient
Working areas include:
• Mandibular anterior teeth
• Mandibular posterior teeth (right side) and
• Maxillary anterior teeth.
It is often advantageous to have the patient’s head rotated
slightly toward the operator.
▪ Right position (9- o'clock):
In this position, the operator sits directly to the right
of the patient.
Working areas include:
• Occlusal surfaces of mandibular left posterior teeth.
• Facial surfaces of maxillary and mandibular right
posterior teeth
▪ Right rear position (11- o'clock):
This is the position of choice for most operations. Here, the
operator is behind and slightly to the right of the patient. The
left arm is positioned around the patient’s head.
Working areas include:
• Palatal and incisal surfaces of maxillary teeth (indirect vision
by the mirror)
• Mandibular teeth (direct vision) particularly on left side
▪ Direct rear position (12- o'clock):
Here, the operator is located directly behind the patient and
looks down over the patient’s head.
Working areas include:
• Lingual surfaces of mandibular anterior teeth (direct
vision).
Instruments and its use in operative dentistry

Instruments and its use in operative dentistry

  • 1.
  • 2.
    Dental Hand Instruments Awide variety of dental instruments are used in dentistry today generally, the instruments used in restorative dentistry are classified according to their use: a. Hand instruments. b. Rotary instruments. Most hand instruments, regardless of use, are composed of three parts:  Handle (shaft) Portion of the instrument where the operator grasps.  Shank Part of the instrument that attaches the working end to the handle.  Blade (working end) Portion of the instrument with a specific function.
  • 3.
    Instrument formula: Cutting instrumentshave formulas describing the dimensions and angles of the working end; these are placed on the handle using a code separated by dashes or spaces. 3 Number instrument formula: Cutting edge of the Instrument is at a right angle to the blade: a) First number- Width of the blade in millimeter. b) Second number - Length of the blade in millimeter. c) Third number - Angle the blade forms with the axis of the handle in centigrade.  Example: Enamel hatchet.
  • 4.
    4 Number instrumentformula: The cutting edge of the Instrument is at an angle other than a right angle to the blade. a) First number - Width of the blade in millimeters. b) Second number - indicates the primary cutting edge angle, measured from a line parallel to the long axis of the instrument handle in clockwise centigrade. c) Third number - Length of the blade in millimeters. d) Fourth number - Angle the blade forms with the axis of the handle in centigrade. Example: Gingival marginal trimmer & angle former.
  • 5.
    Classification of handInstruments:  Four categories 1.Examination instruments 2.Hand-cutting instruments 3.Restorative instruments 4.Accessory instruments
  • 6.
    Examination Instruments (non-cutting handinstruments)  Mouth mirror • Indirect vision • Light reflection • Retraction • Tissue protection  Explorer • Distinguish areas of calculus. • Distinguish decay. • Distinguish areas of discrepancies on teeth.  Tweezers (Cotton Pliers) Carry, retrieve and place small objects, it has 2 types:  Locking  Non-locking
  • 7.
    2. Hand-cutting Instruments Allow the operator to manually remove decay, as well as smooth, finish, and prepare tooth structure to be restored back to its normal function.   Excavator (spoon excavator) is used for the removal of soft dentin, debris, and decay from the tooth. Chisel Hoes
  • 8.
    3. Restorative Instruments Allowthe operator to place, condense, and carve a dental material to the original anatomy of the tooth structure.  Condenser Used to deliver the restoration to the tooth preparation, as well as, to properly condense the freshly placed amalgam into the preparation. It has a hammer like working end available in different sizes and shapes. • Smooth • Serrated  Amalgam carrier • Used to pack and carry the freshly mixed amalgam into the prepared tooth. It has a hollow working ends called barrels to pack the amalgam, while lever is located on top of carrier to depress the amalgam restoration.
  • 9.
     Carvers • Usedto remove excess material, contour surfaces, and carve the restoration to the same tooth anatomy before it hardens. It has sharp cutting edges come in different sizes and shapes  Burnisher  Used to smoothen and polish (shiny) the surface of the freshly placed amalgam restoration by rubbing, as well as, to remove scratches present on the amalgam surface after its carving. It has a smooth rounded working ends available in different sizes and shapes. • Egg-shaped • Football • T-shaped • Beaver tail  Ash 6 and Ash 49 • Is double-ended instrument with cylindrical nibs and rounded ends. Used to manipulate plastic (composite) restorative material.
  • 10.
    4. Accessory Instruments Theseare miscellaneous instruments that may be needed for many uses to complete a procedure.  Spatulas • Used for most every procedure when a dental material is involved which is used for mixing dental materials, as well as, to load materials. It has a flat blunt working end. • Cement spatulas • Impression material spatulas  Scissors: • Used for cutting dental dam material, retraction cord, and stainless steel crowns.
  • 11.
    Dycal applicator Is smallhand instrument with small round nib used for mixing and placing dycal lining material in the cavity. Dappen Dish, and amalgam well Where the newly mixed amalgam is placed and retrieved from.
  • 12.
    Powered cutting equipment: 1.Rotary power cutting instrument 2. Ultrasonic instrument 3. Air-Abrasion instrument Ultrasonic instruments in dentistry are advanced tools used primarily for scaling and cleaning teeth,also in endodonti procedures by enhancing cleaning efficiency, improving the ability to navigate complex root canal systems, and aiding in difficult cases like post removal or retrieving broken instruments. They function by using high-frequency sound waves to create rapid vibrations, which help in removing plaque, calculus (tartar), and stains from the tooth surfaces. The air abrasion instrument is a hand-held tool that dentists use for a variety of purposes. A bit like a mini-sandblaster, it uses compressed air (or another gas) to produce a fine stream of abrasive particles that can be precisely aimed. Rotary cutting instrument Rotary cutting instruments are those instruments that rotate on an axis to do the work of abrading, cutting, polishing, and finishing of tooth structure and the restoration process. This is of two types: 1. Dental Handpieces 2. Dental Burs
  • 13.
    1. Low-Speed handpiece: ▪Design • Either straight on contra-angle in appearance. • Speed ranges from 10,000 to 30,000 rotations per minute (rpm). • Operated either by compressed air or directly by an electric motor. Straight handpiece: This is commonly used in oral surgical and laboratory procedures. Contra-angle handpiece: Uses of the low-speed handpiece ▪ Removal of soft decay and fine finishing of a cavity preparation. ▪ Finishing and polishing of restorations. ▪ Coronal polishing and removal of stains.
  • 14.
    High-Speed Handpiece ▪ Design •One-piece unit with a slight curve in appearance. • Operated by air pressure. • Operates at speeds up to 450,000 rpm. • Maintains a water-coolant system. Uses of the high-speed handpiece ▪ Removes decay. ▪ Removes an old or faulty restoration. ▪ Reduces the crown portion of the tooth for the preparation of a crown or bridge. ▪ Prepares the outline and retention grooves for a new restoration. ▪ Finishes or polishes a restoration. ▪ Sections of a tooth during surgery.
  • 15.
    Dental burs 1. Structureof Dental Burs: • Shank: The part that fits into the dental handpiece. Shanks come in three types: o Straight: Used with straight handpieces, typically in laboratory settings. o Latch-type: Used with slow-speed handpieces. o Friction grip: Used with high-speed handpieces. • Neck: The narrow part between the shank and the head connects them. • Head: The cutting or grinding part of the bur, available in different shapes, sizes, and materials depending on the procedure.
  • 16.
    3. Designs ofbur head: 1. Round bur: the head is spherical in shape, used for initial entry into the tooth, caries removal, extension of the preparation, and placement of retentive features. 2. Inverted cone bur: the head is a cone shape that has a flat base and Sides tapered toward the shank. This bur is used for flatting the floor of The cavity, providing undercuts in tooth preparations, and establishing a wall angulation. 3. Pear-shaped bur: her head is shaped like a tapered cone with a small end Of the cone directed toward the bur shank. It is advocated for tooth preparations for amalgam. 4. Straight fissure bur: the head is an elongated parallel-sided cylinder of Different lengths. This shape is used for obtaining the outline form of the cavity and to cut walls, floor, or margins of the cavity. 5. Tapered fissure bur: head is tapered-sided cylindrical but sides tapering towards tips. This shape is used for tooth preparations for inlay and crown preparations.
  • 17.
    Advances in BurTechnology: • Coated Burs: Newer burs may have special coatings (like zirconia) to improve wear resistance and cutting efficiency. • Multi-layered Diamond Burs: These are designed to provide consistent performance over longer periods and reduce the need for frequent bur replacement.
  • 18.
  • 19.
    1. Modified PenGrasp • Description: Similar to the pen grasp but with the middle finger placed on the instrument's shank or handle for added support, and the ring finger placed on a firm surface (like a tooth or adjacent structure) to act as a fulcrum or rest. • Usage: This is one of the most commonly used grasps in operative dentistry for tasks such as restorative procedures, including the removal of decay, cavity preparation, or shaping fillings especially in mandibular teeth • Advantages: o Provides excellent stability and control during procedures. o Reduces hand fatigue and increases tactile sensitivity. o The ring finger acts as a stabilizing fulcrum, improving precision. • Limitations: o May take time to develop skill in this grasp for certain procedures.
  • 20.
    Inverted Pen Grasp •Description: The hand is rotated so that the palm faces away from the operator. The instrument is held in a way similar to the modified pen grasp, but the orientation is reversed. • Usage: Primarily used for working on the lingual surfaces of the maxillary anterior teeth and certain hard-to-reach areas.
  • 21.
    3. Palm-and-Thumb Grasp(Palm Grasp) • Description: The instrument is held in the palm, with the thumb resting against the instrument for stabilization and control. The other fingers wrap around the instrument handle. • Usage: This grasp is typically used for holding larger instruments like forceps, certain types of pliers, or for tasks requiring more force (e.g., tooth extraction, condensing amalgam, or holding matrix bands). •
  • 22.
    4. Modified Palm-and-ThumbGrasp • Description: The palm-and-thumb grasp is modified by resting the thumb against a firm structure, such as a tooth or alveolar ridge, to stabilize the hand. • Usage: Commonly used for forceful operations, such as manipulating handpieces for cavity preparation or condensing restorative materials, especially in posterior areas. •
  • 23.
    Finger Rest andFulcrum Technique A finger rest (fulcrum) is used to provide stability and control during instrumentation. The ring finger typically serves as the fulcrum point, resting on a firm surface such as a tooth or other stable intraoral structure 1. Intraoral Finger Rests • Conventional: the finger rest is adjacent to the working tooth • Cross-arch: the finger rests on the same arch but on the opposite side • Opposite arch: the finger rest achieved from the opposite arch • Finger on finger: the rest is achieved from the index finger or thumb of the nonoperating hand
  • 24.
    2. Extraoral fingerrests • Palm up: rest is obtained by resting the back of the middle and fourth finger on the lateral aspect of the mandible on the right side of the face • Palm down: rest is obtained by resting the front surface of the middle and fourth fingers on the lateral aspect of the mandible on the left side of the face
  • 25.
    Patient positions techniques: Ina supine position, the patient's head, knees, and feet are approximately at the same level. The patient's head should not be lower than the feet; except in case when the patient is in syncope. In a reclined 45 degrees, the chair is reclined at a 45degree, so that when the patient seated the mandibular occlusal surface are almost 45 degree to the floor.
  • 26.
    Operator positions techniques: ⧫For a right-handed operator, there are essentially three positions right front, right, and right rear. These are sometimes referred to as the 7-, 9-, and 11-o'clock positions. ⧫ For a left-handed operator, the three positions are left front, left, and left rear positions, which are referred as 5-, 3-, and 1-o'clock positions. A fourth position, direct rear or 12-o'clock position, has application for certain areas of the mouth. As a rule, the teeth being treated should be at the same level as the operator's elbow.
  • 27.
    ▪ Right frontposition (7- o'clock): It helps and facilitates the examination of the patient Working areas include: • Mandibular anterior teeth • Mandibular posterior teeth (right side) and • Maxillary anterior teeth. It is often advantageous to have the patient’s head rotated slightly toward the operator.
  • 28.
    ▪ Right position(9- o'clock): In this position, the operator sits directly to the right of the patient. Working areas include: • Occlusal surfaces of mandibular left posterior teeth. • Facial surfaces of maxillary and mandibular right posterior teeth
  • 29.
    ▪ Right rearposition (11- o'clock): This is the position of choice for most operations. Here, the operator is behind and slightly to the right of the patient. The left arm is positioned around the patient’s head. Working areas include: • Palatal and incisal surfaces of maxillary teeth (indirect vision by the mirror) • Mandibular teeth (direct vision) particularly on left side
  • 30.
    ▪ Direct rearposition (12- o'clock): Here, the operator is located directly behind the patient and looks down over the patient’s head. Working areas include: • Lingual surfaces of mandibular anterior teeth (direct vision).