Installation of Dspace in Windows OS: A Complete Documentation
•Download as DOC, PDF•
1 like•1,959 views

A step-by-step pictorial presentation on the installation of Dspace, Digital Library at workplace.

Recommended
Recommended
More Related Content
What's hot
What's hot (20)
Similar to Installation of Dspace in Windows OS: A Complete Documentation
Similar to Installation of Dspace in Windows OS: A Complete Documentation (20)
More from Ashok Kumar Satapathy
More from Ashok Kumar Satapathy (11)
Recently uploaded
Recently uploaded (20)
Installation of Dspace in Windows OS: A Complete Documentation
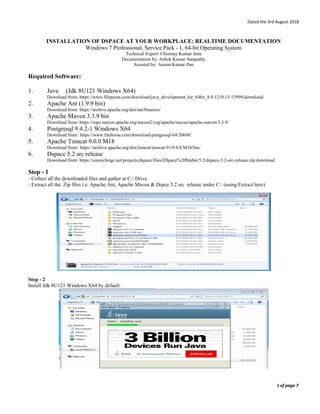
- 1. Dated the 3rd August 2018 INSTALLATION OF DSPACE AT YOUR WORKPLACE: REALTIME DOCUMENTATION Windows 7 Professional, Service Pack - 1, 64-bit Operating System Technical Expert: Chinmay Kumar Jena Documentation by: Ashok Kumar Satapathy Assisted by: Aseem Kumar Das Required Software: 1. Java (Jdk 8U121 Windows X64) Download from: https://www.filepuma.com/download/java_development_kit_64bit_8.0.1210.13-13999/download/ 2. Apache Ant (1.9.9 bin) Download from: https://archive.apache.org/dist/ant/binaries/ 3. Apache Maven 3.3.9 bin Download from: https://repo.maven.apache.org/maven2/org/apache/maven/apache-maven/3.3.9/ 4. Postgresql 9.4.2-1 Windows X64 Download from: https://www.filehorse.com/download-postgresql-64/20688/ 5. Apache Tomcat 9.0.0 M18 Download from: https://archive.apache.org/dist/tomcat/tomcat-9/v9.0.0.M18/bin/ 6. Dspace 5.2 src release Download from: https://sourceforge.net/projects/dspace/files/DSpace%20Stable/5.2/dspace-5.2-src-release.zip/download Step - 1 - Collect all the downloaded files and gather at C: Drive - Extract all the .Zip files i.e. Apache Ant, Apache Maven & Dspce 5.2 src release under C: (using Extract here) Step - 2 Install Jdk 8U121 Windows X64 by default. 1 of page 7
- 2. Dated the 3rd August 2018 Step - 3 - Configure Environmental Variables for that - Go to My ComputerPropertiesAdvance System Settings - Click on Environmental Variables and choose System Variables to set the path to Java, Ant & Maven - Click on new>Variable Name is : "path" & Variable Value is " C:Program FilesJavajdk1.8.0_121bin;C:apache- ant-1.9.9bin;C:apache-maven-3.3.9bin" then click on Ok, Ok & Ok Step - 4 - Again go to Properties> Advance System Settings> Environmental Variable & click on User Variables and set the Variable Name = JAVA_Home and Variable Value = C:Program FilesJavajdk1.8.0_121 then Ok. - Again go to Properties> Advance System Settings> Environmental Variable & click on User Variables and set the Variable Name = ANT_HOME and Variable Value = C:apache-ant-1.9.9 then Ok. - Again go to Properties> Advance System Settings> Environmental Variable & click on User Variables and set the Variable Name = MVN_HOME and Variable Value = C:apache-maven-3.3.9 Ok, Ok & Ok 2 of page 7
- 3. Dated the 3rd August 2018 - Configuration of Java, Ant & Maven completed. For confirmation go to command prompt i.e. cmd. - it shows C:Userskiit>then type “java –version” likewise ant – version & mvn –version. Step - 5 - Install Postgresql 9.4.2.1 - Default path - After one step put "dspace" as password then all steps are set as by default. - We may get following problem i.e. problem running post-install step if come then click on Ok and Finish. - Uninstall Postgres from control panel and go Programme files and delete the Postgres folder then - Once again start the installation and change the path as "C:PostgreSQL9.4" and continue the installation by default. 3 of page 7
- 4. Dated the 3rd August 2018 - Again we may faced another problem i.e. A non-fatal error occured during cluster initialisation if come then click Ok and then Finish. - As solution go to C: drive> Postgres and right click on it and choose properties - Select "security" then choose "Edit" then allow "full control" and apply and Ok. - Again re-install PostgreSQL without any modification. At the last step of installation uncheck the stack builder then Finish. 4 of page 7
- 5. Dated the 3rd August 2018 Step - 6 - Go to Start menu > all programs then choose PostgreSQL 9.4 then Select PgAdmin III and open it, after open right click on PostgreSQL9.4.... here password required to connect server i.e. "dspace" - Go to "Login Roles (1)" right click on it choose New Login Roles> then - Properties = dspace - Definition = dspace - Role privileges = check all the box (tick mark) then Ok. - Right click on Databases (1)> select new Database> - Property and Owner = dspace - Go to Definition and Tablespace and select pg_default then Ok. Now the configuration part of PostgreSQL is over. Step - 7 - Now the procedure to be build Mavan package, for that internet connection should be activated. - Go to command prompt and type the syntax as "cd C:dspace-5.2-src-releasedspace" then enter - type "mvn package" then enter. It will take several minutes to run. Lastly it shows "build success" Now the procedure is over. 5 of page 7
- 6. Dated the 3rd August 2018 Step - 8 - Now the procedure to install Ant package, for that internet connection should be activated. - Copy the path "C:dspace-5.2-src-releasedspacetargetdspace-installer" and paste after cd press enter - Type ant fresh_install then press enter. The installation procedure is completed. Step - 9 - Now check C: drive, there is one new folder created by the name of dspace - Now again copy the path i.e. "C:dspacebin" after cd and press enter - Again type "dspace create-administrator" then press enter - Creating an initial administrator account i.e. E-mail address: ashoksatapathy@yahoo.com, First name: Ashok, Last name: Satapathy , put the password twice i.e. 1234, then put 'y' then enter. 6 of page 7
- 7. Dated the 3rd August 2018 Step - 10 Install Apache Tomcat by default; after installation - Check the installed tomcat at C:Program FilesApache Software Foundation - Go to C: > new created dspace folder> webapp> copy jspui, xmlui and solr > and paste these three folder at C:Program FilesApache Software FoundationTomcat 9.0webapps Step - 11 Go to start>type monitor tomcat>then stop once and restart again for refresh. - Type http://localhost:8080/jspui/ (recommended) or else type http://localhost:8080/xmlui/ in a web browser. 7 of page 7