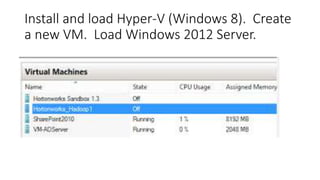
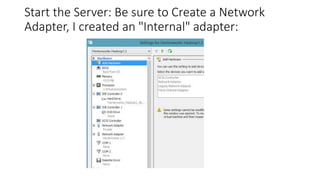
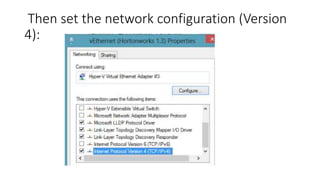
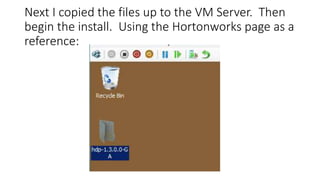
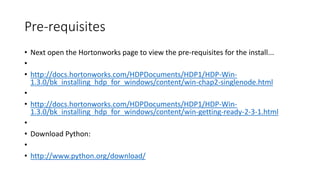
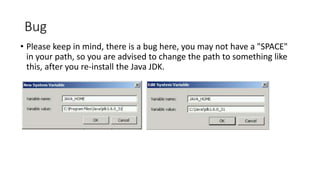
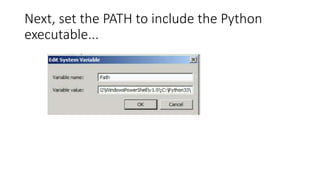
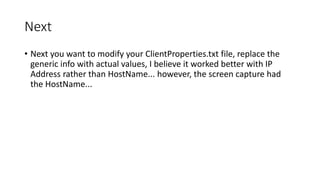
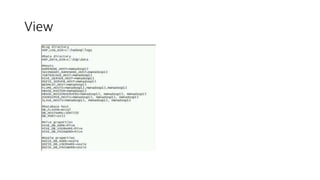
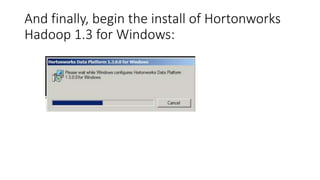
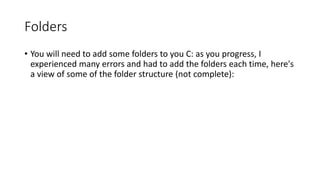
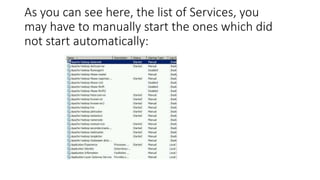
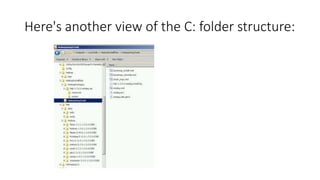
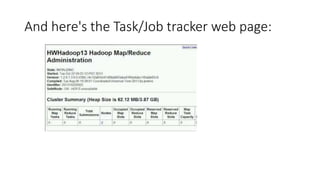
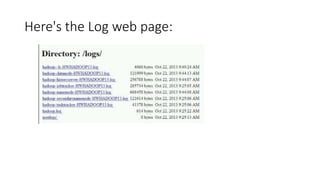
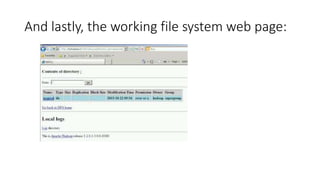
Installing Hortonworks for
Windows
Intro
• I installed Hortonworks for Windows on my local Hyper-V machine.
• The following Slides introduce you to the steps for installing on your
machine.
• The entire content can also be found on my blog:
• http://www.bloomconsultingbi.com/2013/10/installationhortonworks-hadoop-13-part.html
• http://www.bloomconsultingbi.com/2013/10/installationhortonworks-hadoop-13-part_22.html
• Enjoy~!
So today we are going to install Hadoop 1.3 single node cluster onto a
Hyper-V system.

Download the files from the Hortonworks website:
http://hortonworks.com/products/hdp-windows/
Version 1.3
Download Install File
Click the link to begin the download. Unzip
the file, creates a folder:
MSI File
See the text file "clusterproperties.txt"
Install and load Hyper-V (Windows 8). Create
a new VM. Load Windows 2012 Server.
Start the Server: Be sure to Create a Network
Adapter, I created an "Internal" adapter:
Then set the network configuration (Version
4):
Next I copied the files up to the VM Server. Then
begin the install. Using the Hortonworks page as a
reference:
Pre-requisites
• Next open the Hortonworks page to view the pre-requisites for the install...
•
• http://docs.hortonworks.com/HDPDocuments/HDP1/HDP-Win1.3.0/bk_installing_hdp_for_windows/content/win-chap2-singlenode.html
•
• http://docs.hortonworks.com/HDPDocuments/HDP1/HDP-Win1.3.0/bk_installing_hdp_for_windows/content/win-getting-ready-2-3-1.html
•
• Download Python:
•
• http://www.python.org/download/
Python
Create a folder on the VM, I named it
HWHadoop13:
Copy the Python install to the VM as well,
and update the Path variable...
Open PowerShell as Administrator. Rewrite
the line of code in PowerShell...Execute...
Python 2.7.5
*** MESSAGE TO READER ***
Be sure to add the Python executable path to the Environment Variable "PATH"...
Use the following instructions to manually install Python in your local environment:

1.Download Python from here to the workspace directory.
2.Update the PATH environment variable. Using Administrator privileges. From the Powershell window,
execute the following commands as Administrator user:
msiexec /qn /norestart /log %WORKSPACE%python-2.7.5.log /i %WORKSPACE%python-2.7.5.msi setx PATH "$env:path;C:Python27" /m

o%WORKSPACE%

o$env

is the full workspace directory path.

is the Environment setting for your cluster.

where
Note
Important

Ensure the downloaded Python MSI name
matches python-2.7.5.msi. If not, change the
above command to match the MSI file name.
Next download the C++ 2010 Redistributable
Package...
Copy the file to the HWHadoop (Your home
directory for Hadoop) folder...
Type this in the PowerShell command line...
Microsoft Visual C++ 2010 Redistributable
Package (64-bit)
1.Use the instructions provided here to download Microsoft Visual C++ 2010
Redistributable Package (64-bit) to the workspace directory.
2.Execute the following command from Powershell with Administrator privileges:
%WORKSPACE%vcredist_x64.exe /q /norestart

For example:
C:prereqsvcredist_x64.exe /q /norestart
Now, download the Microsoft Framework...
Microsoft.NET framework 4.0

*** MESSAGE TO READER ***
Be sure to connected to the internet, because it has to pull some files off the web,
if you're not connected, the install will fail...
1.Use the instructions provided here to download Microsoft.NET framework 4.0 to the workspace directory.
2.Execute the following command from Powershell with Administrator privileges:
%WORKSPACE%slavesetupdotNetFx40_Full_setup.exe /q /norestart /log %WORKSPACE%/dotNetFx40_Full_setup.exe
.net Framework
And now for the JDK:
• JDK 6.31 or higher

• *** MESSAGE TO READER ***
• During the installation process, it threw an error. Turns out you can
not have spaces in the path for JAVA_HOME. So uninstall and reinstall to new directory, i.e. C:Java instead of C:Program Files...
Use the instructions provided below to manually
install JDK to the workspace directory:
1.Check the version. From a command shell or Powershell window, type:
java -version

2.(Optional): Uninstall the Java package if the JDK version is less than v1.6 update 31.
3.Go to Oracle Java SE 6 Downloads page and accept the license.
Download the JDK installer to the workspace directory.
Note
Important
Ensure that no whitespace characters are present
in the installation directory's path.
For example, C:Program Files is not allowed.
Next
From Powershell with Administrator privileges, execute the following commands:

%WORKSPACE%jdk-6u31-windows-x64.exe /qn /norestart /log %WORKSPACE%jdk-6u31-windows-x64.log INSTALLDIR=C:javajdk1.6.0_31 setx JAVA_HOME
"C:javajdk1.6.0_31" /m where %WORKSPACE%

is the full workspace directory path.
Note
Important
Ensure the downloaded JDK .exe file's name matches with jdk-6u31-windows-x64.exe. If not, change the above
command to match the EXE file name.
For example:
C:prereqsjdk-6u31-windows-x64.exe /qn /norestart/log C:prereqsjdk-6u31-windows-x64.log
INSTALLDIR=C:javajdk1.6.0_31
Note
Oracle
http://www.oracle.com/technetwork/java/javasebusiness/downloads/java-archive-downloads-javase6-419409.html#jdk-6u31-oth-JPR
Only problem is you have to have an Oracle account or you must create one.
execute the Power Shell command...

http://docs.hortonworks.com/HDPDocuments/HDP1/HDP-Win-1.3.0/bk_installing_hdp_for_windows/content/win-chap2-singlenode.html
Java_Home path
• After the pre-requisites are loaded, Python, DotNet, C++
Redistributables, Oracle JDK, you are now ready to proceed.
First, you'll want to set the JAVA_HOME path in the Environmental
Variables:
System Properties
Bug
• Please keep in mind, there is a bug here, you may not have a "SPACE"
in your path, so you are advised to change the path to something like
this, after you re-install the Java JDK.
Environment Variables
Next, set the PATH to include the Python
executable...
You will also want to set the HOSTS file to
translate the DNS from IP to Server name:
From the DOS prompt type hostname to
obtain your hostname:
Open the HOSTS file in Notepad and apply the
necessary change,
Now you'll want to Open all Ports:
Next
• Next you want to modify your ClientProperties.txt file, replace the
generic info with actual values, I believe it worked better with IP
Address rather than HostName... however, the screen capture had
the HostName...
View
And finally, begin the install of Hortonworks
Hadoop 1.3 for Windows:
Folders
• You will need to add some folders to you C: as you progress, I
experienced many errors and had to add the folders each time, here's
a view of some of the folder structure (not complete):
Folders
After some trial and error, we have
successfully loaded the application:
Start the services:
You can run the smoke test:
Workaround
• Mine failed here, and it turns out the HDFS was never formatted so to
help you out here's the article that explains how to format the HDFS
drive:
• http://hortonworks.com/community/forums/topic/namenodecannot-be-started-after-successful-hdp-1-3-installation/
• WORKAROUND:
1. Open the “Hadoop Command Line” Command Prompt shortcut.
2. Run the following command that sets up the NameNode
directories: “hadoop namenode -format”
As you can see here, the list of Services, you
may have to manually start the ones which did
not start automatically:
Here's another view of the C: folder structure:
And here's the Task/Job tracker web page:
Here's the Log web page:
And lastly, the working file system web page:
And here's the shortcuts on the desktop:
Finished
• And that concludes this presentation.
• Happy Hadooping~!
Jonathan Bloom
Current Position:
Senior BI Consultant
• Twitter:
• @SQLJon
• Linked-in:
• http://www.linkedin.com/BloomConsultintBI
• Email:
• JBloom@agilebay.com

Installing Hortonworks Hadoop for Windows

  • 1.
  • 2.
    Intro • I installedHortonworks for Windows on my local Hyper-V machine. • The following Slides introduce you to the steps for installing on your machine. • The entire content can also be found on my blog: • http://www.bloomconsultingbi.com/2013/10/installationhortonworks-hadoop-13-part.html • http://www.bloomconsultingbi.com/2013/10/installationhortonworks-hadoop-13-part_22.html • Enjoy~!
  • 3.
    So today weare going to install Hadoop 1.3 single node cluster onto a Hyper-V system. Download the files from the Hortonworks website: http://hortonworks.com/products/hdp-windows/ Version 1.3
  • 4.
  • 5.
    Click the linkto begin the download. Unzip the file, creates a folder:
  • 6.
  • 7.
    See the textfile "clusterproperties.txt"
  • 8.
    Install and loadHyper-V (Windows 8). Create a new VM. Load Windows 2012 Server.
  • 9.
    Start the Server:Be sure to Create a Network Adapter, I created an "Internal" adapter:
  • 10.
    Then set thenetwork configuration (Version 4):
  • 11.
    Next I copiedthe files up to the VM Server. Then begin the install. Using the Hortonworks page as a reference:
  • 12.
    Pre-requisites • Next openthe Hortonworks page to view the pre-requisites for the install... • • http://docs.hortonworks.com/HDPDocuments/HDP1/HDP-Win1.3.0/bk_installing_hdp_for_windows/content/win-chap2-singlenode.html • • http://docs.hortonworks.com/HDPDocuments/HDP1/HDP-Win1.3.0/bk_installing_hdp_for_windows/content/win-getting-ready-2-3-1.html • • Download Python: • • http://www.python.org/download/
  • 13.
  • 14.
    Create a folderon the VM, I named it HWHadoop13:
  • 15.
    Copy the Pythoninstall to the VM as well, and update the Path variable...
  • 16.
    Open PowerShell asAdministrator. Rewrite the line of code in PowerShell...Execute... Python 2.7.5 *** MESSAGE TO READER *** Be sure to add the Python executable path to the Environment Variable "PATH"... Use the following instructions to manually install Python in your local environment: 1.Download Python from here to the workspace directory. 2.Update the PATH environment variable. Using Administrator privileges. From the Powershell window, execute the following commands as Administrator user: msiexec /qn /norestart /log %WORKSPACE%python-2.7.5.log /i %WORKSPACE%python-2.7.5.msi setx PATH "$env:path;C:Python27" /m o%WORKSPACE% o$env is the full workspace directory path. is the Environment setting for your cluster. where
  • 17.
    Note Important Ensure the downloadedPython MSI name matches python-2.7.5.msi. If not, change the above command to match the MSI file name.
  • 18.
    Next download theC++ 2010 Redistributable Package...
  • 19.
    Copy the fileto the HWHadoop (Your home directory for Hadoop) folder...
  • 20.
    Type this inthe PowerShell command line...
  • 21.
    Microsoft Visual C++2010 Redistributable Package (64-bit) 1.Use the instructions provided here to download Microsoft Visual C++ 2010 Redistributable Package (64-bit) to the workspace directory. 2.Execute the following command from Powershell with Administrator privileges: %WORKSPACE%vcredist_x64.exe /q /norestart For example: C:prereqsvcredist_x64.exe /q /norestart
  • 22.
    Now, download theMicrosoft Framework... Microsoft.NET framework 4.0 *** MESSAGE TO READER *** Be sure to connected to the internet, because it has to pull some files off the web, if you're not connected, the install will fail... 1.Use the instructions provided here to download Microsoft.NET framework 4.0 to the workspace directory. 2.Execute the following command from Powershell with Administrator privileges: %WORKSPACE%slavesetupdotNetFx40_Full_setup.exe /q /norestart /log %WORKSPACE%/dotNetFx40_Full_setup.exe
  • 23.
  • 24.
    And now forthe JDK: • JDK 6.31 or higher • *** MESSAGE TO READER *** • During the installation process, it threw an error. Turns out you can not have spaces in the path for JAVA_HOME. So uninstall and reinstall to new directory, i.e. C:Java instead of C:Program Files...
  • 25.
    Use the instructionsprovided below to manually install JDK to the workspace directory: 1.Check the version. From a command shell or Powershell window, type: java -version 2.(Optional): Uninstall the Java package if the JDK version is less than v1.6 update 31. 3.Go to Oracle Java SE 6 Downloads page and accept the license. Download the JDK installer to the workspace directory.
  • 26.
    Note Important Ensure that nowhitespace characters are present in the installation directory's path. For example, C:Program Files is not allowed.
  • 27.
    Next From Powershell withAdministrator privileges, execute the following commands: %WORKSPACE%jdk-6u31-windows-x64.exe /qn /norestart /log %WORKSPACE%jdk-6u31-windows-x64.log INSTALLDIR=C:javajdk1.6.0_31 setx JAVA_HOME "C:javajdk1.6.0_31" /m where %WORKSPACE% is the full workspace directory path.
  • 28.
    Note Important Ensure the downloadedJDK .exe file's name matches with jdk-6u31-windows-x64.exe. If not, change the above command to match the EXE file name. For example: C:prereqsjdk-6u31-windows-x64.exe /qn /norestart/log C:prereqsjdk-6u31-windows-x64.log INSTALLDIR=C:javajdk1.6.0_31
  • 29.
  • 30.
    Oracle http://www.oracle.com/technetwork/java/javasebusiness/downloads/java-archive-downloads-javase6-419409.html#jdk-6u31-oth-JPR Only problem isyou have to have an Oracle account or you must create one. execute the Power Shell command... http://docs.hortonworks.com/HDPDocuments/HDP1/HDP-Win-1.3.0/bk_installing_hdp_for_windows/content/win-chap2-singlenode.html
  • 31.
    Java_Home path • Afterthe pre-requisites are loaded, Python, DotNet, C++ Redistributables, Oracle JDK, you are now ready to proceed. First, you'll want to set the JAVA_HOME path in the Environmental Variables:
  • 32.
  • 33.
    Bug • Please keepin mind, there is a bug here, you may not have a "SPACE" in your path, so you are advised to change the path to something like this, after you re-install the Java JDK.
  • 34.
  • 35.
    Next, set thePATH to include the Python executable...
  • 36.
    You will alsowant to set the HOSTS file to translate the DNS from IP to Server name:
  • 37.
    From the DOSprompt type hostname to obtain your hostname:
  • 38.
    Open the HOSTSfile in Notepad and apply the necessary change,
  • 39.
    Now you'll wantto Open all Ports:
  • 40.
    Next • Next youwant to modify your ClientProperties.txt file, replace the generic info with actual values, I believe it worked better with IP Address rather than HostName... however, the screen capture had the HostName...
  • 41.
  • 42.
    And finally, beginthe install of Hortonworks Hadoop 1.3 for Windows:
  • 43.
    Folders • You willneed to add some folders to you C: as you progress, I experienced many errors and had to add the folders each time, here's a view of some of the folder structure (not complete):
  • 44.
  • 45.
    After some trialand error, we have successfully loaded the application:
  • 46.
  • 47.
    You can runthe smoke test:
  • 48.
    Workaround • Mine failedhere, and it turns out the HDFS was never formatted so to help you out here's the article that explains how to format the HDFS drive: • http://hortonworks.com/community/forums/topic/namenodecannot-be-started-after-successful-hdp-1-3-installation/ • WORKAROUND: 1. Open the “Hadoop Command Line” Command Prompt shortcut. 2. Run the following command that sets up the NameNode directories: “hadoop namenode -format”
  • 49.
    As you cansee here, the list of Services, you may have to manually start the ones which did not start automatically:
  • 50.
    Here's another viewof the C: folder structure:
  • 51.
    And here's theTask/Job tracker web page:
  • 52.
    Here's the Logweb page:
  • 53.
    And lastly, theworking file system web page:
  • 54.
    And here's theshortcuts on the desktop:
  • 55.
    Finished • And thatconcludes this presentation. • Happy Hadooping~!
  • 56.
    Jonathan Bloom Current Position: SeniorBI Consultant • Twitter: • @SQLJon • Linked-in: • http://www.linkedin.com/BloomConsultintBI • Email: • JBloom@agilebay.com