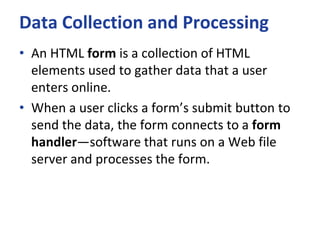
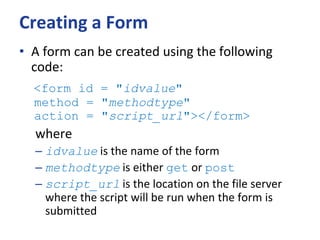
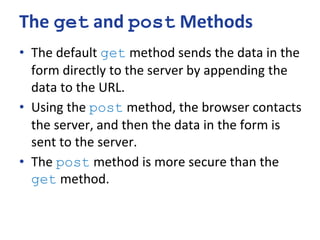
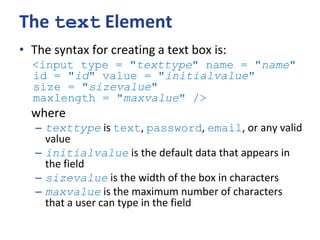
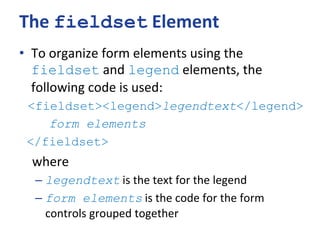
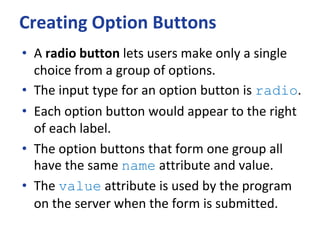
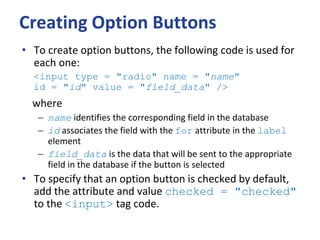
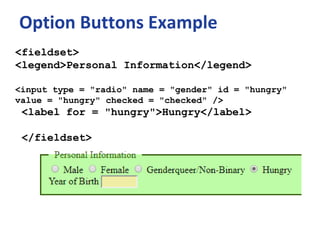
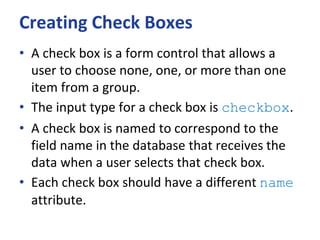
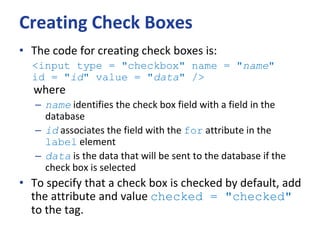
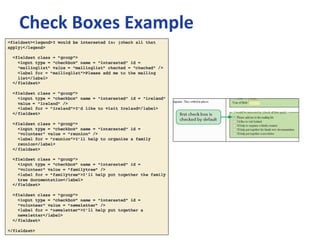
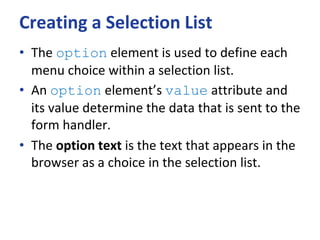
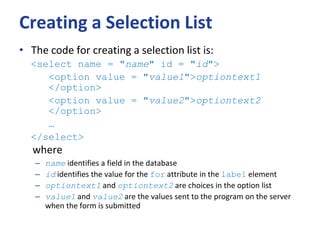
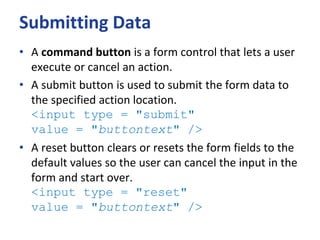
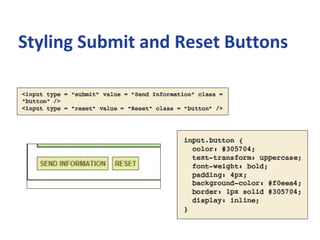
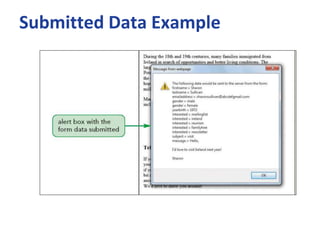
The document discusses how to create different types of HTML form elements, including text boxes, option buttons, checkboxes, drop-down lists, text areas, and submit/reset buttons. It provides the code needed to create each element, explains their attributes and how to style them. Key aspects covered include using labels, setting initial values, organizing elements into fieldsets, and submitting the form data.
Slide pendukung untuk mata kuliah Pemrograman Web 1 di Jurusan Teknik Informatika Universitas Pasundan Bandung.
Digunakan juga sebagai pendukung untuk video di channel youtube "WebProgrammingUNPAS"
https://www.youtube.com/channel/UCkXmLjEr95LVtGuIm3l2dPg
Slide pendukung untuk mata kuliah Pemrograman Web 1 di Jurusan Teknik Informatika Universitas Pasundan Bandung.
Digunakan juga sebagai pendukung untuk video di channel youtube "WebProgrammingUNPAS"
https://www.youtube.com/channel/UCkXmLjEr95LVtGuIm3l2dPg
Ada beberapa cara untuk menampatkan sintaks CSS di halaman web kita. Ada dengan menggunakan cara embed, inline dan external.
slide bantuan untuk video youtube:
https://youtu.be/bnnislprJro
di channel Web Programming UNPAS
Pada slide kali ini yang akan kita bahas adalah mengenai bagaimana cara memberi style pada background dari sebuah elemen. Setiap elemen bisa kita beri background, namun contoh di slide ini hanya pada body saja.
Selain warna, kita juga dapat menambahkan gambar pada background dan pengatur pengulangan dari gambar serta posisinya. Setelah menyaksikan video ini, silahkan berkreasi dengan background pada halaman web kalian.. :)
slide bantuan untuk video youtube:
https://youtu.be/zm-HPYS_ELU
Slide pendukung untuk mata kuliah Pemrograman Web 1 di Jurusan Teknik Informatika Universitas Pasundan Bandung.
Digunakan juga sebagai pendukung untuk video di channel youtube "WebProgrammingUNPAS"
https://www.youtube.com/channel/UCkXmLjEr95LVtGuIm3l2dPg
Slide pendukung untuk mata kuliah Pemrograman Web 1 di Jurusan Teknik Informatika Universitas Pasundan Bandung.
Digunakan juga sebagai pendukung untuk video di channel youtube "WebProgrammingUNPAS"
https://www.youtube.com/channel/UCkXmLjEr95LVtGuIm3l2dPg
Slide pendukung untuk mata kuliah Pemrograman Web 1 di Jurusan Teknik Informatika Universitas Pasundan Bandung.
Digunakan juga sebagai pendukung untuk video di channel youtube "WebProgrammingUNPAS"
https://www.youtube.com/channel/UCkXmLjEr95LVtGuIm3l2dPg
This presentation is regarding HTML table.In this it is briefly explained about the HTML table from which we can get good knowledge about how to use Tables in HTML.
Slide pendukung untuk mata kuliah Pemrograman Web 1 di Jurusan Teknik Informatika Universitas Pasundan Bandung.
Digunakan juga sebagai pendukung untuk video di channel youtube "WebProgrammingUNPAS"
https://www.youtube.com/channel/UCkXmLjEr95LVtGuIm3l2dPg
Konsep inheritance atau pewarisan ternyata terdapat juga pada CSS, tetapi konsepnya sangat sederhana tidak se-kompleks pada bahasa pemrograman lain seperti Java atau PHP.
Intinya adalah elemen child mewarisi beberapa value dari properti yang dimiliki parentnya.
Nilai dari properti di css yang akan kita pelajari di video ini adalah inherit.
slide bantuan untuk video youtube:
https://youtu.be/kY2FEA3y43E
Pseudo class adalah kelas khusus yang dapat kita beri style css pada keadaan tertentu.. ada banyak jenis pseudo class / selector, tetapi yang akan dibahas pada video ini hanya yang berhubungan dengan link dan urutan elemen saja..
contoh pseudo-class yang berhubungan dengan link :
:link
:hover
:active
:visited
slide bantuan untuk video youtube:
https://youtu.be/G0gYWdIHOug
Slide pendukung untuk mata kuliah Pemrograman Web 1 di Jurusan Teknik Informatika Universitas Pasundan Bandung.
Digunakan juga sebagai pendukung untuk video di channel youtube "WebProgrammingUNPAS"
https://www.youtube.com/channel/UCkXmLjEr95LVtGuIm3l2dPg
Slide pendukung untuk mata kuliah Pemrograman Web 1 di Jurusan Teknik Informatika Universitas Pasundan Bandung.
Digunakan juga sebagai pendukung untuk video di channel youtube "WebProgrammingUNPAS"
https://www.youtube.com/channel/UCkXmLjEr95LVtGuIm3l2dPg
Slide pendukung untuk mata kuliah Pemrograman Web 1 di Jurusan Teknik Informatika Universitas Pasundan Bandung.
Digunakan juga sebagai pendukung untuk video di channel youtube "WebProgrammingUNPAS"
https://www.youtube.com/channel/UCkXmLjEr95LVtGuIm3l2dPg
This presentation is regarding HTML table.In this it is briefly explained about the HTML table from which we can get good knowledge about how to use Tables in HTML.
Slide pendukung untuk mata kuliah Pemrograman Web 1 di Jurusan Teknik Informatika Universitas Pasundan Bandung.
Digunakan juga sebagai pendukung untuk video di channel youtube "WebProgrammingUNPAS"
https://www.youtube.com/channel/UCkXmLjEr95LVtGuIm3l2dPg
Konsep inheritance atau pewarisan ternyata terdapat juga pada CSS, tetapi konsepnya sangat sederhana tidak se-kompleks pada bahasa pemrograman lain seperti Java atau PHP.
Intinya adalah elemen child mewarisi beberapa value dari properti yang dimiliki parentnya.
Nilai dari properti di css yang akan kita pelajari di video ini adalah inherit.
slide bantuan untuk video youtube:
https://youtu.be/kY2FEA3y43E
Pseudo class adalah kelas khusus yang dapat kita beri style css pada keadaan tertentu.. ada banyak jenis pseudo class / selector, tetapi yang akan dibahas pada video ini hanya yang berhubungan dengan link dan urutan elemen saja..
contoh pseudo-class yang berhubungan dengan link :
:link
:hover
:active
:visited
slide bantuan untuk video youtube:
https://youtu.be/G0gYWdIHOug
In this slide I described all control which is used by the Html Form Controls such as checkbox , radio , text , drop down list / select , file upload and html output controls.
IT2255 Web Essentials - Unit II Web Designingpkaviya
HTML - Form Elements - Input types and Media elements - HTML 5 - CSS3 - Selectors, Box Model, Backgrounds and Borders, Text Effects, Animations, Multiple Column Layout, User Interface.
Synthetic Fiber Construction in lab .pptxPavel ( NSTU)
Synthetic fiber production is a fascinating and complex field that blends chemistry, engineering, and environmental science. By understanding these aspects, students can gain a comprehensive view of synthetic fiber production, its impact on society and the environment, and the potential for future innovations. Synthetic fibers play a crucial role in modern society, impacting various aspects of daily life, industry, and the environment. ynthetic fibers are integral to modern life, offering a range of benefits from cost-effectiveness and versatility to innovative applications and performance characteristics. While they pose environmental challenges, ongoing research and development aim to create more sustainable and eco-friendly alternatives. Understanding the importance of synthetic fibers helps in appreciating their role in the economy, industry, and daily life, while also emphasizing the need for sustainable practices and innovation.
Safalta Digital marketing institute in Noida, provide complete applications that encompass a huge range of virtual advertising and marketing additives, which includes search engine optimization, virtual communication advertising, pay-per-click on marketing, content material advertising, internet analytics, and greater. These university courses are designed for students who possess a comprehensive understanding of virtual marketing strategies and attributes.Safalta Digital Marketing Institute in Noida is a first choice for young individuals or students who are looking to start their careers in the field of digital advertising. The institute gives specialized courses designed and certification.
for beginners, providing thorough training in areas such as SEO, digital communication marketing, and PPC training in Noida. After finishing the program, students receive the certifications recognised by top different universitie, setting a strong foundation for a successful career in digital marketing.
Francesca Gottschalk - How can education support child empowerment.pptxEduSkills OECD
Francesca Gottschalk from the OECD’s Centre for Educational Research and Innovation presents at the Ask an Expert Webinar: How can education support child empowerment?
Operation “Blue Star” is the only event in the history of Independent India where the state went into war with its own people. Even after about 40 years it is not clear if it was culmination of states anger over people of the region, a political game of power or start of dictatorial chapter in the democratic setup.
The people of Punjab felt alienated from main stream due to denial of their just demands during a long democratic struggle since independence. As it happen all over the word, it led to militant struggle with great loss of lives of military, police and civilian personnel. Killing of Indira Gandhi and massacre of innocent Sikhs in Delhi and other India cities was also associated with this movement.
Read| The latest issue of The Challenger is here! We are thrilled to announce that our school paper has qualified for the NATIONAL SCHOOLS PRESS CONFERENCE (NSPC) 2024. Thank you for your unwavering support and trust. Dive into the stories that made us stand out!
Biological screening of herbal drugs: Introduction and Need for
Phyto-Pharmacological Screening, New Strategies for evaluating
Natural Products, In vitro evaluation techniques for Antioxidants, Antimicrobial and Anticancer drugs. In vivo evaluation techniques
for Anti-inflammatory, Antiulcer, Anticancer, Wound healing, Antidiabetic, Hepatoprotective, Cardio protective, Diuretics and
Antifertility, Toxicity studies as per OECD guidelines
Introduction to AI for Nonprofits with Tapp NetworkTechSoup
Dive into the world of AI! Experts Jon Hill and Tareq Monaur will guide you through AI's role in enhancing nonprofit websites and basic marketing strategies, making it easy to understand and apply.
Honest Reviews of Tim Han LMA Course Program.pptxtimhan337
Personal development courses are widely available today, with each one promising life-changing outcomes. Tim Han’s Life Mastery Achievers (LMA) Course has drawn a lot of interest. In addition to offering my frank assessment of Success Insider’s LMA Course, this piece examines the course’s effects via a variety of Tim Han LMA course reviews and Success Insider comments.
2. Data Collection and Processing
• An HTML form is a collection of HTML
elements used to gather data that a user
enters online.
• When a user clicks a form’s submit button to
send the data, the form connects to a form
handler—software that runs on a Web file
server and processes the form.
4. Creating a Form
• Every form begins with the start <form> tag and
ends with the closing </form> tag, which must
be within the document <body></body> tags.
• The <form> tag has several attributes and
values, including a unique id for the form.
• The action attribute in the <form> tag
identifies the location on the server where you’ll
send the data.
• The method attribute tells the browser how to
submit the form information.
5. Creating a Form
• A form can be created using the following
code:
<form id = "idvalue"
method = "methodtype"
action = "script_url"></form>
where
– idvalue is the name of the form
– methodtype is either get or post
– script_url is the location on the file server
where the script will be run when the form is
submitted
6. The get and post Methods
• The default get method sends the data in the
form directly to the server by appending the
data to the URL.
• Using the post method, the browser contacts
the server, and then the data in the form is
sent to the server.
• The post method is more secure than the
get method.
7. The text Element
• The syntax for creating a text box is:
<input type = "texttype" name = "name"
id = "id" value = "initialvalue"
size = "sizevalue"
maxlength = "maxvalue" />
where
– texttype is text, password, email, or any valid
value
– initialvalue is the default data that appears in
the field
– sizevalue is the width of the box in characters
– maxvalue is the maximum number of characters
that a user can type in the field
8. The fieldset Element
• To organize form elements using the
fieldset and legend elements, the
following code is used:
<fieldset><legend>legendtext</legend>
form elements
</fieldset>
where
– legendtext is the text for the legend
– form elements is the code for the form
controls grouped together
9. Form Container
• The form container can be formatted in the
same way the other HTML elements can be
formatted.
11. Determining Input Types
• A field represents a single kind of data.
• A user enters data into each field in a form
based on prompting text—a short description
that suggests what data belongs in a certain
field.
• The label element is used to display prompting
text on the screen.
• The input element is used to determine the
type of data a control collects.
12. Determining Input Types
• The label element is used together with the input
element.
– The label element uses the for attribute, which associates
the label with the id value in the input element.
<label for = “lastname”>Last Name</label>
<input type = “text” name=“lastname” id=“lastname” />
• The type attribute determines the specific type of form
object that is created:
– text input
– a check box
– an option button
– another form object.
13. Creating Text Boxes
• The text box control is used to gather
alphanumeric data (letters or numbers) as a
single line of text in a form.
• Use the type attribute with a value of text
to create a single-line text box.
• Another type of single-line text field is a
password field, where input is masked.
• The type attribute value for the password
field is password.
15. Email Text Box
• Another type of single-line text field is an
email text box, where input is masked.
• The type attribute value for the email text
box is email.
• The default length for the text boxes is 20
characters.
• The size attribute is used to make the email
text box longer.
17. Setting a Value in a Text Box
• The value attribute is used to set an initial
value of a text box control.
• The value of the value attribute appears in
the text box when the Web page opens.
18. Setting a Placeholder Value
• Some Web browsers recognize the
placeholder attribute and display its value
in a light grey color.
• The placeholder attribute allows you to
display a sample email address in the input
box.
19. Creating Option Buttons
• A radio button lets users make only a single
choice from a group of options.
• The input type for an option button is radio.
• Each option button would appear to the right
of each label.
• The option buttons that form one group all
have the same name attribute and value.
• The value attribute is used by the program
on the server when the form is submitted.
20. Creating Option Buttons
• To create option buttons, the following code is used for
each one:
<input type = "radio" name = "name"
id = "id" value = "field_data" />
where
– name identifies the corresponding field in the database
– id associates the field with the for attribute in the label
element
– field_data is the data that will be sent to the appropriate
field in the database if the button is selected
• To specify that an option button is checked by default,
add the attribute and value checked = "checked"
to the <input> tag code.
21. Option Buttons Example
<fieldset>
<legend>Personal Information</legend>
<input type = "radio" name = "gender" id = "hungry"
value = "hungry" checked = "checked" />
<label for = "hungry">Hungry</label>
</fieldset>
22. Creating Check Boxes
• A check box is a form control that allows a
user to choose none, one, or more than one
item from a group.
• The input type for a check box is checkbox.
• A check box is named to correspond to the
field name in the database that receives the
data when a user selects that check box.
• Each check box should have a different name
attribute.
23. Creating Check Boxes
• The code for creating check boxes is:
<input type = "checkbox" name = "name"
id = "id" value = "data" />
where
– name identifies the check box field with a field in the
database
– id associates the field with the for attribute in the
label element
– data is the data that will be sent to the database if the
check box is selected
• To specify that a check box is checked by default, add
the attribute and value checked = "checked"
to the tag.
25. Creating a Selection List
• A selection list is a form control that displays all the
items in a list and allows a user to choose from the
list.
• A drop-down list box displays only one item in a
selection list; the user clicks a list arrow to display the
remaining contents of the list and to make a
selection.
• The select element is used to create a selection
list.
26. Creating a Selection List
• The option element is used to define each
menu choice within a selection list.
• An option element’s value attribute and
its value determine the data that is sent to the
form handler.
• The option text is the text that appears in the
browser as a choice in the selection list.
27. Creating a Selection List
• The code for creating a selection list is:
<select name = "name" id = "id">
<option value = "value1">optiontext1
</option>
<option value = "value2">optiontext2
</option>
…
</select>
where
– name identifies a field in the database
– id identifies the value for the for attribute in the label element
– optiontext1 and optiontext2 are choices in the option list
– value1 and value2 are the values sent to the program on the server
when the form is submitted
28. Creating a Selection List – Special
Considerations
• More than one item in the list to appear in the
browser
– use size = "number", where number is the number
of items you want to display in the selection list.
• Allow user to select more than one choice
– use multiple = "multiple" in the <select> tag
code.
• Default choice
– use selected = "selected" in the <option> tag
code.
30. Creating a Text Area
• A text area is a control that allows users to enter
more than one line of alphanumeric input.
• The textarea element is used to create a multiline
text field.
• A text area allows users to enter comments that
suggest how to improve a particular service or the
form itself, or to provide other feedback.
31. Creating a Text Area
• The code for creating a text area is:
<textarea name = "name"
id = "id" rows = "height_value"
cols = "width_value"></textarea>
where
– name identifies the field in the database associated
with the text area
– id associates this field with the for attribute value in
the label element
– height_value is the number of rows
– width_value is the character width of the text area
expressed as a number
33. Submitting Data
• A command button is a form control that lets a user
execute or cancel an action.
• A submit button is used to submit the form data to
the specified action location.
<input type = "submit"
value = "buttontext" />
• A reset button clears or resets the form fields to the
default values so the user can cancel the input in the
form and start over.
<input type = "reset"
value = "buttontext" />