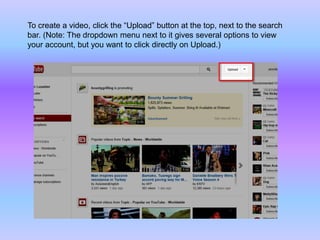
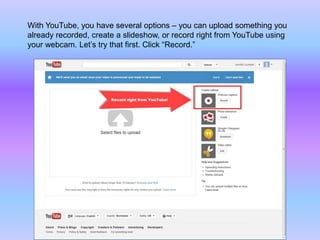
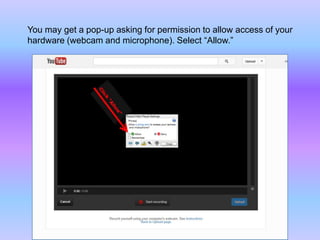
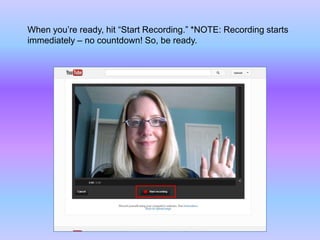
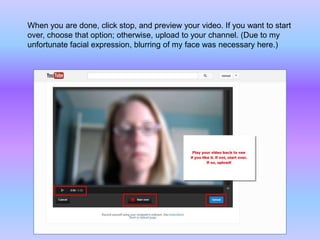
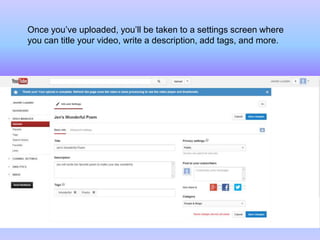
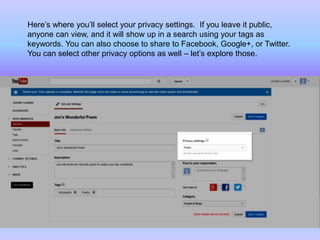
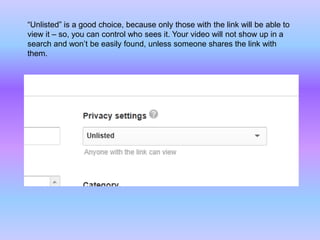
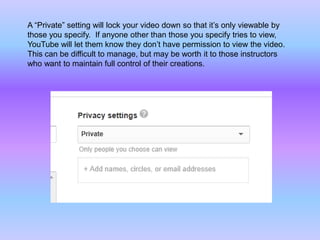
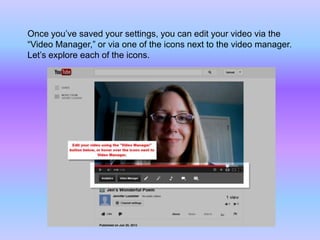
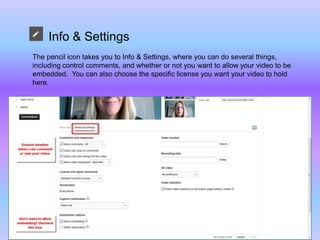
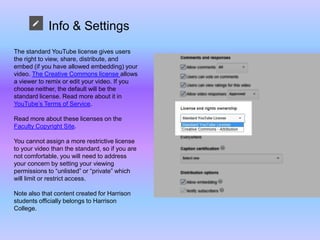
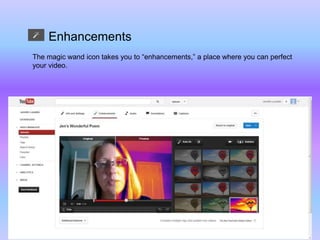
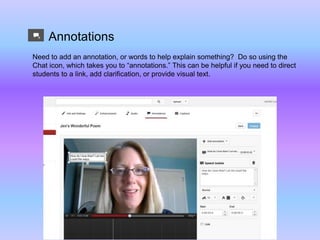
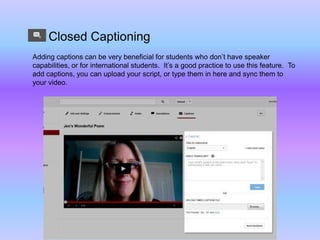
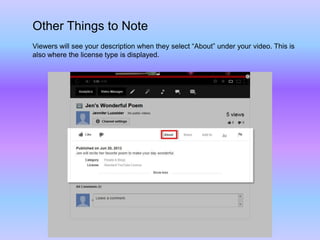
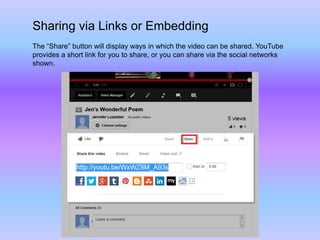
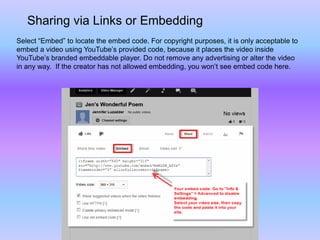
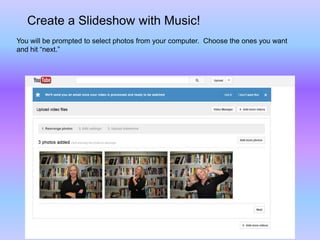
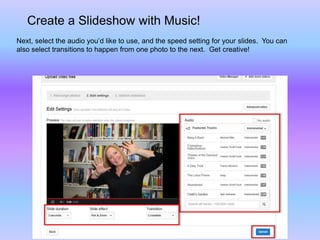
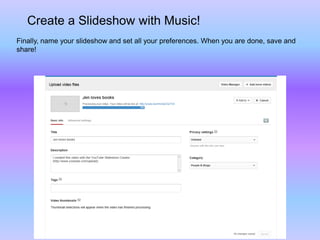
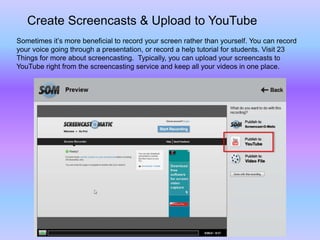
Creating Videos on
To create a video, click the “Upload” button at the top, next to the search
bar. (Note: The dropdown menu next to it gives several options to view
your account, but you want to click directly on Upload.)
With YouTube, you have several options – you can upload something you
already recorded, create a slideshow, or record right from YouTube using
your webcam. Let’s try that first. Click “Record.”
You may get a pop-up asking for permission to allow access of your
hardware (webcam and microphone). Select “Allow.”
When you’re ready, hit “Start Recording.” *NOTE: Recording starts
immediately – no countdown! So, be ready.
When you are done, click stop, and preview your video. If you want to start
over, choose that option; otherwise, upload to your channel. (Due to my
unfortunate facial expression, blurring of my face was necessary here.)
Once you’ve uploaded, you’ll be taken to a settings screen where
you can title your video, write a description, add tags, and more.
Here’s where you’ll select your privacy settings. If you leave it public,
anyone can view, and it will show up in a search using your tags as
keywords. You can also choose to share to Facebook, Google+, or Twitter.
You can select other privacy options as well – let’s explore those.
“Unlisted” is a good choice, because only those with the link will be able to
view it – so, you can control who sees it. Your video will not show up in a
search and won’t be easily found, unless someone shares the link with
them.
A “Private” setting will lock your video down so that it’s only viewable by
those you specify. If anyone other than those you specify tries to view,
YouTube will let them know they don’t have permission to view the video.
This can be difficult to manage, but may be worth it to those instructors
who want to maintain full control of their creations.
Once you’ve saved your settings, you can edit your video via the
“Video Manager,” or via one of the icons next to the video manager.
Let’s explore each of the icons.
Info & Settings
The pencil icon takes you to Info & Settings, where you can do several things,
including control comments, and whether or not you want to allow your video to be
embedded. You can also choose the specific license you want your video to hold
here.
Info & Settings
The standard YouTube license gives users
the right to view, share, distribute, and
embed (if you have allowed embedding) your
video. The Creative Commons license allows
a viewer to remix or edit your video. If you
choose neither, the default will be the
standard license. Read more about it in
YouTube’s Terms of Service.
Read more about these licenses on the
Faculty Copyright Site.
You cannot assign a more restrictive license
to your video than the standard, so if you are
not comfortable, you will need to address
your concern by setting your viewing
permissions to “unlisted” or “private” which
will limit or restrict access.
Note also that content created for Harrison
students officially belongs to Harrison
College.
Enhancements
The magic wand icon takes you to “enhancements,” a place where you can perfect
your video.
Annotations
Need to add an annotation, or words to help explain something? Do so using the
Chat icon, which takes you to “annotations.” This can be helpful if you need to direct
students to a link, add clarification, or provide visual text.
Closed Captioning
Adding captions can be very beneficial for students who don’t have speaker
capabilities, or for international students. It’s a good practice to use this feature. To
add captions, you can upload your script, or type them in here and sync them to
your video.
Other Things to Note
Viewers will see your description when they select “About” under your video. This is
also where the license type is displayed.
Sharing via Links or Embedding
The “Share” button will display ways in which the video can be shared. YouTube
provides a short link for you to share, or you can share via the social networks
shown.
Sharing via Links or Embedding
Select “Embed” to locate the embed code. For copyright purposes, it is only acceptable to
embed a video using YouTube’s provided code, because it places the video inside
YouTube’s branded embeddable player. Do not remove any advertising or alter the video
in any way. If the creator has not allowed embedding, you won’t see embed code here.
Create a Slideshow with Music!
Click the Upload button and select Photo Slideshow to create a slideshow with music.
Create a Slideshow with Music!
You will be prompted to select photos from your computer. Choose the ones you want
and hit “next.”
Create a Slideshow with Music!
Next, select the audio you’d like to use, and the speed setting for your slides. You can
also select transitions to happen from one photo to the next. Get creative!
Create a Slideshow with Music!
Finally, name your slideshow and set all your preferences. When you are done, save and
share!
Create Screencasts & Upload to YouTube
Sometimes it’s more beneficial to record your screen rather than yourself. You can record
your voice going through a presentation, or record a help tutorial for students. Visit 23
Things for more about screencasting. Typically, you can upload your screencasts to
YouTube right from the screencasting service and keep all your videos in one place.
-END-
Return to the training
for more great info!

YouTube - create videos

  • 1.
  • 2.
    To create avideo, click the “Upload” button at the top, next to the search bar. (Note: The dropdown menu next to it gives several options to view your account, but you want to click directly on Upload.)
  • 3.
    With YouTube, youhave several options – you can upload something you already recorded, create a slideshow, or record right from YouTube using your webcam. Let’s try that first. Click “Record.”
  • 4.
    You may geta pop-up asking for permission to allow access of your hardware (webcam and microphone). Select “Allow.”
  • 5.
    When you’re ready,hit “Start Recording.” *NOTE: Recording starts immediately – no countdown! So, be ready.
  • 6.
    When you aredone, click stop, and preview your video. If you want to start over, choose that option; otherwise, upload to your channel. (Due to my unfortunate facial expression, blurring of my face was necessary here.)
  • 7.
    Once you’ve uploaded,you’ll be taken to a settings screen where you can title your video, write a description, add tags, and more.
  • 8.
    Here’s where you’llselect your privacy settings. If you leave it public, anyone can view, and it will show up in a search using your tags as keywords. You can also choose to share to Facebook, Google+, or Twitter. You can select other privacy options as well – let’s explore those.
  • 9.
    “Unlisted” is agood choice, because only those with the link will be able to view it – so, you can control who sees it. Your video will not show up in a search and won’t be easily found, unless someone shares the link with them.
  • 10.
    A “Private” settingwill lock your video down so that it’s only viewable by those you specify. If anyone other than those you specify tries to view, YouTube will let them know they don’t have permission to view the video. This can be difficult to manage, but may be worth it to those instructors who want to maintain full control of their creations.
  • 11.
    Once you’ve savedyour settings, you can edit your video via the “Video Manager,” or via one of the icons next to the video manager. Let’s explore each of the icons.
  • 12.
    Info & Settings Thepencil icon takes you to Info & Settings, where you can do several things, including control comments, and whether or not you want to allow your video to be embedded. You can also choose the specific license you want your video to hold here.
  • 13.
    Info & Settings Thestandard YouTube license gives users the right to view, share, distribute, and embed (if you have allowed embedding) your video. The Creative Commons license allows a viewer to remix or edit your video. If you choose neither, the default will be the standard license. Read more about it in YouTube’s Terms of Service. Read more about these licenses on the Faculty Copyright Site. You cannot assign a more restrictive license to your video than the standard, so if you are not comfortable, you will need to address your concern by setting your viewing permissions to “unlisted” or “private” which will limit or restrict access. Note also that content created for Harrison students officially belongs to Harrison College.
  • 14.
    Enhancements The magic wandicon takes you to “enhancements,” a place where you can perfect your video.
  • 15.
    Annotations Need to addan annotation, or words to help explain something? Do so using the Chat icon, which takes you to “annotations.” This can be helpful if you need to direct students to a link, add clarification, or provide visual text.
  • 16.
    Closed Captioning Adding captionscan be very beneficial for students who don’t have speaker capabilities, or for international students. It’s a good practice to use this feature. To add captions, you can upload your script, or type them in here and sync them to your video.
  • 17.
    Other Things toNote Viewers will see your description when they select “About” under your video. This is also where the license type is displayed.
  • 18.
    Sharing via Linksor Embedding The “Share” button will display ways in which the video can be shared. YouTube provides a short link for you to share, or you can share via the social networks shown.
  • 19.
    Sharing via Linksor Embedding Select “Embed” to locate the embed code. For copyright purposes, it is only acceptable to embed a video using YouTube’s provided code, because it places the video inside YouTube’s branded embeddable player. Do not remove any advertising or alter the video in any way. If the creator has not allowed embedding, you won’t see embed code here.
  • 20.
    Create a Slideshowwith Music! Click the Upload button and select Photo Slideshow to create a slideshow with music.
  • 21.
    Create a Slideshowwith Music! You will be prompted to select photos from your computer. Choose the ones you want and hit “next.”
  • 22.
    Create a Slideshowwith Music! Next, select the audio you’d like to use, and the speed setting for your slides. You can also select transitions to happen from one photo to the next. Get creative!
  • 23.
    Create a Slideshowwith Music! Finally, name your slideshow and set all your preferences. When you are done, save and share!
  • 24.
    Create Screencasts &Upload to YouTube Sometimes it’s more beneficial to record your screen rather than yourself. You can record your voice going through a presentation, or record a help tutorial for students. Visit 23 Things for more about screencasting. Typically, you can upload your screencasts to YouTube right from the screencasting service and keep all your videos in one place.
  • 25.
    -END- Return to thetraining for more great info!