SlideShare a Scribd company logo
How To Create A Transparent Background In Photoshop
With the Photoshop magic now you can curate transparent product and logo images to publish it
across the internet.
Most of the featured products on the websites look better without an image. This process can
take some time for the complex objects, but with recent updates in Photoshop, it has been made
easier. Moreover, this will help in creating catchy display options too. Like, with the
Background removal, you can place your products with a transparent background against the
background that changes the colors. Even you can use the image with a transparent background
on the responsive websites that entirely depends on the screen size of the user.
Not only with the images, but you can also do it with the logo of your website too. You can
remove the background in Photoshop of your logo. This will aid you in keeping your logo
anywhere on the site irrespective of its background color. So, you can save your product image
or logo in the web-ready format using Photoshop.
Steps to Create Transparent Background for an Image in Photoshop
Follow the below steps to create a transparent background for your product image using
Photoshop:
1) Creating your Image into the Layered File
2) Creating your Selection
3) Delete the Image Background
4) Saving your Image in the Web-Ready Format
5) Saving the Image File
Step 1: Creating Your Image into the Layered File
Firstly, open your product image in Photoshop that is in JPG Format. Like, use the image of the
below wristwatch that is clicked against the white background.
After this open the “Layers” panel that rests on the right side of your image window. In case, it is
not accessible you can access it by clicking on Windows then choosing “Layers” from the
dropdown menu. It lies on the top of the Application Window.
Now, in the “Layers” panel double-click on the “Background Layer.” Here, a “New Layer”
dialog box will appear that will ask you to rename the Layer. You can leave this New Layer as
default “Layer 0,” and then click OK.
With this step, you have unlocked your “Background Layer,” and now anything deleted from it
will appear transparent.
Step 2: Creating Your Selection
While doing image editing to create a transparent background, the second step involves
choosing the ‘Magic Wand’ tool from the Toolbar that lies on the left-hand side of the
Application Window. At the top of the screen, click on the “Select Subject” from the “Options
Bar.” Photoshop will select the object from your picture that is regardless of its background. You
will see the selected area inside the ‘Marching Ants’ that is surrounding your image selection.
In any case, if you think that the image selection you did is not perfect, then you can use the
‘Magic Wand’ tool to remove more of the background from the selected image. Even you can
add more of the product to the chosen area depending on its selection.
Like, in the above-featured image of wristwatch the Photoshop did not altogether remove the
shadow of the watch from the selected area. For this, you can choose the ‘Subtract from
Selection’ icon that lies in the Option Bar on the top. Now, click on the portions of the watch’s
shadow with the help of the “Magic Wand” tool until the selected area only contains the watch.
One thing worth noticing here is that, while you are creating your selection, you need to select
the areas where there are “holes” in your product image. As in the image below, where the face
of the watch meets its wristband.
Step 3: Delete the Image Background
With this above step, you have selected your product. Now, by clicking on the “Select” from the
top bar, choose “Inverse” from the dropdown menu, or you can select the “Inverse” option by
typing Shift+Ctrl+I or else you can type Shift+Command+I on your MAC.
As you have selected the ‘Inverse’ or Background, so now, type ‘Backspace’ or ‘Delete’ on your
MAC. This will make your product background transparent. In the Photoshop software, the gray
and white checkerboard pattern represents the transparent background like in the below image.
If you want to deselect your selection, then you can type Ctrl+D or Command+D on your MAC
system.
Step 4: Save Your Image in the Web-Ready Format
The creation of a transparent background using the Adobe Photoshop software is just the first
step. But, make sure you save the file in the proper format. It will help in displaying it in the
correct format on the owner’s E-Commerce website. The best format is to save your image as
the PNG-24 Image file. The reason being, this format allows the multiple layers of transparency.
It means that the image you just saved will not possess the “Pixelated Halo” when it will be
placed on the background of the different color.
Moreover, the old file image formats like GIF and PNG-8 can create an undesirable ‘Halo’
effect. So, it is great if the user uses the PNG-24 format.
You can save your file as the PNG-24 in the Photoshop CC software by typing
Shift+Alt+Ctrl+W or type Shift+Option+Command+W on your MAC. You can also choose File,
then click on “Export” and after that choose “Export As” from the dropdown menu that is
located at the top of the Application Window.
Note: One thing worth noting here is that if the user is using the older version of Photoshop and
did not get an option of the “Export As.” Here, you can choose “Save for Web” and then select
PNG-24 from the already preset dropdown menu that is located at the right-hand side of the
dialog box.
The dialog box that appears under the ‘File Settings’ on the right-hand side of the box, from
there you can set the file format to PNG. You need to check the ‘Transparency’ box. One thing
you need to be careful about is that ‘do not check’ the ‘Smaller File (8-Bit) box. This will
convert your image file into the PNG-8 file.
Here, on the left side, you will see the image size that is predicted for your PNG file. It is
essential from the perspective of your website since larger files will make your web page load
slowly. You must keep the web images around 200KB or a bit smaller.
Under “Image Size,” on the right-hand side of the dialog box, you can adjust the dimensions of
your image. The smaller dimensions will create a small file size, and you do not require much
smaller images too, as this will appear blurry or Pixelated on your webpage. Most of your
consumers will be viewing your product on a retina display, so save your product image at 50%
to 100% larger than the size you expect to display. The image will look crisp on mobile or
desktop devices. Likewise, if you know that your product will show 400px wide that is at its
maximum, so make sure to make it 600px wide.
Maintain a balance while working with maximizing your image size and minimizing your file
size. If you want to save your website loading time, then save your featured products for the
larger retina display and save the bulk of your product images at actual size.
Step 5: Save the Image File
After setting your images to exact proper dimensions, click on “Export All.” You must save your
web-ready images in the “Save Dialog” box folder. The owner must keep the optimized file
images separately from the original file images. It will remove any confusion while loading your
images to the website. Set the name of your image file and set its extension to .png. Now, click
on “SAVE.” After this, you can place your ‘transparent product picture’ against the different
background and display it correctly.
Overview of Steps to Create Transparent Background for Logo in Photoshop
The logo of your website must also possess a transparent background. This will provide you the
flexibility in displaying anywhere on your webpage. If the Logo is saved as JPG, then remove
the background in Photoshop and then save the file in the form of PNG-24. Even if the Logo is
in vector file with extensions like.AI, .PDF, or .EPS, then also open the file in Photoshop and
convert to PNG-24 to make it website ready. The essential steps are described below:
Step 1: Open the Logo File in Photoshop
Open Photoshop, click ‘File’ then ‘Open’ and navigate for your Logo File. The .JPG or any other
raster format file will open in Photoshop. If you are opening the vector file format, then correct
the settings in the appeared dialog box, like
 “Crop To” that is set to the “Bounding Box”
 Check the Constrain Proportions
 Set the Mode to the RGB Color
 Click ‘OK’
Step 2: Making the Background Transparent
You can skip this step by using a Vector File. However, if you are working with the JPG file
format, you need to select and then delete the background from the image. As did above, when
the product image background was made transparent, so here also ‘double-click’ the Background
Layer in the “Layers Panel.” Then, click OK to convert the “Background” to “Layer 0.” But, the
selection of the logo file is slightly different from the product image. The reason here is it has all
white background.
Choose the “Magic Wand” tool from the Toolbar, click on the white background of the “Logo
File.” If you are selecting the multiple areas, then hold down the “Shift key” and click on the
Magic Wand tool to add to file selection.
After selecting the whole Clipping Path logo background, type Backspace or Delete on MAC. It
will now display the transparent background that is represented by the white and gray
checkerboard pattern.
Step 3: Save the Logo Image as PNG File in Photoshop
You can follow Step 4 and Step 5 explained above under “making image background
transparent” to export your logo file in the form of PNG-24. The steps will be the same for any
file format even if your original file has an AI, PDF, JPG or any other file format. The exported
file image size will be slightly lower than the file size of “transparent background product
image.”
The fact is the logos have only two colors as compared to the product images. You do not have
to reduce the proportions of your logo while saving this file. The dimensions will remain the
same as that of the actual file, and after that, click “Save.”
Finally, these are the detailed steps if you want to create a transparent background for your
image or logo file in the given formats. This will help in making the image display amazing on
your website without slowing down its speed.
Visit: https://www.clippingpatharts.com/how-to-create-a-transparent-product-in-photoshop/

More Related Content

What's hot

L Hayes Online E Portfolio
L Hayes Online E PortfolioL Hayes Online E Portfolio
L Hayes Online E Portfolio
Lori
 
Photoshop Elements Tutorial
Photoshop Elements TutorialPhotoshop Elements Tutorial
Photoshop Elements Tutorial
karenalapray
 
Storybook digi class presentation
Storybook digi class presentationStorybook digi class presentation
Storybook digi class presentation
debvell
 
Instruction manual im
Instruction manual imInstruction manual im
Instruction manual im
Chad Middleton
 
Power Point 2007 Get Up To Speed
Power Point 2007  Get Up To SpeedPower Point 2007  Get Up To Speed
Power Point 2007 Get Up To Speed
Oklahoma Dept. Mental Health
 
How to Create a Poster in Ms PowerPoint
How to Create a Poster in Ms PowerPointHow to Create a Poster in Ms PowerPoint
How to Create a Poster in Ms PowerPoint
Flordeliza Angeles
 
Introduction to PowerPoint 2007
Introduction to PowerPoint 2007Introduction to PowerPoint 2007
Introduction to PowerPoint 2007
misscrawleymfl
 
Ppt 2007 tutorial complete
Ppt 2007 tutorial completePpt 2007 tutorial complete
Ppt 2007 tutorial complete
Master Jhay
 
Microsoft Office PowerPoint 2007 - Lesson 1
Microsoft Office PowerPoint 2007 - Lesson 1Microsoft Office PowerPoint 2007 - Lesson 1
Microsoft Office PowerPoint 2007 - Lesson 1
Samantha TerBeest
 
Easyeda tutorial
Easyeda tutorialEasyeda tutorial
Easyeda tutorial
SANTIAGO PABLO ALBERTO
 
Microsoft Power Point
Microsoft Power PointMicrosoft Power Point
Microsoft Power Point
Owly Eyes
 
How to use power point
How to use power pointHow to use power point
How to use power point
eVidhya
 
Powerpoint 2007 tutorial
Powerpoint 2007 tutorialPowerpoint 2007 tutorial
Powerpoint 2007 tutorial
sumatipuri
 
Mspowerpoint 111212103552-phpapp01
Mspowerpoint 111212103552-phpapp01Mspowerpoint 111212103552-phpapp01
Mspowerpoint 111212103552-phpapp01
Mary Gracelyn Bagasbas
 
Microsoft Power Point 2010
Microsoft Power Point 2010Microsoft Power Point 2010
Microsoft Power Point 2010
home
 
Office 365 Productivity Tips -- November Smack-Down
Office 365 Productivity Tips -- November Smack-DownOffice 365 Productivity Tips -- November Smack-Down
Office 365 Productivity Tips -- November Smack-Down
Christian Buckley
 
Office 365 Productivity Tips November 2017 November Smack-Down
Office 365 Productivity Tips November 2017 November Smack-DownOffice 365 Productivity Tips November 2017 November Smack-Down
Office 365 Productivity Tips November 2017 November Smack-Down
Thomas Duff
 
Triad 2010 power_point_chapter_1
Triad 2010 power_point_chapter_1Triad 2010 power_point_chapter_1
Triad 2010 power_point_chapter_1
mindysholder
 
Ms powerpoint
Ms powerpointMs powerpoint
Ms powerpoint
Rahul Kantak
 
Using Stylesheets To Design A Web Site In Dreamweaver Mx 2004
Using Stylesheets To Design A Web Site In Dreamweaver Mx 2004Using Stylesheets To Design A Web Site In Dreamweaver Mx 2004
Using Stylesheets To Design A Web Site In Dreamweaver Mx 2004
brighteyes
 

What's hot (20)

L Hayes Online E Portfolio
L Hayes Online E PortfolioL Hayes Online E Portfolio
L Hayes Online E Portfolio
 
Photoshop Elements Tutorial
Photoshop Elements TutorialPhotoshop Elements Tutorial
Photoshop Elements Tutorial
 
Storybook digi class presentation
Storybook digi class presentationStorybook digi class presentation
Storybook digi class presentation
 
Instruction manual im
Instruction manual imInstruction manual im
Instruction manual im
 
Power Point 2007 Get Up To Speed
Power Point 2007  Get Up To SpeedPower Point 2007  Get Up To Speed
Power Point 2007 Get Up To Speed
 
How to Create a Poster in Ms PowerPoint
How to Create a Poster in Ms PowerPointHow to Create a Poster in Ms PowerPoint
How to Create a Poster in Ms PowerPoint
 
Introduction to PowerPoint 2007
Introduction to PowerPoint 2007Introduction to PowerPoint 2007
Introduction to PowerPoint 2007
 
Ppt 2007 tutorial complete
Ppt 2007 tutorial completePpt 2007 tutorial complete
Ppt 2007 tutorial complete
 
Microsoft Office PowerPoint 2007 - Lesson 1
Microsoft Office PowerPoint 2007 - Lesson 1Microsoft Office PowerPoint 2007 - Lesson 1
Microsoft Office PowerPoint 2007 - Lesson 1
 
Easyeda tutorial
Easyeda tutorialEasyeda tutorial
Easyeda tutorial
 
Microsoft Power Point
Microsoft Power PointMicrosoft Power Point
Microsoft Power Point
 
How to use power point
How to use power pointHow to use power point
How to use power point
 
Powerpoint 2007 tutorial
Powerpoint 2007 tutorialPowerpoint 2007 tutorial
Powerpoint 2007 tutorial
 
Mspowerpoint 111212103552-phpapp01
Mspowerpoint 111212103552-phpapp01Mspowerpoint 111212103552-phpapp01
Mspowerpoint 111212103552-phpapp01
 
Microsoft Power Point 2010
Microsoft Power Point 2010Microsoft Power Point 2010
Microsoft Power Point 2010
 
Office 365 Productivity Tips -- November Smack-Down
Office 365 Productivity Tips -- November Smack-DownOffice 365 Productivity Tips -- November Smack-Down
Office 365 Productivity Tips -- November Smack-Down
 
Office 365 Productivity Tips November 2017 November Smack-Down
Office 365 Productivity Tips November 2017 November Smack-DownOffice 365 Productivity Tips November 2017 November Smack-Down
Office 365 Productivity Tips November 2017 November Smack-Down
 
Triad 2010 power_point_chapter_1
Triad 2010 power_point_chapter_1Triad 2010 power_point_chapter_1
Triad 2010 power_point_chapter_1
 
Ms powerpoint
Ms powerpointMs powerpoint
Ms powerpoint
 
Using Stylesheets To Design A Web Site In Dreamweaver Mx 2004
Using Stylesheets To Design A Web Site In Dreamweaver Mx 2004Using Stylesheets To Design A Web Site In Dreamweaver Mx 2004
Using Stylesheets To Design A Web Site In Dreamweaver Mx 2004
 

Similar to How to create a transparent background in photoshop

Clipping Path Service-Photo Editor PH
Clipping Path Service-Photo Editor PHClipping Path Service-Photo Editor PH
Clipping Path Service-Photo Editor PH
Jannatul Suvarna
 
Firecoresoft slideshow fairy user guide
Firecoresoft slideshow fairy user guideFirecoresoft slideshow fairy user guide
Firecoresoft slideshow fairy user guide
amalejackie
 
Making logos for i movie 09
Making logos for i movie 09Making logos for i movie 09
Making logos for i movie 09
juliancoultas
 
Illustrator portrait project-final
Illustrator portrait project-finalIllustrator portrait project-final
Illustrator portrait project-final
Daniel Downs
 
How to make a transparent background in Photoshop
How to make a transparent background in PhotoshopHow to make a transparent background in Photoshop
How to make a transparent background in Photoshop
Zenith Clipping
 
GuideMaker Design Customization Guideline
GuideMaker Design Customization GuidelineGuideMaker Design Customization Guideline
GuideMaker Design Customization Guideline
iLandGuide Worldwide Inc.
 
Firecoresoft splendvd user guide
Firecoresoft splendvd user guideFirecoresoft splendvd user guide
Firecoresoft splendvd user guide
amalejackie
 
Photoshop pdf
Photoshop pdfPhotoshop pdf
Photoshop pdf
Kim B
 
Adobe photoshop cs6 tutorial
Adobe photoshop cs6 tutorialAdobe photoshop cs6 tutorial
Adobe photoshop cs6 tutorial
Agung Yuwono
 
Adobe photoshop cs6
Adobe photoshop cs6Adobe photoshop cs6
Adobe photoshop cs6
ilaazmil2
 
Adobe photoshop cs6
Adobe photoshop cs6Adobe photoshop cs6
Adobe photoshop cs6
Ila Azmil
 
teacherinset.pptx
teacherinset.pptxteacherinset.pptx
teacherinset.pptx
Rowena Marquez
 
Instructions
InstructionsInstructions
Instructions
Higuchi Aya
 
#8
#8#8
Adobe Photoshop CS6 tutorial 2013
Adobe Photoshop CS6 tutorial 2013Adobe Photoshop CS6 tutorial 2013
Adobe Photoshop CS6 tutorial 2013
Jessie Doan
 
Image Editing for Beginners - Training Handout
Image Editing for Beginners - Training HandoutImage Editing for Beginners - Training Handout
Image Editing for Beginners - Training Handout
Teresa Beary
 
Logo with photoshop
Logo with photoshopLogo with photoshop
Logo with photoshop
Sung Woo Yoo
 
Q.6
Q.6Q.6
Oracle User Productiviy Kit
Oracle User Productiviy KitOracle User Productiviy Kit
Oracle User Productiviy Kit
Larry Sherrod
 
How to create watermark effect
How to create watermark effectHow to create watermark effect
How to create watermark effect
Bán Markus
 

Similar to How to create a transparent background in photoshop (20)

Clipping Path Service-Photo Editor PH
Clipping Path Service-Photo Editor PHClipping Path Service-Photo Editor PH
Clipping Path Service-Photo Editor PH
 
Firecoresoft slideshow fairy user guide
Firecoresoft slideshow fairy user guideFirecoresoft slideshow fairy user guide
Firecoresoft slideshow fairy user guide
 
Making logos for i movie 09
Making logos for i movie 09Making logos for i movie 09
Making logos for i movie 09
 
Illustrator portrait project-final
Illustrator portrait project-finalIllustrator portrait project-final
Illustrator portrait project-final
 
How to make a transparent background in Photoshop
How to make a transparent background in PhotoshopHow to make a transparent background in Photoshop
How to make a transparent background in Photoshop
 
GuideMaker Design Customization Guideline
GuideMaker Design Customization GuidelineGuideMaker Design Customization Guideline
GuideMaker Design Customization Guideline
 
Firecoresoft splendvd user guide
Firecoresoft splendvd user guideFirecoresoft splendvd user guide
Firecoresoft splendvd user guide
 
Photoshop pdf
Photoshop pdfPhotoshop pdf
Photoshop pdf
 
Adobe photoshop cs6 tutorial
Adobe photoshop cs6 tutorialAdobe photoshop cs6 tutorial
Adobe photoshop cs6 tutorial
 
Adobe photoshop cs6
Adobe photoshop cs6Adobe photoshop cs6
Adobe photoshop cs6
 
Adobe photoshop cs6
Adobe photoshop cs6Adobe photoshop cs6
Adobe photoshop cs6
 
teacherinset.pptx
teacherinset.pptxteacherinset.pptx
teacherinset.pptx
 
Instructions
InstructionsInstructions
Instructions
 
#8
#8#8
#8
 
Adobe Photoshop CS6 tutorial 2013
Adobe Photoshop CS6 tutorial 2013Adobe Photoshop CS6 tutorial 2013
Adobe Photoshop CS6 tutorial 2013
 
Image Editing for Beginners - Training Handout
Image Editing for Beginners - Training HandoutImage Editing for Beginners - Training Handout
Image Editing for Beginners - Training Handout
 
Logo with photoshop
Logo with photoshopLogo with photoshop
Logo with photoshop
 
Q.6
Q.6Q.6
Q.6
 
Oracle User Productiviy Kit
Oracle User Productiviy KitOracle User Productiviy Kit
Oracle User Productiviy Kit
 
How to create watermark effect
How to create watermark effectHow to create watermark effect
How to create watermark effect
 

Recently uploaded

FinalLessonPlanResponding.docxnknknknknknk
FinalLessonPlanResponding.docxnknknknknknkFinalLessonPlanResponding.docxnknknknknknk
FinalLessonPlanResponding.docxnknknknknknk
abbieharman
 
Domino Express Storyboard - TV Adv Toys 30"
Domino Express Storyboard - TV Adv Toys 30"Domino Express Storyboard - TV Adv Toys 30"
Domino Express Storyboard - TV Adv Toys 30"
Alessandro Occhipinti
 
All the images mentioned in 'See What You're Missing'
All the images mentioned in 'See What You're Missing'All the images mentioned in 'See What You're Missing'
All the images mentioned in 'See What You're Missing'
Dave Boyle
 
一比一原版加拿大多伦多大学毕业证(uoft毕业证书)如何办理
一比一原版加拿大多伦多大学毕业证(uoft毕业证书)如何办理一比一原版加拿大多伦多大学毕业证(uoft毕业证书)如何办理
一比一原版加拿大多伦多大学毕业证(uoft毕业证书)如何办理
taqyea
 
Cherries 32 collection of colorful paintings
Cherries 32 collection of colorful paintingsCherries 32 collection of colorful paintings
Cherries 32 collection of colorful paintings
sandamichaela *
 
Fed by curiosity and beauty - Remembering Myrsine Zorba
Fed by curiosity and beauty - Remembering Myrsine ZorbaFed by curiosity and beauty - Remembering Myrsine Zorba
Fed by curiosity and beauty - Remembering Myrsine Zorba
mariavlachoupt
 
Codes n Conventions Website Media studies.pptx
Codes n Conventions Website Media studies.pptxCodes n Conventions Website Media studies.pptx
Codes n Conventions Website Media studies.pptx
ZackSpencer3
 
一比一原版(QUT毕业证)昆士兰科技大学毕业证成绩单如何办理
一比一原版(QUT毕业证)昆士兰科技大学毕业证成绩单如何办理一比一原版(QUT毕业证)昆士兰科技大学毕业证成绩单如何办理
一比一原版(QUT毕业证)昆士兰科技大学毕业证成绩单如何办理
zeyhe
 
哪里购买美国乔治城大学毕业证硕士学位证书原版一模一样
哪里购买美国乔治城大学毕业证硕士学位证书原版一模一样哪里购买美国乔治城大学毕业证硕士学位证书原版一模一样
哪里购买美国乔治城大学毕业证硕士学位证书原版一模一样
tc73868
 
HOW TO USE PINTEREST_by: Clarissa Credito
HOW TO USE PINTEREST_by: Clarissa CreditoHOW TO USE PINTEREST_by: Clarissa Credito
HOW TO USE PINTEREST_by: Clarissa Credito
ClarissaAlanoCredito
 
Tibbetts_HappyAwesome_NewArc Sketch to AI
Tibbetts_HappyAwesome_NewArc Sketch to AITibbetts_HappyAwesome_NewArc Sketch to AI
Tibbetts_HappyAwesome_NewArc Sketch to AI
Todd Tibbetts
 
My storyboard for the short film "Maatla".
My storyboard for the short film "Maatla".My storyboard for the short film "Maatla".
My storyboard for the short film "Maatla".
AlejandroGuarnGutirr
 
FinalA1LessonPlanMaking.docxdvdnlskdnvsldkvnsdkvn
FinalA1LessonPlanMaking.docxdvdnlskdnvsldkvnsdkvnFinalA1LessonPlanMaking.docxdvdnlskdnvsldkvnsdkvn
FinalA1LessonPlanMaking.docxdvdnlskdnvsldkvnsdkvn
abbieharman
 
FinalFinalSelf-PortraiturePowerPoint.pptx
FinalFinalSelf-PortraiturePowerPoint.pptxFinalFinalSelf-PortraiturePowerPoint.pptx
FinalFinalSelf-PortraiturePowerPoint.pptx
abbieharman
 
Heart Touching Romantic Love Shayari In English with Images
Heart Touching Romantic Love Shayari In English with ImagesHeart Touching Romantic Love Shayari In English with Images
Heart Touching Romantic Love Shayari In English with Images
Short Good Quotes
 
2024 MATFORCE Youth Poster Contest Winners
2024 MATFORCE Youth Poster Contest Winners2024 MATFORCE Youth Poster Contest Winners
2024 MATFORCE Youth Poster Contest Winners
matforce
 
一比一原版美国亚利桑那大学毕业证(ua毕业证书)如何办理
一比一原版美国亚利桑那大学毕业证(ua毕业证书)如何办理一比一原版美国亚利桑那大学毕业证(ua毕业证书)如何办理
一比一原版美国亚利桑那大学毕业证(ua毕业证书)如何办理
homgo
 
In Focus_ The Evolution of Boudoir Photography in NYC.pdf
In Focus_ The Evolution of Boudoir Photography in NYC.pdfIn Focus_ The Evolution of Boudoir Photography in NYC.pdf
In Focus_ The Evolution of Boudoir Photography in NYC.pdf
Boudoir Photography by Your Hollywood Portrait
 
Ealing London Independent Photography meeting - June 2024
Ealing London Independent Photography meeting - June 2024Ealing London Independent Photography meeting - June 2024
Ealing London Independent Photography meeting - June 2024
Sean McDonnell
 
Colour Theory for Painting - Fine Artist.pdf
Colour Theory for Painting - Fine Artist.pdfColour Theory for Painting - Fine Artist.pdf
Colour Theory for Painting - Fine Artist.pdf
Ketan Naik
 

Recently uploaded (20)

FinalLessonPlanResponding.docxnknknknknknk
FinalLessonPlanResponding.docxnknknknknknkFinalLessonPlanResponding.docxnknknknknknk
FinalLessonPlanResponding.docxnknknknknknk
 
Domino Express Storyboard - TV Adv Toys 30"
Domino Express Storyboard - TV Adv Toys 30"Domino Express Storyboard - TV Adv Toys 30"
Domino Express Storyboard - TV Adv Toys 30"
 
All the images mentioned in 'See What You're Missing'
All the images mentioned in 'See What You're Missing'All the images mentioned in 'See What You're Missing'
All the images mentioned in 'See What You're Missing'
 
一比一原版加拿大多伦多大学毕业证(uoft毕业证书)如何办理
一比一原版加拿大多伦多大学毕业证(uoft毕业证书)如何办理一比一原版加拿大多伦多大学毕业证(uoft毕业证书)如何办理
一比一原版加拿大多伦多大学毕业证(uoft毕业证书)如何办理
 
Cherries 32 collection of colorful paintings
Cherries 32 collection of colorful paintingsCherries 32 collection of colorful paintings
Cherries 32 collection of colorful paintings
 
Fed by curiosity and beauty - Remembering Myrsine Zorba
Fed by curiosity and beauty - Remembering Myrsine ZorbaFed by curiosity and beauty - Remembering Myrsine Zorba
Fed by curiosity and beauty - Remembering Myrsine Zorba
 
Codes n Conventions Website Media studies.pptx
Codes n Conventions Website Media studies.pptxCodes n Conventions Website Media studies.pptx
Codes n Conventions Website Media studies.pptx
 
一比一原版(QUT毕业证)昆士兰科技大学毕业证成绩单如何办理
一比一原版(QUT毕业证)昆士兰科技大学毕业证成绩单如何办理一比一原版(QUT毕业证)昆士兰科技大学毕业证成绩单如何办理
一比一原版(QUT毕业证)昆士兰科技大学毕业证成绩单如何办理
 
哪里购买美国乔治城大学毕业证硕士学位证书原版一模一样
哪里购买美国乔治城大学毕业证硕士学位证书原版一模一样哪里购买美国乔治城大学毕业证硕士学位证书原版一模一样
哪里购买美国乔治城大学毕业证硕士学位证书原版一模一样
 
HOW TO USE PINTEREST_by: Clarissa Credito
HOW TO USE PINTEREST_by: Clarissa CreditoHOW TO USE PINTEREST_by: Clarissa Credito
HOW TO USE PINTEREST_by: Clarissa Credito
 
Tibbetts_HappyAwesome_NewArc Sketch to AI
Tibbetts_HappyAwesome_NewArc Sketch to AITibbetts_HappyAwesome_NewArc Sketch to AI
Tibbetts_HappyAwesome_NewArc Sketch to AI
 
My storyboard for the short film "Maatla".
My storyboard for the short film "Maatla".My storyboard for the short film "Maatla".
My storyboard for the short film "Maatla".
 
FinalA1LessonPlanMaking.docxdvdnlskdnvsldkvnsdkvn
FinalA1LessonPlanMaking.docxdvdnlskdnvsldkvnsdkvnFinalA1LessonPlanMaking.docxdvdnlskdnvsldkvnsdkvn
FinalA1LessonPlanMaking.docxdvdnlskdnvsldkvnsdkvn
 
FinalFinalSelf-PortraiturePowerPoint.pptx
FinalFinalSelf-PortraiturePowerPoint.pptxFinalFinalSelf-PortraiturePowerPoint.pptx
FinalFinalSelf-PortraiturePowerPoint.pptx
 
Heart Touching Romantic Love Shayari In English with Images
Heart Touching Romantic Love Shayari In English with ImagesHeart Touching Romantic Love Shayari In English with Images
Heart Touching Romantic Love Shayari In English with Images
 
2024 MATFORCE Youth Poster Contest Winners
2024 MATFORCE Youth Poster Contest Winners2024 MATFORCE Youth Poster Contest Winners
2024 MATFORCE Youth Poster Contest Winners
 
一比一原版美国亚利桑那大学毕业证(ua毕业证书)如何办理
一比一原版美国亚利桑那大学毕业证(ua毕业证书)如何办理一比一原版美国亚利桑那大学毕业证(ua毕业证书)如何办理
一比一原版美国亚利桑那大学毕业证(ua毕业证书)如何办理
 
In Focus_ The Evolution of Boudoir Photography in NYC.pdf
In Focus_ The Evolution of Boudoir Photography in NYC.pdfIn Focus_ The Evolution of Boudoir Photography in NYC.pdf
In Focus_ The Evolution of Boudoir Photography in NYC.pdf
 
Ealing London Independent Photography meeting - June 2024
Ealing London Independent Photography meeting - June 2024Ealing London Independent Photography meeting - June 2024
Ealing London Independent Photography meeting - June 2024
 
Colour Theory for Painting - Fine Artist.pdf
Colour Theory for Painting - Fine Artist.pdfColour Theory for Painting - Fine Artist.pdf
Colour Theory for Painting - Fine Artist.pdf
 

How to create a transparent background in photoshop

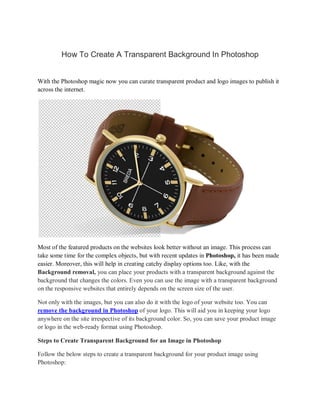
  • 1. How To Create A Transparent Background In Photoshop With the Photoshop magic now you can curate transparent product and logo images to publish it across the internet. Most of the featured products on the websites look better without an image. This process can take some time for the complex objects, but with recent updates in Photoshop, it has been made easier. Moreover, this will help in creating catchy display options too. Like, with the Background removal, you can place your products with a transparent background against the background that changes the colors. Even you can use the image with a transparent background on the responsive websites that entirely depends on the screen size of the user. Not only with the images, but you can also do it with the logo of your website too. You can remove the background in Photoshop of your logo. This will aid you in keeping your logo anywhere on the site irrespective of its background color. So, you can save your product image or logo in the web-ready format using Photoshop. Steps to Create Transparent Background for an Image in Photoshop Follow the below steps to create a transparent background for your product image using Photoshop:
  • 2. 1) Creating your Image into the Layered File 2) Creating your Selection 3) Delete the Image Background 4) Saving your Image in the Web-Ready Format 5) Saving the Image File Step 1: Creating Your Image into the Layered File Firstly, open your product image in Photoshop that is in JPG Format. Like, use the image of the below wristwatch that is clicked against the white background. After this open the “Layers” panel that rests on the right side of your image window. In case, it is not accessible you can access it by clicking on Windows then choosing “Layers” from the dropdown menu. It lies on the top of the Application Window.
  • 3. Now, in the “Layers” panel double-click on the “Background Layer.” Here, a “New Layer” dialog box will appear that will ask you to rename the Layer. You can leave this New Layer as default “Layer 0,” and then click OK.
  • 4. With this step, you have unlocked your “Background Layer,” and now anything deleted from it will appear transparent. Step 2: Creating Your Selection While doing image editing to create a transparent background, the second step involves choosing the ‘Magic Wand’ tool from the Toolbar that lies on the left-hand side of the Application Window. At the top of the screen, click on the “Select Subject” from the “Options Bar.” Photoshop will select the object from your picture that is regardless of its background. You will see the selected area inside the ‘Marching Ants’ that is surrounding your image selection.
  • 5. In any case, if you think that the image selection you did is not perfect, then you can use the ‘Magic Wand’ tool to remove more of the background from the selected image. Even you can add more of the product to the chosen area depending on its selection. Like, in the above-featured image of wristwatch the Photoshop did not altogether remove the shadow of the watch from the selected area. For this, you can choose the ‘Subtract from Selection’ icon that lies in the Option Bar on the top. Now, click on the portions of the watch’s shadow with the help of the “Magic Wand” tool until the selected area only contains the watch. One thing worth noticing here is that, while you are creating your selection, you need to select the areas where there are “holes” in your product image. As in the image below, where the face of the watch meets its wristband.
  • 6. Step 3: Delete the Image Background With this above step, you have selected your product. Now, by clicking on the “Select” from the top bar, choose “Inverse” from the dropdown menu, or you can select the “Inverse” option by typing Shift+Ctrl+I or else you can type Shift+Command+I on your MAC.
  • 7. As you have selected the ‘Inverse’ or Background, so now, type ‘Backspace’ or ‘Delete’ on your MAC. This will make your product background transparent. In the Photoshop software, the gray and white checkerboard pattern represents the transparent background like in the below image.
  • 8. If you want to deselect your selection, then you can type Ctrl+D or Command+D on your MAC system. Step 4: Save Your Image in the Web-Ready Format The creation of a transparent background using the Adobe Photoshop software is just the first step. But, make sure you save the file in the proper format. It will help in displaying it in the correct format on the owner’s E-Commerce website. The best format is to save your image as the PNG-24 Image file. The reason being, this format allows the multiple layers of transparency. It means that the image you just saved will not possess the “Pixelated Halo” when it will be placed on the background of the different color. Moreover, the old file image formats like GIF and PNG-8 can create an undesirable ‘Halo’ effect. So, it is great if the user uses the PNG-24 format. You can save your file as the PNG-24 in the Photoshop CC software by typing Shift+Alt+Ctrl+W or type Shift+Option+Command+W on your MAC. You can also choose File, then click on “Export” and after that choose “Export As” from the dropdown menu that is located at the top of the Application Window.
  • 9. Note: One thing worth noting here is that if the user is using the older version of Photoshop and did not get an option of the “Export As.” Here, you can choose “Save for Web” and then select PNG-24 from the already preset dropdown menu that is located at the right-hand side of the dialog box. The dialog box that appears under the ‘File Settings’ on the right-hand side of the box, from there you can set the file format to PNG. You need to check the ‘Transparency’ box. One thing you need to be careful about is that ‘do not check’ the ‘Smaller File (8-Bit) box. This will convert your image file into the PNG-8 file.
  • 10. Here, on the left side, you will see the image size that is predicted for your PNG file. It is essential from the perspective of your website since larger files will make your web page load slowly. You must keep the web images around 200KB or a bit smaller. Under “Image Size,” on the right-hand side of the dialog box, you can adjust the dimensions of your image. The smaller dimensions will create a small file size, and you do not require much smaller images too, as this will appear blurry or Pixelated on your webpage. Most of your consumers will be viewing your product on a retina display, so save your product image at 50% to 100% larger than the size you expect to display. The image will look crisp on mobile or desktop devices. Likewise, if you know that your product will show 400px wide that is at its maximum, so make sure to make it 600px wide. Maintain a balance while working with maximizing your image size and minimizing your file size. If you want to save your website loading time, then save your featured products for the larger retina display and save the bulk of your product images at actual size. Step 5: Save the Image File After setting your images to exact proper dimensions, click on “Export All.” You must save your web-ready images in the “Save Dialog” box folder. The owner must keep the optimized file images separately from the original file images. It will remove any confusion while loading your images to the website. Set the name of your image file and set its extension to .png. Now, click
  • 11. on “SAVE.” After this, you can place your ‘transparent product picture’ against the different background and display it correctly. Overview of Steps to Create Transparent Background for Logo in Photoshop The logo of your website must also possess a transparent background. This will provide you the flexibility in displaying anywhere on your webpage. If the Logo is saved as JPG, then remove the background in Photoshop and then save the file in the form of PNG-24. Even if the Logo is in vector file with extensions like.AI, .PDF, or .EPS, then also open the file in Photoshop and convert to PNG-24 to make it website ready. The essential steps are described below: Step 1: Open the Logo File in Photoshop Open Photoshop, click ‘File’ then ‘Open’ and navigate for your Logo File. The .JPG or any other raster format file will open in Photoshop. If you are opening the vector file format, then correct the settings in the appeared dialog box, like  “Crop To” that is set to the “Bounding Box”  Check the Constrain Proportions  Set the Mode to the RGB Color  Click ‘OK’
  • 12. Step 2: Making the Background Transparent You can skip this step by using a Vector File. However, if you are working with the JPG file format, you need to select and then delete the background from the image. As did above, when the product image background was made transparent, so here also ‘double-click’ the Background Layer in the “Layers Panel.” Then, click OK to convert the “Background” to “Layer 0.” But, the selection of the logo file is slightly different from the product image. The reason here is it has all white background. Choose the “Magic Wand” tool from the Toolbar, click on the white background of the “Logo File.” If you are selecting the multiple areas, then hold down the “Shift key” and click on the Magic Wand tool to add to file selection.
  • 13. After selecting the whole Clipping Path logo background, type Backspace or Delete on MAC. It will now display the transparent background that is represented by the white and gray checkerboard pattern. Step 3: Save the Logo Image as PNG File in Photoshop You can follow Step 4 and Step 5 explained above under “making image background transparent” to export your logo file in the form of PNG-24. The steps will be the same for any file format even if your original file has an AI, PDF, JPG or any other file format. The exported file image size will be slightly lower than the file size of “transparent background product image.” The fact is the logos have only two colors as compared to the product images. You do not have to reduce the proportions of your logo while saving this file. The dimensions will remain the same as that of the actual file, and after that, click “Save.” Finally, these are the detailed steps if you want to create a transparent background for your image or logo file in the given formats. This will help in making the image display amazing on your website without slowing down its speed. Visit: https://www.clippingpatharts.com/how-to-create-a-transparent-product-in-photoshop/