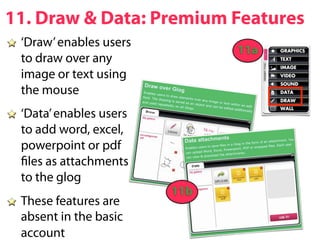
UDL               Sandbox


       by Paviter Singh
      paviter@gmail.com
Glogster
 To help teachers learn
how to set up a class glog
What is Glogster?
 A free online poster application
 Easy to use interface
 Customizable - allows users to upload
 images, audio video and text
 Publish, share, comment on each other’s
 glog
 Education version is
    secure - private - safe
Possible Use in the classroom
  As a student portfolio
     Access to parents and teachers
  For project work
     Each student can have an individual account
     Students can collaborate in groups
1: Open Internet Browser
 We recommend using the
 Firefox Internet Browser     1a
 To download Firefox visit
 the following website
 www.mozilla.com/ refox/
 Once you have
 downloaded Firefox,
 double click on the          1b
 browser icon
 This will establish a
 connection to the internet
2: Visit Glogster                address panel


 Type edu.glogster.com in   2a
 the address panel and
 click enter


 This will take you to
 glogster’s website for                    2b
 educators
3: Register
 Click on the grey box on       click here
 the top of the screen that
 says ‘Edu Basic’ to register
 for a free account
4: Register                 e.g. of a prompt


This will take you to a
page where you will be
required to enter some
information
You will be prompted by
the application - through
a green dialogue box if
amendments are
required
 Once this is done, click
sign up                                click here
5: Create a glog                        Did you guess
                                      that this was the
                                         next step?


 Check your email          5a
 account to authorize the
 use of your new Glogster
 account. Once your
 account is authorized,
 the red reminder notice
 will disappear
                            5b
 Next, click on the pink
 banner in the middle of
 the screen that says
 ‘Create a New Glog’     click here
6. Glog Name
                       name your glog
This is your glog
workspace
Key in a name for
your glog. If you do
not, a random
name will be
assigned
7. Magnet Tool
                                      did you guess
                                       correctly?


The magnet tool
allows you to insert
images, audio,
video and text
It also allows you to
customize other         magnet tool
features of your
glog
8. Page Wall & Glog Wall
 Click on ‘wall’ on the                       8a
 magnet tool
 Page wall is the         page wall
 grey area on the left
 and right of the
                  8b
 glog
 Glog wall refers to
 the background of
 your workspace

                                  glog wall
9. Page Wall & Glog Wall
                        glog wall tab        9a
To change the glog
wall, select the glog
wall tab
Pick a design
The selected design
will appear in the                      9b
preview panel
Select ‘Use it!’                         preview
                                          panel
10. Page Wall & Glog Wall
                                                           10b
 The design will be
                     10a                     click here to close
 applied to the glog
                     change page wall design
 wall
 Repeat the process
 to change page
 wall design
 Click      on the
 top right hand
 corner of the menu
 to close the magnet
 tool when done
11. Draw & Data: Premium Features
 ‘Draw’ enables users
                              11a
 to draw over any
 image or text using
 the mouse
 ‘Data’ enables users
 to add word, excel,
 powerpoint or pdf
  les as attachments
 to the glog
                        11b
 These features are
 absent in the basic
 account
12. Add Sound, Video, Image
 The steps for adding
                                12a
 sound, video and
 image are similar
 To add sound, video
 or images, either
                          12b
   upload from your
   computer
   link to sound, video
   or image online
   grab it using your
   webcam or mic
13. Add Sound, Video, Image
 As an example, to link                   click here
                             13a
 to a video on You-
 Tube, click on ‘link’
 Type in the URL of the
 You-Tube video       13b
 Click ‘add to your les’
 Click      on the top
 right hand corner of
 the menu to close the
 magnet tool               URL of video
14. Add Sound, Video, Image
 The You-Tube video will
 be added under ‘video’
 Next, select the ‘players’
                            14a
 tab
                                   You-Tube video
 Pick a ‘player’ or border
 for your video
 Click ‘use it’
                             14b
 Click      on the top
 right hand corner of the
 menu to close the
 magnet tool
15. Add Sound, Video, Image
 The You-Tube video will
 be added to your glog           15a
 To play or watch the
 video, you must either
                           You-Tube video
 switch to ‘preview’
 mode or ‘save and
 publish’ the glog
                   15b
16. Add Text
                            16a
 Click on ‘text’ on
 the magnet tool
 Pick a design
                      16b
 The selected
 design will appear
 in the preview
 panel
 Select ‘Use it!’
17. Add Text                 17a


 The text box you
 picked will appear    17b
 on your glog
 workspace
 Click on the design
 A black tool bar
 will appear above            17c
 the design
18. Add Text
 a: click to edit the text in
 text box
 b: bring text box in front
                                a       c       e
 of other items
 c: send text box behind            b       d       f
 other items
 d: clone / make a copy
 of text box
 e: cancel changes /
 f: delete text box
19. Add Text                        19a

 Click on the ‘edit’ button
 You will see the tool bar
 change (19b)                 19b

 You can now edit the
 text box by typing your
 own message
20. Add Text
You can also:
a: change the color of
the text box                          a         c
b: hyperlink the text to
any webpage on the                        b         d
internet
c: change the font type    click OK when done
and color
d: add effects to text
such as a drop shadow
21. Save & Publish
 When you have reached
 a point where you are
 ready to publish your
 glog
 Click ‘save and publish’
 You can return to edit
 your glog at anytime
22. Save & Publish
If you intend to return
to edit your glog, click
on the ‘un nished’ radio
button
Then click SAVE
The more speci c the
‘categories’ and ‘tags’
are, the easier for others
to locate your glog          click UNFINISHED
online
23. Embed your Glog
                           23a
 To embed your glog in a
 website, blog or wiki,
 scroll to the bottom of
 your blog workspace
 Click on ‘embed into      23b
 your page’                      click here

 Click on the copy
 button (23b)
Excellent Work!

Glogster Sandbox

  • 1.
    UDL Sandbox by Paviter Singh paviter@gmail.com
  • 2.
    Glogster To helpteachers learn how to set up a class glog
  • 3.
    What is Glogster? A free online poster application Easy to use interface Customizable - allows users to upload images, audio video and text Publish, share, comment on each other’s glog Education version is secure - private - safe
  • 4.
    Possible Use inthe classroom As a student portfolio Access to parents and teachers For project work Each student can have an individual account Students can collaborate in groups
  • 5.
    1: Open InternetBrowser We recommend using the Firefox Internet Browser 1a To download Firefox visit the following website www.mozilla.com/ refox/ Once you have downloaded Firefox, double click on the 1b browser icon This will establish a connection to the internet
  • 6.
    2: Visit Glogster address panel Type edu.glogster.com in 2a the address panel and click enter This will take you to glogster’s website for 2b educators
  • 7.
    3: Register Clickon the grey box on click here the top of the screen that says ‘Edu Basic’ to register for a free account
  • 8.
    4: Register e.g. of a prompt This will take you to a page where you will be required to enter some information You will be prompted by the application - through a green dialogue box if amendments are required Once this is done, click sign up click here
  • 9.
    5: Create aglog Did you guess that this was the next step? Check your email 5a account to authorize the use of your new Glogster account. Once your account is authorized, the red reminder notice will disappear 5b Next, click on the pink banner in the middle of the screen that says ‘Create a New Glog’ click here
  • 10.
    6. Glog Name name your glog This is your glog workspace Key in a name for your glog. If you do not, a random name will be assigned
  • 11.
    7. Magnet Tool did you guess correctly? The magnet tool allows you to insert images, audio, video and text It also allows you to customize other magnet tool features of your glog
  • 12.
    8. Page Wall& Glog Wall Click on ‘wall’ on the 8a magnet tool Page wall is the page wall grey area on the left and right of the 8b glog Glog wall refers to the background of your workspace glog wall
  • 13.
    9. Page Wall& Glog Wall glog wall tab 9a To change the glog wall, select the glog wall tab Pick a design The selected design will appear in the 9b preview panel Select ‘Use it!’ preview panel
  • 14.
    10. Page Wall& Glog Wall 10b The design will be 10a click here to close applied to the glog change page wall design wall Repeat the process to change page wall design Click on the top right hand corner of the menu to close the magnet tool when done
  • 15.
    11. Draw &Data: Premium Features ‘Draw’ enables users 11a to draw over any image or text using the mouse ‘Data’ enables users to add word, excel, powerpoint or pdf les as attachments to the glog 11b These features are absent in the basic account
  • 16.
    12. Add Sound,Video, Image The steps for adding 12a sound, video and image are similar To add sound, video or images, either 12b upload from your computer link to sound, video or image online grab it using your webcam or mic
  • 17.
    13. Add Sound,Video, Image As an example, to link click here 13a to a video on You- Tube, click on ‘link’ Type in the URL of the You-Tube video 13b Click ‘add to your les’ Click on the top right hand corner of the menu to close the magnet tool URL of video
  • 18.
    14. Add Sound,Video, Image The You-Tube video will be added under ‘video’ Next, select the ‘players’ 14a tab You-Tube video Pick a ‘player’ or border for your video Click ‘use it’ 14b Click on the top right hand corner of the menu to close the magnet tool
  • 19.
    15. Add Sound,Video, Image The You-Tube video will be added to your glog 15a To play or watch the video, you must either You-Tube video switch to ‘preview’ mode or ‘save and publish’ the glog 15b
  • 20.
    16. Add Text 16a Click on ‘text’ on the magnet tool Pick a design 16b The selected design will appear in the preview panel Select ‘Use it!’
  • 21.
    17. Add Text 17a The text box you picked will appear 17b on your glog workspace Click on the design A black tool bar will appear above 17c the design
  • 22.
    18. Add Text a: click to edit the text in text box b: bring text box in front a c e of other items c: send text box behind b d f other items d: clone / make a copy of text box e: cancel changes / f: delete text box
  • 23.
    19. Add Text 19a Click on the ‘edit’ button You will see the tool bar change (19b) 19b You can now edit the text box by typing your own message
  • 24.
    20. Add Text Youcan also: a: change the color of the text box a c b: hyperlink the text to any webpage on the b d internet c: change the font type click OK when done and color d: add effects to text such as a drop shadow
  • 25.
    21. Save &Publish When you have reached a point where you are ready to publish your glog Click ‘save and publish’ You can return to edit your glog at anytime
  • 26.
    22. Save &Publish If you intend to return to edit your glog, click on the ‘un nished’ radio button Then click SAVE The more speci c the ‘categories’ and ‘tags’ are, the easier for others to locate your glog click UNFINISHED online
  • 27.
    23. Embed yourGlog 23a To embed your glog in a website, blog or wiki, scroll to the bottom of your blog workspace Click on ‘embed into 23b your page’ click here Click on the copy button (23b)
  • 28.