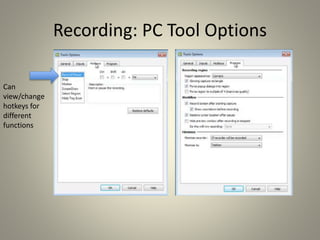
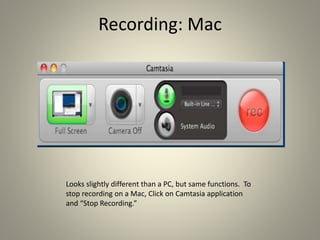
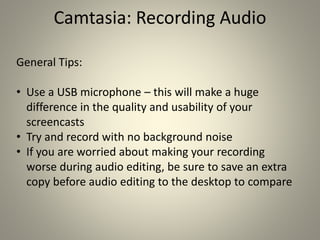
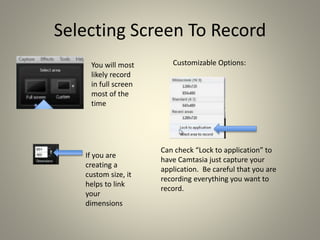
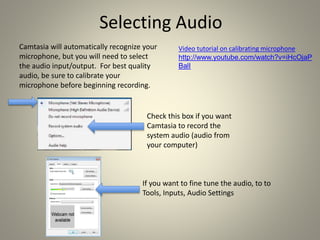
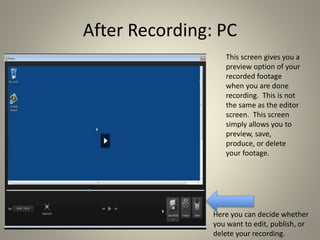
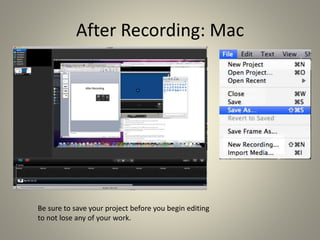
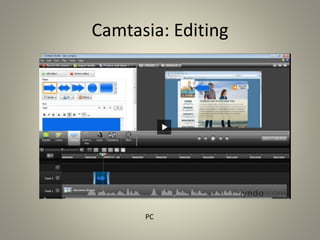
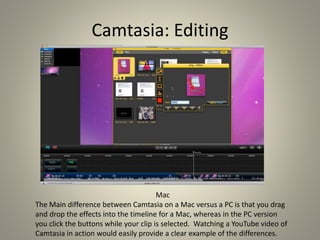
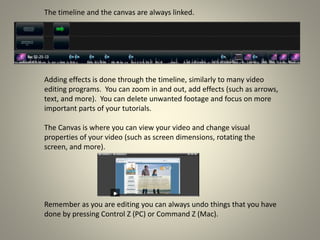
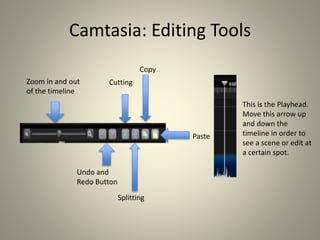
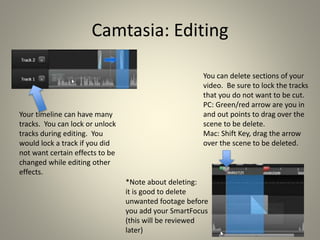
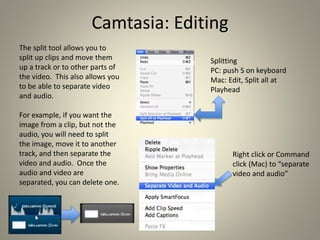
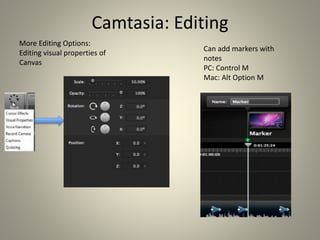
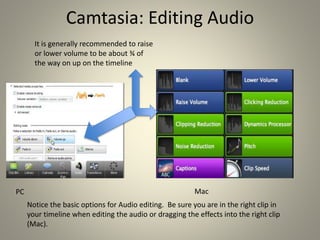
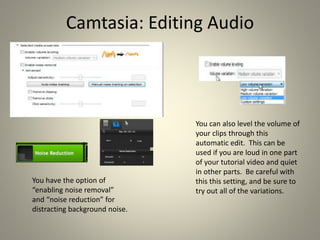
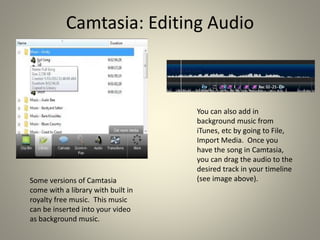
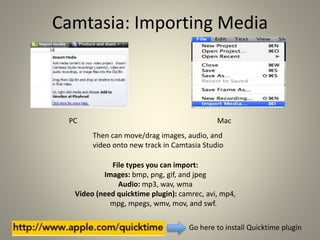
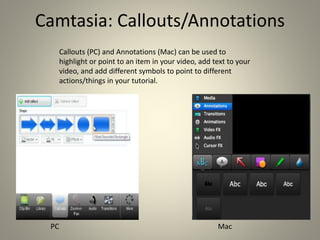
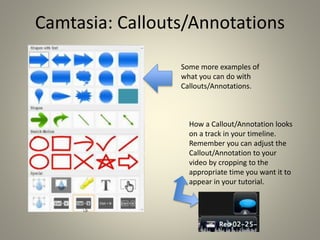
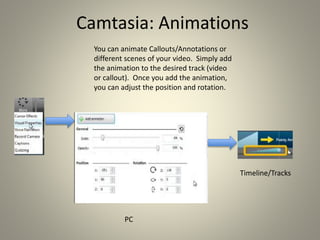
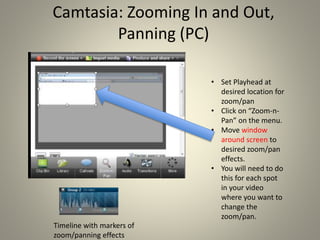
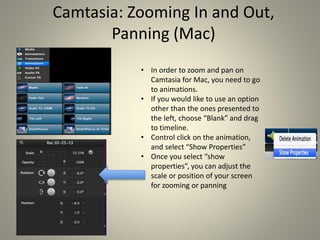
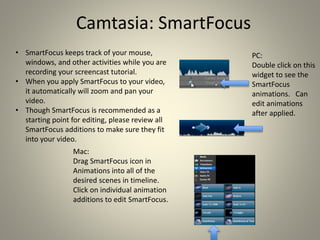
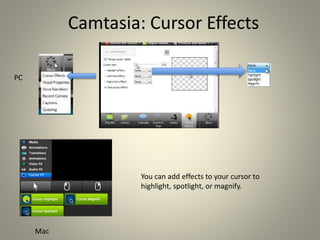
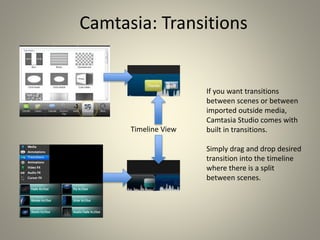
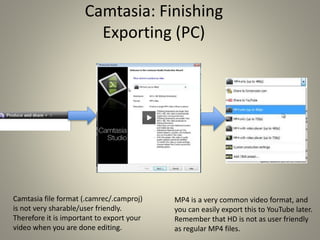
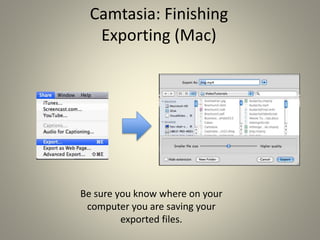
Camtasia: Screencast Software
2014
By Samantha Harlow
Instructional Technology Consultant
UNC Greensboro
Preparing to record
• Write a script
• Practice
• Think about what you want your screen to look
like during the recording
– Sometimes it is good to clear off your desktop in order
to not distract tutorial viewers
You can change the mouse properties to be
slower, faster, more visible for your
screencast by going to Mouse Properties.
Recording: PC
You have the option of recording
yourself while you create the
tutorial
You can customize your screen for
recording
You can record using
built in microphone or
USB microphone. You
can also record what is
happening on your
computer.
Once you press record, it
will give you time to set
up your computer. You
can stop the recording
anytime by pressing F10.
To pause recording, press
F9.
Recording: PC Tool Options
Reducing
frame rate
will create a
smaller video
file and not
hurt your
video.
Can record
in .camrec
(Camtasia
file) or .avi.
Use .avi if
you are
planning on
editing in
Final Cut
Pro, After
Effects, Etc.
Recording: PC Tool Options
Can
view/change
hotkeys for
different
functions
Recording: Mac
Looks slightly different than a PC, but same functions. To
stop recording on a Mac, Click on Camtasia application
and “Stop Recording.”
Camtasia: Recording Audio
General Tips:
• Use a USB microphone – this will make a huge
difference in the quality and usability of your
screencasts
• Try and record with no background noise
• If you are worried about making your recording
worse during audio editing, be sure to save an extra
copy before audio editing to the desktop to compare
Selecting Screen To Record
If you are
creating a
custom size, it
helps to link
your
dimensions
Can check “Lock to application” to
have Camtasia just capture your
application. Be careful that you are
recording everything you want to
record.
Customizable Options:You will most
likely record
in full screen
most of the
time
Selecting Audio
Camtasia will automatically recognize your
microphone, but you will need to select
the audio input/output. For best quality
audio, be sure to calibrate your
microphone before beginning recording.
Check this box if you want
Camtasia to record the
system audio (audio from
your computer)
If you want to fine tune the audio, to to
Tools, Inputs, Audio Settings
Video tutorial on calibrating microphone
http://www.youtube.com/watch?v=iHcOjaP
BalI
After Recording: PC
This screen gives you a
preview option of your
recorded footage
when you are done
recording. This is not
the same as the editor
screen. This screen
simply allows you to
preview, save,
produce, or delete
your footage.
Here you can decide whether
you want to edit, publish, or
delete your recording.
After Recording: Mac
Be sure to save your project before you begin editing
to not lose any of your work.
Camtasia: Starting Editing
You will be prompted with this
screen when you start Camtasia
Here are your screen
output options. Try and
stick with the dimensions
you recorded in, typically
854x480.
Be sure to that “Keep aspect ratio” is
checked.
*After you have selected your
size, be sure to save your project
in order to not lose any changes.
The editing project will save as
.camproj file. Be sure to save
often when editing in Camtasia.
Camtasia: Editing
PC
Camtasia: Editing
Mac
The Main difference between Camtasia on a Mac versus a PC is that you drag
and drop the effects into the timeline for a Mac, whereas in the PC version
you click the buttons while your clip is selected. Watching a YouTube video of
Camtasia in action would easily provide a clear example of the differences.
The timeline and the canvas are always linked.
Adding effects is done through the timeline, similarly to many video
editing programs. You can zoom in and out, add effects (such as arrows,
text, and more). You can delete unwanted footage and focus on more
important parts of your tutorials.
The Canvas is where you can view your video and change visual
properties of your video (such as screen dimensions, rotating the
screen, and more).
Remember as you are editing you can always undo things that you have
done by pressing Control Z (PC) or Command Z (Mac).
Camtasia: Editing Tools
Zoom in and out
of the timeline
Undo and
Redo Button
Cutting
Splitting
Copy
Paste
This is the Playhead.
Move this arrow up
and down the
timeline in order to
see a scene or edit at
a certain spot.
Camtasia: Editing
Your timeline can have many
tracks. You can lock or unlock
tracks during editing. You
would lock a track if you did
not want certain effects to be
changed while editing other
effects.
You can delete sections of your
video. Be sure to lock the tracks
that you do not want to be cut.
PC: Green/red arrow are you in
and out points to drag over the
scene to be delete.
Mac: Shift Key, drag the arrow
over the scene to be deleted.
*Note about deleting:
it is good to delete
unwanted footage before
you add your SmartFocus
(this will be reviewed
later)
Camtasia: Editing
The split tool allows you to
split up clips and move them
up a track or to other parts of
the video. This also allows you
to be able to separate video
and audio.
For example, if you want the
image from a clip, but not the
audio, you will need to split
the image, move it to another
track, and then separate the
video and audio. Once the
audio and video are
separated, you can delete one.
Splitting
PC: push S on keyboard
Mac: Edit, Split all at
Playhead
Right click or Command
click (Mac) to “separate
video and audio”
Camtasia: Editing
More Editing Options:
Editing visual properties of
Canvas
Can add markers with
notes
PC: Control M
Mac: Alt Option M
Camtasia: Editing Audio
PC Mac
Notice the basic options for Audio editing. Be sure you are in the right clip in
your timeline when editing the audio or dragging the effects into the right clip
(Mac).
It is generally recommended to raise
or lower volume to be about ¾ of
the way on up on the timeline
Camtasia: Editing Audio
You have the option of
“enabling noise removal”
and “noise reduction” for
distracting background noise.
You can also level the volume of
your clips through this
automatic edit. This can be
used if you are loud in one part
of your tutorial video and quiet
in other parts. Be careful with
this this setting, and be sure to
try out all of the variations.
Camtasia: Editing Audio
Some versions of Camtasia
come with a library with built in
royalty free music. This music
can be inserted into your video
as background music.
You can also add in
background music from
iTunes, etc by going to File,
Import Media. Once you
have the song in Camtasia,
you can drag the audio to the
desired track in your timeline
(see image above).
Camtasia: Importing Media
PC Mac
File types you can import:
Images: bmp, png, gif, and jpeg
Audio: mp3, wav, wma
Video (need quicktime plugin): camrec, avi, mp4,
mpg, mpegs, wmv, mov, and swf.
Go here to install Quicktime plugin
Then can move/drag images, audio, and
video onto new track in Camtasia Studio
Camtasia: Callouts/Annotations
PC Mac
Callouts (PC) and Annotations (Mac) can be used to
highlight or point to an item in your video, add text to your
video, and add different symbols to point to different
actions/things in your tutorial.
Camtasia: Callouts/Annotations
Some more examples of
what you can do with
Callouts/Annotations.
How a Callout/Annotation looks
on a track in your timeline.
Remember you can adjust the
Callout/Annotation to your
video by cropping to the
appropriate time you want it to
appear in your tutorial.
Camtasia: Animations
PC
Timeline/Tracks
You can animate Callouts/Annotations or
different scenes of your video. Simply add
the animation to the desired track (video
or callout). Once you add the animation,
you can adjust the position and rotation.
Camtasia: Zooming In and Out,
Panning (PC)
• Set Playhead at
desired location for
zoom/pan
• Click on “Zoom-n-
Pan” on the menu.
• Move window
around screen to
desired zoom/pan
effects.
• You will need to do
this for each spot
in your video
where you want to
change the
zoom/pan.
Timeline with markers of
zoom/panning effects
Camtasia: Zooming In and Out,
Panning (Mac)
• In order to zoom and pan on
Camtasia for Mac, you need to go
to animations.
• If you would like to use an option
other than the ones presented to
the left, choose “Blank” and drag
to timeline.
• Control click on the animation,
and select “Show Properties”
• Once you select “show
properties”, you can adjust the
scale or position of your screen
for zooming or panning
Camtasia: SmartFocus
• SmartFocus keeps track of your mouse,
windows, and other activities while you are
recording your screencast tutorial.
• When you apply SmartFocus to your video,
it automatically will zoom and pan your
video.
• Though SmartFocus is recommended as a
starting point for editing, please review all
SmartFocus additions to make sure they fit
into your video.
PC:
Double click on this
widget to see the
SmartFocus
animations. Can
edit animations
after applied.
Mac:
Drag SmartFocus icon in
Animations into all of the
desired scenes in timeline.
Click on individual animation
additions to edit SmartFocus.
Camtasia: Cursor Effects
Mac
PC
You can add effects to your cursor to
highlight, spotlight, or magnify.
Camtasia: Transitions
If you want transitions
between scenes or between
imported outside media,
Camtasia Studio comes with
built in transitions.
Simply drag and drop desired
transition into the timeline
where there is a split
between scenes.
Timeline View
Camtasia: Finishing
Exporting (PC)
Camtasia file format (.camrec/.camproj)
is not very sharable/user friendly.
Therefore it is important to export your
video when you are done editing.
MP4 is a very common video format, and
you can easily export this to YouTube later.
Remember that HD is not as user friendly
as regular MP4 files.
Camtasia: Finishing
Exporting (Mac)
Be sure you know where on your
computer you are saving your
exported files.
Please contact the Samantha Harlow
Instructional Technology Consultant for the
School of Education, UNCG
with any questions or concerns about this tutorial.
Email: sharlow@uncg.edu
Website:
http://intech.uncg.edu/
Thank You!!!
Sources:
This tutorial was made from a
Lynda.com tutorial:
Camtasia Studio 8 Essential Training
By Chris Mattia

Camtasia Tutorial

  • 1.
    Camtasia: Screencast Software 2014 BySamantha Harlow Instructional Technology Consultant UNC Greensboro
  • 2.
    Preparing to record •Write a script • Practice • Think about what you want your screen to look like during the recording – Sometimes it is good to clear off your desktop in order to not distract tutorial viewers You can change the mouse properties to be slower, faster, more visible for your screencast by going to Mouse Properties.
  • 3.
    Recording: PC You havethe option of recording yourself while you create the tutorial You can customize your screen for recording You can record using built in microphone or USB microphone. You can also record what is happening on your computer. Once you press record, it will give you time to set up your computer. You can stop the recording anytime by pressing F10. To pause recording, press F9.
  • 4.
    Recording: PC ToolOptions Reducing frame rate will create a smaller video file and not hurt your video. Can record in .camrec (Camtasia file) or .avi. Use .avi if you are planning on editing in Final Cut Pro, After Effects, Etc.
  • 5.
    Recording: PC ToolOptions Can view/change hotkeys for different functions
  • 6.
    Recording: Mac Looks slightlydifferent than a PC, but same functions. To stop recording on a Mac, Click on Camtasia application and “Stop Recording.”
  • 7.
    Camtasia: Recording Audio GeneralTips: • Use a USB microphone – this will make a huge difference in the quality and usability of your screencasts • Try and record with no background noise • If you are worried about making your recording worse during audio editing, be sure to save an extra copy before audio editing to the desktop to compare
  • 8.
    Selecting Screen ToRecord If you are creating a custom size, it helps to link your dimensions Can check “Lock to application” to have Camtasia just capture your application. Be careful that you are recording everything you want to record. Customizable Options:You will most likely record in full screen most of the time
  • 9.
    Selecting Audio Camtasia willautomatically recognize your microphone, but you will need to select the audio input/output. For best quality audio, be sure to calibrate your microphone before beginning recording. Check this box if you want Camtasia to record the system audio (audio from your computer) If you want to fine tune the audio, to to Tools, Inputs, Audio Settings Video tutorial on calibrating microphone http://www.youtube.com/watch?v=iHcOjaP BalI
  • 10.
    After Recording: PC Thisscreen gives you a preview option of your recorded footage when you are done recording. This is not the same as the editor screen. This screen simply allows you to preview, save, produce, or delete your footage. Here you can decide whether you want to edit, publish, or delete your recording.
  • 11.
    After Recording: Mac Besure to save your project before you begin editing to not lose any of your work.
  • 12.
    Camtasia: Starting Editing Youwill be prompted with this screen when you start Camtasia Here are your screen output options. Try and stick with the dimensions you recorded in, typically 854x480. Be sure to that “Keep aspect ratio” is checked. *After you have selected your size, be sure to save your project in order to not lose any changes. The editing project will save as .camproj file. Be sure to save often when editing in Camtasia.
  • 13.
  • 14.
    Camtasia: Editing Mac The Maindifference between Camtasia on a Mac versus a PC is that you drag and drop the effects into the timeline for a Mac, whereas in the PC version you click the buttons while your clip is selected. Watching a YouTube video of Camtasia in action would easily provide a clear example of the differences.
  • 15.
    The timeline andthe canvas are always linked. Adding effects is done through the timeline, similarly to many video editing programs. You can zoom in and out, add effects (such as arrows, text, and more). You can delete unwanted footage and focus on more important parts of your tutorials. The Canvas is where you can view your video and change visual properties of your video (such as screen dimensions, rotating the screen, and more). Remember as you are editing you can always undo things that you have done by pressing Control Z (PC) or Command Z (Mac).
  • 16.
    Camtasia: Editing Tools Zoomin and out of the timeline Undo and Redo Button Cutting Splitting Copy Paste This is the Playhead. Move this arrow up and down the timeline in order to see a scene or edit at a certain spot.
  • 17.
    Camtasia: Editing Your timelinecan have many tracks. You can lock or unlock tracks during editing. You would lock a track if you did not want certain effects to be changed while editing other effects. You can delete sections of your video. Be sure to lock the tracks that you do not want to be cut. PC: Green/red arrow are you in and out points to drag over the scene to be delete. Mac: Shift Key, drag the arrow over the scene to be deleted. *Note about deleting: it is good to delete unwanted footage before you add your SmartFocus (this will be reviewed later)
  • 18.
    Camtasia: Editing The splittool allows you to split up clips and move them up a track or to other parts of the video. This also allows you to be able to separate video and audio. For example, if you want the image from a clip, but not the audio, you will need to split the image, move it to another track, and then separate the video and audio. Once the audio and video are separated, you can delete one. Splitting PC: push S on keyboard Mac: Edit, Split all at Playhead Right click or Command click (Mac) to “separate video and audio”
  • 19.
    Camtasia: Editing More EditingOptions: Editing visual properties of Canvas Can add markers with notes PC: Control M Mac: Alt Option M
  • 20.
    Camtasia: Editing Audio PCMac Notice the basic options for Audio editing. Be sure you are in the right clip in your timeline when editing the audio or dragging the effects into the right clip (Mac). It is generally recommended to raise or lower volume to be about ¾ of the way on up on the timeline
  • 21.
    Camtasia: Editing Audio Youhave the option of “enabling noise removal” and “noise reduction” for distracting background noise. You can also level the volume of your clips through this automatic edit. This can be used if you are loud in one part of your tutorial video and quiet in other parts. Be careful with this this setting, and be sure to try out all of the variations.
  • 22.
    Camtasia: Editing Audio Someversions of Camtasia come with a library with built in royalty free music. This music can be inserted into your video as background music. You can also add in background music from iTunes, etc by going to File, Import Media. Once you have the song in Camtasia, you can drag the audio to the desired track in your timeline (see image above).
  • 23.
    Camtasia: Importing Media PCMac File types you can import: Images: bmp, png, gif, and jpeg Audio: mp3, wav, wma Video (need quicktime plugin): camrec, avi, mp4, mpg, mpegs, wmv, mov, and swf. Go here to install Quicktime plugin Then can move/drag images, audio, and video onto new track in Camtasia Studio
  • 24.
    Camtasia: Callouts/Annotations PC Mac Callouts(PC) and Annotations (Mac) can be used to highlight or point to an item in your video, add text to your video, and add different symbols to point to different actions/things in your tutorial.
  • 25.
    Camtasia: Callouts/Annotations Some moreexamples of what you can do with Callouts/Annotations. How a Callout/Annotation looks on a track in your timeline. Remember you can adjust the Callout/Annotation to your video by cropping to the appropriate time you want it to appear in your tutorial.
  • 26.
    Camtasia: Animations PC Timeline/Tracks You cananimate Callouts/Annotations or different scenes of your video. Simply add the animation to the desired track (video or callout). Once you add the animation, you can adjust the position and rotation.
  • 27.
    Camtasia: Zooming Inand Out, Panning (PC) • Set Playhead at desired location for zoom/pan • Click on “Zoom-n- Pan” on the menu. • Move window around screen to desired zoom/pan effects. • You will need to do this for each spot in your video where you want to change the zoom/pan. Timeline with markers of zoom/panning effects
  • 28.
    Camtasia: Zooming Inand Out, Panning (Mac) • In order to zoom and pan on Camtasia for Mac, you need to go to animations. • If you would like to use an option other than the ones presented to the left, choose “Blank” and drag to timeline. • Control click on the animation, and select “Show Properties” • Once you select “show properties”, you can adjust the scale or position of your screen for zooming or panning
  • 29.
    Camtasia: SmartFocus • SmartFocuskeeps track of your mouse, windows, and other activities while you are recording your screencast tutorial. • When you apply SmartFocus to your video, it automatically will zoom and pan your video. • Though SmartFocus is recommended as a starting point for editing, please review all SmartFocus additions to make sure they fit into your video. PC: Double click on this widget to see the SmartFocus animations. Can edit animations after applied. Mac: Drag SmartFocus icon in Animations into all of the desired scenes in timeline. Click on individual animation additions to edit SmartFocus.
  • 30.
    Camtasia: Cursor Effects Mac PC Youcan add effects to your cursor to highlight, spotlight, or magnify.
  • 31.
    Camtasia: Transitions If youwant transitions between scenes or between imported outside media, Camtasia Studio comes with built in transitions. Simply drag and drop desired transition into the timeline where there is a split between scenes. Timeline View
  • 32.
    Camtasia: Finishing Exporting (PC) Camtasiafile format (.camrec/.camproj) is not very sharable/user friendly. Therefore it is important to export your video when you are done editing. MP4 is a very common video format, and you can easily export this to YouTube later. Remember that HD is not as user friendly as regular MP4 files.
  • 33.
    Camtasia: Finishing Exporting (Mac) Besure you know where on your computer you are saving your exported files.
  • 34.
    Please contact theSamantha Harlow Instructional Technology Consultant for the School of Education, UNCG with any questions or concerns about this tutorial. Email: sharlow@uncg.edu Website: http://intech.uncg.edu/ Thank You!!!
  • 35.
    Sources: This tutorial wasmade from a Lynda.com tutorial: Camtasia Studio 8 Essential Training By Chris Mattia