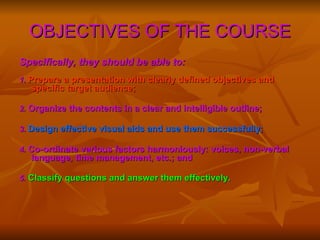
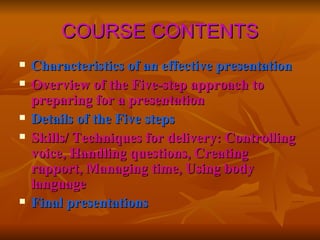
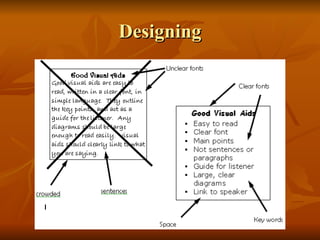
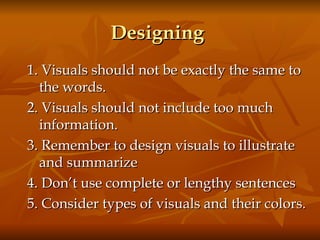
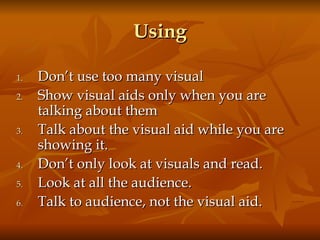
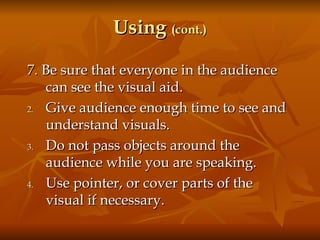
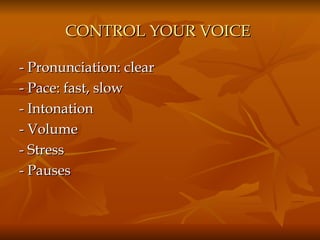
WELCOME TO   PRESENTATION SKILLS  COURSE 27- 31 August 2006
OBJECTIVES OF THE COURSE By the end of the training, participants should be  able to give an effective presentation .
OBJECTIVES OF THE COURSE Specifically, they should be able to:   1.  Prepare a presentation with clearly defined objectives and specific target audience; 2.  Organize the contents in a clear and intelligible outline;   3.  Design effective visual aids and use them successfully; 4.  Co-ordinate various factors harmoniously: voices, non-verbal language, time management, etc.; and 5.  Classify questions and answer them effectively.
COURSE CONTENTS Characteristics of an effective presentation Overview of the Five-step approach to preparing for a presentation Details of the Five steps Skills/ Techniques for delivery: Controlling voice, Handling questions, Creating rapport, Managing time, Using body language Final presentations
An effective presentation   What are the characteristics of an effective presentation? What are the characteristics of an effective presenter?
An effective presentation Watch the video clip and  comment on  Joanna’s presentation  (Using the criteria checklist 1)
An effective presentation Focused topic, clear structure Logical organization of ideas and information Good cohesion between parts Clear objectives Clear information Brief and concise sentences Good supportive visual aids Good timing Interesting two-way communication
An effective presenter Humorous, confident, calm, knowledgeable Clear, loud, attractive voice Good non-verbal behaviors: facial expression, gestures, posture, attitude and clothing Good use of visual aids Good timing Able to answer questions of the audience Ability to attract audience & involve audience in two way communication Understand audience needs and feelings
The 5–step approach in preparing for a presentation Step 1 Define the audience and the aim  Step 2 Plan the structure Step 3 Decide and prepare visual aids Step 4 Prepare the presentation Step 5 Rehearse the presentation
Step 1 Defining the audience Ask yourself  -  Why   do we need to identify the audience of the presentation? -  What   is the basic information that we need to know about the audience?
Step 1 Defining the aim Ask yourself  1. What do you want to happen as a  RESULT ? 2. What do you want the  audience TO DO ?
Step 1 Defining the aim A clear aim  will  help you think and arrange your ideas in a clear way help the audience know your aim and understand your presentation better
Step 1:  Define Your Aim What do you want to happen as a  RESULT   of your presentation  ? What do you want your audience  TO DO ? See handout Discuss your aim and write it in large print on a card.  ONE SENTENCE ONLY.   Share your aim with the class.  Discuss .
Practice with defining the aim Get in groups of 4  choose  one topic   define  the aim  of your group’s  presentation Present your aim
Step 2:  Plan the Structure “ Tell them what you are going to tell them.”  ( introduction ) “ Tell them.”  ( main presentation ) “ Tell them what you told them.”  (conclusion )
Step 2: How you will Plan the Structure FIRST :  Plan the MAIN POINTS  of the presentation SECOND:  Plan the introduction
Step 2:  Plan the Structure The Main Points ( Headings ) This is the part where you  “Tell them.”   See handout About 3 MAIN POINTS ( headings )  for a 5 minute presentation About 5 MAIN POINTS ( headings ) for a 10 minute presentation
Step 2:  Plan the Structure The Main Points ( Headings) “ Brainstorm” the possible headings Write down everyone’s  ideas for the general headings, NOT the details You may see handouts for ideas about how to do a “brainstorm” Choose the best 3-5 headings Remember to consider your aim and your audience
Step 2:  Plan the Structure The Introduction “ Tell them what you are going to tell them.” Introduce yourself and the aim How you will help them get what they want Capture the audience’s attention Ask a question ; Tell a story Briefly introduce the main points  in the same order that you will present them   1 or 2 minutes long
PRACTICE: Present the Introduction “ Tell them what you are going to tell them.” Someone from each group will: FIRST:   Tell the class who her audience is SECOND:   Present her Introduction ( 1 - 2 minutes ) After each presentation we will discuss the effectiveness of the introduction  ( 1 - 2 minutes )
Suggested procedures “ Tell them what you are going to tell them.” ( introduction ) “ Tell them.”  ( main presentation ) “ Tell them what you told them.” (conclusion )
SCHEDULE Warm up – Review Practice with giving the introduction 3.   Step 3 - Selecting, designing, using visual aids 4.  Practice 5.  Step 4 – Prepare a speech 5.  Step 5 - Rehearse 6.  Delivery: Voice
Review on  Presentation skills
Presentation skills Step 3 Selecting, preparing and using visual aids
What is a visual aid? A visual aid is anything the audience can see that helps the speaker get his or her message across to the audience
1. Why do we need to use visual aids?  2. What visual aids can we use?  3. What should be noted when designing and using visual aids? 4. Some specific guidelines
Why do we need to use visual aids? - To emphasize the main ideas - To illustrate, clarify a difficult point - To animate a presentation, making it lively - To utilize many senses of the audience - To help audience remember the points easily - To reduce explanation time.
What visual aids should we use?   The human body Actual objects or models of actual objects Posters and flip charts Photographs, pictures or videos Maps Handouts Chalkboard, overhead transparencies, PP slides
How many types of charts? LINE GRAPH
How many types of charts? BAR GRAPH
How many types of charts? PIE CHART
How many types of charts? FLOW CHART
When to use which? illustrate key points for smaller audiences.   flip chart to illustrate key points for large audiences slides to illustrate a series of steps in a procedure, decision, or other "stepwise" process.  flow chart show how percentages relate to each other within a whole.   pie chart compare data.   bar graph demonstrate how something has changed over a period of time.   line graph
What should be noted when -  Designing visual aids ?  -  Using visual aids ?
Designing
Three golden rules
Designing   1. Visuals should not be exactly the same to the words. 2. Visuals should not include too much information. 3. Remember to design visuals to illustrate and summarize 4. Don’t use complete or lengthy sentences 5. Consider types of visuals and their colors.
Using Don’t use too many visual Show visual aids only when you are talking about them Talk about the visual aid while you are showing it.  Don’t only look at visuals and read.  Look at all the audience.  Talk to audience, not the visual aid.
Using  (cont.) 7.  Be sure that everyone in the audience can see the visual aid. Give audience enough time to see and understand visuals. Do not pass objects around the audience while you are speaking. Use pointer, or cover parts of the visual if necessary.
Focus Attract listeners’ attention to:  +  important points + give comments + give conclusion
Language Introduction and explanation Take a look at this Let’s have a look at this I’d like you to look at this Here we can see… The … represents… and the … represents
Language Highlights and comments I’d like us to look at … in more detail. As you can see, …… I’d also like to draw your attention to …. If you look at it more closely, you’ll notice ……
Language Interpretations I’m sure the implications of this …. The conclusions to be drawn from this are clear to all of us.
Some specific guidelines when using transparencies or PP slides Needs to be prepared carefully:   - Consider each part of the presentation and decide on the type of visuals - Visuals should include only main points
Short :  - Visuals need to be clear and tidy Simple :  - brief phrases or sentences - No more than 10 lines/ page - No more than 10 numbers/ page - Pictures don’t need to be too detailed (if not necessary?
Attract audience attention by using  structure,   and color - designing visuals that audience only need  a few seconds  to understand. - Remember to  turn off the OHP or projector  when no longer in use.
Use pictures or objects   Make additional use of pictures or objects or real person if necessary.
SUMMARY   1. Why visual aids?  2. What visual aids?  3. Some common notes 4. Some specific guidelines
Step 4-  Prepare the speech How can we remember the speech?  4 levels of details:  1.  Full script   2.  Abbreviated script  3.  Key words (note cards) 4.  No written script
Step 5-  Rehearse Why should we rehearse the speech?  How should we rehearse the speech? What are the important points to check?
CONTROL YOUR VOICE   - Pronunciation: clear - Pace: fast, slow - Intonation - Volume - Stress - Pauses
VOICE CONTROL Practice 1:  Read aloud the sentence individually   Practice 2: In pairs (5 minutes)  - Read the passages with intonation and stress - Read the passages to the class

GiapESP

  • 1.
    WELCOME TO PRESENTATION SKILLS COURSE 27- 31 August 2006
  • 2.
    OBJECTIVES OF THECOURSE By the end of the training, participants should be able to give an effective presentation .
  • 3.
    OBJECTIVES OF THECOURSE Specifically, they should be able to: 1.  Prepare a presentation with clearly defined objectives and specific target audience; 2.  Organize the contents in a clear and intelligible outline; 3. Design effective visual aids and use them successfully; 4. Co-ordinate various factors harmoniously: voices, non-verbal language, time management, etc.; and 5. Classify questions and answer them effectively.
  • 4.
    COURSE CONTENTS Characteristicsof an effective presentation Overview of the Five-step approach to preparing for a presentation Details of the Five steps Skills/ Techniques for delivery: Controlling voice, Handling questions, Creating rapport, Managing time, Using body language Final presentations
  • 5.
    An effective presentation What are the characteristics of an effective presentation? What are the characteristics of an effective presenter?
  • 6.
    An effective presentationWatch the video clip and comment on Joanna’s presentation (Using the criteria checklist 1)
  • 7.
    An effective presentationFocused topic, clear structure Logical organization of ideas and information Good cohesion between parts Clear objectives Clear information Brief and concise sentences Good supportive visual aids Good timing Interesting two-way communication
  • 8.
    An effective presenterHumorous, confident, calm, knowledgeable Clear, loud, attractive voice Good non-verbal behaviors: facial expression, gestures, posture, attitude and clothing Good use of visual aids Good timing Able to answer questions of the audience Ability to attract audience & involve audience in two way communication Understand audience needs and feelings
  • 9.
    The 5–step approachin preparing for a presentation Step 1 Define the audience and the aim Step 2 Plan the structure Step 3 Decide and prepare visual aids Step 4 Prepare the presentation Step 5 Rehearse the presentation
  • 10.
    Step 1 Definingthe audience Ask yourself - Why do we need to identify the audience of the presentation? - What is the basic information that we need to know about the audience?
  • 11.
    Step 1 Definingthe aim Ask yourself 1. What do you want to happen as a RESULT ? 2. What do you want the audience TO DO ?
  • 12.
    Step 1 Definingthe aim A clear aim will help you think and arrange your ideas in a clear way help the audience know your aim and understand your presentation better
  • 13.
    Step 1: Define Your Aim What do you want to happen as a RESULT of your presentation ? What do you want your audience TO DO ? See handout Discuss your aim and write it in large print on a card. ONE SENTENCE ONLY. Share your aim with the class. Discuss .
  • 14.
    Practice with definingthe aim Get in groups of 4 choose one topic define the aim of your group’s presentation Present your aim
  • 15.
    Step 2: Plan the Structure “ Tell them what you are going to tell them.” ( introduction ) “ Tell them.” ( main presentation ) “ Tell them what you told them.” (conclusion )
  • 16.
    Step 2: Howyou will Plan the Structure FIRST : Plan the MAIN POINTS of the presentation SECOND: Plan the introduction
  • 17.
    Step 2: Plan the Structure The Main Points ( Headings ) This is the part where you “Tell them.” See handout About 3 MAIN POINTS ( headings ) for a 5 minute presentation About 5 MAIN POINTS ( headings ) for a 10 minute presentation
  • 18.
    Step 2: Plan the Structure The Main Points ( Headings) “ Brainstorm” the possible headings Write down everyone’s ideas for the general headings, NOT the details You may see handouts for ideas about how to do a “brainstorm” Choose the best 3-5 headings Remember to consider your aim and your audience
  • 19.
    Step 2: Plan the Structure The Introduction “ Tell them what you are going to tell them.” Introduce yourself and the aim How you will help them get what they want Capture the audience’s attention Ask a question ; Tell a story Briefly introduce the main points in the same order that you will present them 1 or 2 minutes long
  • 20.
    PRACTICE: Present theIntroduction “ Tell them what you are going to tell them.” Someone from each group will: FIRST: Tell the class who her audience is SECOND: Present her Introduction ( 1 - 2 minutes ) After each presentation we will discuss the effectiveness of the introduction ( 1 - 2 minutes )
  • 21.
    Suggested procedures “Tell them what you are going to tell them.” ( introduction ) “ Tell them.” ( main presentation ) “ Tell them what you told them.” (conclusion )
  • 22.
    SCHEDULE Warm up– Review Practice with giving the introduction 3. Step 3 - Selecting, designing, using visual aids 4. Practice 5. Step 4 – Prepare a speech 5. Step 5 - Rehearse 6. Delivery: Voice
  • 23.
    Review on Presentation skills
  • 24.
    Presentation skills Step3 Selecting, preparing and using visual aids
  • 25.
    What is avisual aid? A visual aid is anything the audience can see that helps the speaker get his or her message across to the audience
  • 26.
    1. Why dowe need to use visual aids? 2. What visual aids can we use? 3. What should be noted when designing and using visual aids? 4. Some specific guidelines
  • 27.
    Why do weneed to use visual aids? - To emphasize the main ideas - To illustrate, clarify a difficult point - To animate a presentation, making it lively - To utilize many senses of the audience - To help audience remember the points easily - To reduce explanation time.
  • 28.
    What visual aidsshould we use? The human body Actual objects or models of actual objects Posters and flip charts Photographs, pictures or videos Maps Handouts Chalkboard, overhead transparencies, PP slides
  • 29.
    How many typesof charts? LINE GRAPH
  • 30.
    How many typesof charts? BAR GRAPH
  • 31.
    How many typesof charts? PIE CHART
  • 32.
    How many typesof charts? FLOW CHART
  • 33.
    When to usewhich? illustrate key points for smaller audiences.   flip chart to illustrate key points for large audiences slides to illustrate a series of steps in a procedure, decision, or other "stepwise" process. flow chart show how percentages relate to each other within a whole.   pie chart compare data.   bar graph demonstrate how something has changed over a period of time.   line graph
  • 34.
    What should benoted when - Designing visual aids ? - Using visual aids ?
  • 35.
  • 36.
  • 37.
    Designing 1. Visuals should not be exactly the same to the words. 2. Visuals should not include too much information. 3. Remember to design visuals to illustrate and summarize 4. Don’t use complete or lengthy sentences 5. Consider types of visuals and their colors.
  • 38.
    Using Don’t usetoo many visual Show visual aids only when you are talking about them Talk about the visual aid while you are showing it. Don’t only look at visuals and read. Look at all the audience. Talk to audience, not the visual aid.
  • 39.
    Using (cont.)7. Be sure that everyone in the audience can see the visual aid. Give audience enough time to see and understand visuals. Do not pass objects around the audience while you are speaking. Use pointer, or cover parts of the visual if necessary.
  • 40.
    Focus Attract listeners’attention to: + important points + give comments + give conclusion
  • 41.
    Language Introduction andexplanation Take a look at this Let’s have a look at this I’d like you to look at this Here we can see… The … represents… and the … represents
  • 42.
    Language Highlights andcomments I’d like us to look at … in more detail. As you can see, …… I’d also like to draw your attention to …. If you look at it more closely, you’ll notice ……
  • 43.
    Language Interpretations I’msure the implications of this …. The conclusions to be drawn from this are clear to all of us.
  • 44.
    Some specific guidelineswhen using transparencies or PP slides Needs to be prepared carefully: - Consider each part of the presentation and decide on the type of visuals - Visuals should include only main points
  • 45.
    Short : - Visuals need to be clear and tidy Simple : - brief phrases or sentences - No more than 10 lines/ page - No more than 10 numbers/ page - Pictures don’t need to be too detailed (if not necessary?
  • 46.
    Attract audience attentionby using structure, and color - designing visuals that audience only need a few seconds to understand. - Remember to turn off the OHP or projector when no longer in use.
  • 47.
    Use pictures orobjects Make additional use of pictures or objects or real person if necessary.
  • 48.
    SUMMARY 1. Why visual aids? 2. What visual aids? 3. Some common notes 4. Some specific guidelines
  • 49.
    Step 4- Prepare the speech How can we remember the speech? 4 levels of details: 1. Full script 2. Abbreviated script 3. Key words (note cards) 4. No written script
  • 50.
    Step 5- Rehearse Why should we rehearse the speech? How should we rehearse the speech? What are the important points to check?
  • 51.
    CONTROL YOUR VOICE - Pronunciation: clear - Pace: fast, slow - Intonation - Volume - Stress - Pauses
  • 52.
    VOICE CONTROL Practice1: Read aloud the sentence individually Practice 2: In pairs (5 minutes) - Read the passages with intonation and stress - Read the passages to the class