
Recommended
More Related Content
What's hot
What's hot (18)
Viewers also liked
Viewers also liked (13)
Similar to 2D Top-down shooter workflow
Similar to 2D Top-down shooter workflow (20)
More from raimondklavins
Recently uploaded
Recently uploaded (20)
2D Top-down shooter workflow
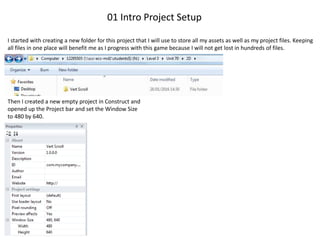
- 1. I started with creating a new folder for this project that I will use to store all my assets as well as my project files. Keeping all files in one place will benefit me as I progress with this game because I will not get lost in hundreds of files. Then I created a new empty project in Construct and opened up the Project bar and set the Window Size to 480 by 640. 01 Intro Project Setup
- 2. I also have renamed the layout to Level 1 and set its size to 480, 3200. Created 5 different layers.
- 3. 02 Tiled Backgrounds I have added two layers of background (ground and mist) by importing them as Tiled Background. Then resized them and saved the project into my project folder.
- 4. 03 Tilemap I have imported my tilemap into the project.
- 5. Then using this tileset I have quickly created two flying islands.
- 6. 04 Vertical Scroll & Parallax To make the layout vertically scrolling up, I created a sprite and gave a bullet behaviour and a scroll to. I have also set its angle to 270 so that it will be scrolling up the screen and its position to 224, 2880 so that it is right in the middle. I have figured out that 40 would be a good speed for scrolling. This sprite will not be visible, it is only for the scroll.
- 7. Then I have added parallax to the background layers. The layer that is more far away from us will be moving slower than the one that is closer to us. I have set the parallax of BG1 to 50 and parallax of BG2 to 75.
- 8. 05 Player Sprite & Movement Now it is time to add the character. I have created a new sprite and imported my default, turn left and turn right animations. Then I have set the animation on loop and set up the correct speed for the animation.
- 9. Because the sprite was facing a wrong direction, I have rotated all animation frames by 90° and set the angle of the player sprite to 270. This made it face up. After that I gave my player a behaviour of 8 direction movement. I have also changed it to 4 directions and set angle to No. Because I don’t want the player to face the direction it is moving. It must only be facing up.
- 10. Now I have added a new CustomMovement behaviour to the Player, this will allow me to control the scroll mechanism. Also I have done the following coding. Now the player is not able to fly off the screen.
- 11. 06 Player Animation & Particle Effect I started with coding the animations so that when right arrow is pressed it plays the bank right animation and when right arrow is released it goes back to default. With the left arrow key accordingly. Then I create a new object – particles. And changed its properties, you can see what I have set on this screenshot.
- 12. Before I started coding how my particles are going to work, I’ve set up 2 image points on the back of my Ghost. The particles will be created from these image points. Then I’ve created a new event in the event sheet so that any time I press up arrow key the system will create particles on the game layer at both image points. This is how it looks in the game –
- 13. 07 Player Firing Events Part 1 I’ve create a new sprite and called it bullet. Then uploaded my bullet art asset and then gave this sprite a Bullet behaviour. Then I went to the event sheet and made the bullets spawn from the player when space bar is pressed and so that when a bullet leaves the screen it gets destroyed.
- 14. 08 Player Firing Events Part 2 Firstly I have added two instance variables to the player. Then I’ve changed the code a little to make automatic shooting. When Space is down it will create a bullet and set up a timer for 0.25 secs. After that it will create another bullet and so on. Then I’ve added a some randomness to make the shooting feel a bit more natural.
- 15. Here I am creating a little firing flash that will flash when the player is shooting. I have set this sprite’s opacity to 0. When the space bar is down it sets its opacity to 100%. As it reaches the cooldown it sets its opacity back to 0.
- 16. 09 Weapon Power Up To create weapon powerups I started with adding a new instance variable to the Player. Then I went to even sheet and created another shooting event that. It will work when weaponPower = 1. It starts shooting 2 bullets instead of 1 and they spread a little. Now I can create an object that when collected will increase this instance variable and change the way my Ghost is shooting.
- 17. On this screenshot here I have added 2 more weapon types and have set the fire rate for each of them, from 0.2 to 0.5.
- 18. 010 Hit Points Bar & HUD Firstly, I’ve added another instance variable and named it HP – Hit Points. Also gave it a value of 100. Then I went to Layer HUD and created a new sprite, and coloured it green. I have set its parallax to 0,0 and placed it on the bottom of the screen so that it is stays there all the time. It is going to be the Health Bar.
- 19. Then I’ve created another sprite, coloured it black and placed beneath the health bar as shown on the screenshot. This adds a black background to the health bar. Before I started coding the health bar, I’ve created another variable for the player - MaxHP.
- 20. In the event sheet I’ve coded the healthBar so that it decreases in size as PlayerHP decreases. Also I’ve added an effect SetColor and made so that the health bar changes its colour from green when 100% to red when 0%. Then finally I made the Player to have maxHP on the start of layout.
- 21. 011 Enemy 1 Spawn & Movement I have created 2 new sprites – Mouse1enemy and Mouse1Spawn. Mouse1Enemy is the enemy animation, it will spawn and chase the player dealing damage when the collide. And Mouse1Spawn is an invisible point where these enemies will spawn. Then I’ve done this coding. The system will create the enemy from the mouse1spawn, this enemy has a bullet behaviour so it shoots towards the player. When it is not on screen – it destroys. To not overload the game.
- 22. 012 Enemy 1 Hit Points Now I’ve given my enemy an instance variable HP, set it to 4. On collision with a bullet subtract 1 from hp. So it needs 4 shots to destroy the enemy. When HP equals or less than 0 it destroys. I also have given enemy1 the brightness effect. And coded it so that when hit it sets brightness to 175, in 0.05 seconds it goes back to normal. Now when I hit my enemy I can see the effect of them being damaged.
- 23. 013 Enemy Firing I’ve created a new sprite for bullet and imported my bullet art asset that I’m going to use as a bullet. Then I’ve added 4 instance variables to enemy1, which are Shoot, coolDown, fireRate and ammo. I will code them similarly to the Player firing. I’ve also given it the behaviour LineOfSight. Changed its range to 500 and Cone of view to 2.
- 24. So here I’ve made my enemies shoot a few bullets as they face the player. Starting from event 32 – if the enemy is on line of sight with the player set Shoot to true (for each enemy). Then if ammo is not 0 and cooldown is 1 create a bullet that will move towards the player, and set cooldown back to 0 and subtract 1 from ammo. When bullet leaves the screen – destroy it.
- 25. 014 Enemy Destroyed Effects To add some effects that will happen when an enemy is destroyed I’ve imported 2 particles with blood and changed its properties so that the enemies blow up a bit more realistic. Then I coded it in the event sheet. When enemy is destroyed create those 2 particles where it was. Then I’ve imported an audio file with explosion sound. And coded it to play when an enemy is destroyed.
- 26. 015 Player Gun Audio & Enemy Fire Damage Firstly I’ve imported the sound for firing and coded it to play when space is pressed and to stop when space is released. Then I have adjusted its volume. Then I’ve added this code that makes the enemy bullets subtract HP from the Player when they collide and if the Player HP is 0 it is destroyed. I also made it so that when player collides with an enemy he also takes damage and the enemy destroys. Similarly to enemies, the player will flash when it takes damage so that we see an effect of being hit.
- 27. 016 Adjusting Collision Masks Before moving on, I’ve adjusted the collision masks for some of my objects (these that collide each other in the game). The screenshots show collision masks for the Player and the enemy1. I also did this to bullets.
- 28. On this step I’ve created a new sprite and uploaded my player asset again. Then I gave it a bullet and destroy outside of layout behaviour. Then I’ve changed its speed to -50 and in the event sheet I’ve coded that when the Player is destroyed the object PlayerDeath is created on its place. 017 Player Destroyed FX After it has been created it quickly decreases in size and rotates clockwise. When it becomes too small it destroys. I also made the particles to shoot from the back of the player as he rotates.
- 29. 018 Mouse Launcher Here I’ve started creating another type of enemy. I started with uploading 2 sprites, 1 for the launcher and another 1 for the spawner. I have also uploaded an animation strip for mice that will be shot out of the launcher. Then I went to event sheet and copied the bit of code that is responsible for spawning Enemy1 and have replaced the objects with mouseLauncher and mouseSpawn. Set Scroll.Y.- 338 to -352 to make it spawn before the player can see it. Then I have added a Sine and a Bulge effect to the Launcher. In the event sheet I’ve coded it so that it will bulge from 0 to 50 and back. This way I’ve animated the Launcher so that It would look like it is shooting out mice.
- 30. 019 Mouse Launcher 2 The screenshot shows what I’ve added to the event sheet and I am going to explain what it means. For each mouseLauncher the boolean variable will be set to True, then when the player reaches the launcher and if its ammo is greater than 0 it will create Mice with a random angle from 0 to 360 degrees. Fire rate will be random 0.2 - 0.3. Then I’ve set ammo to 50. The bullets are being shot out but the don’t chase the player yet. Then I’ve added a new event which is Compare distance travelled and set it to random value from 80 to 180 pixels. Then set the mice angle of motion chasing the player and acceleration to 3. Basically as the bullet travelled some distance it will start chasing the player and accelerating a little bit.
- 31. 020 Mouse Launcher 3Firstly, I’ve added HP variable to mouseLauncher and mice and also a damage variable to mice. Then continued on coding in the event sheet. I’ve made it so that mice will destroy on collision with the player or the bullet and when it’s destroyed the blood particles will be shown. Also on collision with the player a little mouse will deal 3 damage. Then I’ve made the Launcher to destroy when it reaches 0 HP and create blood2 particles. Finally, I’ve given mice a Timer behaviour and set it to self destroy 6 secs after spawning. I’ve also set the mouseLauncher to destroy itself as soon as it left the screen.
- 32. 021 Bug 2 Enemy Part 1 I started with importing 2 sprites, the bug enemy and its launcher. Rotated it the right way, sorted out the collision masks, image points and animations. Then imported another sprite for the turret and created 2 more image points at the end of each barrel. Then, similarly to mouse1enemy and mouseLauncher, I have coded the bugEnemy to be created on top of bugSpawner when Y is greater or equal than scroll.Y+100 pixels and the spawner to be destroyed after that. Then I’ve added a boolean and a number variable to the enemy (ScaleIn – False and Scale – 0) and set the position of the turret to image point 1. And the scale of the enemy and the turret to be 0 when it is created. Then ScaleIn will be turned to True. After the enemy with its turret are created they will scale in to their normal size and set the ScaleIn to false.
- 33. Screenshot showing the event sheet for the bugEnemy.
- 34. 022 Bug 2 Enemy Part 2 In this part I started with giving the bug enemy a bullet behaviour and 2 sine behaviours. Then I gave the enemy bullet speed and of 20 and acceleration of 40. Then it will travel a random distance between 300 and 600 and set bot Sines to active. As you see Sine 1 has magnitude of random(40,60) second Sine has (40,80). This makes the bug enemy to dribble around after it appeared and travelled some distance. Sets movementMode to 1 when finished. 1 Sine is Horizontal and 1 is Vertical. So now I gave it a turret behaviour and made the turret to target the player. Set the range to 500 and made to start shooting when the Player is in range.
- 35. 023 Bug 2 Enemy Part 3 Because I don’t want the turret to shoot straight after it spawned I am going to make it start shooting only after it stopped moving. For this I have set the turret to be disabled when created. Then I gave the turret a Sine behaviour to make it turn on and off. I also gave it an instance variable canShoot with initial value of 1.
- 36. Then I coded the enemy2 to take damage as it collides with the bullet and when its HP is less or equal than 0 to destroy itself and create blood particles, as well as play the enemy destroyed sound. Then I gave it a brightness effect and copied the code from the enemy1 to create the flashing effect when it is being hit. To make it run out of ammo I’ve given it a new instance variable - ammo; coded that the enemy2 can shoot if its ammo is greater than 0 and made to subtract 1 from ammo with every shot. Then I made to turn off both Sines and increase acceleration to 40 when it ran out of ammo. This way the enemy2 will simply fly off the screen when the ammo is 0. Then I told it to destroy when it is not on screen.
- 37. 024 Boss Enemy Part 1 In this part I started creating the final boss. I’ve inserted the boss sprite (it has no animation) and its mouth animation; sorted out all origin points and collision polygons. Then I’ve placed the mouth where it will be and pinned it to the boss sprite using the Pin behaviour. Then I’ve inserted another turret sprite and placed 3 of them on the boss so that he can shoot (also pinned them with Pin behaviour). Then I’ve inserted another animation for the missiles or the bullets that boss is going to shoot.
- 38. 025 Boss Enemy Part 2 First thing I’ve done is pinned the turrets and his mouth to the boss sprite. I also set the Open animation to play as the boss is created and turn off straight away. Then I made the scroll speed to go to 0 when the boss is 538 pixels away from it. This will turn on the bullet behaviour. Finally when boss is 150 pixels away from the scroll it will gradually stop (acceleration -40). 5.37 Added some variables to the boss and set their values.
- 39. As you see I’ve made the Mode to change from 0 to 1 when boss decelerates, then when mode is 1 it starts the timer “shoot” and changes the mode to 2. When timer “shoot” is done it sets CanShoot to True and turns the collisions on (makes him vulnerable).
- 40. 026 Boss Enemy Part 3 Next thing that I did is I made the boss mouth to create 20 missiles with random of 32 pixels, then they will set the angle of motion in the direction they are facing. Because missileAmmo is 3 it will spawn 20 missiles three times with a short pause between them. Then set cooldown to -1 and set canShoot to false so that it no longer shoots. The event 89 says: when the missile has travelled between 100 and 120 pixels it will set the angle of motion towards the player.
- 41. 027 Boss Enemy Part 4 So what I’ve done here is I have set up a cycle of 4 modes that the boss will have to complete and after it finishes the mode 4 it goes back to mode 0. Firstly it sets mode to 1 and plays the open animation and turns on the shooting timer. Then it sets the mode to 2 and sets canShoot to true and makes the mouth vulnerable; spawns missiles (I’ve shown it in the previous part). When ammo is 0 it goes to mode 3 and sets the sine to active. Sine makes the boss to slowly move from left to right.
- 42. Then it waits 2 seconds and sets turrets enabled for for 5 seconds. The turrets aim at the Player. Then the mode goes to 4. When mode is 4 the turrets start spawning the bullets with the fireRate of the boss. At the end the turrets set to disabled and the Sine set to disabled too. Finally when this is all done the mode turns to 0 and the cycle starts over again.
- 43. 028 Boss Enemy Part 5 In this part I have coded the way boss can be killed. On collision with the bullet BossMouth will receive 2 damage. When boss mouth loses all HP it gets destroyed and when it is destroyed it will also destroy the boss. Then I have added blood particles and a sound effect that will play when boss is destroyed. As you see blood is being sprayed in 360 degrees with some randomness. The process is repeated 20 times. This makes the explosion massive and cool.
- 44. 029 BOSS BUG SOUND FX, PLAYER DAMAGE & CHANGE LAYOUT I have created a new layout and called it Level 2. Then added a Timer behaviour to the Player. What will happen is, when the boss is destroyed it will start the timer and after 5 seconds the system will go switch to another layout – Level 2. Then I have coded the damage that the Player will take on collision with missiles and the boss.
- 45. 031 Intro Screen This time I have created a new layout with the event sheet; named them Intro. In the event sheet I’ve coded that On any key pressed go to layout Level 1. This will start the actual game. I also have added a background music for the intro screen. It starts playing on the start of layout and stops when any key is spressed.