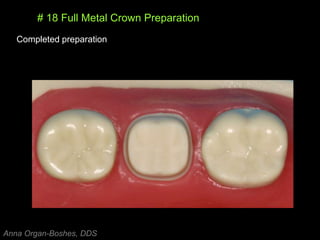
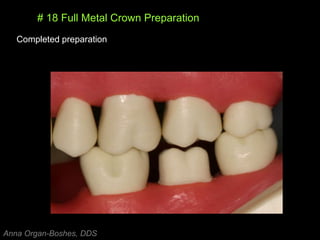
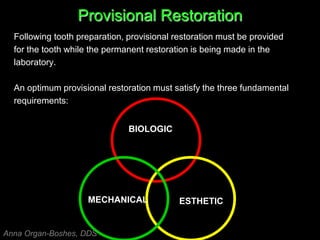
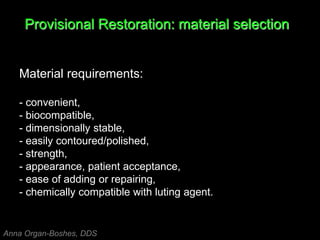
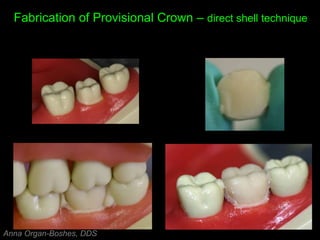
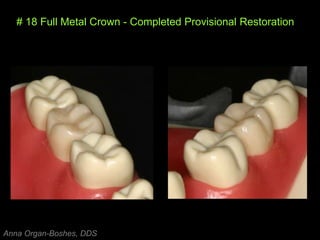
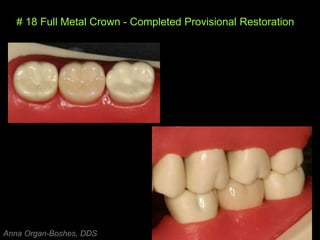
# 18 FGC Preparation
and
Provisional Crown
Anna Organ-Boshes, DDS
Reading Assignment:
Contemporary Fixed Prosthodontics by Rosenstiel; Fourth Edition
- Chapter #8, pg 258-271
Anna Organ-Boshes, DDS
Treatment options for tooth # 18
Anna Organ-Boshes, DDS
Full Metal Crown
Indications:
- extensive coronal tooth destruction by caries or trauma,
- replacement of large defective restorations,
- teeth when maximum retention and resistance are required,
- abutment for FPD, RPD,
- correction of occlusion, axial contour of posterior teeth,
- teeth with RCT,
Anna Organ-Boshes, DDS
Full Metal Crown Preparation
0.5 mm chamfer
1.0 – 1.25 mm
axial reduction
2 - 5 º
axial wall convergence
1.25 – 1.5 mm
occlusal reduction
functional cusp bevel
Anna Organ-Boshes, DDS
Gingival finish line – CHAMFER
CHAMFER MODIFIED CHAMFER
#6856 #856 #6856 SS #6878 #878
Anna Organ-Boshes, DDS
# 18 Full Metal Crown Preparation
Preparation Sequence:
- Initial interproximal reduction
- Axial reduction
- Functional cusp bevel
- Occlusal reduction
- Final axial and occlusal modifications
Anna Organ-Boshes, DDS
# 18 Full Metal Crown Preparation
Anna Organ-Boshes, DDS
# 18 Full Metal Crown Preparation
Completed preparation
Anna Organ-Boshes, DDS
# 18 Full Metal Crown Preparation
Completed preparation
Anna Organ-Boshes, DDS
# 18 Full Metal Crown Preparation
Completed preparation
2 - 5 degree taper of buccal and lingual walls is recommended for the cast restorations.
View the preparation with one eye open
from a distance of 12 inches.
Anna Organ-Boshes, DDS
# 18 Full Metal Crown Preparation
Completed preparation
Anna Organ-Boshes, DDS
Provisional Restoration
Following tooth preparation, provisional restoration must be provided
for the tooth while the permanent restoration is being made in the
laboratory.
An optimum provisional restoration must satisfy the three fundamental
requirements:
BIOLOGIC
MECHANICAL ESTHETIC
Anna Organ-Boshes, DDS
Provisional Restoration
1. Biologic
- cover exposed dentin in order to protect the pulp from chemical, bacterial,
and thermal irritation,
- maintain periodontal health: good margins, contour, and non-irritating
surface texture,
- prevent tooth fracture,
- maintain the position of prepared tooth and prevent extrusion of opposing
teeth,
- permit normal function of the masticatory system by restoring occlusion
- decrease sensitivity,
2. Mechanical
- function without fracture: resists functional loads and removal forces,
- easily reline after preparation modifications,
3. Esthetic
- proper anatomy and color
Anna Organ-Boshes, DDS
Provisional Restoration: material selection
Material requirements:
- convenient,
- biocompatible,
- dimensionally stable,
- easily contoured/polished,
- strength,
- appearance, patient acceptance,
- ease of adding or repairing,
- chemically compatible with luting agent.
Anna Organ-Boshes, DDS
Provisional Restoration: material selection
1. Acrylic resins
- Polymethyl methacrylate: Jet (Lang), Alike (G-C),
- Polyethyl methylacrylate: Snap (Parkell),
2. Bis-acryl resins
- autocure systems: Protemp II (ESPE), Luxatemp (Zenith/DMG),
Integrity (Caulk), Protemp Garant (ESPE);
- dual cure systems: Provipont DC (Vivadent) and Iso-Temp (3M),
Anna Organ-Boshes, DDS
Provisional Restoration: Fabrication techniques
Direct Technique
- Impression of diagnostic wax-up,
- Matrix fabrication with vacuuform or elastomeric impression materials,
- Shade selection,
- Lubricate prepared teeth,
- Place mixed provisional material in matrix,
- Remove and replace several times to offset shrinkage during polymerization,
- Trim after final polymerization,
- Polish with polishing points or pumice.
Indirect Technique
- Does not subject the prepared teeth to direct exposure to monomer,
- Involves impression of prepared teeth,
- Provisional restoration is fabricated using vacuum form matrix
and provisional material on lubricated cast of prepared teeth,
- Restoration is polished and cemented.
Anna Organ-Boshes, DDS
Provisional Restoration: Necessary Materials
- Silicone impression material
- Jet acrylic
- cement spatula
- dappen dishes
- Benda brushes
- Vaseline
- scissors
- articulating paper
- Acrylic burs - provisional kit
- pumice
- rag wheel
- Robinson wheel,
- acrylic polishing agents
Anna Organ-Boshes, DDS
Fabrication of Provisional – direct technique
Handling of Acrylic
- fill a dappen dish ¾ full of acrylic powder,
- using a eye dropper, add monomer liquid to the powder
and mix the acrylic with a spatula
Anna Organ-Boshes, DDS
Fabrication of Provisional – direct technique
Handling of Acrylic
- at the soupy stage, you can lift the spatula from the mix and form a “string” of acrylic about
half of an inch long before it brakes,
- pour the soupy acrylic into the mold,
- use the cement spatula to remove the acrylic from the mold areas of the unprepared teeth,
Anna Organ-Boshes, DDS
Fabrication of Provisional – direct technique
Insertion of Mold Filled with Acrylic onto the Prepared Tooth
- when the sheen of the soupy acrylic disappears, the acrylic in the mold has reached
the doughy stage,
- invert the mold over the teeth,
- the mold should be seated and held with light pressure only by areas
that have unprepared teeth underneath them,
- after the mold has been completely seated, remove the excess acrylic
from around the periphery of the mold,
Anna Organ-Boshes, DDS
Fabrication of Provisional – direct technique
Removal of the Mold from the Prepared Tooth and Handling of
the Acrylic Provisional
- remove any remaining acrylic from the dappen dish, knead it with your fingers and pull it
apart every few seconds,
- when it can be pulled apart with a clean “snap”, the acrylic has reached its rubbery stage,
- after the acrylic has reached a rubbery stage, the mold should be removed from teeth
Anna Organ-Boshes, DDS
Fabrication of Provisional – direct technique
Removal of the Mold from the Prepared Tooth and Handling of
the Acrylic Provisional
- when removing the provisional from teeth, gently tease the provisional off of the teeth with
an explorer,
- the excess acrylic which lodged into the undercuts areas adjacent to the unprepared teeth
must be trimmed off,
- as quickly as possible, reinsert the provisional back and close the dentech into occlusion,
- if the provisional was successfully placed back while the acrylic was still in the rubbery
stage, very little occlusal adjustment will be needed on the set acrylic
Anna Organ-Boshes, DDS
Fabrication of Provisional – direct technique
Removal of the Mold from the Prepared Tooth and Handling
of the Acrylic Provisional
- when the acrylic reaches its initial set ( beginning to feel the heat from the polymerization
reaction), it should be removed from preparation, rinsed off in cold water and reinserted
for final set,
Anna Organ-Boshes, DDS
Fabrication of Provisional – direct technique
Finishing of the Acrylic Provisional
- excessive acrylic located at the margins
and axial contours should be trimmed off
with diamond disk,
- check proximal contacts and occlusion,
Anna Organ-Boshes, DDS
Fabrication of Provisional – direct technique
Finishing of the Acrylic Provisional – occlusal adjustment
Anna Organ-Boshes, DDS
Fabrication of Provisional – direct technique
Polishing of the Acrylic Provisional
- provisional can be polished with the acrylic polishing points
and wheels at slow speed,
- provisional can also be polished with wet pumice and a soft wheel at slow speed
on a lathe with moderate pressure,
- final high polish can be achieved by using wet fine pumice or whiting bar
with a soft rag wheel on a lathe with gentle light pressure,
Anna Organ-Boshes, DDS
Fabrication of Provisional Crown – direct shell technique
Clear vacuum form is made on the diagnostic cast.
Clear form or silicone mold is used to fabricate the shell
Anna Organ-Boshes, DDS
Fabrication of Provisional Crown – direct shell technique
Transparent form may be used
to evaluate the preparation.
Anna Organ-Boshes, DDS
Fabrication of Provisional Crown – direct shell technique
Anna Organ-Boshes, DDS
Fabrication of Provisional Crown – direct shell technique
Anna Organ-Boshes, DDS
Fabrication of Provisional Crown – direct shell technique
Anna Organ-Boshes, DDS
Fabrication of Provisional Crown – direct shell technique
Anna Organ-Boshes, DDS
# 18 Full Metal Crown - Completed Provisional Restoration
Anna Organ-Boshes, DDS
# 18 Full Metal Crown - Completed Provisional Restoration
Anna Organ-Boshes, DDS

Full gold crown preparation

  • 1.
    # 18 FGCPreparation and Provisional Crown Anna Organ-Boshes, DDS
  • 2.
    Reading Assignment: Contemporary FixedProsthodontics by Rosenstiel; Fourth Edition - Chapter #8, pg 258-271 Anna Organ-Boshes, DDS
  • 3.
    Treatment options fortooth # 18 Anna Organ-Boshes, DDS
  • 4.
    Full Metal Crown Indications: -extensive coronal tooth destruction by caries or trauma, - replacement of large defective restorations, - teeth when maximum retention and resistance are required, - abutment for FPD, RPD, - correction of occlusion, axial contour of posterior teeth, - teeth with RCT, Anna Organ-Boshes, DDS
  • 5.
    Full Metal CrownPreparation 0.5 mm chamfer 1.0 – 1.25 mm axial reduction 2 - 5 º axial wall convergence 1.25 – 1.5 mm occlusal reduction functional cusp bevel Anna Organ-Boshes, DDS
  • 6.
    Gingival finish line– CHAMFER CHAMFER MODIFIED CHAMFER #6856 #856 #6856 SS #6878 #878 Anna Organ-Boshes, DDS
  • 7.
    # 18 FullMetal Crown Preparation Preparation Sequence: - Initial interproximal reduction - Axial reduction - Functional cusp bevel - Occlusal reduction - Final axial and occlusal modifications Anna Organ-Boshes, DDS
  • 8.
    # 18 FullMetal Crown Preparation Anna Organ-Boshes, DDS
  • 9.
    # 18 FullMetal Crown Preparation Completed preparation Anna Organ-Boshes, DDS
  • 10.
    # 18 FullMetal Crown Preparation Completed preparation Anna Organ-Boshes, DDS
  • 11.
    # 18 FullMetal Crown Preparation Completed preparation 2 - 5 degree taper of buccal and lingual walls is recommended for the cast restorations. View the preparation with one eye open from a distance of 12 inches. Anna Organ-Boshes, DDS
  • 12.
    # 18 FullMetal Crown Preparation Completed preparation Anna Organ-Boshes, DDS
  • 13.
    Provisional Restoration Following toothpreparation, provisional restoration must be provided for the tooth while the permanent restoration is being made in the laboratory. An optimum provisional restoration must satisfy the three fundamental requirements: BIOLOGIC MECHANICAL ESTHETIC Anna Organ-Boshes, DDS
  • 14.
    Provisional Restoration 1. Biologic -cover exposed dentin in order to protect the pulp from chemical, bacterial, and thermal irritation, - maintain periodontal health: good margins, contour, and non-irritating surface texture, - prevent tooth fracture, - maintain the position of prepared tooth and prevent extrusion of opposing teeth, - permit normal function of the masticatory system by restoring occlusion - decrease sensitivity, 2. Mechanical - function without fracture: resists functional loads and removal forces, - easily reline after preparation modifications, 3. Esthetic - proper anatomy and color Anna Organ-Boshes, DDS
  • 15.
    Provisional Restoration: materialselection Material requirements: - convenient, - biocompatible, - dimensionally stable, - easily contoured/polished, - strength, - appearance, patient acceptance, - ease of adding or repairing, - chemically compatible with luting agent. Anna Organ-Boshes, DDS
  • 16.
    Provisional Restoration: materialselection 1. Acrylic resins - Polymethyl methacrylate: Jet (Lang), Alike (G-C), - Polyethyl methylacrylate: Snap (Parkell), 2. Bis-acryl resins - autocure systems: Protemp II (ESPE), Luxatemp (Zenith/DMG), Integrity (Caulk), Protemp Garant (ESPE); - dual cure systems: Provipont DC (Vivadent) and Iso-Temp (3M), Anna Organ-Boshes, DDS
  • 17.
    Provisional Restoration: Fabricationtechniques Direct Technique - Impression of diagnostic wax-up, - Matrix fabrication with vacuuform or elastomeric impression materials, - Shade selection, - Lubricate prepared teeth, - Place mixed provisional material in matrix, - Remove and replace several times to offset shrinkage during polymerization, - Trim after final polymerization, - Polish with polishing points or pumice. Indirect Technique - Does not subject the prepared teeth to direct exposure to monomer, - Involves impression of prepared teeth, - Provisional restoration is fabricated using vacuum form matrix and provisional material on lubricated cast of prepared teeth, - Restoration is polished and cemented. Anna Organ-Boshes, DDS
  • 18.
    Provisional Restoration: NecessaryMaterials - Silicone impression material - Jet acrylic - cement spatula - dappen dishes - Benda brushes - Vaseline - scissors - articulating paper - Acrylic burs - provisional kit - pumice - rag wheel - Robinson wheel, - acrylic polishing agents Anna Organ-Boshes, DDS
  • 19.
    Fabrication of Provisional– direct technique Handling of Acrylic - fill a dappen dish ¾ full of acrylic powder, - using a eye dropper, add monomer liquid to the powder and mix the acrylic with a spatula Anna Organ-Boshes, DDS
  • 20.
    Fabrication of Provisional– direct technique Handling of Acrylic - at the soupy stage, you can lift the spatula from the mix and form a “string” of acrylic about half of an inch long before it brakes, - pour the soupy acrylic into the mold, - use the cement spatula to remove the acrylic from the mold areas of the unprepared teeth, Anna Organ-Boshes, DDS
  • 21.
    Fabrication of Provisional– direct technique Insertion of Mold Filled with Acrylic onto the Prepared Tooth - when the sheen of the soupy acrylic disappears, the acrylic in the mold has reached the doughy stage, - invert the mold over the teeth, - the mold should be seated and held with light pressure only by areas that have unprepared teeth underneath them, - after the mold has been completely seated, remove the excess acrylic from around the periphery of the mold, Anna Organ-Boshes, DDS
  • 22.
    Fabrication of Provisional– direct technique Removal of the Mold from the Prepared Tooth and Handling of the Acrylic Provisional - remove any remaining acrylic from the dappen dish, knead it with your fingers and pull it apart every few seconds, - when it can be pulled apart with a clean “snap”, the acrylic has reached its rubbery stage, - after the acrylic has reached a rubbery stage, the mold should be removed from teeth Anna Organ-Boshes, DDS
  • 23.
    Fabrication of Provisional– direct technique Removal of the Mold from the Prepared Tooth and Handling of the Acrylic Provisional - when removing the provisional from teeth, gently tease the provisional off of the teeth with an explorer, - the excess acrylic which lodged into the undercuts areas adjacent to the unprepared teeth must be trimmed off, - as quickly as possible, reinsert the provisional back and close the dentech into occlusion, - if the provisional was successfully placed back while the acrylic was still in the rubbery stage, very little occlusal adjustment will be needed on the set acrylic Anna Organ-Boshes, DDS
  • 24.
    Fabrication of Provisional– direct technique Removal of the Mold from the Prepared Tooth and Handling of the Acrylic Provisional - when the acrylic reaches its initial set ( beginning to feel the heat from the polymerization reaction), it should be removed from preparation, rinsed off in cold water and reinserted for final set, Anna Organ-Boshes, DDS
  • 25.
    Fabrication of Provisional– direct technique Finishing of the Acrylic Provisional - excessive acrylic located at the margins and axial contours should be trimmed off with diamond disk, - check proximal contacts and occlusion, Anna Organ-Boshes, DDS
  • 26.
    Fabrication of Provisional– direct technique Finishing of the Acrylic Provisional – occlusal adjustment Anna Organ-Boshes, DDS
  • 27.
    Fabrication of Provisional– direct technique Polishing of the Acrylic Provisional - provisional can be polished with the acrylic polishing points and wheels at slow speed, - provisional can also be polished with wet pumice and a soft wheel at slow speed on a lathe with moderate pressure, - final high polish can be achieved by using wet fine pumice or whiting bar with a soft rag wheel on a lathe with gentle light pressure, Anna Organ-Boshes, DDS
  • 28.
    Fabrication of ProvisionalCrown – direct shell technique Clear vacuum form is made on the diagnostic cast. Clear form or silicone mold is used to fabricate the shell Anna Organ-Boshes, DDS
  • 29.
    Fabrication of ProvisionalCrown – direct shell technique Transparent form may be used to evaluate the preparation. Anna Organ-Boshes, DDS
  • 30.
    Fabrication of ProvisionalCrown – direct shell technique Anna Organ-Boshes, DDS
  • 31.
    Fabrication of ProvisionalCrown – direct shell technique Anna Organ-Boshes, DDS
  • 32.
    Fabrication of ProvisionalCrown – direct shell technique Anna Organ-Boshes, DDS
  • 33.
    Fabrication of ProvisionalCrown – direct shell technique Anna Organ-Boshes, DDS
  • 34.
    # 18 FullMetal Crown - Completed Provisional Restoration Anna Organ-Boshes, DDS
  • 35.
    # 18 FullMetal Crown - Completed Provisional Restoration Anna Organ-Boshes, DDS