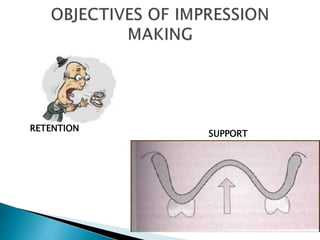
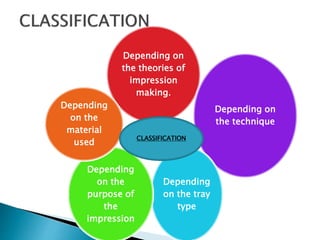
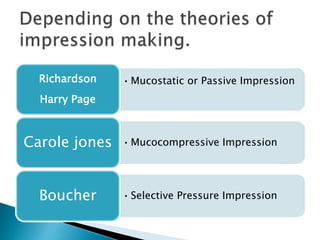
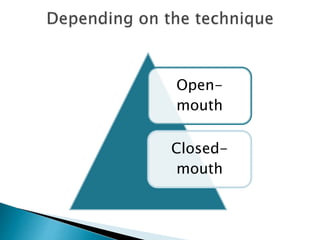
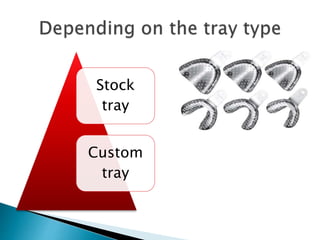
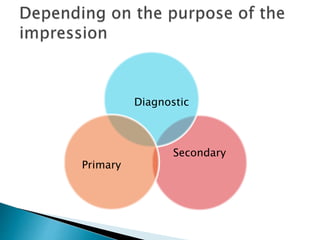
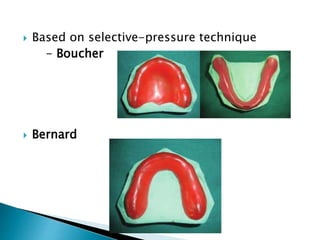
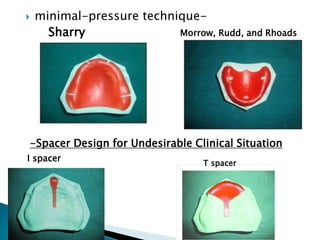
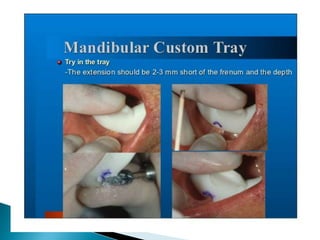
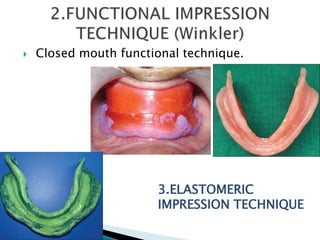
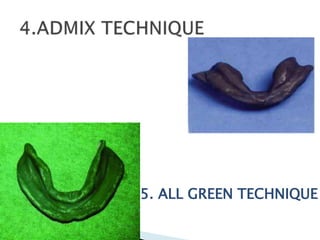
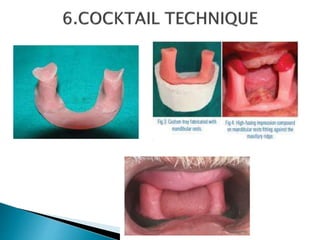
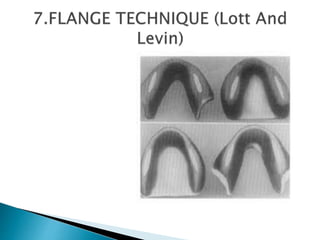
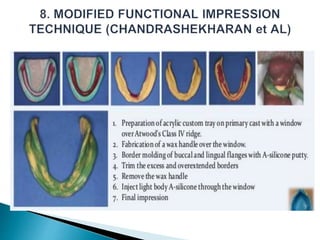
 INTRODUCTION
 DEFINITIONS
 BASIC REQUIREMENTS FOR IMPRESSION
MAKING
 OBJECTIVES OF IMPRESSION MAKING
 CLASSIFICATION OF IMPRESSIONS
 IMPRESSION MATERIALS
 IMPRESSION TECHNIQUES IN COMPROMISED
SITUATIONS
 IMPRESSION-
A negative replica or
copy in reverse of the surface of
an object . – gpt 9
 COMPLETE DENTURE
IMPRESSION-
A complete denture
impression is a negative
registration of the entire denture
bearing, stabilizing and border
seal areas present in the
edentulous mouth.
PRELIMINARY IMPRESSION –
A preliminary impression is an
impression made for the purpose of
diagnosis or for the construction of a tray
FINAL IMPRESSION: A final
impression is an impression
for making the master cast .
 Knowledge of Basic anatomy
 Knowledge of basic reliable technique
 Knowledge and understanding of impression
materials
 Skill
 Patient management
RETENTION
SUPPORT
ALVEOLAR RIDGE
buccal shelf area
Posterior ridge
anterior ridge
 STABILITY
 ESTHETICS
 PRESERVATION OF REMAINING STRUCTURES
Depending on
the theories of
impression
making.
Depending on
the technique
Depending
on the tray
type
Depending
on the
purpose of
the
impression
Depending
on the
material
used
CLASSIFICATION
•Mucostatic or Passive ImpressionRichardson
Harry Page
•Mucocompressive ImpressionCarole jones
•Selective Pressure ImpressionBoucher
Open-
mouth
Closed-
mouth
Stock
tray
Custom
tray
Secondary
Diagnostic
Primary
 Reversible hydrocolloid impression.
 Irreversible hydrocolloid impression.
 Modeling plastic impression.
 Plaster impression.
 Wax impression.
 Silicone impression.
 Thiokol rubber impression.
(Polysulphide)
1. BEFORE MAKING THE IMPRESSION
2. SELECTION OF IMPRESSION TECHNIQUE
3. SELECTION OF IMPRESSION MATERIAL
4. TRAY SELECTION
 Preliminary impression materials-
– impression compound
– alginate
 Final impression materials:-
– alginate
– silicon based elastomers
– zinc-oxide eugenol impression paste
– impression plaster
– tissue conditioners
– waxes
– impression compound
– alginate
 Boucher
 Bernard
 Sharry
 Morrow, Rudd, and Rhoads
 Spacer Design for Undesirable Clinical
Situation
 Based on selective-pressure technique
- Boucher
 Bernard
 minimal-pressure technique-
Sharry Morrow, Rudd, and Rhoads
-Spacer Design for Undesirable Clinical Situation
I spacer
T spacer
BOURDER MOULDING
FINAL IMPRESSION
 1. Conventional technique
 2. Functional impression technique
 3. Elastomeric technique
 4. Admix technique
 5. Cocktail technique
 6. All green technique
 7. Flange technique
 8. Modified Functional Impression
Technique
 1.CONVENTIONAL TECHNIQUE (Boucher)
 Closed mouth functional technique.
3.ELASTOMERIC
IMPRESSION TECHNIQUE
5. ALL GREEN TECHNIQUE
Surgical removal of fibrous tissue
prior to conventional prosthodontics
Conventional prosthodontics without
surgical intervention
Implant retained prosthesis
APPROACHES TO MANAGEMENT OF
FLABBY TISSUE
Mucodisplacive
impression
technique
Mucostatic
impression
technique
Light body silicon material
Low viscocity impression
By performing the impression in this way, the original relatively
undistorted shape of the fibrous tissues is retained while the tissues
more capable of functional denture support are recorded in a
displaced state.
Close fitting cold-cured or light
cured acrylic base
applying or syringing a thin mix of
impression plaster or lightbodied
silicone
zinc oxide eugenol or medium-bodied
silicone
 Window Technique:
– An alternative, described by
Hobkirk, McCord and Grant, involves removal
of acrylic from a complete special tray
creating a window over the displaceable area.
 Used for multiple dispersed areas of fibrous
tissue where multiple small windows are
made
Low viscocity vinyl polysiloxane impression material
 Curaet al J Prosthet Dent
 Baker et al
 Colvenkar S
 Moghadam BK
 Hegde C. et al
 Flexible impression trays-
 Putty-type impression material
silicone tray
 Once the impression putty is placed onto the
denture bearing areas, the impression
material was border moulded to the
appropriate contour
 material polymerized
(REMOVE)
 Hydrocolloid primary impression using
sectional plastic stock tray.
 Fabrication of sectional light cure
custom tray.
connected by horizontal hinge.
 Elastomeric impression is made with
first half of the tray followed by
the second part.
 Approximate both the sections while
making the second sectional
impression and close the horizontal hinge.
 Allow the impression to set. • Remove
the impression in sections. • Evaluate-
reassemble- pour
Press button
Make an impression of the left side of the mouth
with irreversible hydrocolloid by using tray No. 1
Pour this impression with dental stone as soon as
possible (SEPARATE IMPRESSION)
Make an impression of the right side of the arch
with irreversible hydrocolloid by using tray No. 2.
 Position the cast made from the first impression in
this impression and stabilize the cast in the
impression.
 Pour the impression containing the cast in dental
stone.
Maxillary sectional tray locked at the
handle region with steel pins into
tubings and acrylic hook into bent
handles
Mandibular sectional stock tray to be
joined with acrylic hook and steel bur
at the handle region.
 Also called “marble technique” •
Involves 7 visits
 1st visit: 5 marbles placed in mouth, patient
instructed to keep them for 1 week
 2nd visit: ability to tolerate marbles evaluated
 3rd visit: before making impressions, topical
anaestheticapplied , primary impression
made, base plates made with a rough finish
 4th visit: lower base plate inserted , 3
marbles placed and a “training bead”
 5th visit: upper base plate inserted , asked to
discontinue marbles
 6th visit: patient able to endure the presence
of both base plates , occlusal rims
constructed Jaw relation taken , try in
completed.
 7th visit: completed lower denture inserted
first + upper base plate + a training bead.
Next upper denture inserted
 If stock trays are used, a posterior dam can
be constructed in the tray using wax or
silicone putty
 history of gagging, consider using a less
fluid impression material with faster setting
characteristics.
 Avoid overloading trays and initially seat the
tray posteriorly.
 Use of sectional impression trays
Impression techniques in complete denture

Impression techniques in complete denture

  • 2.
     INTRODUCTION  DEFINITIONS BASIC REQUIREMENTS FOR IMPRESSION MAKING  OBJECTIVES OF IMPRESSION MAKING  CLASSIFICATION OF IMPRESSIONS  IMPRESSION MATERIALS  IMPRESSION TECHNIQUES IN COMPROMISED SITUATIONS
  • 3.
     IMPRESSION- A negativereplica or copy in reverse of the surface of an object . – gpt 9  COMPLETE DENTURE IMPRESSION- A complete denture impression is a negative registration of the entire denture bearing, stabilizing and border seal areas present in the edentulous mouth.
  • 4.
    PRELIMINARY IMPRESSION – Apreliminary impression is an impression made for the purpose of diagnosis or for the construction of a tray FINAL IMPRESSION: A final impression is an impression for making the master cast .
  • 5.
     Knowledge ofBasic anatomy  Knowledge of basic reliable technique  Knowledge and understanding of impression materials  Skill  Patient management
  • 6.
  • 7.
    ALVEOLAR RIDGE buccal shelfarea Posterior ridge anterior ridge
  • 8.
     STABILITY  ESTHETICS PRESERVATION OF REMAINING STRUCTURES
  • 9.
    Depending on the theoriesof impression making. Depending on the technique Depending on the tray type Depending on the purpose of the impression Depending on the material used CLASSIFICATION
  • 10.
    •Mucostatic or PassiveImpressionRichardson Harry Page •Mucocompressive ImpressionCarole jones •Selective Pressure ImpressionBoucher
  • 11.
  • 12.
  • 13.
  • 14.
     Reversible hydrocolloidimpression.  Irreversible hydrocolloid impression.  Modeling plastic impression.  Plaster impression.  Wax impression.  Silicone impression.  Thiokol rubber impression. (Polysulphide)
  • 15.
    1. BEFORE MAKINGTHE IMPRESSION 2. SELECTION OF IMPRESSION TECHNIQUE 3. SELECTION OF IMPRESSION MATERIAL 4. TRAY SELECTION
  • 16.
     Preliminary impressionmaterials- – impression compound – alginate  Final impression materials:- – alginate – silicon based elastomers – zinc-oxide eugenol impression paste – impression plaster – tissue conditioners – waxes
  • 17.
  • 18.
     Boucher  Bernard Sharry  Morrow, Rudd, and Rhoads  Spacer Design for Undesirable Clinical Situation
  • 19.
     Based onselective-pressure technique - Boucher  Bernard
  • 20.
     minimal-pressure technique- SharryMorrow, Rudd, and Rhoads -Spacer Design for Undesirable Clinical Situation I spacer T spacer
  • 23.
  • 25.
     1. Conventionaltechnique  2. Functional impression technique  3. Elastomeric technique  4. Admix technique  5. Cocktail technique  6. All green technique  7. Flange technique  8. Modified Functional Impression Technique
  • 26.
  • 27.
     Closed mouthfunctional technique. 3.ELASTOMERIC IMPRESSION TECHNIQUE
  • 28.
    5. ALL GREENTECHNIQUE
  • 33.
    Surgical removal offibrous tissue prior to conventional prosthodontics Conventional prosthodontics without surgical intervention Implant retained prosthesis APPROACHES TO MANAGEMENT OF FLABBY TISSUE
  • 34.
  • 35.
    Light body siliconmaterial Low viscocity impression
  • 37.
    By performing theimpression in this way, the original relatively undistorted shape of the fibrous tissues is retained while the tissues more capable of functional denture support are recorded in a displaced state.
  • 38.
    Close fitting cold-curedor light cured acrylic base applying or syringing a thin mix of impression plaster or lightbodied silicone zinc oxide eugenol or medium-bodied silicone
  • 39.
     Window Technique: –An alternative, described by Hobkirk, McCord and Grant, involves removal of acrylic from a complete special tray creating a window over the displaceable area.
  • 40.
     Used formultiple dispersed areas of fibrous tissue where multiple small windows are made
  • 41.
    Low viscocity vinylpolysiloxane impression material
  • 43.
     Curaet alJ Prosthet Dent  Baker et al  Colvenkar S  Moghadam BK  Hegde C. et al
  • 44.
     Flexible impressiontrays-  Putty-type impression material silicone tray  Once the impression putty is placed onto the denture bearing areas, the impression material was border moulded to the appropriate contour  material polymerized (REMOVE)
  • 45.
     Hydrocolloid primaryimpression using sectional plastic stock tray.  Fabrication of sectional light cure custom tray. connected by horizontal hinge.  Elastomeric impression is made with first half of the tray followed by the second part.  Approximate both the sections while making the second sectional impression and close the horizontal hinge.  Allow the impression to set. • Remove the impression in sections. • Evaluate- reassemble- pour
  • 46.
  • 47.
    Make an impressionof the left side of the mouth with irreversible hydrocolloid by using tray No. 1 Pour this impression with dental stone as soon as possible (SEPARATE IMPRESSION) Make an impression of the right side of the arch with irreversible hydrocolloid by using tray No. 2.  Position the cast made from the first impression in this impression and stabilize the cast in the impression.  Pour the impression containing the cast in dental stone.
  • 48.
    Maxillary sectional traylocked at the handle region with steel pins into tubings and acrylic hook into bent handles Mandibular sectional stock tray to be joined with acrylic hook and steel bur at the handle region.
  • 51.
     Also called“marble technique” • Involves 7 visits  1st visit: 5 marbles placed in mouth, patient instructed to keep them for 1 week  2nd visit: ability to tolerate marbles evaluated  3rd visit: before making impressions, topical anaestheticapplied , primary impression made, base plates made with a rough finish  4th visit: lower base plate inserted , 3 marbles placed and a “training bead”
  • 52.
     5th visit:upper base plate inserted , asked to discontinue marbles  6th visit: patient able to endure the presence of both base plates , occlusal rims constructed Jaw relation taken , try in completed.  7th visit: completed lower denture inserted first + upper base plate + a training bead. Next upper denture inserted
  • 53.
     If stocktrays are used, a posterior dam can be constructed in the tray using wax or silicone putty  history of gagging, consider using a less fluid impression material with faster setting characteristics.  Avoid overloading trays and initially seat the tray posteriorly.  Use of sectional impression trays