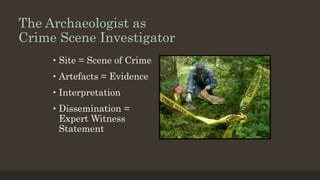
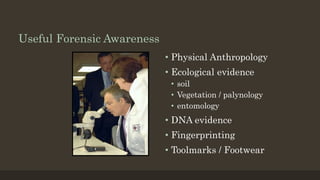
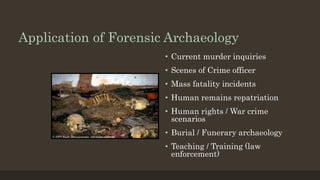
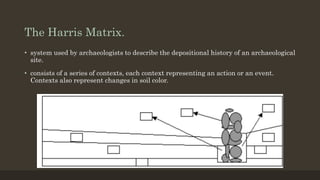
Forensic Archaeology
Defining Forensic Archaeology
The application of archaeological techniques (i.e. the excavation, recovery,
documentation, & interpretation of human activity) to criminal activity and
medicolegal issues.
The Archaeologist as
Crime Scene Investigator
• Site = Scene of Crime
• Artefacts = Evidence
• Interpretation
• Dissemination =
Expert Witness
Statement
Forensic Archaeology Skill Set
• Excavation Skills specific to human remains
• Sampling
• Police protocols, packaging & paperwork procedures
• Expert Witness Statement writing
• Expert Testimony
• Exposure to partially decomposed human remains
• Human Rights issues
• General forensic awareness
Useful Forensic Awareness
• Physical Anthropology
• Ecological evidence
• soil
• Vegetation / palynology
• entomology
• DNA evidence
• Fingerprinting
• Toolmarks / Footwear
Application of Forensic Archaeology
• Current murder inquiries
• Scenes of Crime officer
• Mass fatality incidents
• Human remains repatriation
• Human rights / War crime
scenarios
• Burial / Funerary archaeology
• Teaching / Training (law
enforcement)
Searching the site
• Locating a shallow grave
• First, look for obvious signs such as disturbed earth or dying/disturbed vegetation. Of course,
how long the grave has been around will make a difference. Sometimes, rather than dead
vegetation, there will be an area of particularly lush growth as the decomposing body acts as
a fertilizer.
• Look for any indentations in the ground. As the body decomposes, it will cause the soil to
slump further in the grave.
• Look for straight lines, i.e. the grave cut. There are no straight lines in nature; anything
straight will be man-made.
• Look around the periphery. Graves are often dug along fences, walls, and field edges.
• Look for points of reference. The suspect will return to the scene of crime and therefore,
burials tend to have something nearby to act as a marker.
• Look for easy burials. Compost heaps, tree falls, dumpsters, these all make the disposal of a
body much easier.
The Harris Matrix.
• system used by archaeologists to describe the depositional history of an archaeological
site.
• consists of a series of contexts, each context representing an action or an event.
Contexts also represent changes in soil color.
The Harris Matrix.
• When excavating a grave, be on the lookout for changes in soil color, consistency,
other cuts, anything that might signify a new context.
• Every new context must be documented stating its depth, color and texture.
• Even a piece of evidence is a context as it has been deposited.
• Take a sample of each context, but make sure you know exactly from where the
sample originated.
• Treat it like a piece of evidence as it might end up being so.
Videos
• https://www.youtube.com/watch?v=eGngPn2KoPo
• https://www.youtube.com/watch?v=k7POWHFzY_w
Excavating a shallow grave
• same way as one would excavate an archaeological feature
• the stakes are higher
• work within the framework of police procedures
• me constraints
Excavating a shallow grave - Procedure
• Identify the grave cut/area
• how large of an area is to be excavated
• disturbed vegetation will be visible and often the grave cut is also clear
• when the area is more vague - better to excavate a larger area
• Set up the excavation unit
• use four 5” nails to demarcate the area
• make sure the area forms a regular square or rectangle shape
• use some nylon cord to string around the nails
• EU – excavation Unit
• Use a compass to ascertain your north, south, east, and west sides or corners
• Taking depths
• drive a wooden stake into the ground from which you will take depths
• The stake is now called a datum
• take depth measurements
• If any point you find evidence, a change in soil, or anything of importance, you can take its
depth
• Photography and Plan drawing
• Take photographs at every stage and keep a log
• in situ before removing
• a plan drawing will have to be produced
• include what is around the EU as well as the EU itself
• Bisecting the feature and removing the soil
• only half of the grave at a time
• runs parallel along the length of the grave
• adding two additional nails and running a string between them to act as a guide
• Soil is removed evenly
• Loose soil is collected in a dustpan and dumped into a sieve for screening
• Screening the soil
• screened through a ¼” mesh screen.
• Evidence recovery
• all evidence should be recovered during excavation
• When evidence is located, first, gently brush the soil away from the object to expose it.
• Take a photograph of the object in situ
• take measurements of its location both horizontally and vertically so that it may be plotted
• evidence log should be kept to record all information
• object should then be removed and packed
• Profile drawing
• a drawing representing a profile view must be completed
• plot any change in context and the location of any evidence
• Recovery of human remains
• the other half of the grave is removed
• remove as much soil as possible around the body
• the body is photographed
• continue excavation of the grave until all the loose soil has been screened and only the grave
cut remains
• Back filling
• the grave can be back-filled
• get permission from the crime scene officer
Important types of evidence often found
• Large evidence
• human remains
• potential murder weapons
• Newspaper
• Clothing
• bank notes, etc.
• Tiny evidence – often it’s the tiny bits of evidence that end up being the most
important.
• cigarette butts, coins, scraps of paper, teeth, rings, bits of vegetation, charred remains, fibers,
bullet/blade fragments, glass, etc.
• can be hard to find but contain a wealth of information.
Interpretation of a forensic excavation
• Once the excavation is completed
• compile all the notes and drawings from the site into an expert witness statement
• provide an account of how and when objects were deposited

Forensic archaeology

  • 2.
  • 3.
    Defining Forensic Archaeology Theapplication of archaeological techniques (i.e. the excavation, recovery, documentation, & interpretation of human activity) to criminal activity and medicolegal issues.
  • 4.
    The Archaeologist as CrimeScene Investigator • Site = Scene of Crime • Artefacts = Evidence • Interpretation • Dissemination = Expert Witness Statement
  • 5.
    Forensic Archaeology SkillSet • Excavation Skills specific to human remains • Sampling • Police protocols, packaging & paperwork procedures • Expert Witness Statement writing • Expert Testimony • Exposure to partially decomposed human remains • Human Rights issues • General forensic awareness
  • 6.
    Useful Forensic Awareness •Physical Anthropology • Ecological evidence • soil • Vegetation / palynology • entomology • DNA evidence • Fingerprinting • Toolmarks / Footwear
  • 7.
    Application of ForensicArchaeology • Current murder inquiries • Scenes of Crime officer • Mass fatality incidents • Human remains repatriation • Human rights / War crime scenarios • Burial / Funerary archaeology • Teaching / Training (law enforcement)
  • 8.
    Searching the site •Locating a shallow grave • First, look for obvious signs such as disturbed earth or dying/disturbed vegetation. Of course, how long the grave has been around will make a difference. Sometimes, rather than dead vegetation, there will be an area of particularly lush growth as the decomposing body acts as a fertilizer. • Look for any indentations in the ground. As the body decomposes, it will cause the soil to slump further in the grave. • Look for straight lines, i.e. the grave cut. There are no straight lines in nature; anything straight will be man-made. • Look around the periphery. Graves are often dug along fences, walls, and field edges. • Look for points of reference. The suspect will return to the scene of crime and therefore, burials tend to have something nearby to act as a marker. • Look for easy burials. Compost heaps, tree falls, dumpsters, these all make the disposal of a body much easier.
  • 9.
    The Harris Matrix. •system used by archaeologists to describe the depositional history of an archaeological site. • consists of a series of contexts, each context representing an action or an event. Contexts also represent changes in soil color.
  • 10.
    The Harris Matrix. •When excavating a grave, be on the lookout for changes in soil color, consistency, other cuts, anything that might signify a new context. • Every new context must be documented stating its depth, color and texture. • Even a piece of evidence is a context as it has been deposited. • Take a sample of each context, but make sure you know exactly from where the sample originated. • Treat it like a piece of evidence as it might end up being so.
  • 11.
  • 12.
    Excavating a shallowgrave • same way as one would excavate an archaeological feature • the stakes are higher • work within the framework of police procedures • me constraints
  • 13.
    Excavating a shallowgrave - Procedure • Identify the grave cut/area • how large of an area is to be excavated • disturbed vegetation will be visible and often the grave cut is also clear • when the area is more vague - better to excavate a larger area • Set up the excavation unit • use four 5” nails to demarcate the area • make sure the area forms a regular square or rectangle shape • use some nylon cord to string around the nails • EU – excavation Unit • Use a compass to ascertain your north, south, east, and west sides or corners
  • 14.
    • Taking depths •drive a wooden stake into the ground from which you will take depths • The stake is now called a datum • take depth measurements • If any point you find evidence, a change in soil, or anything of importance, you can take its depth • Photography and Plan drawing • Take photographs at every stage and keep a log • in situ before removing • a plan drawing will have to be produced • include what is around the EU as well as the EU itself
  • 15.
    • Bisecting thefeature and removing the soil • only half of the grave at a time • runs parallel along the length of the grave • adding two additional nails and running a string between them to act as a guide • Soil is removed evenly • Loose soil is collected in a dustpan and dumped into a sieve for screening • Screening the soil • screened through a ¼” mesh screen.
  • 16.
    • Evidence recovery •all evidence should be recovered during excavation • When evidence is located, first, gently brush the soil away from the object to expose it. • Take a photograph of the object in situ • take measurements of its location both horizontally and vertically so that it may be plotted • evidence log should be kept to record all information • object should then be removed and packed • Profile drawing • a drawing representing a profile view must be completed • plot any change in context and the location of any evidence
  • 17.
    • Recovery ofhuman remains • the other half of the grave is removed • remove as much soil as possible around the body • the body is photographed • continue excavation of the grave until all the loose soil has been screened and only the grave cut remains • Back filling • the grave can be back-filled • get permission from the crime scene officer
  • 18.
    Important types ofevidence often found • Large evidence • human remains • potential murder weapons • Newspaper • Clothing • bank notes, etc. • Tiny evidence – often it’s the tiny bits of evidence that end up being the most important. • cigarette butts, coins, scraps of paper, teeth, rings, bits of vegetation, charred remains, fibers, bullet/blade fragments, glass, etc. • can be hard to find but contain a wealth of information.
  • 19.
    Interpretation of aforensic excavation • Once the excavation is completed • compile all the notes and drawings from the site into an expert witness statement • provide an account of how and when objects were deposited