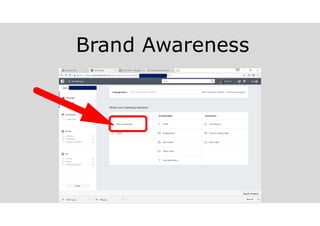
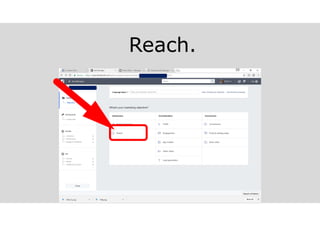
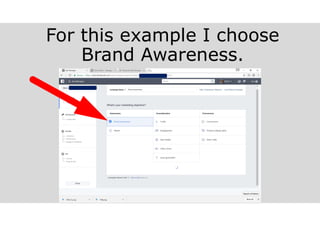
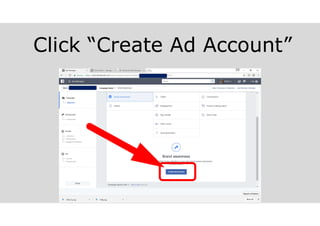
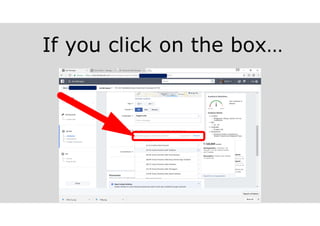
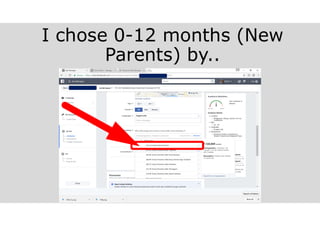
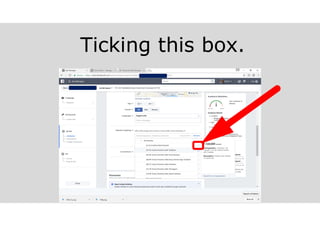
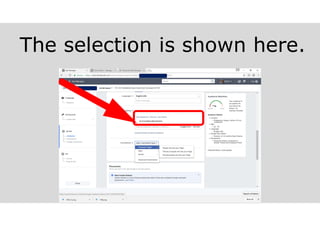
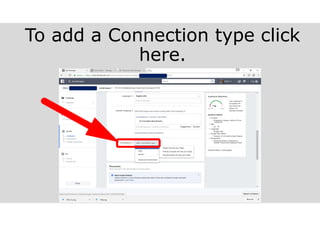
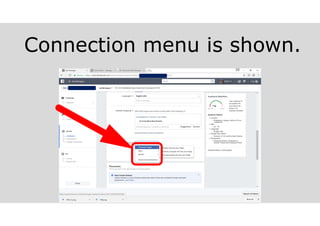
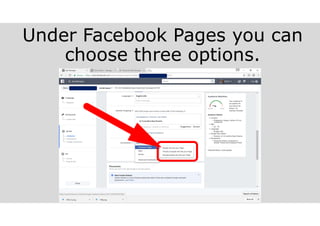
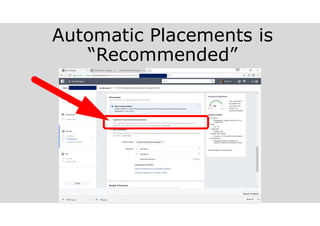
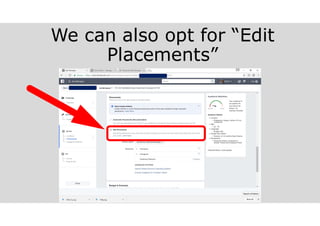
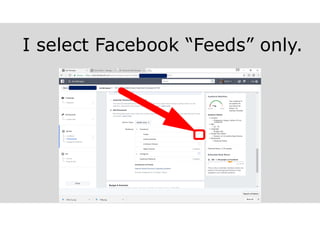
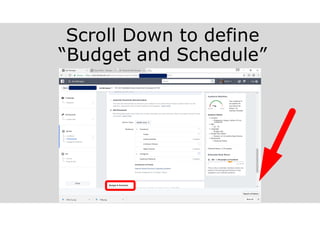
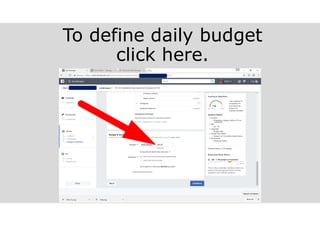
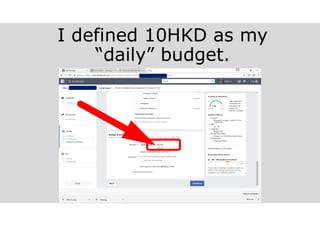
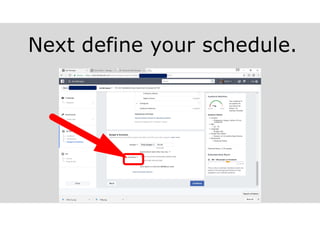
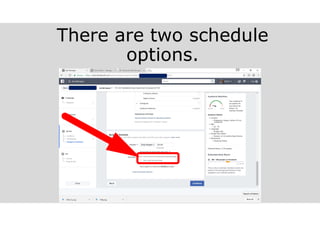
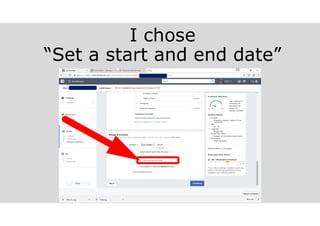
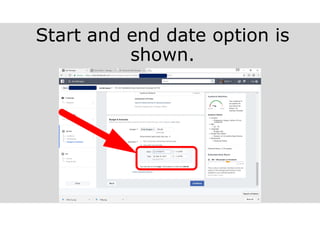
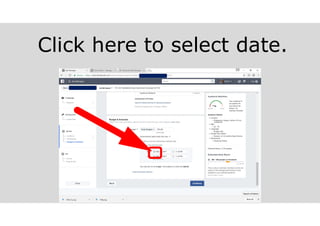
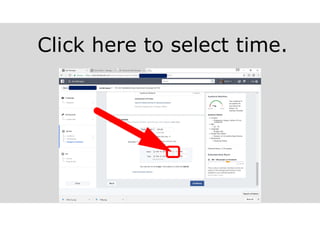
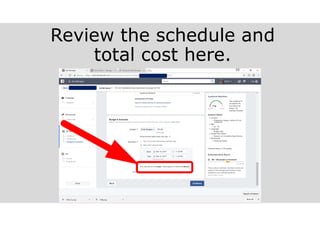
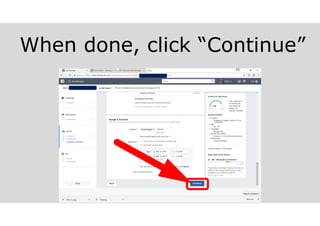
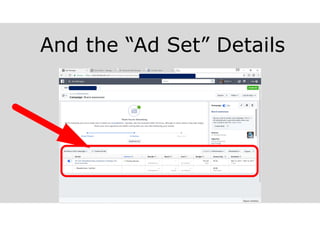
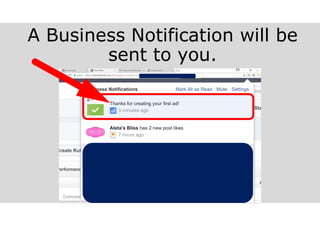
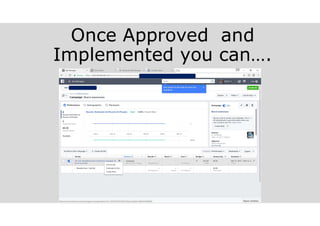
Image from : http://vinaora.com
There are 1 Billion users in
Facebook and counting!
With almost every
member sharing what
they want and care about.
This is why Facebook ads
is a dream come true for
Online Marketers and
Start-Up Businesses.
Let us START by
Logging-in to a sample
Facebook Account.
This is a sample Facebook
account
To go to FB Ads Manager..
Click Here “ ”.
Drop down menu is shown.
Click “Create Ads”.
This page is shown.
Facebook is preparing the Ad
account.
Once done this page is shown.
This is the Ads Manager Page.
On the left side

Is the step by step process of
creating an FB ad.
First step is to define an
Objective.
There are 10 types of
Objectives

An Ad campaign needs a
“clear objective”. Before
starting your Ad Campaign
please define what you
want to accomplish.
Brand Awareness
Brand awareness is used
to tell people the value of
your product or service.
Reach.
Reach is used to advertise
to people near your place
of business.
Traffic
Traffic is used to send
people to a destination on
or off Facebook.
Engagement
Engagement is used to get
more Page Likes, Event
Responses or Offer
Claims.
App Installs.
If you have an App, you
can use App Installs to get
customers install your
App.
Video Views
Video views is used to get
more people view your
video content.
Lead Generation
Lead Generation is used to
get more people
interested in your brand or
product to give you their
email address.
Conversions
Conversions is used to
drive people to visit your
website.
Product Catalog Sales
Product catalog sales is
used to directly show your
target audience your
product catalogue.
And Store Visits
Store visits are used to
get your customers
actually visit your physical
store.
For this example I choose
Brand Awareness.
Scroll Down
Click “Create Ad Account”
This Page is shown.
Select Account Country here.
Select Currency here.
Select Time Zone here.
Click “Continue”.
This page is shown.
This page is shown.
We are going to select our
Audience.
Skip Custom Audience
Custom Audience is used
if you already have a
contact list or mailing list
from your website.
Select “Locations”

By clicking here.
Location Menu is shown.
As an example select
“Everyone in this location”
Key In your location here.
Location will be shown here.
A 25 mile area is shown in the
map.
You can change the area by
clicking here.
I chose a 10 mile area.
You can change the “Age”
range here.
I chose 22–45 years old.
Scroll Down.
To select “Gender” click here.
To select “Language” click here.
We can narrow down our
audience by being specific
with age, gender and
language.
This saves you money and
focuses on your desired
audience.
Detailed Targeting further
narrows the reach.
If you click on the box

Further choices are presented.
I chose 0-12 months (New
Parents) by..
Ticking this box.
The selection is shown here.
To add a Connection type click
here.
Connection menu is shown.
Under Facebook Pages you can
choose three options.
I chose “Exclude people who
like your page”
Detailed targeting can
help you further trim
down your target
audience. Saving you
more money while testing
your ads.
Scroll Down
Here we can select Placements.
Automatic Placements is
“Recommended”
We can also opt for “Edit
Placements”
Depending on what type
of Ads you want to run, it
is better to make different
Ads for different
placements.
Remember:
FOCUS saves Money
Gets BETTER Results
Select “Device Types” here.
I chose “Mobile” only.
Select “Platforms” here.
Platform options are shown.
To Select or De-select click on
the boxes.
I select Facebook “Feeds” only.
Scroll Down to define
“Budget and Schedule”
To define daily budget
click here.
I defined 10HKD as my
“daily” budget.
Next define your schedule.
There are two schedule
options.
I chose
“Set a start and end date”
Start and end date option is
shown.
Click here to select date.
Click here to select time.
Review the schedule and
total cost here.
When done, click “Continue”
That completes our
“Ad Set”
Take NOTE:
We have narrowed down our
Facebook Audience from a
potential daily reach of
8,900-24,000
To
360-940
Now we will finally
create our “Ad”
Select the Ad format here.
Select the Facebook Page here.
Key-in your desired Text here.
Text is shown in the
Ad Preview.
Scroll Down
To “Select Image” click here.
This Screen is shown.
To select click the image.
And Click “Confirm”
The image is shown in the
Ad Preview.
You can adjust the image..
By Clicking on “Crop Image”.
This screen is shown.
Adjust image by dragging the
picture

Or changing the crop area.
And then Click “Done”
Create a “Headline” here.
Headline is shown in the
Ad Preview.
You can add further description
here.
As an example
“ Made Fresh in Silang”.
“ Made Fresh in Silang” is
shown in the Ad Preview.
And then add a “Destination
URL” here.
Scroll Down.
Your Facebook page URL is
suggested here.
You can Add a
“Call to Action”...
By clicking here.
I chose “Learn More”
“Learn More” button is shown
To “Review Order”,
Click here.
This Screen is shown

If the “caution” sign is shown.
Click Fix Errors
Your are shown the item that
needs to be fixed.
Copy the suggested URL.
And Paste it here.
Click “Place Order”
Review Ad details.
And then click “Place Order”
again.
Your Order is now being
processed

The Select Payment Method
Screen appears.
Select Payment Method.
Key-in your payment details.
And then click Log-in.
Your payment is processed

Click “Agree and Pay Now”
Final Payment processing

This page appears.
This page shows your
Campaign.
The Status of your Ad.
And the “Ad Set” Details
A Business Notification will be
sent to you.
Once Approved and
Implemented you can
.
Review the Performance of
your Ad.
Go Ahead and Try it.
This concludes our tutorial
on FACEBOOK ADS.
Thank you so much for your Time.
Melvin Receno

Facebook ads tutorial 2017 melvinreceno themagnificentpm