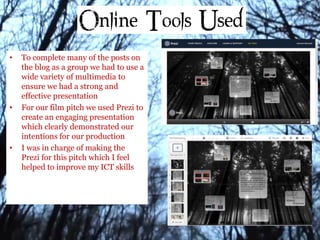
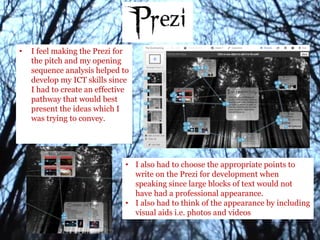
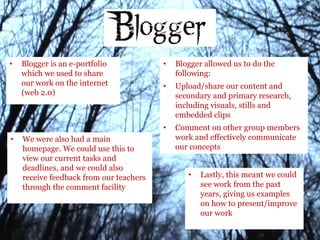
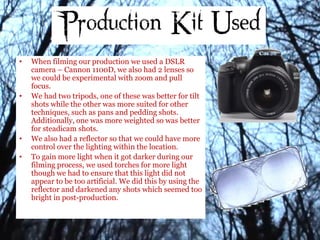
• To complete many of the posts on
the blog as a group we had to use a
wide variety of multimedia to
ensure we had a strong and
effective presentation
• For our film pitch we used Prezi to
create an engaging presentation
which clearly demonstrated our
intentions for our production
• I was in charge of making the
Prezi for this pitch which I feel
helped to improve my ICT skills
• I feel making the Prezi for
the pitch and my opening
sequence analysis helped to
develop my ICT skills since
I had to create an effective
pathway that would best
present the ideas which I
was trying to convey.
• I also had to choose the appropriate points to
write on the Prezi for development when
speaking since large blocks of text would not
have had a professional appearance.
• I also had to think of the appearance by including
visual aids i.e. photos and videos
• Blogger is an e-portfolio
which we used to share
our work on the internet
(web 2.0)
• Blogger allowed us to do the
following:
• Upload/share our content and
secondary and primary research,
including visuals, stills and
embedded clips
• Comment on other group members
work and effectively communicate
our concepts
• We were also had a main
homepage. We could use this to
view our current tasks and
deadlines, and we could also
receive feedback from our teachers
through the comment facility
• Lastly, this meant we could
see work from the past
years, giving us examples
on how to present/improve
our work
• We used youtube to upload our
exported films to the internet.
• After doing this, we were able to
embed them in blogger so that we
could post them on our blog.
• Youtube was a beneficial site to
use as, similar to blogger, you can
utilise the comment facility to
gain feedback on our work and
improve it accordingly
• We had a channel on youtube which allowed us to upload all our videos
to one place making it simple to use them when needed.
• Also this meant that the facility could be used by all group members
when required.
• When filming our production we used a DSLR
camera – Cannon 1100D, we also had 2 lenses so
we could be experimental with zoom and pull
focus.
• We had two tripods, one of these was better for tilt
shots while the other was more suited for other
techniques, such as pans and pedding shots.
Additionally, one was more weighted so was better
for steadicam shots.
• We also had a reflector so that we could have more
control over the lighting within the location.
• To gain more light when it got darker during our
filming process, we used torches for more light
though we had to ensure that this light did not
appear to be too artificial. We did this by using the
reflector and darkened any shots which seemed too
bright in post-production.
• The biggest problem we faced during our production process was lighting since
we only had a small time frame in which the lighting was correct to film
• The first shoot we did ended up being far too dark so that the footage was not
useable, therefore we decided that it would be more effective to film earlier and
darken the shots in post-production if necessary.
• We also managed to use the tripods to solve a problem that we encountered with
a lack of space in which to film. Since one tripod was smaller than the other so
could be used when the spacing was tighter.
• One of the main
aftereffects we used was
the brightness/contrast
tool. This allowed us to
darken shots to create a
more eerie appearance
which was more
appropriate to the film.
• We had to ensure that the lighting
didn’t vary too noticeably between
shots in order to achieve continuity
editing.
• Another thing we had to take into account when
ensuring our editing was continuous was
including aspects such as sound bridges and
transitions.
• We used a fade to black transition in order to
show time moving on without having to include
many unnecessary shots, for example, the whole
set up of the pentangle.
Sound bridge
• When editing our titles into the
production we were careful when
thinking about the positioning of
them in order to create a
professional composition.
• Our main title was positioned in
the centre with a black
background, whereas we placed
our others on the thirds.
• To get our final title to have a
flicker effect we had short cuts in
the timeline between the title and
a black screen so this caused it to
have an flickering effect
• I also put a ‘drone’ soundtrack in the background of the production
in order for suspense to be built up gradually throughout
• Also we used a different soundtrack for the establishing shot in the
same idea so that there was a change in music and therefore feel
inside the house to outside.
• To get these sounds I used freesound.org where there was a wide
variety to choose from.
• I spent time going through to find the most appropriate and chose
one that continuously built up the tension.

Evaluation 6

  • 2.
    • To completemany of the posts on the blog as a group we had to use a wide variety of multimedia to ensure we had a strong and effective presentation • For our film pitch we used Prezi to create an engaging presentation which clearly demonstrated our intentions for our production • I was in charge of making the Prezi for this pitch which I feel helped to improve my ICT skills
  • 3.
    • I feelmaking the Prezi for the pitch and my opening sequence analysis helped to develop my ICT skills since I had to create an effective pathway that would best present the ideas which I was trying to convey. • I also had to choose the appropriate points to write on the Prezi for development when speaking since large blocks of text would not have had a professional appearance. • I also had to think of the appearance by including visual aids i.e. photos and videos
  • 4.
    • Blogger isan e-portfolio which we used to share our work on the internet (web 2.0) • Blogger allowed us to do the following: • Upload/share our content and secondary and primary research, including visuals, stills and embedded clips • Comment on other group members work and effectively communicate our concepts • We were also had a main homepage. We could use this to view our current tasks and deadlines, and we could also receive feedback from our teachers through the comment facility • Lastly, this meant we could see work from the past years, giving us examples on how to present/improve our work
  • 5.
    • We usedyoutube to upload our exported films to the internet. • After doing this, we were able to embed them in blogger so that we could post them on our blog. • Youtube was a beneficial site to use as, similar to blogger, you can utilise the comment facility to gain feedback on our work and improve it accordingly • We had a channel on youtube which allowed us to upload all our videos to one place making it simple to use them when needed. • Also this meant that the facility could be used by all group members when required.
  • 6.
    • When filmingour production we used a DSLR camera – Cannon 1100D, we also had 2 lenses so we could be experimental with zoom and pull focus. • We had two tripods, one of these was better for tilt shots while the other was more suited for other techniques, such as pans and pedding shots. Additionally, one was more weighted so was better for steadicam shots. • We also had a reflector so that we could have more control over the lighting within the location. • To gain more light when it got darker during our filming process, we used torches for more light though we had to ensure that this light did not appear to be too artificial. We did this by using the reflector and darkened any shots which seemed too bright in post-production.
  • 7.
    • The biggestproblem we faced during our production process was lighting since we only had a small time frame in which the lighting was correct to film • The first shoot we did ended up being far too dark so that the footage was not useable, therefore we decided that it would be more effective to film earlier and darken the shots in post-production if necessary. • We also managed to use the tripods to solve a problem that we encountered with a lack of space in which to film. Since one tripod was smaller than the other so could be used when the spacing was tighter.
  • 8.
    • One ofthe main aftereffects we used was the brightness/contrast tool. This allowed us to darken shots to create a more eerie appearance which was more appropriate to the film. • We had to ensure that the lighting didn’t vary too noticeably between shots in order to achieve continuity editing.
  • 9.
    • Another thingwe had to take into account when ensuring our editing was continuous was including aspects such as sound bridges and transitions. • We used a fade to black transition in order to show time moving on without having to include many unnecessary shots, for example, the whole set up of the pentangle. Sound bridge • When editing our titles into the production we were careful when thinking about the positioning of them in order to create a professional composition. • Our main title was positioned in the centre with a black background, whereas we placed our others on the thirds. • To get our final title to have a flicker effect we had short cuts in the timeline between the title and a black screen so this caused it to have an flickering effect
  • 10.
    • I alsoput a ‘drone’ soundtrack in the background of the production in order for suspense to be built up gradually throughout • Also we used a different soundtrack for the establishing shot in the same idea so that there was a change in music and therefore feel inside the house to outside. • To get these sounds I used freesound.org where there was a wide variety to choose from. • I spent time going through to find the most appropriate and chose one that continuously built up the tension.